车道线识别(一) 简单识别
转载请注明出处 https://blog.csdn.net/gloria_iris/article/details/91625656
本博文是优达城Finding Lane Lines项目的总结,主要实现车道线识别功能。课程连接:https://classroom.udacity.com/nanodegrees/nd013-cn-preview/parts/b2c3eb3d-8c52-4b8c-9d68-6af6d02a27b8/modules/91f01fb3-48a0-4c5a-a20d-3570261a18c3/lessons/44eca098-2fbb-45d8-81b6-d16b245b4af4/concepts/5ab569c2-d833-4dd4-9f85-b84afe3e0d38
1. 颜色选择
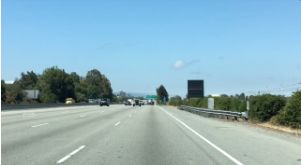
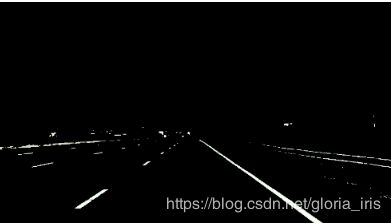
彩色图像通常是由RGB通道的三幅图像叠加而成的,RGB的变化范围都是[0, 255]。通过三通道颜色的阈值选择,可以得到一幅简单的二值化图像。
import matplotlib.pyplot as plt
import matplotlib.image as mpimg
import numpy as np

 # Read in the image
image = mpimg.imread('test.jpg')

# Grab the x and y size and make a copy of the image
ysize = image.shape[0]
xsize = image.shape[1]
color_select = np.copy(image)

# Define color selection criteria
red_threshold = 200
green_threshold = 200
blue_threshold = 200

rgb_threshold = [red_threshold, green_threshold, blue_threshold]

# Do a boolean or with the "|" character to identify
# pixels below the thresholds
thresholds = (image[:,:,0] < rgb_threshold[0]) \
            | (image[:,:,1] < rgb_threshold[1]) \
            | (image[:,:,2] < rgb_threshold[2])
color_select[thresholds] = [0,0,0]

# Display the image
plt.imshow(color_select)2. ROI选择
二值化后还是会有很多其他干扰像素。此处只选择感兴趣区域ROI的掩码,即车道线所在的范围。
import matplotlib.pyplot as plt
import matplotlib.image as mpimg
import numpy as np

# Read in the image and print some stats
image = mpimg.imread('test.jpg')

# Pull out the x and y sizes and make a copy of the image
ysize = image.shape[0]
xsize = image.shape[1]
region_select = np.copy(image)

# Define a triangle region of interest
# Keep in mind the origin (x=0, y=0) is in the upper left in image processing
# Note: if you run this code, you'll find these are not sensible values!!
# But you'll get a chance to play with them soon in a quiz
left_bottom = [0, 539]
right_bottom = [900, 300]
apex = [400, 0]

# Fit lines (y=Ax+B) to identify the  3 sided region of interest
# np.polyfit() returns the coefficients [A, B] of the fit
fit_left = np.polyfit((left_bottom[0], apex[0]), (left_bottom[1], apex[1]), 1)
fit_right = np.polyfit((right_bottom[0], apex[0]), (right_bottom[1], apex[1]), 1)
fit_bottom = np.polyfit((left_bottom[0], right_bottom[0]), (left_bottom[1], right_bottom[1]), 1)

# Find the region inside the lines
XX, YY = np.meshgrid(np.arange(0, xsize), np.arange(0, ysize))
region_thresholds = (YY > (XX*fit_left[0] + fit_left[1])) & \
                    (YY > (XX*fit_right[0] + fit_right[1])) & \
                    (YY < (XX*fit_bottom[0] + fit_bottom[1]))

# Color pixels red which are inside the region of interest
region_select[region_thresholds] = [255, 0, 0]

# Display the image
plt.imshow(region_select)
plt.show()
3. 颜色选择和ROI结合
import matplotlib.pyplot as plt
import matplotlib.image as mpimg
import numpy as np

# Read in the image
image = mpimg.imread('test.jpg')

# Grab the x and y sizes and make two copies of the image
ysize = image.shape[0]
xsize = image.shape[1]
color_select= np.copy(image)
line_image = np.copy(image)

# Define our color criteria
red_threshold = 200
green_threshold = 200
blue_threshold = 200
rgb_threshold = [red_threshold, green_threshold, blue_threshold]

# Define a triangle region of interest (Note: if you run this code,
# Keep in mind the origin (x=0, y=0) is in the upper left in image processing
# you'll find these are not sensible values!!
# But you'll get a chance to play with them soon in a quiz ;)
left_bottom = [0, 539]
right_bottom = [900, 539]
apex = [475, 320]

# Perform a linear fit (y=Ax+B) to each of the three sides of the triangle
# np.polyfit returns the coefficients [A, B] of the fit
fit_left = np.polyfit((left_bottom[0], apex[0]), (left_bottom[1], apex[1]), 1)
fit_right = np.polyfit((right_bottom[0], apex[0]), (right_bottom[1], apex[1]), 1)
fit_bottom = np.polyfit((left_bottom[0], right_bottom[0]), (left_bottom[1], right_bottom[1]), 1)

# Mask pixels below the threshold
color_thresholds = (image[:,:,0] < rgb_threshold[0]) | \
                    (image[:,:,1] < rgb_threshold[1]) | \
                    (image[:,:,2] < rgb_threshold[2])

# Find the region inside the lines
XX, YY = np.meshgrid(np.arange(0, xsize), np.arange(0, ysize))
region_thresholds = (YY > (XX*fit_left[0] + fit_left[1])) & \
                    (YY > (XX*fit_right[0] + fit_right[1])) & \
                    (YY < (XX*fit_bottom[0] + fit_bottom[1]))
# Mask color selection
color_select[color_thresholds] = [0,0,0]
# Find where image is both colored right and in the region
line_image[~color_thresholds & region_thresholds] = [255,0,0]

# Display the image and show region and color selections
plt.imshow(image)
x = [left_bottom[0], right_bottom[0], apex[0], left_bottom[0]]
y = [left_bottom[1], right_bottom[1], apex[1], left_bottom[1]]
plt.plot(x, y, 'b--', lw=4)
plt.imshow(color_select)
plt.imshow(line_image)


