springboot2.0.6 整合redis实践
整合redis之前,先提前安装一下redis,redis官方下载的是不支持windows安装的,点击redis-window版本下载,下载解压双击redis-server就启动了。
本文还会用到一个redis可视化的工具,点击redis desktop manager下载
1.pom.xml引用redis的依赖
	org.springframework.boot
	spring-boot-starter-data-redis
2.application.yml 添加redis配置
spring:
  redis:
    database: 2
    host: 127.0.0.1
    port: 6379
    jedis:
      pool:
        max-active: 8
        max-wait: 1
        max-idle: 8
        min-idle: 0
    timeout: 5000
jedis-pool 本文暂时没有使用(可以暂时不用配)。
database 是配置使用哪个数据库,redis有16个数据库
timeout是配置redis响应时间,我看别人的文章这段配置timeout配的是0,如果给的值是0,是会遇到报错的,大家可以试试。
3.创建一个RedisService
import org.springframework.beans.factory.annotation.Autowired;
import org.springframework.data.redis.core.StringRedisTemplate;
import org.springframework.stereotype.Service;

@Service
public class RedisService {

	@Autowired
	private StringRedisTemplate redisTemplate;

	public void setString(String key, String value) {
		redisTemplate.opsForValue().set(key, value);
	}

	public String getString(String key) {
		return redisTemplate.opsForValue().get(key);
	}

	public void setList(String key, String value) {
		redisTemplate.opsForList().leftPush(key, value);
	}

	public String getList(String key) {
		return redisTemplate.opsForList().rightPop(key);
	}
}
setString、getString是对字符串类型的操作。
setList、getList 是对列表类型的操作。
到这一步,redis 其实就可以使用了,下面测试一下。
4.创建一个TestController
import java.util.Date;

import org.springframework.beans.factory.annotation.Autowired;
import org.springframework.web.bind.annotation.RequestMapping;
import org.springframework.web.bind.annotation.RestController;

import com.alibaba.fastjson.JSONObject;
import com.example.pojo.User;
import com.example.service.RedisService;

@RestController
public class TestController {

	@Autowired
	private RedisService redisService;

	@RequestMapping("/test2")
	public void test2() {
		JSONObject jo = new JSONObject();
		jo.put("username", "用户名");
		jo.put("age", 18);
		jo.put("birthday", new Date());
		redisService.setString("userJson", jo.toString());
	}

	@RequestMapping("/test3")
	public void test3(String username) {
		JSONObject jo = new JSONObject();
		jo.put("username", username);
		jo.put("age", 18);
		jo.put("birthday", new Date());
		redisService.setList("runoob", jo.toString());
	}

	@RequestMapping("/test4")
	public String test4() {
		String value = redisService.getList("runoob");
		return value;
	}
}
打开Postman,测试一下
测试一:test2

我在test2创建了 userjson 的 JSONObject,调用setString,存到了redis里。
测试二:test3


通过Postman依次执行上面的链接,下面看看redis的结果

创建了一个runoob的key,list的类型,数据从头部(左边)添加,也可以从尾部(右边)添加
测试三:test4
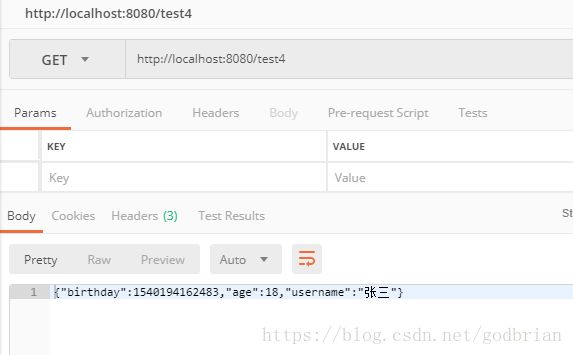
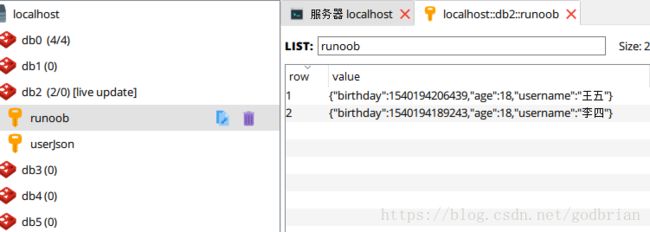
从runoob这个list的右边(尾部)取出一个元素,并且从这个list中移除
RedisTemplate 和 StringRedisTemplate
redis提供了两个容器,一个StringRedisTemplate,上面的例子用的就是这个,用来操作字符串。还有另外一个是RedisTemplate,用来操作对象。
注入RedisTemplate
import org.springframework.beans.factory.annotation.Autowired;
import org.springframework.data.redis.core.RedisTemplate;
import org.springframework.stereotype.Service;

@Service
public class RedisService2 {

	@Autowired
	private RedisTemplate redisTemplate;

	public void setString(String key, Object value) {
		redisTemplate.opsForValue().set(key, value);
	}

	public String getString(String key) {
		return (String) redisTemplate.opsForValue().get(key);
	}

	public void setList(String key, Object value) {
		redisTemplate.opsForList().leftPush(key, value);
	}

	public String getList(String key) {
		return (String) redisTemplate.opsForList().rightPop(key);
	}
}
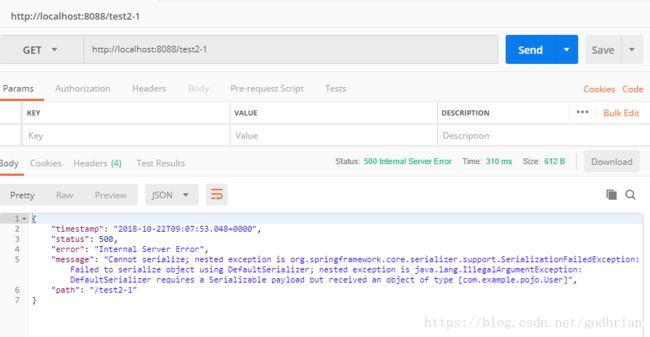
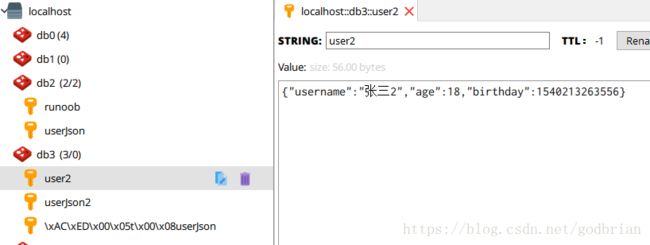
@RequestMapping("/test2-1")
	public void test1() {
		User user = new User();
		user.setUsername("张三2");
		user.setAge(18);
		user.setBirthday(new Date());
		redisService2.setString("user", user);
	}
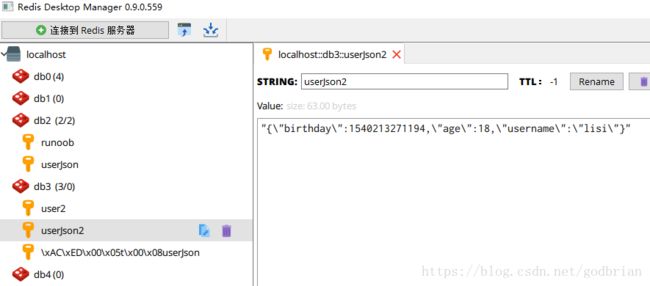
@RequestMapping("/test2-2")
	public void test2() {
		JSONObject jo = new JSONObject();
		jo.put("username", "lisi");
		jo.put("age", 18);
		jo.put("birthday", new Date());
		redisService2.setString("userJson", jo.toString());
	}
使用RedisTemplate时,在存储的时候,会默认使用redis默认的序列化器,所以才会有看不懂的结果。因此需要自定义一个序列化器。
import org.springframework.context.annotation.Bean;
import org.springframework.context.annotation.Configuration;
import org.springframework.data.redis.connection.RedisConnectionFactory;
import org.springframework.data.redis.core.RedisTemplate;
import org.springframework.data.redis.serializer.Jackson2JsonRedisSerializer;
import org.springframework.data.redis.serializer.StringRedisSerializer;
@Configuration
public class MyRedisConfig {
/**
* 自定义redis序列化器
* @param redisConnectionFactory
* @return
*/
@Bean
public RedisTemplate redisTemplate(RedisConnectionFactory redisConnectionFactory){
RedisTemplate template = new RedisTemplate<>();
//使用Jackson2JsonRedisSerializer 自带序列化
Jackson2JsonRedisSerializer 发现用RedisTemplate操作对象是真的方便,可以直接把对象存到redis,然后通过自定义的序列化器,转成了json。
springboot2.0.6 整合redis实践介绍完了。
