利用scrapy框架爬取并下载天堂图片网的图片和数据
1. 通过命令创建项目
scrapy startproject IvskySpider
2. 用pycharm打开项目
3. 通过命令创建爬虫(Terminal中输入以下命令)
scrapy genspider ivsky ivsky.com
4. 配置settings
robots_obey=False
Download_delay=0.5
Cookie_enable=False
5. 在middlewares.py文件中:自定义UserAgentMiddleWare
法一:
可以直接粘现成的
法二:
或者自己通过研究源码实现
6. ivsky.py文件中,开始解析数据
1) 先大致规划一下需要几个函数
2) 函数1跳转到函数2使用 yield scrapy.Request(url,callback,meta,dont_filter)
具体代码如下:
item中数据封装的代码为:
9.useragent相关问题
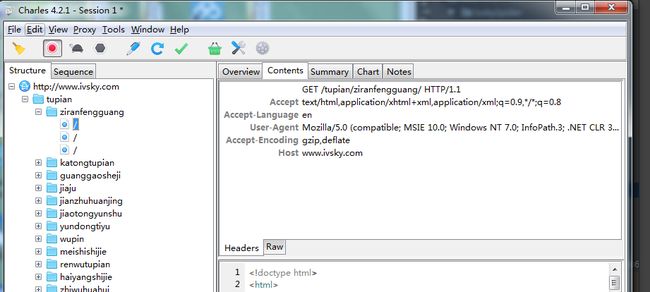
用charles抓包我们会发现UserAgent并不是我们想要的结果,因此需要,自定义获取useragent函数
但是,结果显示的确实系统的UserAgent,我们可以在settings.py文件中做以下处理,优先使用自定义的useragent

useragent:

scrapy startproject IvskySpider
2. 用pycharm打开项目
3. 通过命令创建爬虫(Terminal中输入以下命令)
scrapy genspider ivsky ivsky.com
4. 配置settings
robots_obey=False
Download_delay=0.5
Cookie_enable=False
5. 在middlewares.py文件中:自定义UserAgentMiddleWare
法一:
可以直接粘现成的
from fake_useragent import UserAgent
class UserAgentMiddleware(object):
    """This middleware allows spiders to override the user_agent"""

    def __init__(self):
        self.user_agent = UserAgent()

    @classmethod
    def from_crawler(cls, crawler):
        o = cls()
        # crawler.signals.connect(o.spider_opened, signal=signals.spider_opened)
        return o

    # 这个函数不能删,否则会报错
    def spider_opened(self, spider):
        # self.user_agent = getattr(spider, 'user_agent', self.user_agent)
        pass

    def process_request(self, request, spider):
        if self.user_agent:
            # b 转换为二进制,不能改
            request.headers.setdefault(b'User-Agent', self.user_agent.random)
法二:
或者自己通过研究源码实现
6. ivsky.py文件中,开始解析数据
1) 先大致规划一下需要几个函数
2) 函数1跳转到函数2使用 yield scrapy.Request(url,callback,meta,dont_filter)
具体代码如下:
# -*- coding: utf-8 -*-
import scrapy
# scrapy框架自带一种解析方式,基于lxml  所以不用导入etree
# form lxml import etree
# 创建文件夹
import os
# 下载图片
import requests
from ..items import ImgInfoItem


class IvskySpider(scrapy.Spider):
    name = 'ivsky'
    allowed_domains = ['ivsky.com']
    # start_url 可以替换为自己需要的网址
    start_urls = ['http://www.ivsky.com/tupian/ziranfengguang/']

    # 只有parse这个函数是自动调用的
    def parse(self, response):
        # 这里的response跟之前我们写的不太一样,没有content属性
        # print(response.text)

        # 调用函数(法一)
        # self.parse_big_category()
        # 调用函数(法二)
        """
        参数1:url,爬取的网址
        参数2:callback回调,当网页下载好以后传给谁去解析
        参数3:method,默认get
        headers
        cookies
        meta

        """
        yield scrapy.Request(
            url=response.url,
            # 把url的值传递给调用的parse_big_category函数
            # 注意parse_big_category后面没有括号!!!
            callback=self.parse_big_category,
            # scrapy会自动过滤已经爬过的文件,因此设置为True,表示不过滤
            dont_filter=True,
        )

    def parse_big_category(self, response):
        """
            函数注释用三个双引号
            解析网页大分类
        :param response:
        :return:
        """
        # 以下三种方式都可以,推荐使用xpath
        # response.selector.xpath() 简写成 response.xpath()
        # response.selector.css()
        # response.selector.re()
        big_a_list = response.xpath("//ul[@class='tpmenu']/li/a")
        for big_a in big_a_list[1:]:
            # extract_first :将列表中的元素转换为字符串并且取第0个,如果取不到返回默认值
            big_title = big_a.xpath("text()").extract_first("没有标题")
            big_href = big_a.xpath("@href").extract_first("没有地址")
            big_href = "http://www.ivsky.com" + big_href
            # print(big_title, big_href)
            yield scrapy.Request(
                url=big_href,
                callback=self.parse_small_category,
                # meta 1.用于传递数据  2.类型为字典
                meta={
                    "big_title": big_title,
                },
                dont_filter=True,
            )

    # 解析小分类
    def parse_small_category(self, response):
        """
            解析网页小分类
            response指的是big_href
        :param response:
        :return:
        """
        # 将big_title传递进来
        # 法一
        # big_title = response.meta.get("big_title")
        small_a_list = response.xpath("//div[@class='sline']/div/a")
        for small_a in small_a_list:
            # extract_first :将列表中的元素转换为字符串并且取第0个,如果取不到返回默认值
            small_title = small_a.xpath("text()").extract_first("没有标题")
            # 法二
            response.meta['small_title'] = small_title
            small_href = small_a.xpath("@href").extract_first("没有地址")
            small_href = "http://www.ivsky.com" + small_href
            # print(small_title, small_href)
            yield scrapy.Request(
                url=small_href,
                callback=self.parse_img_list,
                # 法一
                # meta={
                #     "big_title": big_title,
                #     "small_title": small_title,
                # }
                # 法二
                meta=response.meta,
                dont_filter=True,
            )

    def parse_img_list(self, response):
        """
            解析图片缩略图
        :param response:  response指的是small_href
        :return:
        """
        img_a_list = response.xpath("//ul[@class='pli']/li/div/a")
        for img_a in img_a_list:
            detail_href = img_a.xpath("@href").extract_first("没有详细地址")
            detail_href = "http://www.ivsky.com" + detail_href
            thumb_src = img_a.xpath("img/@src").extract_first("没有图片地址")
            thumb_alt = img_a.xpath("img/@alt").extract_first("没有图片名称")
            # print(thumb_alt, thumb_src)
            response.meta['thumb_src'] = thumb_src
            response.meta['thumb_alt'] = thumb_alt
            yield scrapy.Request(
                url=detail_href,
                callback=self.parse_img_detail,
                meta=response.meta,
                dont_filter=True,
            )

    def parse_img_detail(self, response):
        """
            解析图片详情
        :param response:
        :return:
        """
        # 在最后一个函数中,把所有的数据传递过来
        big_title = response.meta.get("big_title").strip()
        small_title = response.meta.get("small_title").strip()
        thumb_src = response.meta.get("thumb_src").strip()
        thumb_alt = response.meta.get("thumb_alt").strip()
        img_detail_src = response.xpath("//img[@id='imgis']/@src").extract_first("没有图片详情地址")
        # print(img_detail_src)
        path = "big/" + big_title + '/' + small_title + '/' + thumb_alt
        if not os.path.exists(path):
            os.makedirs(path)
        picture_name = thumb_src.split('/')[-1]
        thumb_name = "缩略图" + picture_name
        detail_name = "高清图" + picture_name
        # 定义对象
        item = ImgInfoItem()
        # 将数据封装到item中
        item["big_title"] = big_title
        item["small_title"] = small_title
        item["thumb_src"] = thumb_src
        item["thumb_alt"] = thumb_alt
        item["img_detail_src"] = img_detail_src
        item["path"] = path
        # 类似于return 如果用return,效果没问题,但是return以后的代码不执行
        # 但yield可返回数据,并且之后的代码照样执行
        yield item

        with open(path+"/"+thumb_name, "wb") as f:
            # thumb_src 缩略图网址
            img_response = requests.get(thumb_src)
            f.write(img_response.content)
        with open(path+"/"+detail_name, "wb") as f:
            # img_detail_src 高清图网址
            img_response = requests.get(img_detail_src)
            f.write(img_response.content)


"""
    1.进程:
    2.线程:与进程相关,一个进程相当于一个人,一个线程相当于一个脑子
        默认线程只有一个,叫主线程
        一个线程每次只能做一件事,例如:迅雷 同时下载任务量为1
        多个线程可以“同时”做多件事,例如:迅雷同时下载的任务量为5,可以显著提高下载效率
        注意:线程不是越多越好,(10个左右)例如:火车站卖票 窗口越多成本越高,速度越快
        注意:Scrapy默认使用多线程
        注意:python没有多线程
    3.协成:负责协助线程的资源切换
"""
item中数据封装的代码为:
# -*- coding: utf-8 -*-

# Define here the models for your scraped items
#
# See documentation in:
# https://doc.scrapy.org/en/latest/topics/items.html

import scrapy


class IvskyspiderItem(scrapy.Item):
    # define the fields for your item here like:
    # name = scrapy.Field()
    pass


class ImgInfoItem(scrapy.Item):
    """
        item用于组装爬虫数据
        里面的字段根据实际情况定义即可,一般字段名和变量名保持一致
        item封装后的数据  可以经过管道做一些数据
    """
    big_title = scrapy.Field()
    small_title = scrapy.Field()
    thumb_src = scrapy.Field()
    thumb_alt = scrapy.Field()
    img_detail_src = scrapy.Field()
    path = scrapy.Field()
9.useragent相关问题
用charles抓包我们会发现UserAgent并不是我们想要的结果,因此需要,自定义获取useragent函数
但是,结果显示的确实系统的UserAgent,我们可以在settings.py文件中做以下处理,优先使用自定义的useragent
DOWNLOADER_MIDDLEWARES = {
    # 改为自己在Middleware中添加的获取useragent类
   'IvskySpider.middlewares.UserAgentMiddleware': 543,
    # 优先选择系统的useragent,下面的一行代码设置禁用系统的useragent
    'scrapy.downloadermiddlewares.useragent.UserAgentMiddleware': None
    # 数字表示优先级 越小越先执行 如果填为none,表示不执行
}
useragent:
