Python GUI进阶(ttk)—让界面变得更美
Python3.5版GUI官方文档:https://docs.python.org/3.5/library/tk.html
上一篇介绍的GUI界面有以下两个较大的缺点:
1、界面比较丑陋,控件种类有限。
2、界面布局逻辑性差。
针对以上两个缺点,引入Tkinter 中的ttk组件。
需要说明的,ttk的很多组件同Tkinter都是相同的,在这种情况下,ttk将覆盖Tkinter的组件,将采用ttk的特性。--原文如下
And then severalttk widgets (Button, Checkbutton, Entry, Frame, Label, LabelFrame, Menubutton,PanedWindow, Radiobutton, Scale and Scrollbar) will automatically substitutefor the Tk widgets.
使用ttk以后的组件,同windows操作系统(这里是win7系统)的外观的一致性更高,看起来也会舒服很多。
需要注意的是:
ttk的用法同Tkinter还是相同的,但是有一些属性ttk不再支持,如 Tkinter 中的fg,bg 在ttk中以不被支持,它是通过style这个对象进行支持的,其它的方面还是变化不大。下面的例子来源于《Python GUI Programming Cookbook》,自己在原来的基础上进行了一些改变,并添加了一些注释。界面图和源代码如下所示。
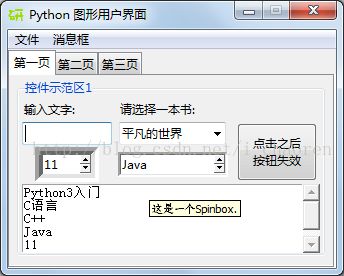
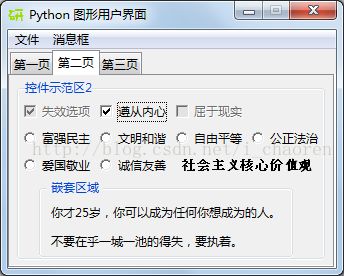
三个主页面的截图如下:
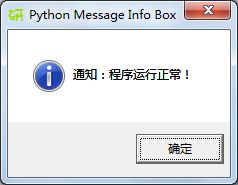
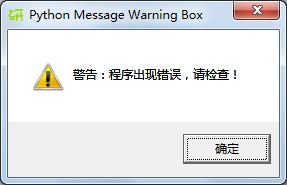
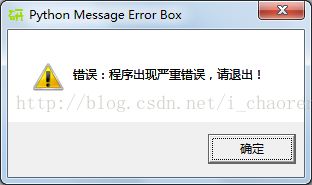
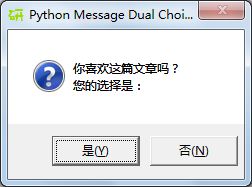
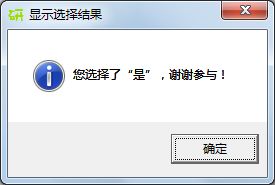
各种类型的对话框形式如下:
程序源代码如下:
#======================
# imports
#======================
import tkinter as tk
from tkinter import ttk
from tkinter import scrolledtext
from tkinter import Menu
from tkinter import Spinbox
from tkinter import messagebox as mBox

#由于tkinter中没有ToolTip功能,所以自定义这个功能如下
class ToolTip(object):
    def __init__(self, widget):
        self.widget = widget
        self.tipwindow = None
        self.id = None
        self.x = self.y = 0

    def showtip(self, text):
        "Display text in tooltip window"
        self.text = text
        if self.tipwindow or not self.text:
            return
        x, y, _cx, cy = self.widget.bbox("insert")
        x = x + self.widget.winfo_rootx() + 27
        y = y + cy + self.widget.winfo_rooty() +27
        self.tipwindow = tw = tk.Toplevel(self.widget)
        tw.wm_overrideredirect(1)
        tw.wm_geometry("+%d+%d" % (x, y))

        label = tk.Label(tw, text=self.text, justify=tk.LEFT,
                      background="#ffffe0", relief=tk.SOLID, borderwidth=1,
                      font=("tahoma", "8", "normal"))
        label.pack(ipadx=1)

    def hidetip(self):
        tw = self.tipwindow
        self.tipwindow = None
        if tw:
            tw.destroy()

#===================================================================
def createToolTip( widget, text):
    toolTip = ToolTip(widget)
    def enter(event):
        toolTip.showtip(text)
    def leave(event):
        toolTip.hidetip()
    widget.bind('', enter)
    widget.bind('', leave)

# Create instance
win = tk.Tk()

# Add a title
win.title("Python 图形用户界面")

# Disable resizing the GUI
win.resizable(0,0)

# Tab Control introduced here --------------------------------------
tabControl = ttk.Notebook(win)          # Create Tab Control

tab1 = ttk.Frame(tabControl)            # Create a tab
tabControl.add(tab1, text='第一页')      # Add the tab

tab2 = ttk.Frame(tabControl)            # Add a second tab
tabControl.add(tab2, text='第二页')      # Make second tab visible

tab3 = ttk.Frame(tabControl)            # Add a third tab
tabControl.add(tab3, text='第三页')      # Make second tab visible

tabControl.pack(expand=1, fill="both")  # Pack to make visible
# ~ Tab Control introduced here -----------------------------------------

#---------------Tab1控件介绍------------------#
# We are creating a container tab3 to hold all other widgets
monty = ttk.LabelFrame(tab1, text='控件示范区1')
monty.grid(column=0, row=0, padx=8, pady=4)

# Modified Button Click Function
def clickMe():
    action.configure(text='Hello\n ' + name.get())
    action.configure(state='disabled')    # Disable the Button Widget

# Changing our Label
ttk.Label(monty, text="输入文字:").grid(column=0, row=0, sticky='W')

# Adding a Textbox Entry widget
name = tk.StringVar()
nameEntered = ttk.Entry(monty, width=12, textvariable=name)
nameEntered.grid(column=0, row=1, sticky='W')

# Adding a Button
action = ttk.Button(monty,text="点击之后\n按钮失效",width=10,command=clickMe)
action.grid(column=2,row=1,rowspan=2,ipady=7)

ttk.Label(monty, text="请选择一本书:").grid(column=1, row=0,sticky='W')

# Adding a Combobox
book = tk.StringVar()
bookChosen = ttk.Combobox(monty, width=12, textvariable=book)
bookChosen['values'] = ('平凡的世界', '亲爱的安德烈','看见','白夜行')
bookChosen.grid(column=1, row=1)
bookChosen.current(0)  #设置初始显示值,值为元组['values']的下标
bookChosen.config(state='readonly')  #设为只读模式

# Spinbox callback
def _spin():
    value = spin.get()
    #print(value)
    scr.insert(tk.INSERT, value + '\n')

def _spin2():
    value = spin2.get()
    #print(value)
    scr.insert(tk.INSERT, value + '\n')

# Adding 2 Spinbox widget using a set of values
spin = Spinbox(monty, from_=10,to=25, width=5, bd=8, command=_spin)
spin.grid(column=0, row=2)

spin2 = Spinbox(monty, values=('Python3入门', 'C语言','C++', 'Java', 'OpenCV'), width=13, bd=3, command=_spin2)
spin2.grid(column=1, row=2,sticky='W')

# Using a scrolled Text control
scrolW  = 30; scrolH  =  5
scr = scrolledtext.ScrolledText(monty, width=scrolW, height=scrolH, wrap=tk.WORD)
scr.grid(column=0, row=3, sticky='WE', columnspan=3)

# Add Tooltip
createToolTip(spin,       '这是一个Spinbox.')
createToolTip(spin2,      '这是一个Spinbox.')
createToolTip(action,     '这是一个Button.')
createToolTip(nameEntered,'这是一个Entry.')
createToolTip(bookChosen, '这是一个Combobox.')
createToolTip(scr,        '这是一个ScrolledText.')

# 一次性控制各控件之间的距离
for child in monty.winfo_children():
    child.grid_configure(padx=3,pady=1)
# 单独控制个别控件之间的距离
action.grid(column=2,row=1,rowspan=2,padx=6)
#---------------Tab1控件介绍------------------#


#---------------Tab2控件介绍------------------#
# We are creating a container tab3 to hold all other widgets -- Tab2
monty2 = ttk.LabelFrame(tab2, text='控件示范区2')
monty2.grid(column=0, row=0, padx=8, pady=4)
# Creating three checkbuttons
chVarDis = tk.IntVar()
check1 = tk.Checkbutton(monty2, text="失效选项", variable=chVarDis, state='disabled')
check1.select()
check1.grid(column=0, row=0, sticky=tk.W)

chVarUn = tk.IntVar()
check2 = tk.Checkbutton(monty2, text="遵从内心", variable=chVarUn)
check2.deselect()   #Clears (turns off) the checkbutton.
check2.grid(column=1, row=0, sticky=tk.W )

chVarEn = tk.IntVar()
check3 = tk.Checkbutton(monty2, text="屈于现实", variable=chVarEn)
check3.deselect()
check3.grid(column=2, row=0, sticky=tk.W)

# GUI Callback function
def checkCallback(*ignoredArgs):
    # only enable one checkbutton
    if chVarUn.get(): check3.configure(state='disabled')
    else:             check3.configure(state='normal')
    if chVarEn.get(): check2.configure(state='disabled')
    else:             check2.configure(state='normal')

# trace the state of the two checkbuttons  #??
chVarUn.trace('w', lambda unused0, unused1, unused2 : checkCallback())
chVarEn.trace('w', lambda unused0, unused1, unused2 : checkCallback())

# Radiobutton list
values = ["富强民主", "文明和谐", "自由平等","公正法治","爱国敬业","诚信友善"]

# Radiobutton callback function
def radCall():
    radSel=radVar.get()
    if   radSel == 0: monty2.configure(text='富强民主')
    elif radSel == 1: monty2.configure(text='文明和谐')
    elif radSel == 2: monty2.configure(text='自由平等')
    elif radSel == 3: monty2.configure(text='公正法治')
    elif radSel == 4: monty2.configure(text='爱国敬业')
    elif radSel == 5: monty2.configure(text='诚信友善')

# create three Radiobuttons using one variable
radVar = tk.IntVar()

# Selecting a non-existing index value for radVar
radVar.set(99)

# Creating all three Radiobutton widgets within one loop
for col in range(4):
    #curRad = 'rad' + str(col)
    curRad = tk.Radiobutton(monty2, text=values[col], variable=radVar, value=col, command=radCall)
    curRad.grid(column=col, row=6, sticky=tk.W, columnspan=3)
for col in range(4,6):
    #curRad = 'rad' + str(col)
    curRad = tk.Radiobutton(monty2, text=values[col], variable=radVar, value=col, command=radCall)
    curRad.grid(column=col-4, row=7, sticky=tk.W, columnspan=3)

style = ttk.Style()
style.configure("BW.TLabel", font=("Times", "10",'bold'))
ttk.Label(monty2, text="   社会主义核心价值观",style="BW.TLabel").grid(column=2, row=7,columnspan=2, sticky=tk.EW)

# Create a container to hold labels
labelsFrame = ttk.LabelFrame(monty2, text=' 嵌套区域 ')
labelsFrame.grid(column=0, row=8,columnspan=4)

# Place labels into the container element - vertically
ttk.Label(labelsFrame, text="你才25岁,你可以成为任何你想成为的人。").grid(column=0, row=0)
ttk.Label(labelsFrame, text="不要在乎一城一池的得失,要执着。").grid(column=0, row=1,sticky=tk.W)

# Add some space around each label
for child in labelsFrame.winfo_children():
    child.grid_configure(padx=8,pady=4)
#---------------Tab2控件介绍------------------#


#---------------Tab3控件介绍------------------#
tab3 = tk.Frame(tab3, bg='#AFEEEE')
tab3.pack()
for i in range(2):
    canvas = 'canvas' + str(col)
    canvas = tk.Canvas(tab3, width=162, height=95, highlightthickness=0, bg='#FFFF00')
    canvas.grid(row=i, column=i)
#---------------Tab3控件介绍------------------#


#----------------菜单栏介绍-------------------#
# Exit GUI cleanly
def _quit():
    win.quit()
    win.destroy()
    exit()

# Creating a Menu Bar
menuBar = Menu(win)
win.config(menu=menuBar)

# Add menu items
fileMenu = Menu(menuBar, tearoff=0)
fileMenu.add_command(label="新建")
fileMenu.add_separator()
fileMenu.add_command(label="退出", command=_quit)
menuBar.add_cascade(label="文件", menu=fileMenu)


# Display a Message Box
def _msgBox1():
    mBox.showinfo('Python Message Info Box', '通知:程序运行正常!')
def _msgBox2():
    mBox.showwarning('Python Message Warning Box', '警告:程序出现错误,请检查!')
def _msgBox3():
    mBox.showwarning('Python Message Error Box', '错误:程序出现严重错误,请退出!')
def _msgBox4():
    answer = mBox.askyesno("Python Message Dual Choice Box", "你喜欢这篇文章吗?\n您的选择是:")
    if answer == True:
        mBox.showinfo('显示选择结果', '您选择了“是”,谢谢参与!')
    else:
        mBox.showinfo('显示选择结果', '您选择了“否”,谢谢参与!')

# Add another Menu to the Menu Bar and an item
msgMenu = Menu(menuBar, tearoff=0)
msgMenu.add_command(label="通知 Box", command=_msgBox1)
msgMenu.add_command(label="警告 Box", command=_msgBox2)
msgMenu.add_command(label="错误 Box", command=_msgBox3)
msgMenu.add_separator()
msgMenu.add_command(label="判断对话框", command=_msgBox4)
menuBar.add_cascade(label="消息框", menu=msgMenu)
#----------------菜单栏介绍-------------------#


# Change the main windows icon
win.iconbitmap(r'C:\Users\feng\Desktop\研.ico')

# Place cursor into name Entry
nameEntered.focus()
#======================
# Start GUI
#======================
win.mainloop()
