centos系统网口聚合(bonding)的配置
最近在研究网口聚合,系统是centos5.5(内核是2.6.18),先根据配置好聚合口,再用iometer工具通过配置好的聚合口对磁盘进行打流量,看最终的效果如何?
配置网口聚合的时候,我选择了两种模式:balance-rr和active-backup。balance-rr模式采用的是轮转算法(round-robin),即数据包会按顺序从第一个可用的绑定网口(即该聚合口的slave)到最后一个slave中传输,此时每个slave上都会有数据流量,而active-backup模式采用的是备份算法,此时只有一个slave是激活的,只有该salve上有数据流量,当该slave有问题不能正常工作时,其他的某个slave会被激活,
linux内核文档bonding.txt如是描述这两种模式:
balance-rr or 0
Round-robin policy: Transmit packets in sequential
order from the first available slave through the
last. This mode provides load balancing and fault
tolerance.
active-backup or 1
Active-backup policy: Only one slave in the bond is
active. A different slave becomes active if, and only
if, the active slave fails. The bond's MAC address is
externally visible on only one port (network adapter)
to avoid confusing the switch.
In bonding version 2.6.2 or later, when a failover
occurs in active-backup mode, bonding will issue one
or more gratuitous ARPs on the newly active slave.
One gratuitous ARP is issued for the bonding master
interface and each VLAN interfaces configured above
it, provided that the interface has at least one IP
address configured. Gratuitous ARPs issued for VLAN
interfaces are tagged with the appropriate VLAN id.
This mode provides fault tolerance. The primary
option, documented below, affects the behavior of this
mode.
如果你想详细的了解bonding,那么这个文档无疑是最权威的,内核源码中包含了该文件,路径是kernel-source/Documentation/networking/bonding.txt。
配置bonding有好几种方式,可以通过Initscritps来实现,即配置/etc/sysconfig/network-scripts/目录下的配置文件,可以通过工具ifenslave来实现,还可以通sysfs 接口来实现,即配置/sys/class/net/下的的配置文件,使用起来很方便,还有一些其他的方法,bonding.txt中都有详细的说明。
一、 配置balance-rr模式的网口聚合
1.修改/etc/modprobe.cof,在文件的最后一行添加如下内容:
alias bond2 bonding
2.加载bonding驱动
#modprobe bonding
3.修改配置文件
在此,我使用的是Initscripts方法来配置,假如要配置的目标机器上有eth1~eth4四个业务网口,那么先进入目录/etc/sysconfig/network-scripts/:
#cd /etc/sysconfig/network-scripts/
假定要配置的聚合名称为bond2,那么新建ifcfg-bond2文件:
#touch ifcfg-bond2
添加可执行属性:
#chmod +x ifcfg-bond2
在ifcfg-bond2中添加如下内容:
DEVICE=bond2 #bonding name
IPADDR=192.168.252.222 #bonding ip address
NETMASK=255.255.255.0 #bonding netmask
GATEWAY=0.0.0.0
MTU=1500
BONDING_OPTS="mode=balance-rr" #bonding mode
ONBOOT=yes
BOOTPROTO=none
USERCTL=no
然后再修改ifcfg-eth1~ifcfg-eth4文件的内容,记住,先将备份原来的ifcfg-eth1,以便于恢复配置,^_^,例如ifcfg-eth1的内容为:
#cat ifcfg-eth1
DEVICE=eth1
USERCTL=no
ONBOOT=yes
MASTER=bond2 #belong to bond2
SLAVE=yes #is bond1's slave
BOOTPROTO=none
文件ifcfg-eth2~ifcfg-eth4只需要修改对应的DEVIE后面的值即可,记住添加文件的可执行属性。
3.重启网络
#/etc/init.d/network restart
在我的机器上结果如下:
/etc/init.d/network restart
Shutting down interface eth0: [ OK ]
Shutting down interface eth6: [ OK ]
Shutting down loopback interface: [ OK ]
Bringing up loopback interface: [ OK ]
Bringing up interface bond2: [ OK ]
Bringing up interface eth0: [ OK ]
Bringing up interface eth5: [ OK ]
Bringing up interface eth6: [ OK ]
4.查看是否配置成功
通过ifconfig命令查看:
#ifconfig bond2
bond2 Link encap:Ethernet HWaddr 50:B3:42:00:01:08
inet addr:192.168.252.222 Bcast:192.168.252.255 Mask:255.255.255.0
UP BROADCAST MASTER MULTICAST MTU:1500 Metric:1
RX packets:0 errors:0 dropped:0 overruns:0 frame:0
TX packets:0 errors:0 dropped:0 overruns:0 carrier:0
collisions:0 txqueuelen:0
RX bytes:0 (0.0 b) TX bytes:0 (0.0 b)
# ifconfig eth1
eth1 Link encap:Ethernet HWaddr 50:B3:42:00:01:08
UP BROADCAST SLAVE MULTICAST MTU:1500 Metric:1
RX packets:0 errors:0 dropped:0 overruns:0 frame:0
TX packets:0 errors:0 dropped:0 overruns:0 carrier:0
collisions:0 txqueuelen:1000
RX bytes:0 (0.0 b) TX bytes:0 (0.0 b)
Memory:fb900000-fb920000
# ifconfig eth2
eth2 Link encap:Ethernet HWaddr 50:B3:42:00:01:08
UP BROADCAST SLAVE MULTICAST MTU:1500 Metric:1
RX packets:0 errors:0 dropped:0 overruns:0 frame:0
TX packets:0 errors:0 dropped:0 overruns:0 carrier:0
collisions:0 txqueuelen:1000
RX bytes:0 (0.0 b) TX bytes:0 (0.0 b)
Memory:fba00000-fba20000
另外,还可以看/sys/class/net/下面的bonding驱动的模块参数的值,比如:
# cat /sys/class/net/bonding_masters
bond0 bond2
是当前所有的聚合口。
# cat /sys/class/net/bond2/bonding/slaves
eth1 eth2 eth3 eth4
查看bond1的所有的slave
#cat /sys/class/net/bond2/bonding/mode
balance-rr 0
查看bond2的模式,是balance-rr模式,balance-rr模式对应的数值就是0。
同样我们可以查看/proc/net/目录下的有关文件:
还有更多的参数,都在上面的目录中,看到这些,说明我们的聚合口已经配置成功。
5.测试
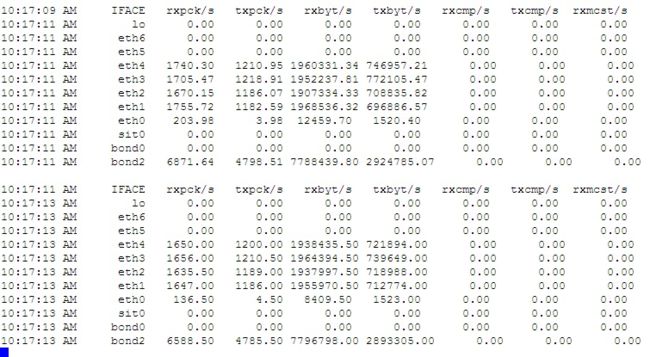
在工作PC上,通过工具IOmeter对目标机器(即配置了网口聚合的机器)的磁盘进行打流量,然后查看每个网口的数据流量情况。监测每个网口的数据流量使用命令sar -n DEV 2 1000
#sar -n DEV 2 1000
这是结果的截图:
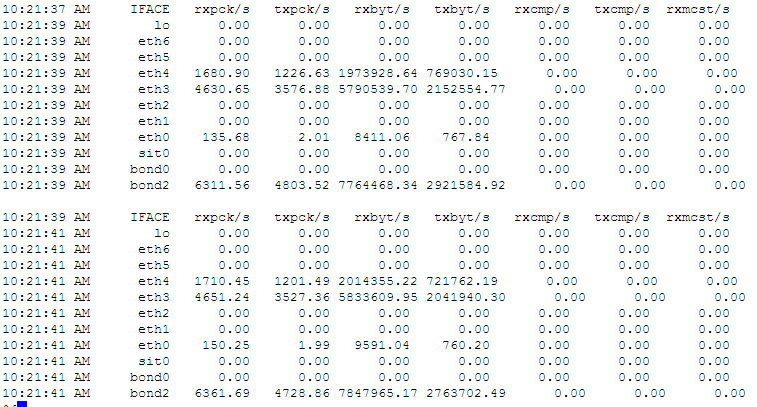
如果我将eth1和eth2拔掉,那么流量会转移到eth3和eth4上去:
从结果中看出:每个可用的slave上都有数据流量,而每个slave上的流量之和即为bond2上的总流量,如果某个slave出现问题,那么流量会自动切换到其他的slave上,以上说明我们配置的聚合口bond2起作用了,这就是balance-rr模式^_^
如果要将聚合口配置成active-backup模式,只要在修改ifcfg-bond2为以下内容,其他的步骤一样:
DEVICE=bond2 #bonding name
IPADDR=192.168.252.222 #bonding ip address
NETMASK=255.255.255.0 #bonding netmask
GATEWAY=0.0.0.0
MTU=1500
BONDING_OPTS="mode=active-backup" #bonding mode
ONBOOT=yes
BOOTPROTO=none
USERCTL=no
重启网络后,看/sys/class/net下的参数:
#cat /sys/class/net/bond2/bonding/mode
active-backup 1
active-backup模式,该模式对应的数值就是1。
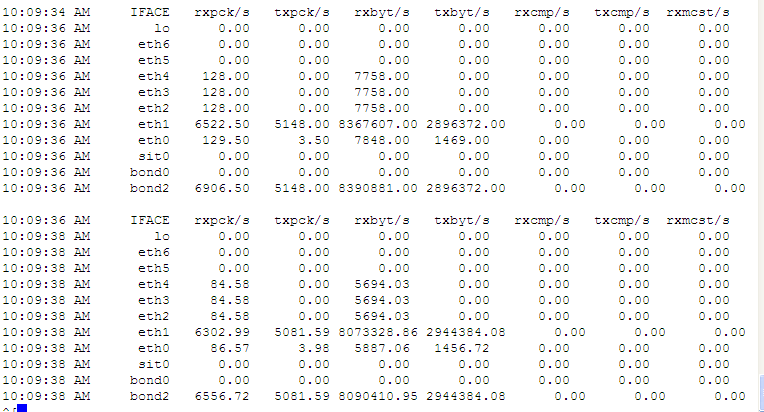
下面是active-backup模式的测试结果:
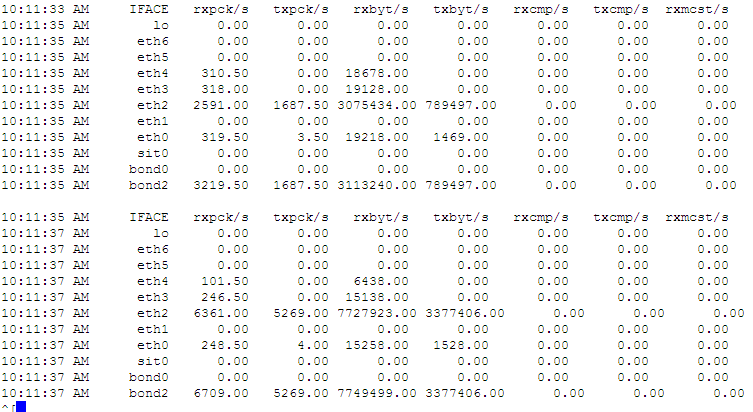
此时只有一个slave上有数据流量,就是eth1,如果我这时候将eth1的网线拔掉:
我们看到数据流量切换到eth2上了,但是始终只有一个slave上有流量。active-back模式,总是只有一个slave上有数据流量,如果当前的slave有问题,会自动切换到其他可用的slave上。
完


