安装LINUX版VMWARE
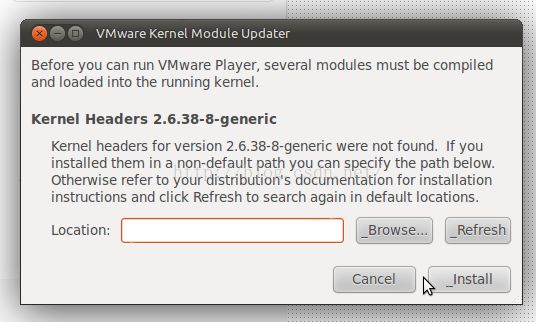
昨天在WIN10上的CENTOS7的虚拟机中安装VMWARE,试了VMWARE12_64,装好后无法启动,一直报Kernel Headers错误
像是这样(图片来自网络),rpm -qa 包名发现已经安装了,使用yum -y install 包名提示已经是最新版本
尝试了很多方法,都不行,在网上百度谷歌,发现了这个
http://superuser.com/questions/976119/centos-7-as-guest-in-vmware-cant-drag-and-drop-cant-copy-and-paste
I have installed CentOS 7 as a guest under VMWare Workstation 7 on a Windows 7 host, and the problem is that I can't drag and drop files, nor copy and paste. VMWare's documentation has the following:

http://partnerweb.vmware.com/GOSIG/CentOS_7.html#Tools

Where they basically say that:

In order to enable drag and drop, you have to install the vmhgfs driver.
In order to install vmhgfs, you have to first install the open source Open VMware tools (the open-vm-tools package), and then install the VMWare's supplied VMWare Tools on top of that.
The problem is that, when installing the latter, it requires you to compile a kernel module, and when doing so, it asks for the path to the kernel headers, and no matter what you add, it says that the path is not valid. Basically, it's the same problem described here:

https://www.centos.org/forums/viewtopic.php?f=47&t=50812

If you google it, you'll find that there's a lot of people with the same problem. The solution usually suggested is to install the kernel-devel package, but I've done so, and it doesn't work either. I have two different kernel header packages installed:

kernel-devel-3.10.0-229.el7.x86_64
kernel-devel-3.10.0-229.l4.l.el7.x86_64
I've tried giving VMWare's installer all the following paths:

/usr/src/kernels/3.10.0-229.el7.x86_64
/usr/src/kernels/3.10.0-229.el7.x86_64/include
/usr/src/kernels/3.10.0-229.el7.x86_64/include/linux
/usr/src/kernels/3.10.0-229.l4.l.el7.x86_64
/usr/src/kernels/3.10.0-229.l4.l.el7.x86_64/include
/usr/src/kernels/3.10.0-229.l4.l.el7.x86_64/include/linux
And no matter what, it says that it's not a valid path.

As I said, if you google this, you'll find a lot of people with the same problem, while for others it seems to simply "work", without doing anything. What's going on?
这哥们估计是把谷歌翻遍了
UBUNTU的可以试试这个,应该管用,赞成率是我搜到的最高的了,可惜centos不适用,对应文件夹和version.h怎么找都对不上
http://askubuntu.com/questions/40979/what-is-the-path-to-the-kernel-headers-so-i-can-install-vmware
cd /lib/modules/$(uname -r)/build/include/linux
sudo ln -s ../generated/utsrelease.h
sudo ln -s ../generated/autoconf.h
sudo ln -s ../generated/uapi/linux/version.h
After adding the symlink, the path is /usr/src/linux-headers-$(uname -r)/include (Thanks @Kariem!)http://askubuntu.com/questions/231876/vmware-cant-find-linux-headers-path
ln -s /usr/src/linux-3.7-rc6/include/generated/uapi/linux/version.h /usr/src/linux-3.7-rc6/include/linux/version.h另外,网上最多的解决方法是
yum install kernel-devel 关于centos的解决方法查到这样一篇,估计是从国外网站拿过来的
http://mrlee23.iteye.com/blog/2124924
在 CentOS 7 中安装 VMware 10.0.3之后无法正常工作,其实这主要是因为 CentOS 7 中的kernel为较低版本的kernel 3.10。

想运行vm需要有gcc ,kernel ,kernel-devel ,kernel-headers 这几个组件。
用仓库在线安装就可以yum install -y。

要想在 CentOS 7 中正常安装和运行 VMware 10.0.3必需执行如下步骤:
1.进行到/usr/lib/vmware/modules/source目录
cd /usr/lib/vmware/modules/source
2.解压vmnet.tar
tar -xvf vmnet.tar
3.进入到vmnet-only目录
cd vmnet-only
4.编辑filter.c文件
vi filter.c
将206行和259行的
#if LINUX_VERSION_CODE < KERNEL_VERSION(3, 13, 0)
替换为
#if LINUX_VERSION_CODE < KERNEL_VERSION(3, 0, 0)
5.回到上级目录
cd ../
6.重新压缩文件夹
tar -uvf vmnet.tar vmnet-only
7.移除旧目录
rm -fr vmnet-only
8.重新打开 VMware 即可#if LINUX_VERSION_CODE < KERNEL_VERSION(3, 13, 0)
放弃vmware12,去下载了vmware11,同样的错误
后来换成普通服务器中装vmware12也是这样的错,改成装vmware11就没问题了
TIPS:启动vmware bundle时后台会有一些报错,如
Extracting VMware Installer...done.
Gtk-Message: Failed to load module "pk-gtk-module": libpk-gtk-module.so: cannot open shared object file: No such file or directory
Gtk-Message: Failed to load module "canberra-gtk-module": libcanberra-gtk-module.so: cannot open shared object file: No such file or directory
错误并不影响安装
解决方法为
http://www.aichengxu.com/view/38314
于是去找了个VMWorkstation,安装的过程中报了两个错误

Gtk-Message:Failedtoloadmodule"pk-gtk-module":libpk-gtk-module.so:cannotopensharedobjectfile:Nosuchfileordirectory

Gtk-Message:Failedtoloadmodule"canberra-gtk-module":libcanberra-gtk-module.so:cannotopensharedobjectfile:Nosuchfileordirectory

因为能正常开启VMware的安装界面,所以当时也就忽略了这个问题,然而在开启VMware时提示

Could not open /dev/vmmon:No such file or directory.Please make sure that the kernel module 'vmmon' is loaded

后来在网上察了很久,终于找到了解决方案,共分为两步

第一步

首先确定需要的module是否安装及其位置

#locatelibpk-gtk-module.so

/usr/lib/gtk-2.0/modules/libpk-gtk-module.so

#locatelibcanberra-gtk-module.so

/usr/lib/gtk-2.0/modules/libcanberra-gtk-module.so

找到之后,再添加系统加载modules的路径

#vim/etc/ld.so.conf.d/gtk-2.0.conf

/usr/lib/gtk-2.0/modules

然后重新加载下modules

#ldconfighttp://www.aichengxu.com/view/38314
为了修正内核版本与VMware不匹配的问题

使用root用户依次执行以下命令

# service vmware stop
# rm /lib/modules/$(uname -r)/misc/vmmon.ko
# vmware-modconfig --console --build-mod vmmon /usr/bin/gcc /lib/modules/$(uname -r)/build/include/
# depmod -a
# service vmware start卸载方法
vmware-installer -u vmware-workstation
如果是player , vmware-installer -u vmware-player
