Android基础总结十:Fragment
文章来源:https://blog.csdn.net/shift_wwx/article/details/79990327
前言:
最近公司需要做个apk,需要用到fragment,其中的东西比较多,总结一下。
原文简介:
A Fragment is a piece of an application's user interface or behavior that can be placed in an Activity. Interaction with fragments is done through FragmentManager, which can be obtained via Activity.getFragmentManager() and Fragment.getFragmentManager().
Though Fragment defines its own lifecycle, that lifecycle is dependent on its activity: if the activity is stopped, no fragments inside of it can be started; when the activity is destroyed, all fragments will be destroyed.
All subclasses of Fragment must include a public no-argument constructor. The framework will often re-instantiate a fragment class when needed, in particular during state restore, and needs to be able to find this constructor to instantiate it. If the no-argument constructor is not available, a runtime exception will occur in some cases during state restore.
Fragment可以当做一个可以放到Activity 里的控件,这个控件交互都是通过FragmentManager。
Fragment基于Activity 有自己的声明周期,如果Activity stop,Activity 中的Fragment 是不能start,当Activity destroyed,所有的Fragment 都会destroyed。
设计原理:
Android 在 Android 3.0(API 级别 11)中引入了fragment,主要是为了给大屏幕(如平板电脑)上更加动态和灵活的 UI 设计提供支持。由于平板电脑的屏幕比手机屏幕大得多,因此可用于组合和交换 UI 组件的空间更大。利用fragment 实现此类设计时,您无需管理对视图层次结构的复杂更改。 通过将 Activity 布局分成fragment,您可以在运行时修改 Activity 的外观,并在由 Activity 管理的返回栈中保留这些更改。
例如,新闻应用可以使用一个片段在左侧显示文章列表,使用另一个fragment 在右侧显示文章 — 两个fragment 并排显示在一个 Activity 中,每个fragment 都具有自己的一套生命周期回调方法,并各自处理自己的用户输入事件。 因此,用户不需要使用一个 Activity 来选择文章,然后使用另一个 Activity 来阅读文章,而是可以在同一个 Activity 内选择文章并进行阅读,如图。
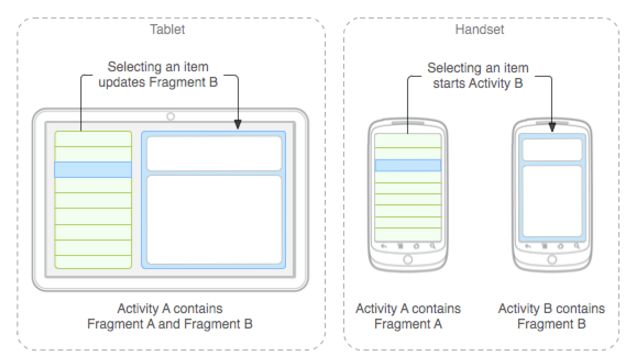
仍然以新闻应用为例 — 在平板电脑尺寸的设备上运行时,该应用可以在 Activity A 中嵌入两个fragment。 不过,在手机尺寸的屏幕上,没有足以储存两个fragment 的空间,因此Activity A 只包括用于显示文章列表的fragment,当用户选择文章时,它会启动Activity B,其中包括用于阅读文章的第二个fragment。 因此,应用可通过重复使用不同组合的片段来同时支持平板电脑和手机,如上图所示。
您应该将每个fragment 都设计为可重复使用的模块化 Activity 组件。也就是说,由于每个fragment 都会通过各自的生命周期回调来定义其自己的布局和行为,您可以将一个片段加入多个 Activity,因此,您应该采用可复用式设计,避免直接从某个fragment 直接操纵另一个fragment。 这特别重要,因为模块化fragment 让您可以通过更改fragment 的组合方式来适应不同的屏幕尺寸。 在设计可同时支持平板电脑和手机的应用时,您可以在不同的布局配置中重复使用您的片段,以根据可用的屏幕空间优化用户体验。 例如,在手机上,如果不能在同一 Activity 内储存多个fragment,可能必须利用单独fragment 来实现单窗格 UI。
Fragment是可以让你的app纵享丝滑的设计,如果你的app想在现在基础上性能大幅度提高,并且占用内存降低,同样的界面Activity占用内存比Fragment要多,响应速度Fragment比Activty在中低端手机上快了很多,甚至能达到好几倍!如果你的app当前或以后有移植平板等平台时,可以让你节省大量时间和精力。
生命周期:
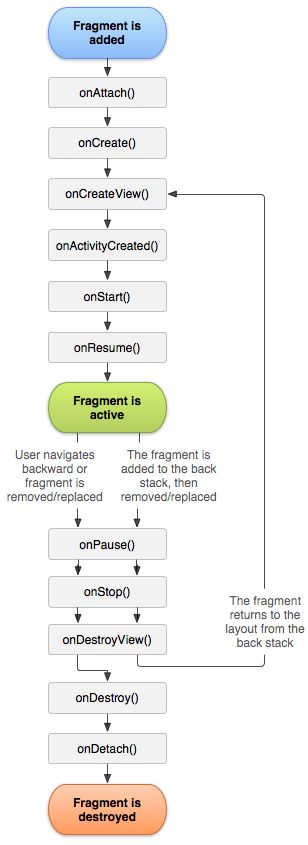
对于生命周期后面会深入说明,先来看看这些函数的意义:
onAttach:一旦fragment 与activity通信的时候就会调用到
onCreate:onAttach调用完就会调用onCreate,可以在Bundle对象中获取一些在Activity中传过来的数据。通常会在该方法中读取保存的状态,获取或初始化一些数据。在该方法中不要进行耗时操作,不然窗口不会显示。
onCreateView:该方法是Fragment很重要的一个生命周期方法,因为会在该方法中创建在Fragment显示的View,其中inflater是用来装载布局文件的,container是
onViewCreated:在onCreateView 中获取的View 如果不是null 的话,会立马调用onViewCreated,标记fragment 用于显示的view 已经创建成功。
onActivityCreated:在onViewCreated 之后标记fragment 创建部分已经完成 ,会立马调用onActivityCreated。
onStart:在onActivityCreated 之后会调用onStart
onResume:在onStart 之后会调用onResume
当fragment 不在使用的时候会进入回收的流程:
onPause:fragment由活跃状态变成非活跃状态执行的第一个回调方法,通常可以在这个方法中保存一些需要临时暂停的工作。如保存音乐播放进度,然后在onResume中恢复音乐播放进度。
onStop:当onStop返回的时候,fragment将从屏幕上消失。
onDestoryView:该方法的调用意味着在 onCreateView 中创建的视图都将被移除。
onDestory:Android在Fragment不再使用时会调用该方法,要注意的是~这时Fragment还和Activity藕断丝连!并且可以获得Fragment对象,但无法对获得的Fragment进行任何操作
onDetach:为Fragment生命周期中的最后一个方法,当该方法执行完后,Fragment与Activity不再有关联
注意:
Fragment 子类中的上述函数除了onCreateView 以外,其他的函数都都需要先调用super 中的对应的函数。
扩展出来的子类:
DialogFragment
显示浮动对话框。使用此类创建对话框可有效地替代使用 Activity 类中的对话框帮助程序方法,因为您可以将片段对话框纳入由 Activity 管理的片段返回栈,从而使用户能够返回清除的片段。
ListFragment
显示由适配器(如 SimpleCursorAdapter)管理的一系列项目,类似于 ListActivity。它提供了几种管理列表视图的方法,如用于处理点击事件的 onListItemClick() 回调。
PreferenceFragment
以列表形式显示 Preference 对象的层次结构,类似于 PreferenceActivity。这在为您的应用创建“设置” Activity 时很有用处。
布局使用Fragment:
布局使用fragment 分两种方式,一个静态,一个动态。
在layout.xml 直接使用fragment进行布局为静态方式:
这个layout 在activity 用正常方式加载即可:
@Override
protected void onCreate(Bundle savedInstanceState) {
    super.onCreate(savedInstanceState);

    setContentView(R.layout.fragment_layout);
}
其中fragment 需要指定class,确定fragment的最终布局,这里是TitlesFragment,来看下TitlesFragment.java:
public static class TitlesFragment extends ListFragment {
    boolean mDualPane;
    int mCurCheckPosition = 0;

    @Override
    public void onActivityCreated(Bundle savedInstanceState) {
        super.onActivityCreated(savedInstanceState);

        // Populate list with our static array of titles.
        setListAdapter(new ArrayAdapter(getActivity(),
                android.R.layout.simple_list_item_activated_1, Shakespeare.TITLES));

        // Check to see if we have a frame in which to embed the details
        // fragment directly in the containing UI.
        View detailsFrame = getActivity().findViewById(R.id.details);
        mDualPane = detailsFrame != null && detailsFrame.getVisibility() == View.VISIBLE;

        if (savedInstanceState != null) {
            // Restore last state for checked position.
            mCurCheckPosition = savedInstanceState.getInt("curChoice", 0);
        }

        if (mDualPane) {
            // In dual-pane mode, the list view highlights the selected item.
            getListView().setChoiceMode(ListView.CHOICE_MODE_SINGLE);
            // Make sure our UI is in the correct state.
            showDetails(mCurCheckPosition);
        }
    }

    @Override
    public void onSaveInstanceState(Bundle outState) {
        super.onSaveInstanceState(outState);
        outState.putInt("curChoice", mCurCheckPosition);
    }
}
详细的Fragment 的布局,可以看ListFragment 的source code,如下:
    @Override
    public View onCreateView(LayoutInflater inflater, ViewGroup container,
            Bundle savedInstanceState) {
        return inflater.inflate(com.android.internal.R.layout.list_content,
                container, false);
    }
再来看下动态方式:
要想在您的 Activity 中执行frgment 事务(如add、replace、remove等),您必须使用 FragmentTransaction 中的 API。您可以像下面这样从 Activity 获取一个 FragmentTransaction 实例:
FragmentManager fragmentManager = getFragmentManager();
FragmentTransaction fragmentTransaction = fragmentManager.beginTransaction();
然后,您可以使用 add() 方法添加一个fragment,指定要添加的fragment 以及将其插入哪个视图。例如:
ExampleFragment fragment = new ExampleFragment();
fragmentTransaction.add(R.id.fragment_container, fragment);
fragmentTransaction.commit();
传递到 add() 的第一个参数是 ViewGroup,即应该放置fragment 的位置,由资源 ID 指定,第二个参数是要添加的fragment。
一旦您通过 FragmentTransaction 做出了更改,就必须调用 commit() 以使更改生效。
当然除了add,还有replace 和remove ,来看下这几个操作的source code:
    public FragmentTransaction add(int containerViewId, Fragment fragment) {
        doAddOp(containerViewId, fragment, null, OP_ADD);
        return this;
    }

    public FragmentTransaction replace(int containerViewId, Fragment fragment) {
        return replace(containerViewId, fragment, null);
    }

    public FragmentTransaction replace(int containerViewId, Fragment fragment, String tag) {
        if (containerViewId == 0) {
            throw new IllegalArgumentException("Must use non-zero containerViewId");
        }

        doAddOp(containerViewId, fragment, tag, OP_REPLACE);
        return this;
    }

    public FragmentTransaction remove(Fragment fragment) {
        addOp(new Op(OP_REMOVE, fragment));

        return this;
    }
详细的code 最终这三个操作都会最终执行addOp这个函数,只不过操作码不同,分别是OP_ADD、OP_REPLACE、OP_REMOVE(当然,还有其他的操作码请看source code)。
在commit 之前我们来看下doAddOp 这个函数:
private void doAddOp(int containerViewId, Fragment fragment, String tag, int opcmd) {
        if (mManager.getTargetSdk() > Build.VERSION_CODES.N_MR1) {
            final Class fragmentClass = fragment.getClass();
            final int modifiers = fragmentClass.getModifiers();
            if ((fragmentClass.isAnonymousClass() || !Modifier.isPublic(modifiers)
                    || (fragmentClass.isMemberClass() && !Modifier.isStatic(modifiers)))) {
                throw new IllegalStateException("Fragment " + fragmentClass.getCanonicalName()
                        + " must be a public static class to be  properly recreated from"
                        + " instance state.");
            }
        }
        fragment.mFragmentManager = mManager;

        if (tag != null) {
            if (fragment.mTag != null && !tag.equals(fragment.mTag)) {
                throw new IllegalStateException("Can't change tag of fragment "
                        + fragment + ": was " + fragment.mTag
                        + " now " + tag);
            }
            fragment.mTag = tag;
        }

        if (containerViewId != 0) {
            if (containerViewId == View.NO_ID) {
                throw new IllegalArgumentException("Can't add fragment "
                        + fragment + " with tag " + tag + " to container view with no id");
            }
            if (fragment.mFragmentId != 0 && fragment.mFragmentId != containerViewId) {
                throw new IllegalStateException("Can't change container ID of fragment "
                        + fragment + ": was " + fragment.mFragmentId
                        + " now " + containerViewId);
            }
            fragment.mContainerId = fragment.mFragmentId = containerViewId;
        }

        addOp(new Op(opcmd, fragment));
    }
版本在Build.VERSION_CODES.N_MR1 之后的,需要fragment 不能是匿名的、非public、非static。这里需要注意下。
接着上面分析,最终每次的fragment 事务(add、replace、remove)的完成是在commit 函数,跟踪后最终调用的是:
    private void scheduleCommit() {
        synchronized (this) {
            boolean postponeReady =
                    mPostponedTransactions != null && !mPostponedTransactions.isEmpty();
            boolean pendingReady = mPendingActions != null && mPendingActions.size() == 1;
            if (postponeReady || pendingReady) {
                mHost.getHandler().removeCallbacks(mExecCommit);
                mHost.getHandler().post(mExecCommit);
            }
        }
    }
最终调用:
Fragment expandOps(ArrayList added, Fragment oldPrimaryNav) {
        for (int opNum = 0; opNum < mOps.size(); opNum++) {
            final Op op = mOps.get(opNum);
            switch (op.cmd) {
                case OP_ADD:
                case OP_ATTACH:
                    added.add(op.fragment);
                    break;
                case OP_REMOVE:
                case OP_DETACH: {
                    added.remove(op.fragment);
                    if (op.fragment == oldPrimaryNav) {
                        mOps.add(opNum, new Op(OP_UNSET_PRIMARY_NAV, op.fragment));
                        opNum++;
                        oldPrimaryNav = null;
                    }
                }
                break;
                case OP_REPLACE: {
                    final Fragment f = op.fragment;
                    final int containerId = f.mContainerId;
                    boolean alreadyAdded = false;
                    for (int i = added.size() - 1; i >= 0; i--) {
                        final Fragment old = added.get(i);
                        if (old.mContainerId == containerId) {
                            if (old == f) {
                                alreadyAdded = true;
                            } else {
                                // This is duplicated from above since we only make
                                // a single pass for expanding ops. Unset any outgoing primary nav.
                                if (old == oldPrimaryNav) {
                                    mOps.add(opNum, new Op(OP_UNSET_PRIMARY_NAV, old));
                                    opNum++;
                                    oldPrimaryNav = null;
                                }
                                final Op removeOp = new Op(OP_REMOVE, old);
                                removeOp.enterAnim = op.enterAnim;
                                removeOp.popEnterAnim = op.popEnterAnim;
                                removeOp.exitAnim = op.exitAnim;
                                removeOp.popExitAnim = op.popExitAnim;
                                mOps.add(opNum, removeOp);
                                added.remove(old);
                                opNum++;
                            }
                        }
                    }
                    if (alreadyAdded) {
                        mOps.remove(opNum);
                        opNum--;
                    } else {
                        op.cmd = OP_ADD;
                        added.add(f);
                    }
                }
                break;
		...
		...
	    }
	    ...
	    ...

        }
    }
可以看到replace 复杂一些,需要确认之前是否有添加过。
请谨记,当您执行替换或移除片段等片段事务时,通常最好让用户能够回退并“撤消”更改。 要让用户回退所执行的片段事务,您必须先调用 addToBackStack(),然后再提交 FragmentTransaction。
注:当您移除或替换一个片段并向返回栈添加事务时,系统会停止(而非销毁)移除的片段。 如果用户执行回退操作进行片段恢复,该片段将重新启动。 如果您不向返回栈添加事务,则系统会在您移除或替换片段时将其销毁。