《tensorflow 实战》学习4——AlexNet(经典CNN)
几大经典CNN:AlexNet、VGGNet、GoogleNet、ResNet。是2012以来ILSVRC的冠军或亚军。在学习CNN时,分析一下各网络的结果以及参数、神经元(tensor)的数量计算.
1. AlexNet的结构
整个网络有8层,这8层中,其中前5层为卷积层,后三层是全连接层。
第1、2个卷积层由卷积滤波、ReLU激活、LRN局部响应归一化、Max Pool池化组成,第3、4个卷积层由卷积滤波、ReLU组成,
第5个卷积层是由卷积滤波、ReLU激活、Max Pool池化组成。
第5个卷积层的输出被reshape成1阶向量,输入到第1个全连接层中,前两个全连接层有矩阵乘法和ReLU组成,最后一个全连接由矩阵乘法达到分类目的。因为,ImageNet提供的图像分1000类。
LRN是AlexNet首次使用的处理方法,据说在池化前使用效果很好。具体可参考博客:
http://blog.csdn.net/hduxiejun/article/details/70570086
图1中,Conv和Max Pool后面跟的是核的size和Conv的核数。例如,Conv 11*11s4, 96表示第一个卷积层的卷积核是(11,11,3)[其中3是图像颜色通道],卷积核做卷积运算的步长为4。这一层有96个卷积核。又如,Max Pool 3*3s2表示最大池化的核size为(3,3),步长为2。
Alex在训练AlexNet时用了两块GTX 580的GPU,两个GPU的分工是这样的:

除了最后一层之外,每个GPU分担一半的参数训练,两个GPU之间相互通信。具体可参考:http://blog.csdn.net/liumaolincycle/article/details/50496499
输入数据
此网络的发明者对ImageNet数据集中的数据做了数据增强,并从(256,256)的图片中随机选取(224,224)区域输入网络中进行训练。这样的好处是,1张图片可以衍生成很多张图片,增大训练数据的规模。(Caffe中选取的图片尺寸为(227,227),但原论文和tensorflow是(224, 224)。)
2. Tensor(也是神经元)的size计算
卷积和池化tensoflow对应的tf接口:
def conv2d(input, filter, strides, padding, use_cudnn_on_gpu=None,
           data_format=None, name=None):

def max_pool(value, ksize, strides, padding, data_format="NHWC", name=None):
其中Padding有两个值可选(”SAME”, “VALID”),SAME表示卷积和池化时,当卷积核或池化函数的行最后一次计算,如果行神经元不够,则进行填充,保证最后一个完成;VALID表示,取样不超过边界,行神经元不够则放弃最后一个计算。
如果Padding=’VALID’,那么卷积层或池化层的神经元个数为
![]()
如果Paddding=’SAME’,个数为

按照tf中建立的alexnet,卷积的Padding=’SAME’,池化的Padding=‘VALID’,那么各层的神经元数如下:

这是整个网络的神经元数,而在Alex训练网络时,conv1到fc2的所有神经元都被平分成两分,在两个GPU上跑。
3. 参数数量的计算
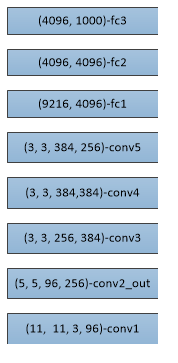
Tf内的conv2d输入的权重是4维的变量矩阵。表示(核的行数,核的列数,输入数据的通道数, 核数)。
每一个卷积核卷积输出一张feature map,因此,上一层的核数是下一层的输入通道数。
按照这样算,AlexNet的参数size:

4. 程序解析
AlexNet算是4个经典网络中体量最小的一个,最大的resNet有152层。这些网络训练起来特别慢,对设备要求很高。《tensorflow实战》的作者在书中讲到的也只是建立网络,然后用假数据测试网络速度而已。而使用VGGNet,一般是按照网络建图,然后加载预训练的模型,用模型达到自己的目的,例如,图片的风格迁移。本人手上的4核4G内存的电脑,就更别指望训练了。因此,AlexNet跟着作者做时间测试。后面VGG尝试一下风格迁移。
以下程序主要是作者给出的程序,本人做了全连接层的补充和结果的整合。
# coding: utf-8

from datetime import datetime
import math
import time
import tensorflow as tf

batch_size = 32
num_batches = 100

#打印op对应的name和shape
def print_activations(t):
    print t.op.name + ' '+ str(t.get_shape().as_list())


def variable_weight(shape):
    Weight = tf.Variable(tf.truncated_normal(shape, dtype=tf.float32, stddev=0.1), name='weight')
    return Weight


def variable_bias(shape, initial_value):
    #tf.Variable()内trainable默认就是True.为True则会将变量加入到Trainable_variables中,可被训练。
    bias = tf.Variable(tf.constant(initial_value, dtype=tf.float32, shape=shape), trainable=True, name='bias')
    return bias


def convAndReLU(images, shape, strides, scope_name):
    #name_scope:自动将scope范围内生成的变量自动命名为(scope_name/xxx)
    with tf.name_scope(scope_name) as scope:
        Weight = variable_weight(shape)
        bias = variable_bias([shape[3]], 0.0)
        conv = tf.nn.conv2d(images, Weight, strides=strides, padding='SAME')
        conv_and_bias = tf.nn.bias_add(conv, bias)
        relu = tf.nn.relu(conv_and_bias, name='conv')
        print_activations(relu)
        parameters = [Weight, bias]

        return relu, parameters


def fc(input, shape, scope_name):
    with tf.name_scope(scope_name) as scope:
        Weight = variable_weight(shape)
        bias = variable_bias([shape[1]], 0.1)
        matmul = tf.matmul(input, Weight) + bias
        fc_layer = tf.nn.relu(matmul, name = 'relu')
        parameters = [Weight, bias]

    return fc_layer, parameters


def interface(images):
    parameters = []
    conv1, para1 = convAndReLU(images, [11, 11, 3, 96], [1, 4, 4, 1], 'conv1')
    #把所有参数放到一个列表里,计算梯度时使用。
    parameters += para1
    lrn1 = tf.nn.lrn(conv1, bias=1.0, alpha=0.001/9, beta=0.75, name='lrn1')
    pool1 = tf.nn.max_pool(lrn1, ksize=[1,3,3,1], strides=[1,2,2,1], padding='VALID', name='pool1')
    print_activations(pool1)

    conv2, para2 = convAndReLU(pool1, [5, 5, 96, 256], [1, 1, 1, 1], 'conv2')
    parameters += para2
    #tf.nn.lrn:局部响应归一化。
    lrn2 = tf.nn.lrn(conv2, bias=1.0, alpha=0.001/9, beta=0.75, name='lrn2')
    pool2 = tf.nn.max_pool(lrn2, ksize=[1,3,3,1], strides=[1,2,2,1], padding='VALID', name='pool2')
    print_activations(pool2)

    conv3, para3 = convAndReLU(pool2, [3, 3, 256, 384], [1, 1, 1, 1], 'conv3')
    conv4, para4 = convAndReLU(conv3, [3, 3, 384, 384], [1, 1, 1, 1], 'conv4')
    conv5, para5 = convAndReLU(conv4, [3, 3, 384, 256], [1, 1, 1, 1], 'conv5')
    parameters += para3
    parameters += para4
    parameters += para5
    pool3 = tf.nn.max_pool(conv5, ksize=[1,3,3,1], strides=[1,2,2,1], padding='VALID', name='pool3')
    print_activations(pool3)

    reshape = tf.reshape(pool3, [batch_size, -1])
    dim = reshape.get_shape()[1].value

    fc1, para6 = fc(reshape, [dim, 4096], 'fc1')
    fc2, para7 = fc(fc1, [4096, 4096], 'fc2')
    fc3, para8 = fc(fc2, [4096, 1000], 'fc3')
    parameters += para6
    parameters += para7
    parameters += para8

    return fc3, parameters

#运行网络
#计算网络运行时间
#计算每个batch运行时间,并且每10个batch输出一次
#计算整个num_batches过程的时间开销期望、标准差。
def time_tensorflow_run(session, target, info_string):
    #num_steps_burn_in:预热迭代
    num_steps_burn_in = 10
    total_duration = 0.0
    total_duration_square = 0.0
    for i in range(num_batches + num_steps_burn_in):
        start_time = time.time()
        _ = session.run(target)
        duration = time.time() - start_time
        if i >= num_steps_burn_in:
            if not i%10:
                print('%s: step %d, duration = %.3f' %(datetime.now(), i - num_steps_burn_in, duration))
        total_duration += duration
        total_duration_square += duration * duration
    mn = total_duration / num_batches
    vr = total_duration_square / num_batches - mn * mn
    sd = math.sqrt(math.fabs(vr))
    print('%s: %s across %d steps, %.3f +/- %.3f sec / batch' %(datetime.now(), info_string, num_batches, mn, sd))

#分别读网络前向通道的时间开销和前向加反馈的总开销。
#只计算到梯度,却没有真正优化参数。
def run_benchmark():
    with tf.Graph().as_default():
        image_size = 224
        images = tf.Variable(tf.random_normal([batch_size, image_size, image_size, 3],
                                              dtype=tf.float32, stddev=0.1))
        fc3, parameters = interface(images)

        init = tf.global_variables_initializer()
        sess = tf.Session()
        sess.run(init)
        time_tensorflow_run(sess, fc3, 'Forward')
        #tf.nn.l2_loss:返回fc3的平方的二分之一。
        objective = tf.nn.l2_loss(fc3)
        #计算梯度
        grad = tf.gradients(objective, parameters)
        time_tensorflow_run(sess, grad, 'Forward_backward')


run_benchmark()
跑出来的结果如下:
conv1/conv [32, 56, 56, 96]
pool1 [32, 27, 27, 96]
conv2/conv [32, 27, 27, 256]
pool2 [32, 13, 13, 256]
conv3/conv [32, 13, 13, 384]
conv4/conv [32, 13, 13, 384]
conv5/conv [32, 13, 13, 256]
pool3 [32, 6, 6, 256]
2017-08-16 16:42:04.746075: W tensorflow/core/platform/cpu_feature_guard.cc:45] The TensorFlow library wasn't compiled to use SSE4.1 instructions, but these are available on your machine and could speed up CPU computations.
2017-08-16 16:42:04.746113: W tensorflow/core/platform/cpu_feature_guard.cc:45] The TensorFlow library wasn't compiled to use SSE4.2 instructions, but these are available on your machine and could speed up CPU computations.
2017-08-16 16:42:04.746120: W tensorflow/core/platform/cpu_feature_guard.cc:45] The TensorFlow library wasn't compiled to use AVX instructions, but these are available on your machine and could speed up CPU computations.
2017-08-16 16:42:17.031926: step 0, duration = 1.037
2017-08-16 16:42:27.380473: step 10, duration = 1.036
2017-08-16 16:42:37.729663: step 20, duration = 1.034
2017-08-16 16:42:48.104901: step 30, duration = 1.068
2017-08-16 16:42:58.442003: step 40, duration = 1.034
2017-08-16 16:43:08.792255: step 50, duration = 1.035
2017-08-16 16:43:19.146079: step 60, duration = 1.035
2017-08-16 16:43:29.517388: step 70, duration = 1.035
2017-08-16 16:43:39.869903: step 80, duration = 1.036
2017-08-16 16:43:50.242175: step 90, duration = 1.034
1.13945998192 118.037327657
-0.117995773822
2017-08-16 16:43:59.574870: Forward across 100 steps, 1.139 +/- 0.344 sec / batch
2017-08-16 16:44:40.937596: step 0, duration = 3.719
2017-08-16 16:45:18.086263: step 10, duration = 3.692
2017-08-16 16:45:55.250951: step 20, duration = 3.712
2017-08-16 16:46:32.309782: step 30, duration = 3.695
2017-08-16 16:47:09.572564: step 40, duration = 3.721
2017-08-16 16:47:46.692089: step 50, duration = 3.705
2017-08-16 16:48:24.789718: step 60, duration = 3.739
2017-08-16 16:49:02.075369: step 70, duration = 3.706
2017-08-16 16:49:39.328542: step 80, duration = 3.745
2017-08-16 16:50:16.533898: step 90, duration = 3.701
4.10196747541 1529.96932776
-1.52644389177
2017-08-16 16:50:49.909081: Forward_backward across 100 steps, 4.102 +/- 1.235 sec / batch
作者跑出来每10个前向batch只用0.026s,加上反向传播也只要0.078s,标准差为0。设备是硬伤啊。
