使用 SpringBoot + kaptcha 生成、校对 验证码
一、前言
验证码这么常见,想必不用多说了。最近做项目要用到验证码,也参考了网上很多方法,唯有下面方法感觉是最简单的,使用的是 Google 的 kaptcha 框架。
二、功能演示
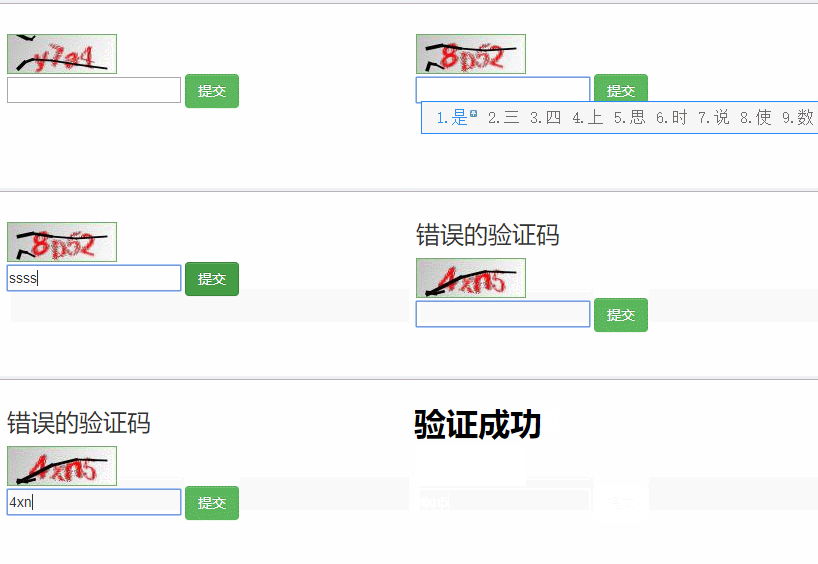
1、git 图说明:
①点击验证码图片会切换验证码图片
②验证码输入错误会提示输入错误,重新输入新的验证码
③输入验证码正确跳转到成功界面
三、代码
2018.7.14 更新,代码已经放到github上了: https://github.com/larger5/Kaptcha.git
1、代码结构
2、pom
(SpringBoot+thymeleaf+web+kaptcha )
注意引入 kaptcha 的 Maven 依赖
		<dependency>
			<groupId>com.github.pengglegroupId>
			<artifactId>kaptchaartifactId>
			<version>2.3.2version>
		dependency>
3、KaptchaConfig
即 kaptcha 的配置文件
package com.cun.conf;

import java.util.Properties;

import org.springframework.context.annotation.Bean;
import org.springframework.stereotype.Component;

import com.google.code.kaptcha.impl.DefaultKaptcha;
import com.google.code.kaptcha.util.Config;

@Component
public class KaptchaConfig {
	@Bean
	public DefaultKaptcha getDefaultKaptcha() {
		com.google.code.kaptcha.impl.DefaultKaptcha defaultKaptcha = new com.google.code.kaptcha.impl.DefaultKaptcha();
		Properties properties = new Properties();
		// 图片边框
		properties.setProperty("kaptcha.border", "yes");
		// 边框颜色
		properties.setProperty("kaptcha.border.color", "105,179,90");
		// 字体颜色
		properties.setProperty("kaptcha.textproducer.font.color", "red");
		// 图片宽
		properties.setProperty("kaptcha.image.width", "110");
		// 图片高
		properties.setProperty("kaptcha.image.height", "40");
		// 字体大小
		properties.setProperty("kaptcha.textproducer.font.size", "30");
		// session key
		properties.setProperty("kaptcha.session.key", "code");
		// 验证码长度
		properties.setProperty("kaptcha.textproducer.char.length", "4");
		// 字体
		properties.setProperty("kaptcha.textproducer.font.names", "宋体,楷体,微软雅黑");
		Config config = new Config(properties);
		defaultKaptcha.setConfig(config);

		return defaultKaptcha;
	}
}
4、KaptchaController
验证码控制层
package com.cun.controller;

import java.awt.image.BufferedImage;
import java.io.ByteArrayOutputStream;

import javax.imageio.ImageIO;
import javax.servlet.ServletOutputStream;
import javax.servlet.http.HttpServletRequest;
import javax.servlet.http.HttpServletResponse;

import org.springframework.beans.factory.annotation.Autowired;
import org.springframework.stereotype.Controller;
import org.springframework.web.bind.annotation.RequestMapping;
import org.springframework.web.servlet.ModelAndView;

import com.google.code.kaptcha.impl.DefaultKaptcha;

@Controller
public class KaptchaController {

	/**
	 * 1、验证码工具
	 */
	@Autowired
	DefaultKaptcha defaultKaptcha;

	/**
	 * 2、生成验证码
	 * @param httpServletRequest
	 * @param httpServletResponse
	 * @throws Exception
	 */
	@RequestMapping("/defaultKaptcha")
	public void defaultKaptcha(HttpServletRequest httpServletRequest, HttpServletResponse httpServletResponse)
			throws Exception {
		byte[] captchaChallengeAsJpeg = null;
		ByteArrayOutputStream jpegOutputStream = new ByteArrayOutputStream();
		try {
			// 生产验证码字符串并保存到session中
			String createText = defaultKaptcha.createText();
			httpServletRequest.getSession().setAttribute("rightCode", createText);
			// 使用生产的验证码字符串返回一个BufferedImage对象并转为byte写入到byte数组中
			BufferedImage challenge = defaultKaptcha.createImage(createText);
			ImageIO.write(challenge, "jpg", jpegOutputStream);
		} catch (IllegalArgumentException e) {
			httpServletResponse.sendError(HttpServletResponse.SC_NOT_FOUND);
			return;
		}

		// 定义response输出类型为image/jpeg类型,使用response输出流输出图片的byte数组
		captchaChallengeAsJpeg = jpegOutputStream.toByteArray();
		httpServletResponse.setHeader("Cache-Control", "no-store");
		httpServletResponse.setHeader("Pragma", "no-cache");
		httpServletResponse.setDateHeader("Expires", 0);
		httpServletResponse.setContentType("image/jpeg");
		ServletOutputStream responseOutputStream = httpServletResponse.getOutputStream();
		responseOutputStream.write(captchaChallengeAsJpeg);
		responseOutputStream.flush();
		responseOutputStream.close();
	}

	/**
	 * 3、校对验证码
	 * @param httpServletRequest
	 * @param httpServletResponse
	 * @return
	 */
	@RequestMapping("/imgvrifyControllerDefaultKaptcha")
	public ModelAndView imgvrifyControllerDefaultKaptcha(HttpServletRequest httpServletRequest,
			HttpServletResponse httpServletResponse) {
		ModelAndView andView = new ModelAndView();
		String rightCode = (String) httpServletRequest.getSession().getAttribute("rightCode");
		String tryCode = httpServletRequest.getParameter("tryCode");
		System.out.println("rightCode:"+rightCode+" ———— tryCode:"+tryCode);
		if (!rightCode.equals(tryCode)) {
			andView.addObject("info", "错误的验证码");
			andView.setViewName("index");
		} else {
			andView.addObject("info", "登录成功");
			andView.setViewName("success");
		}
		return andView;
	}

	@RequestMapping("/toIndex")
	public String toIndex() {
		return "index";
	}
}
5、application.yml SpringBoot 核心配置文件
server:
  port: 80
  context-path: /
6、主界面 index.html
<html xmlns:th="http://www.thymeleaf.org">
<head lang="en">
<meta charset="UTF-8">meta>
<title>hellotitle>

<link rel="stylesheet" href="../bootstrap3/css/bootstrap-theme.min.css" />
<link rel="stylesheet" href="../bootstrap3/css/bootstrap.min.css" />
<script type="text/javascript" src="../bootstrap3/js/jquery-1.11.2.min.js">script>
<script type="text/javascript" src="../bootstrap3/js/bootstrap.min.js">script>
head>
<style type="text/css">
body {
	padding: 10px
}
style>
<body>

	<h3 th:text="${info}">h3>
	<div>

		<img alt="验证码" onclick="this.src='/defaultKaptcha?d='+new Date()*1" src="/defaultKaptcha" />
	div>
	<form action="imgvrifyControllerDefaultKaptcha" >
		<input type="text" name="tryCode" />
		<input type="submit" value="提交" class="btn btn-success">input>
	form>
body>
html>
7、验证成功界面 success.html
<html>
<head>
<meta charset="UTF-8">meta>
<title>验证成功title>
head>
<body>
	<h1>验证成功h1>
body>
html>
三、小结
1、参考文章
①springboot 集成kaptcha验证码简单实例
②Kaptchar详细配置表
2、感受
验证码这种东西,一切都是固定套路,会用就行

