Nginx的配置文件详解
Nginx的高级配置
点击此处即可查看nginx的官方文档
1.Nginx的源码编译安装
安装包:
nginx-1.14.2.tar.gz
点击此处即可下载nginx
1.安装nignx并解压
[root@sever1 ~]# ls
nginx-1.14.2.tar.gz
[root@sever1 ~]# tar zxf nginx-1.14.2.tar.gz
[root@sever1 ~]# ls
nginx-1.14.2  nginx-1.14.2.tar.gz
2.关闭debug日志
隐藏版本号可以不设定,但在实际应用中,一般都需要隐藏
[root@sever1 ~]# cd nginx-1.14.2
[root@sever1 nginx-1.14.2]# vim auto/cc/gcc
3.源码编译
(1).configure配置
#安装依赖包
[root@sever1 nginx-1.14.2]# yum install -y gcc pcre-devel zlib-devel
#配置
[root@sever1 nginx-1.14.2]# ./configure --prefix=/usr/local/nginx
(2)编译与安装
[root@sever1 nginx-1.14.2]# make && make install
4.开启nginx
# /root/nginx-1.14.2/objs/nginx是二进制程序,更新的版本就更新的它
[root@sever1 nginx-1.14.2]# pwd
/root/nginx-1.14.2
[root@sever1 nginx-1.14.2]# ls
auto     CHANGES.ru  configure  html     Makefile  objs    src
CHANGES  conf        contrib    LICENSE  man       README
[root@sever1 nginx-1.14.2]# cd objs/
[root@sever1 objs]# pwd
/root/nginx-1.14.2/objs
[root@sever1 objs]# ll nginx
-rwxr-xr-x 1 root root 803880 Feb 21 14:18 nginx
[root@sever1 objs]# cd /usr/local/nginx/sbin
#开启nignx
[root@sever1 sbin]# ./nginx
#查看进程,一个master,一个worker
[root@sever1 sbin]# ps -ef | grep nginx
2.Nginx的基础配置
1.更改工作进程数
#1.查看cpu个数
[root@sever1 sbin]# lscpu
[root@sever1 sbin]# cd ..
[root@sever1 nginx]# cd conf/
[root@sever1 conf]# pwd
/usr/local/nginx/conf
#2.更改工作进程数
[root@sever1 conf]# vim nginx.conf
##################
worker_processes  auto;  #绑定cpu核心(工作进程数取决于cpu数目)
[root@sever1 conf]# cd ..
[root@sever1 nginx]# cd sbin/
[root@sever1 sbin]# pwd
/usr/local/nginx/sbin
#3.重新加载
[root@sever1 sbin]# ./nginx -s reload
#4.查看cpu数目
[root@sever1 ~]# lscpu
[root@foundation66 Desktop]# ssh [email protected]
[root@sever1 ~]# cd /usr/local/nginx/sbin/
#5.开启nignx
[root@sever1 sbin]# ./nginx
测试:
#查看nginx有关进程
[root@sever1 sbin]# ps -ef | grep nginx
2.vim高量检测语法
# /root/nginx-1.14.2/contrib/vim/为高量检测语法工具
[root@sever1 nginx-1.14.2]# pwd
/root/nginx-1.14.2
[root@sever1 nginx-1.14.2]# cd contrib/
[root@sever1 contrib]# ls
geo2nginx.pl  README  unicode2nginx  vim
[root@sever1 contrib]# cd vim/
[root@sever1 vim]# ls
ftdetect  ftplugin  indent  syntax
#1.创建目录
[root@sever1 ~]# mkdir .vim
[root@sever1 ~]# cd /root/nginx-1.14.2/contrib/
2.拷贝vim
[root@sever1 contrib]# cp -r vim/* ~/.vim
测试:
[root@sever1 contrib]# cd /usr/local/nginx/conf/
#文件内容有颜色,即带有高量语法检测
[root@sever1 conf]# vim nginx.conf
3.设定用户和组
#1.添加用户和组;-M表示不创建家目录,-s表示shell,-d表示家目录
[root@sever1 ~]# useradd -M -d /usr/local/nginx/ -s /sbin/nologin nginx
[root@sever1 ~]# id nginx
uid=1000(nginx) gid=1000(nginx) groups=1000(nginx)
#2.更改配置文件
[root@sever1 ~]# cd /usr/local/nginx/conf/
[root@sever1 conf]# vim nginx.conf
###################
user  nginx nginx;
#3.开启nginx;因为之前做实验将nignx关闭了,此时便无需再重新加载
[root@sever1 conf]# cd ../sbin/
[root@sever1 sbin]# ./nginx
测试:
#查看进程
[root@sever1 sbin]# ps -ef | grep nginx
3.nginx的平滑升级
1.版本升级
1.下载新版本的nginx并解压
[root@sever1 ~]# ls
nginx-1.14.2  nginx-1.14.2.tar.gz  nginx-1.15.8.tar.gz
[root@sever1 ~]# tar zxf nginx-1.15.8.tar.gz
[root@sever1 ~]# ls
nginx-1.14.2  nginx-1.14.2.tar.gz  nginx-1.15.8  nginx-1.15.8.tar.gz
2.源码编译
[root@sever1 ~]# cd nginx-1.15.8
[root@sever1 nginx-1.15.8]# ls
auto     CHANGES.ru  configure  html     man     src
CHANGES  conf        contrib    LICENSE  README
#配置
[root@sever1 nginx-1.15.8]# ./configure --prefix=/usr/local/nginx
#编译
[root@sever1 nginx-1.15.8]# make
注意:此时一定不能make install 直接安装,因为旧版本的nginx已经启动
[root@sever1 nginx-1.15.8]# ps -ef | grep nginx
#查看系统nginx版本
[root@sever1~]# /usr/local/nginx//sbin/nginx -v
3.备份旧版本nginx程序
[root@sever1 objs]# cd /usr/local/nginx/sbin/
[root@sever1 sbin]# ls
nginx
[root@sever1 sbin]# cp nginx nginx.old
4.拷贝二进制程序
[root@sever1 ~]# cd nginx-1.15.8/objs/
[root@sever1 objs]# ls
autoconf.err  nginx    ngx_auto_config.h   ngx_modules.c  src
Makefile      nginx.8  ngx_auto_headers.h  ngx_modules.o
[root@sever1 objs]# cp -f nginx /usr/local/nginx/sbin/
cp: overwrite ‘/usr/local/nginx/sbin/nginx’? y
[root@sever1 objs]# ps -ef | grep nginx
[root@sever1 objs]# kill -USR2 2086
[root@sever1 objs]# ps -ef | grep nginx
[root@sever1 objs]# kill -WINCH 2086
[root@sever1 objs]# ps -ef | grep nginx
[root@sever1 objs]# /usr/local/nginx//sbin/nginx -v
nginx version: nginx/1.15.8
2.版本回退
1.拷贝二进制程序
[root@sever1 ~]# cd /usr/local/nginx/sbin/
[root@sever1 sbin]# ls
nginx  nginx.old
[root@sever1 sbin]# cp -f nginx.old nginx
cp: overwrite ‘nginx’? y
2.添加旧版本的nginx进程
[root@sever1 sbin]# ps -ef | grep nginx
[root@sever1 sbin]# kill -HUP 2086
[root@sever1 sbin]# ps -ef | grep nginx
[root@sever1 sbin]# kill -USR2 4676
[root@sever1 sbin]# kill -WINCH 4676
[root@sever1 sbin]# ps -ef | grep nginx
[root@sever1 sbin]# /usr/local/nginx//sbin/nginx -v
nginx version: nginx/1.14.2
4.日志截断
#访问本机;200表示成功
[root@sever1 ~]# curl -I localhost
# /usr/local/nginx/logs/存放日志目录
[root@sever1 ~]# cd /usr/local/nginx/logs/
[root@sever1 logs]# ls
access.log  error.log  nginx.pid  nginx.pid.oldbin
#1.查看日志
[root@sever1 logs]# cat access.log
#2.查看错误日志
[root@sever1 logs]# cat error.log
#3.查看进程ID
[root@sever1 logs]# cat nginx.pid
4676
#4.压测:
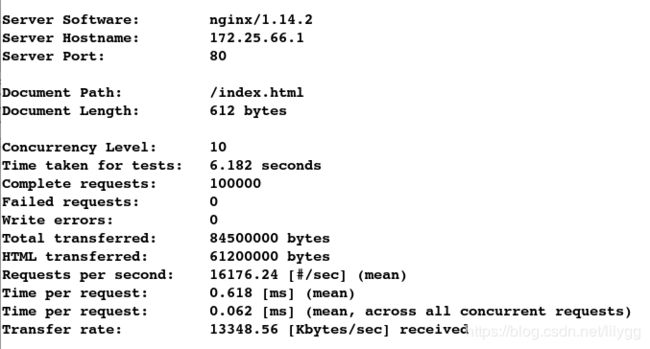
[root@foundation66 Desktop]# ab -c 10 -n 100000 http://172.25.66.1/index.html
#查看日志大小
[root@sever1 logs]# du -h access.log
16M	access.log
#5.输出当天日期
[root@sever1 logs]# date +%F
2019-02-21
#6.输出前一天的日期
[root@sever1 logs]# date +%F -d -1day
2019-02-20
#7.重命名
[root@sever1 logs]# mv access.log `date +%F -d -1day`_access.log
[root@sever1 logs]# ls
2019-02-20_access.log  error.log  nginx.pid  nginx.pid.oldbin
#
[root@sever1 logs]# /usr/local/nginx/sbin/nginx -s reopen
[root@sever1 logs]# ll access.log
-rw-r--r-- 1 nobody root 0 Feb 21 15:59 access.log
[root@sever1 logs]# cat access.log
[root@sever1 logs]# ls
2019-02-20_access.log  access.log  error.log  nginx.pid  nginx.pid.oldbin
5.编写nginx启动脚本
编写nginx启动脚本,是为了可以使用systemctl命令启动/关闭/重启nginx
1.安装apache
#安装apache;因为apache和nginx的启动脚本类似,直接更改即可
[root@sever1 ~]# yum install -y httpd
2.查看并拷贝脚本文件
[root@sever1 ~]# cd /usr/lib/systemd/system
[root@sever1 system]# cp httpd.service /etc/systemd/system/nginx.service
3.更改脚本文件
[root@sever1 system]# cd /etc/systemd/system
[root@sever1 system]# vim nginx.service
#####################
[Unit]
Description=The Apache nginx Server
After=network.target remote-fs.target nss-lookup.target

[Service]
Type=forking        #nginx的主进程maskter会fork子进程worker
PIDFile=/usr/local/nginx/logs/nginx.pid   #设定pid文件
ExecStart=/usr/local/nginx/sbin/nginx     #开启nginx
ExecReload=/usr/local/nginx/sbin/nginx -s reload   #重启nginx
ExecStop=/usr/local/nginx/sbin/nginx -s stop       #关闭nginx
PrivateTmp=true     #分配独立空间

[Install]
WantedBy=multi-user.target      #设定多用户模式
[root@sever1 system]# ll /usr/local/nginx/logs/nginx.pid
-rw-r--r-- 1 root root 5 Feb 21 14:26 /usr/local/nginx/logs/nginx.pid
[root@sever1 sbin]# cat /usr/local/nginx/logs/nginx.pid
14445
[root@sever1 system]# kill 14445
[root@sever1 system]# ps -ef | grep nginx
root     14485  2067  0 16:52 pts/0    00:00:00 grep --color=auto nginx
测试:
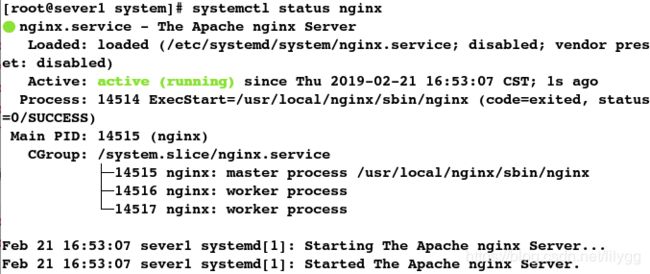
[root@sever1 system]# systemctl start nginx
[root@sever1 system]# systemctl status nginx
[root@sever1 system]# systemctl reload nginx
[root@sever1 system]# systemctl enable nginx
Created symlink from /etc/systemd/system/multi-user.target.wants/nginx.service to /etc/systemd/system/nginx.service.
[root@sever1 system]# systemctl disable nginx
Removed symlink /etc/systemd/system/multi-user.target.wants/nginx.service.
[root@sever1 system]# systemctl stop nginx
[root@sever1 system]# systemctl status nginx
6.限制并发连接数
1.更改配置文件
#查看最大文件数
[root@sever1 ~]# sysctl -a | grep file
[root@sever1 ~]# ulimit -a
[root@sever1 conf]# vim nginx.conf
##################
events {
    worker_connections  65536;     #最大工作连接数;由能打开的最大文件数(操作系统性能)决定
}

tcp_nopush      on;    #避免网络阻塞
tcp_nodelay     on;    #避免磁盘阻塞

limit_conn_zone $binary_remote_addr zone=addr:10m;

location /download/ {
            limit_conn addr 1;     #限制并发连接数;限制每个IP并发连接数,必须与limit_conn_zone变量对应
        }
#1.制作软链接;便于使用nginx命令
[root@sever1 ~]# ln -s /usr/local/nginx/sbin/nginx /sbin/
#2.重新加载
[root@sever1 ~]# nginx -s reload
3.创建目录
[root@sever1 conf]# cd /usr/local/nginx/html/
[root@sever1 html]# ls
50x.html  index.html
#创建目录
[root@sever1 html]# mkdir download
4.下载图片更改图片权限
#1.先在网上下载一张较大的图片并图片至download共享目录
[root@foundation66 Desktop]# scp tests.jpg [email protected]:/usr/local/nginx/html/download
[root@sever1 html]# cd download/
[root@sever1 download]# pwd
/usr/local/nginx/html/download
[root@sever1 download]# ls
tests.jpg
#查看图片大小;稍微大点便于测试
[root@sever1 download]# du -sh tests.jpg
1.7M	tests.jpg
[root@sever1 download]# ll
total 1716
-r-------- 1 root root 1755818 Feb 21 20:14 tests.jpg
#2更改权限
[root@sever1 download]# chmod 755 tests.jpg
[root@sever1 download]# ll
total 1716
-rwxr-xr-x 1 root root 1755818 Feb 21 20:14 tests.jpg
测试:
1.在网页上输入: 172.25.66.1/download/tests.jpg 发现可以访问图片

2.清空日志
[root@sever1 ~]# cd /usr/local/nginx/logs/
[root@sever1 logs]# > access.log
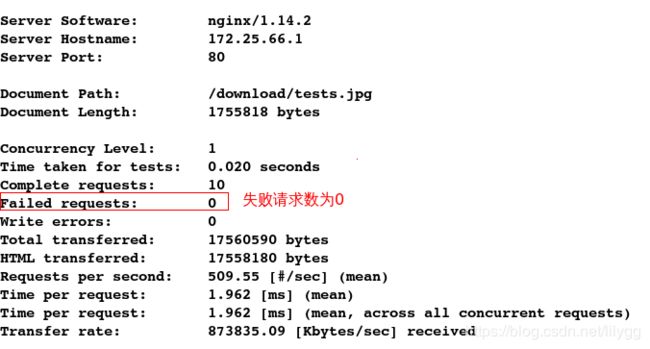
3.压测:1个并发
[root@foundation66 Desktop]# ab -c 1 -n 10 http://172.25.66.1/download/vim.jnp
发现所有的请求均通过,因为只有一个并发
[root@sever1 logs]# pwd
/usr/local/nginx/logs
[root@sever1 logs]# cat access.log
[root@sever1 logs]# > access.log
[root@sever1 logs]# cat access.log
6.压测:10个并发
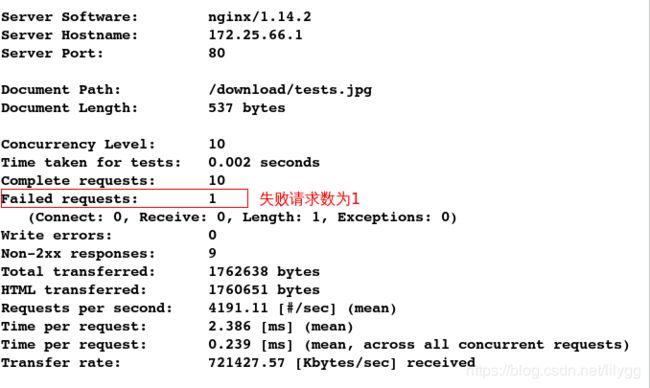
[root@foundation66 Desktop]# ab -c 10 -n 10 http://172.25.66.1/download/tests.jpg
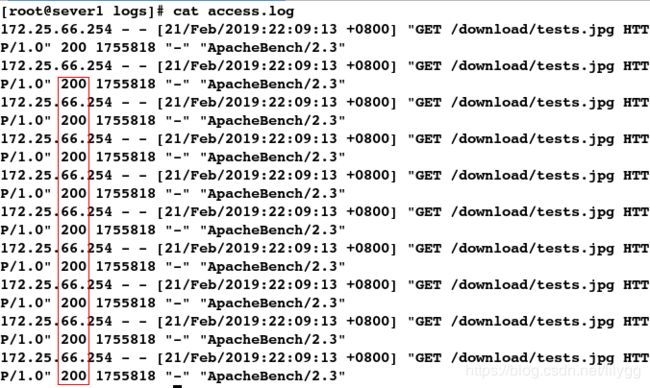
7.查看日志
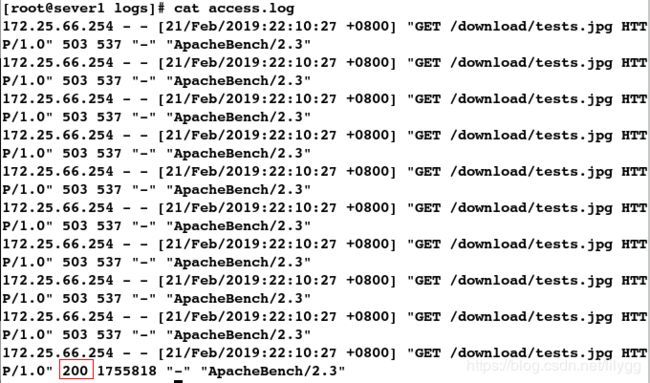
发现只有一个请求成功(200),其他的均失败(503)。因为设定了限制并发数为1
[root@sever1 logs]# cat access.log
7.限速
方式1:
1.更改配置文件
[root@sever1 ~]# cd /usr/local/nginx/conf/
[root@sever1 conf]# vim nginx.conf
###################
location /download/ {
            limit_conn addr 1;
            limit_rate 50k;      #限速
        }
[root@sever1 conf]# nginx -s reload
3.压测
[root@foundation66 Desktop]# ab -c 1 -n 10 http://172.25.66.1/download/tests.jpg
1.更改配置文件
[root@sever1 conf]# vim nginx.conf
###################
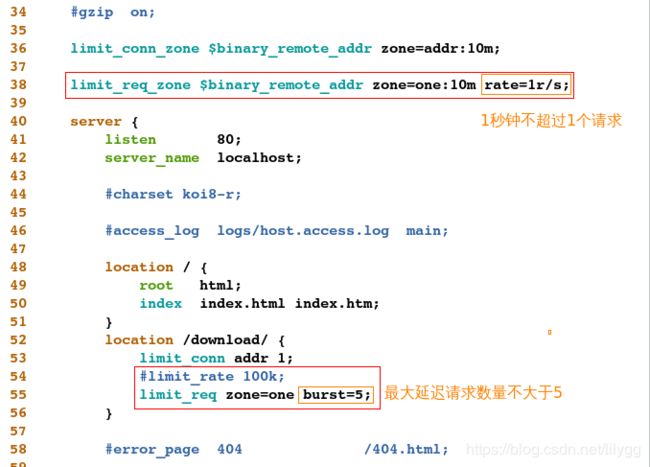
limit_req_zone $binary_remote_addr zone=one:10m rate=1r/s;   #

limit_req zone=one burst=5;    #
[root@sever1 conf]# nginx -s reload
3.压测
[root@foundation66 Desktop]# ab -c 1 -n 10 http://172.25.66.1/download/tests.jpg
8.获取客户端真实ip
默认nginx是无法取到客户端真实ip信息
Client -----> ADSL-----> cdn -----> SLB -----> nginx
1.关闭原来的nginx
[root@sever1 ~]# ps aux | grep nginx
[root@sever1 ~]# nginx -v
nginx version: nginx/1.14.2
[root@sever1 ~]# nginx -s stop
[root@sever1 ~]# ps aux | grep nginx
root      2096  0.0  0.1 112648   956 pts/0    R+   09:45   0:00 grep --color=auto nginx
2.重新编译
重新编译:是为了添加realip模块
[root@sever1 nginx-1.14.2]# make clean
rm -rf Makefile objs
#1.configure 配置
[root@sever1 nginx-1.14.2]# ./configure --prefix=/usr/local/nginx --with-http_realip_module
[root@sever1 nginx-1.14.2]# cd objs/
[root@sever1 objs]# ls
autoconf.err  nginx    ngx_auto_config.h   ngx_modules.c  src
Makefile      nginx.8  ngx_auto_headers.h  ngx_modules.o
#查看到reialip模块,说明添加模块成功
[root@sever1 objs]# vim ngx_modules.c
#2.编译
[root@sever1 nginx-1.14.2]# make
注意:一定不要执行make install,直接将二进制文件拷贝过来即可
3.拷贝二进制文件
[root@sever1 objs]# pwd
/root/nginx-1.14.2/objs
[root@sever1 objs]# ll nginx
-rwxr-xr-x 1 root root 809528 Feb 22 09:50 nginx
#拷贝
[root@sever1 objs]# cp nginx /usr/local/nginx/sbin/
cp: overwrite ‘/usr/local/nginx/sbin/nginx’? y
#查看编译参数
[root@sever1 objs]# nginx -V
nginx version: nginx/1.14.2
built by gcc 4.8.5 20150623 (Red Hat 4.8.5-11) (GCC)
configure arguments: --prefix=/usr/local/nginx --with-http_realip_module
#查看版本
[root@sever1 objs]# nginx -v
nginx version: nginx/1.14.2
4.更改配置文件
(1)添加虚拟主机
#1.更改配置文件
[root@sever1 objs]# cd /usr/local/nginx/conf/
[root@sever1 conf]# vim nginx.conf
###################
server {                                     #添加虚拟主机
     listen 80;                       #监听端口
     server_name server1.westos.org;  #指定域名

     location / {
            return 200;   #返回200:表示访问正常
     }

}
#2.开启nginx
[root@sever1 conf]# nginx
(2)添加解析
[root@sever1 conf]# vim /etc/hosts
测试:
[root@sever1 conf]# ping server1.westos.org -w 1 -t 1
[root@sever1 conf]# curl -I server1.westos.org
#1.更改配置文件
[root@sever1 conf]# vim nginx.conf
###################
server {                                       #添加虚拟主机
     listen 80;                        #监听端口
     server_name server1.westos.org;   #指定域名

     location / {
            return 200 "client real ip:$remote_addr\n";   #返回客户端真实ip
     }

}
#2.重新加载
[root@sever1 conf]# nginx -s reload
测试:
[root@sever1 conf]# curl server1.westos.org
client real ip:172.25.66.1
(4)返回原始ip
默认返回的是记录ip中的最后一个:
#1.更改配置文件
[root@sever1 conf]# vim nginx.conf
###################
server {
     listen 80;
     server_name server1.westos.org;
     set_real_ip_from 172.25.66.1;
     real_ip_header X-Forwarded-For;   #记录所有的ip地址
     real_ip_recursive off;     #默认为关闭状态;表示取记录在X-Forwarded-For参数中的最后一个ip(源地址)

     location / {
            return 200 "client real ip:$remote_addr\n";
     }

}
#2.重新加载
[root@sever1 conf]# nginx -s reload
测试:
#-H表示添加参数
[root@sever1 conf]# curl -H "X-Forwarded-For:1.1.1.1,172.25.66.1" server1.westos.org
client real ip:172.25.66.1
返回记录ip中的第一个(源ip):
#1.更改配置文件
[root@sever1 conf]# vim nginx.conf
###################
server {
     listen 80;
     server_name server1.westos.org;
     set_real_ip_from 172.25.66.1;
     real_ip_header X-Forwarded-For;
     real_ip_recursive on;    #开启表示:取记录在X-Forwarded-For参数中的第一个ip(源地址)

     location / {
            return 200 "client real ip:$remote_addr\n";
     }

}
#2.重新加载
[root@sever1 conf]# nginx -s reload
测试:
[root@sever1 conf]# curl -H "X-Forwarded-For:1.1.1.1,172.25.66.1" server1.westos.org
client real ip:1.1.1.1
9.添加动态模块
1.关闭nginx
[root@sever1 ~]# nginx -s stop
[root@sever1 ~]# ps aux | grep nginx
root      6256  0.0  0.1 112648   956 pts/0    S+   11:24   0:00 grep --color=auto nginx
2.重新编译
重新编译:是为了添加动态模块(http_image_filter_module)
#1.清理:删除缓存文件
[root@sever1 ~]# cd nginx-1.14.2
[root@sever1 nginx-1.14.2]# make clean
rm -rf Makefile objs
2.查看编译参数
[root@sever1 nginx-1.14.2]# ./configure --help | grep realip
[root@sever1 nginx-1.14.2]# ./configure --help | grep dynamic
#3.configure配置;报错
[root@sever1 nginx-1.14.2]# ./configure --prefix=/usr/local/nginx --with-http_realip_module --with-http_image_filter_module=dynamic
gd-devel-2.0.35-26.el7.x86_64.rpm
#4.解决依赖性
[root@sever1 ~]# ls
gd-devel-2.0.35-26.el7.x86_64.rpm  nginx-1.14.2.tar.gz  nginx-1.15.8.tar.gz
nginx-1.14.2                       nginx-1.15.8
[root@sever1 ~]# yum install -y gd-devel-2.0.35-26.el7.x86_64.rpm
#5.重新配置
[root@sever1 ~]# cd  nginx-1.14.2
[root@sever1 nginx-1.14.2]# ./configure --prefix=/usr/local/nginx --with-http_realip_module --with-http_image_filter_module=dynamic
#6.编译
[root@sever1 nginx-1.14.2]# make
#7.查看到重新编译生成了新的二进制文件
[root@sever1 nginx-1.14.2]# cd objs/
[root@sever1 objs]# pwd
/root/nginx-1.14.2/objs
[root@sever1 objs]# ll nginx
-rwxr-xr-x 1 root root 809528 Feb 22 11:26 nginx
3.拷贝二进制文件
[root@sever1 objs]# pwd
/root/nginx-1.14.2/objs
#拷贝
[root@sever1 objs]# cp nginx /usr/local/nginx/sbin/
cp: overwrite ‘/usr/local/nginx/sbin/nginx’? y
4.拷贝image模块
[root@sever1 objs]# pwd
/root/nginx-1.14.2/objs
[root@sever1 objs]# ls
autoconf.err        ngx_http_image_filter_module_modules.c
Makefile            ngx_http_image_filter_module_modules.o
nginx               ngx_http_image_filter_module.so
nginx.8             ngx_modules.c
ngx_auto_config.h   ngx_modules.o
ngx_auto_headers.h  src
[root@sever1 objs]# mkdir /usr/local/nginx/modules
[root@sever1 objs]# cp ngx_http_image_filter_module.so /usr/local/nginx/modules
5.下载图片并拷贝
#1.在网上下载图片并发送至nginx的默认发布目录中
[kiosk@foundation66 Desktop]$ scp westos.jpg [email protected]:/usr/local/nginx/html/download/
[root@sever1 conf]# cd /usr/local/nginx/html/download/
[root@sever1 download]# ls
tests.jpg  westos.jpg
[root@sever1 download]# rm -rf tests.jpg
[root@sever1 download]# ls
westos.jpg
[root@sever1 download]# ll westos.jpg
-rw-r--r-- 1 root root 115409 Feb 22 11:41 westos.jpg
6.浏览器访问
输入:172.25.66.1/download/tests.jpg,发现可以访问图片

7.更改配置文件
[root@sever1 objs]# cd /usr/local/nginx/conf/
[root@sever1 conf]# vim nginx.conf
###################
load_module modules/ngx_http_image_filter_module.so   #加载图片
image_filter resize 150 150;   #更改图片大小
[root@sever1 conf]# nginx -s reload
测试:
网页直接访问 172.25.66.1/download/ ,发现报错

解决方案:
#1.更改配置文件
[root@sever1 conf]# vim nginx.conf
###################
#image_filter resize 150 150;
autoindex on;    #开启目录浏览功能
#2.重新加载
[root@sever1 conf]# nginx -s reload
测试:
10.设定缓存
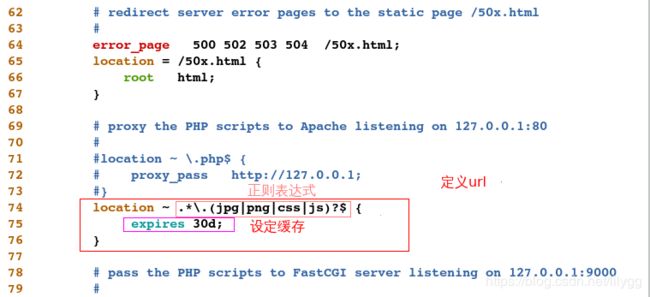
设定缓存:是为了减少网站流量,加速用户访问的速度
1.更改配置文件
[root@sever1 conf]# vim nginx.conf
###################
location ~ .*\.(jpg|png|css|js)?$ {
             expires 30d;  #设定缓存
}
[root@sever1 conf]# nginx -s reload
测试:
#查看日期
[kiosk@foundation66 Desktop]$ date
Fri Feb 22 13:02:38 CST 2019
[kiosk@foundation66 Desktop]$ curl -I 172.25.66.1/download/westos.jpg
#更改改配置文件
[root@sever1 conf]# vim nginx.conf
#重新加载
[root@sever1 conf]# nginx -s reload
[kiosk@foundation66 Desktop]$ curl -I 172.25.66.1/download/westos.jpg
11.配置SSL实现HTTPS加密访问
HTTP:全名超文本传输协议,客户端据此获取服务器上的超文本内容。超文本内容则以HTML为主,客户端拿到HTML内容后可根据规范进行解析呈现。因此,HTTP主要负责的是“内容的请求和获取”。
HTTPS:做的就是给请求加密,让其对用户更加安全
1.添加主机
(1).更改配置文件
[root@sever1 web]# vim nginx.conf
##################
server {
     listen 80;    #监听端口(http:80)
     server_name www.westos.org;    #设定域名

    location / {
        root /web;      #定义根目录
        index index.html;
     }
}
[root@sever1 conf]# mkdir /web
[root@sever1 conf]# cd /web/
[root@sever1 web]# vim index.html
[root@sever1 web]# cat index.html
www.westos.org
(3).重新启动
[root@sever1 web]# nginx -s reload
(4).添加解析
[root@sever1 web]# vim /etc/hosts
[root@sever1 conf]# curl www.westos.org
www.westos.org
2.添加SSL模块
(1).更改配置文件
[root@sever1 conf]# pwd
/usr/local/nginx/conf
[root@sever1 conf]# vim nginx.conf
###################
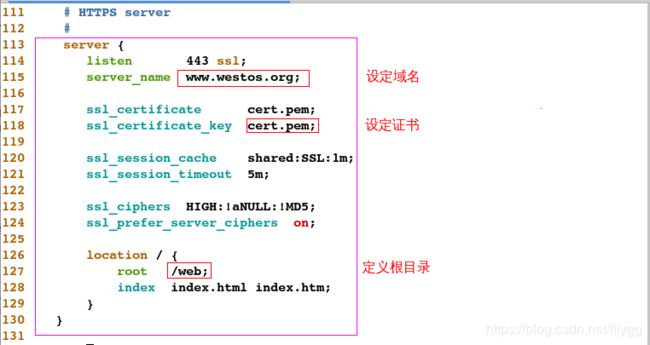
    server {
       listen       443 ssl;     #监听端口(https:443)
       server_name  www.westos.org;     #设定域名

       ssl_certificate      cert.pem;   #设定证书
       ssl_certificate_key  cert.pem;

       ssl_session_cache    shared:SSL:1m;
       ssl_session_timeout  5m;

       ssl_ciphers  HIGH:!aNULL:!MD5;
       ssl_prefer_server_ciphers  on;

       location / {
           root   /web;   #定义根目录
           index  index.html index.htm;
       }
   }
重新编译:是为了添加ssl模块
[root@sever1 ~]# cd nginx-1.14.2
#1.清理缓存文件
[root@sever1 nginx-1.14.2]# make clean
rm -rf Makefile objs
#2.查看编译参数
[root@sever1 nginx-1.14.2]# ./configure --help | grep ssl
#3.配置
[root@sever1 nginx-1.14.2]# ./configure --prefix=/usr/local/nginx --with-http_realip_module --with-http_image_filter_module=dynamic --with-http_ssl_module
#4.解决依赖性
[root@sever1 nginx-1.14.2]# yum install -y openssl-devel
#5.重新配置
[root@sever1 nginx-1.14.2]# ./configure --prefix=/usr/local/nginx --with-http_realip_module --with-http_image_filter_module=dynamic --with-http_ssl_module
#6.编译
[root@sever1 nginx-1.14.2]# make
(3).拷贝二进制文件
#1.查看编译后新生成的二进制文件
[root@sever1 objs]# pwd
/root/nginx-1.14.2/objs
[root@sever1 objs]# ll nginx
-rwxr-xr-x 1 root root 902896 Feb 22 14:20 nginx
[root@sever1 objs]# cp nginx /usr/local/nginx/sbin/
cp: cannot create regular file ‘/usr/local/nginx/sbin/nginx’: Text file busy
#2.关闭nginx
[root@sever1 objs]# nginx -s stop
[root@sever1 objs]# ps aux | grep nginx
root     12903  0.0  0.1 112648   956 pts/0    S+   14:21   0:00 grep --color=auto nginx
#3.拷贝
[root@sever1 objs]# cp nginx /usr/local/nginx/sbin/
cp: overwrite ‘/usr/local/nginx/sbin/nginx’? y
(4).拷贝image模块
[root@sever1 objs]# pwd
/root/nginx-1.14.2/objs
[root@sever1 objs]# ls
autoconf.err        ngx_http_image_filter_module_modules.c
Makefile            ngx_http_image_filter_module_modules.o
nginx               ngx_http_image_filter_module.so
nginx.8             ngx_modules.c
ngx_auto_config.h   ngx_modules.o
ngx_auto_headers.h  src
[root@sever1 objs]# cp ngx_http_image_filter_module.so /usr/local/nginx/modules/
cp: overwrite ‘/usr/local/nginx/modules/ngx_http_image_filter_module.so’? y
(5).制作证书并拷贝
[root@sever1 certs]# pwd
/etc/pki/tls/certs
[root@sever1 certs]# ls
ca-bundle.crt  ca-bundle.trust.crt  make-dummy-cert  Makefile  renew-dummy-cert
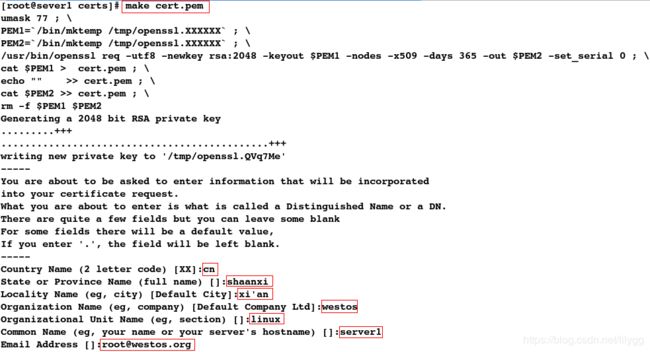
[root@sever1 certs]# make cert.pem
[root@sever1 certs]# ls
ca-bundle.crt        cert.pem         Makefile
ca-bundle.trust.crt  make-dummy-cert  renew-dummy-cert
[root@sever1 certs]# cp cert.pem /usr/local/nginx/conf/
(6).重新加载
#1.检测语法
[root@sever1 conf]# nginx -t
nginx: the configuration file /usr/local/nginx/conf/nginx.conf syntax is ok
nginx: configuration file /usr/local/nginx/conf/nginx.conf test is successful
#2.重新加载
[root@sever1 conf]# nginx -s reload
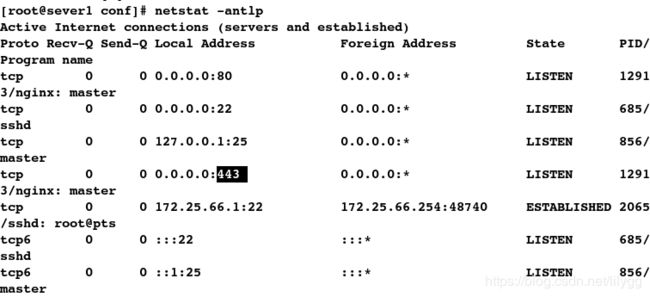
#3.查看端口
[root@sever1 conf]# netstat -anlp
[root@foundation66 ~]# vim /etc/hosts
输入:www.westos.org/

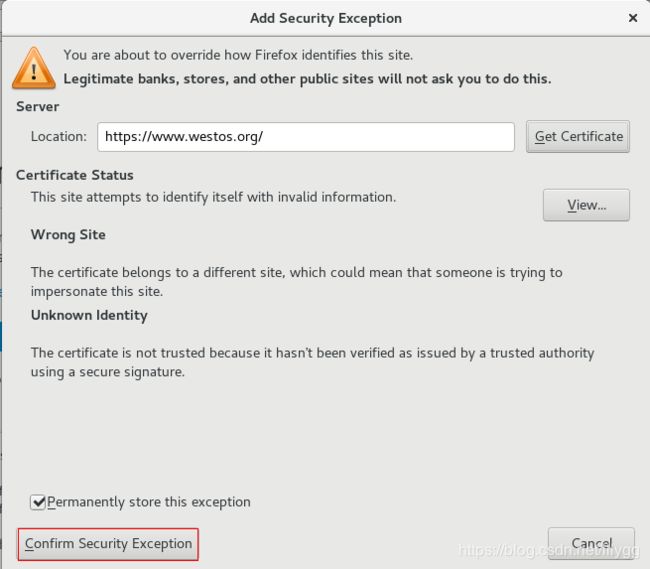
输入:https://www.westos.org

添加证书:


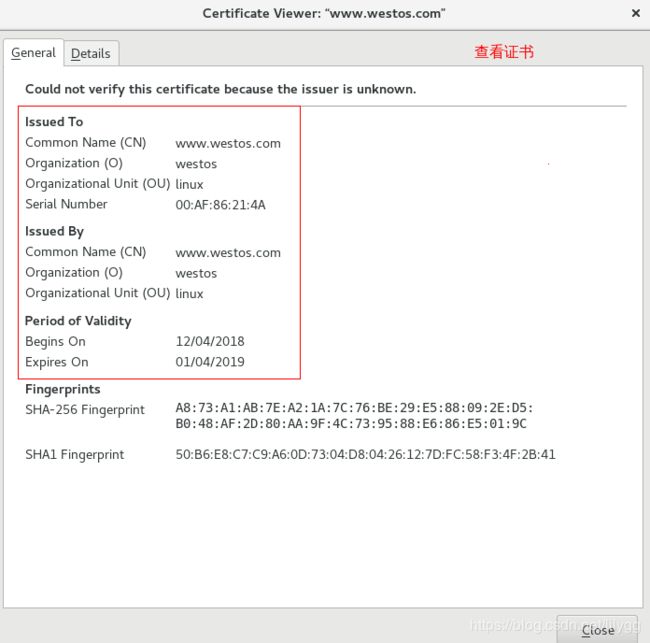
查看证书:

那如何自动实现https加密呢?
也就是要实现:在网页上输入: www.westos.org(实质:http://www.westos.org) 自动跳转到 https://www.westos.org 即:http ---> https
访问淘宝,发现淘宝做了重定向(注意:需要连接无线)
[kiosk@foundation66 Desktop]$ curl -I taobao.com
[kiosk@foundation66 Desktop]$ curl -I www.taobao.com

利用rewrite模块实现:将http重定向到https即可
#200表示访问正常
[root@foundation66 ~]# curl -I www.westos.org
临时重定向:
1.更改配置文件
[root@sever1 conf]# vim nginx.conf
###################
rewrite ^/(.*)$ https://www.westos.org/$1 ;   #将将所有的域名均重定向到https://www.westos.org/$1下,$1表示
[root@sever1 conf]# nginx -s reload
测试:
#302表示临时重定向
[root@foundation66 ~]# curl -I www.westos.org
1.更改配置文件
[root@sever1 conf]# vim nginx.conf
##################
rewrite ^/(.*)$ https://www.westos.org/$1 permanent;   #永久重定向
[root@sever1 conf]# nginx -s reload
测试:
#301表示永久重定向
[root@foundation66 ~]# curl -I www.westos.org
输入:www.westos.org,发现自动跳转到 https://www.westos.org


对$1的理解:
[root@sever1 conf]# cd /web/
[root@sever1 web]# ls
index.html
[root@foundation66 ~]# curl -I www.westos.org/index.html
[root@sever1 web]# pwd
/web
[root@sever1 web]# vim test.html
[root@sever1 web]# cat test.html
test
[root@foundation66 ~]# curl -I www.westos.org/test.html
12.重定向
rewrite模块:用来做重定向
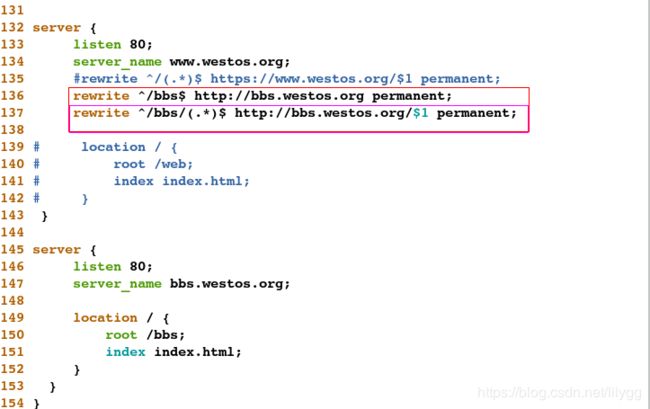
(1). 将 www.westos.org/bbs 重定向到 bbs.westos.org
1.添加虚拟主机
[root@sever1 ~]# cd /usr/local/nginx/conf/
[root@sever1 conf]# vim nginx.conf
###################
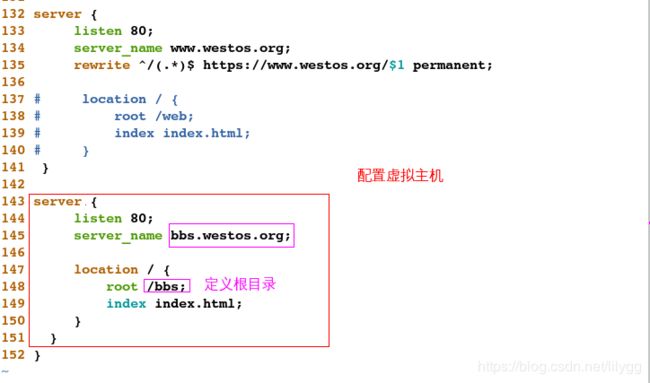
server {
     listen 80;    #设定监听端口
     server_name bbs.westos.org;     #设定域名

     location / {
         root /bbs;        #定义根目录
         index index.html;
     }
  }
[root@sever1 conf]# nginx -s reload
3.建立根目录并编写文件
[root@sever1 conf]# mkdir /bbs
[root@sever1 conf]# cd /bbs/
[root@sever1 bbs]# vim index.html
[root@sever1 bbs]# cat index.html
bbs.westos.org
4.添加解析
[root@foundation66 ~]# vim /etc/hosts
输入:bbs.westos.org 可查看到站点域名所发布的内容

5.重定向
[root@sever1 conf]# vim nginx.conf
###################
rewrite ^/bbs$ http://bbs.westos.org permanent;  #重定向;将以/bbs结尾的域名永久重定向到http://bbs.westos.org
[root@sever1 conf]# nginx -s reload
测试:
[root@foundation66 ~]# curl -I www.westos.org/bbs
[root@foundation66 ~]# curl -I www.westos.org/bbs/index.html
[root@sever1 conf]# vim nginx.conf
###################
rewrite ^/bbs$ http://bbs.westos.org permanent;
rewrite ^/bbs/(.*)$ http://bbs.westos.org/$1 permanent;  #重定向:将.../bbs/$1永久重定向到http://bbs.westos.org/$1
[root@sever1 conf]# nginx -s reload
测试:
[root@foundation66 ~]# curl -I www.westos.org/bbs/index.html
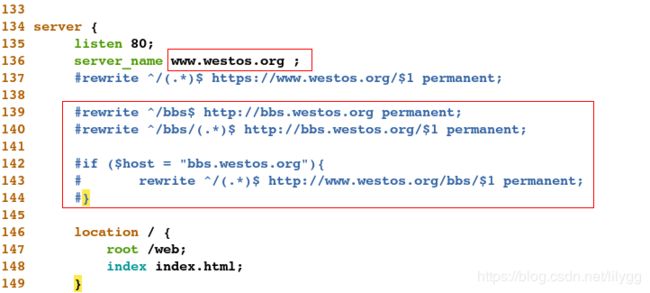
(2).将 bbs.westos.org 重定向到 www.westos.org/bbs
相当于反向重定向,这样可以提高站点访问量
1.重定向
[root@sever1 conf]# vim nginx.conf
###################
if ($host = "bbs.westos.org"){
            rewrite ^/(.*)$ http://www.westos.org/bbs/$1 permanent;
     }
[root@sever1 conf]# nginx -s reload
3.拷贝/bbs目录
[root@sever1 conf]# cd /web/
[root@sever1 web]# ls
index.html  test.html
[root@sever1 web]# cp -r /bbs/ .
[root@sever1 web]# ls
bbs  index.html  test.html
[root@sever1 web]# cd bbs/
[root@sever1 bbs]# pwd
/web/bbs
[root@sever1 bbs]# ls
index.html
测试:
[root@foundation66 ~]# curl -I bbs.westos.org
[root@foundation66 ~]# curl -I bbs.westos.org/index.html
(3).关闭默认server
当访问不存在域名站点时,只要做了本地解析,测试发现会自动跳转到默认发布页面,这样存在安全隐患。
[root@foundation66 ~]# vim /etc/hosts
[root@foundation66 ~]# curl -I test.westos.org

在网页上输入:test.westos.org 发现访问的是nginx的默认发布首页

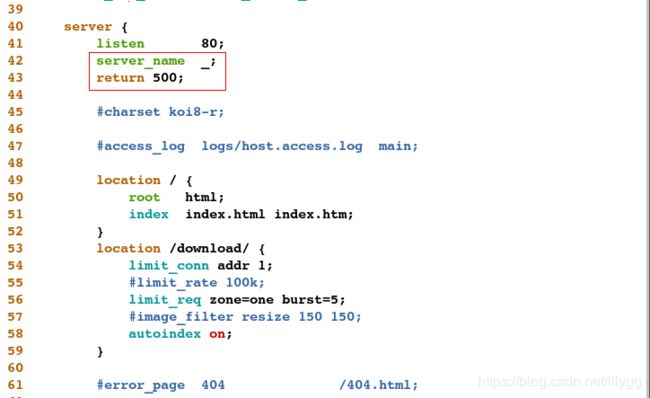
为了避免恶意解析,所以需要关闭默认server
1.当访问不存在的站点域名时,直接返回500错误
[root@sever1 conf]# vim nginx.conf
###################
server_name  _;        #访问不存在的站点域名时,直接返回500错误
return 500;
[root@sever1 conf]# nginx -s reload
测试:
#直接返回500报错
[root@foundation66 ~]# curl -I test.westos.org

在网页上输入:test.westos.org 返回500报错
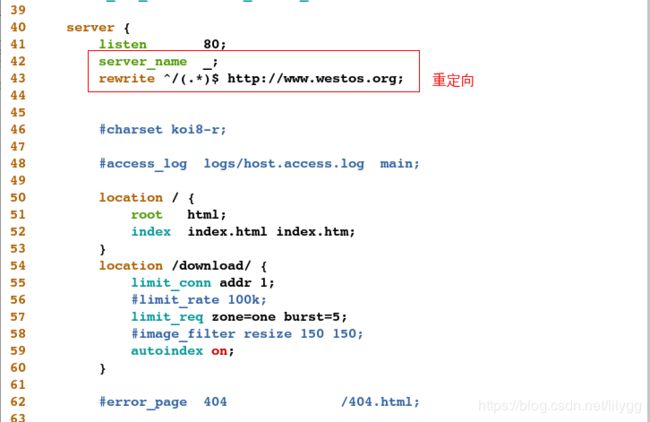
 改进:一般在生产环境中不会直接返回500报错,而是将其重定向到其他域名需要宣传的站点,这样不仅避免了恶意解析,又提高了访问量(比如:某个公司宣传界面等)
2. 当访问不存在的站点域名时,重定向到其他站点
[root@sever1 conf]# vim nginx.conf

###################
server_name  _;
        rewrite ^/(.*)$ http://www.westos.org;   #重定向
[root@sever1 conf]# nginx -s reload
[root@foundation66 ~]# curl -I test.westos.org
#302:临时重定向
[root@foundation66 ~]# curl -I test.westos.org
在网页上输入:test.westos.org 会自动跳转到 www.westos.org


13.制作防盗链
1.何为盗链?
server1:172.25.66.1    nginx服务器
server2:172.25.66.2    apache服务器
模拟server2结点盗链server1结点的图片:
1.配置apache服务器端
#1.安装apache
[root@sever2 ~]# yum install -y httpd
#2.编写默认发布文件:写入网页链接
[root@sever2 ~]# cd /var/www/html/
[root@sever2 html]# ls
[root@sever2 html]# vim index.html
###################


   #访问地址
#访问地址
#3.开启apache
[root@sever2 html]# systemctl start httpd
2.配置nginx服务器端
#拷贝图片到/web/images目录下
[root@sever1 ~]# cd /usr/local/nginx/html/download
[root@sever1 download]# ls
westos.jpg
[root@sever1 download]# cd /web/
[root@sever1 web]# ls
bbs  index.html  test.html
[root@sever1 web]# mkdir images
[root@sever1 web]# cd images/
[root@sever1 web]# mv /usr/local/nginx/html/download/westos.jpg .
[root@sever1 images]# pwd
/web/images
[root@sever1 images]# ls
westos.jpg
测试:
输入:172.25.66.2(server1的ip) 即可访问到server2结点上的图片信息;这就是图片盗链

2.那么如何防盗链呢?
[root@sever1 conf]# vim nginx.conf
###################
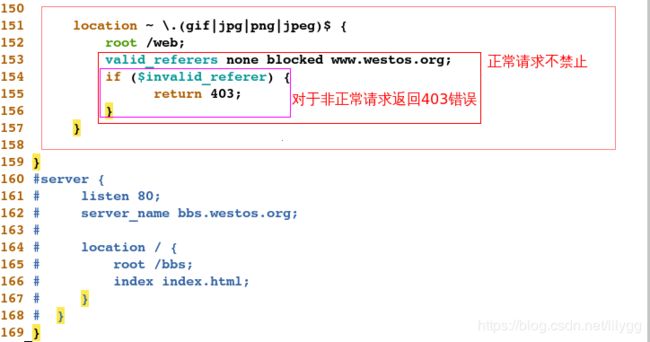
     location ~ \.(gif|jpg|png|jpeg)$ {
         root /web;
         valid_referers none blocked www.westos.org;     #正常请求不禁止
         if ($invalid_referer) {            #对于非正常请求返回403错误
              return 403
         }
     }
在网页上输入:172.25.66.1 发现无法查看到westos.jpg图片,说明防盗链成功

改进:
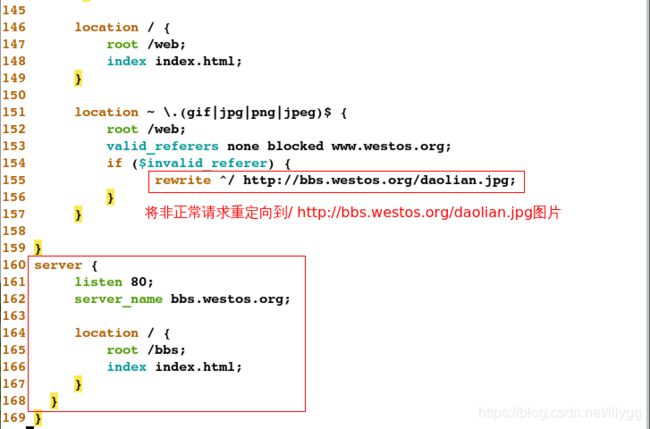
直接返回403错误,显得很不专业,所以我们来做个重定向,将其重定向到其他站点。在实际生产环境中,一般是将其重定向到外部其他的站点
1.更改配置文件
[root@sever1 conf]# vim nginx.conf
###################
     location ~ \.(gif|jpg|png|jpeg)$ {
         root /web;
         valid_referers none blocked www.westos.org;   #正常请求不禁止
         if ($invalid_referer) {
               rewrite ^/ http://bbs.westos.org/daolian.jpg;   #将非正常请求重定向到/ http://bbs.westos.org/daolian.jpg图片
         }
     }

}
server {
     listen 80;
     server_name bbs.westos.org;

     location / {
         root /bbs;
         index index.html;
     }
  }
[root@sever1 conf]# nginx -s reload
3.下载图片并拷贝
[kiosk@foundation66 Desktop]$ scp daolian.jpg [email protected]:/bbs
[root@sever1 conf]# cd /bbs/
[root@sever1 bbs]# ls
daolian.jpg  index.html
测试:
输入:172.25.66.1 时,原本server2服务器想盗链server1服务器的westos.jpg图片,现在由于server1服务器做了防盗链,将其重定向到另一个站点。 因此访问到的便是daolian.jpg图片,达到了很好的防盗链效果


