Tensorflow object detection API训练自己的数据
一. 安装
Tensorflow object detection api是tensorflow官方出品的检测工具包,集成了像ssd、faster rcnn等检测算法,mobilenet、inception、resnet等backbone和fpn、ppn等方法,各模块之间能够通过组合的方式来work。
Github下载地址:https://github.com/tensorflow/models
解压models-master,主要的内容都在/research/目录下,里面有很多代码包括ocr、nlp、speech等,本节我们只需要关注object_detection,也就是目标检测部分。
代码安装步骤如下:
1)确保电脑上已安装了tensorflow环境+keras,建议tf版本>=1.6,注意tf版本要与CUDA、cudnn环境匹配,否则可能会有意想不到的错误。ps:tensorflow版本升级过快,前向兼容性不好(接口不一致),确实得吐槽。
2)编译protoc (建议版本3.4+)
cd research
protoc --python_out=. object_detection/protos/*.proto
3)安装research & slim
python setup.py install
cd slim
python setup.py install
4)添加系统路径(research目录)
export PYTHONPATH=$PYTHONPATH:`pwd`:`pwd`/slim
也可以添加到系统变量:
vim ~/.bashrc
export PYTHONPATH=$PYTHONPATH:/path/to/research:/path/to/research/slim
source ~/.bashrc
5)测试是否安装成功(research目录)
python object_detection/builders/model_builder_test.py
安装成功会显示ok。
二. 数据准备
数据标注工具建议使用labelImg,采用xml进行数据保存,相关教程比较多,这里不再赘述。
这里需要说明的是:tensorflow需要tfrecord格式数据,需要在完成的标注数据基础上进行数据转换,这里将标注数据分为两个文件夹,train和test,文件夹下包含图片文件和xml。
需要通过脚本进行数据转换:首先将annotation转换成csv,然后将csv转换成tfrecord。
python xml_to_csv.py /path/to/train ./data/train_labels.csv
python xml_to_csv.py /path/to/test ./data/test_labels.csv
python generate_tfrecord.py --csv_input=data/train_labels.csv --output_path=train.record
python generate_tfrecord.py --csv_input=data/test_labels.csv --output_path=test.record
# xml_to_csv.py
# -*- coding: utf-8 -*-

import os, sys
import glob
import pandas as pd
import xml.etree.ElementTree as ET

def xml_to_csv(_path, _out_file):
    xml_list = []
    for xml_file in glob.glob(_path + '/*.xml'):
        tree = ET.parse(xml_file)
        root = tree.getroot()
        for member in root.findall('object'):
            value = (root.find('filename').text,
                     int(root.find('size')[0].text),
                     int(root.find('size')[1].text),
                     member[0].text,
                     int(member[4][0].text),
                     int(member[4][1].text),
                     int(member[4][2].text),
                     int(member[4][3].text)
                     )
            xml_list.append(value)
    column_name = ['filename', 'width', 'height', 'class', 'xmin', 'ymin', 'xmax', 'ymax']
    xml_df = pd.DataFrame(xml_list, columns=column_name)
    xml_df.to_csv(_out_file, index=None)
    print('Successfully converted xml to csv.')

if __name__ == '__main__':
    # convert
    xml_to_csv(sys.argv[1], sys.argv[2])
# generate_tfrecord.py
# -*- coding: utf-8 -*-
"""
Usage:
# From tensorflow/models/
# Create train data:
python generate_tfrecord.py --csv_input=data/train_labels.csv --output_path=train.record
# Create test data:
python generate_tfrecord.py --csv_input=data/test_labels.csv --output_path=test.record
"""
import os
import io
import pandas as pd
import tensorflow as tf
from PIL import Image
from object_detection.utils import dataset_util
flags = tf.app.flags
flags.DEFINE_string('csv_input', '', 'Path to the CSV input')
flags.DEFINE_string('output_path', '', 'Path to output TFRecord')
FLAGS = flags.FLAGS
# 需要修改类别标签
def class_text_to_int(row_label):
if row_label == 'person':
return 1
else:
None
def create_tf_example(row):
#full_path = os.path.join(os.getcwd(), 'images', '{}'.format(row['filename']))
full_path = os.path.join(os.path.dirname(FLAGS.csv_input), 'images', '{}'.format(row['filename']))
with tf.gfile.GFile(full_path, 'rb') as fid:
encoded_jpg = fid.read()
encoded_jpg_io = io.BytesIO(encoded_jpg)
image = Image.open(encoded_jpg_io)
width, height = image.size
filename = row['filename'].encode('utf8')
image_format = b'jpg'
xmins = [row['xmin'] / width]
xmaxs = [row['xmax'] / width]
ymins = [row['ymin'] / height]
ymaxs = [row['ymax'] / height]
classes_text = [row['class'].encode('utf8')]
classes = [class_text_to_int(row['class'])]
tf_example = tf.train.Example(features=tf.train.Features(feature={
'image/height': dataset_util.int64_feature(height),
'image/width': dataset_util.int64_feature(width),
'image/filename': dataset_util.bytes_feature(filename),
'image/source_id': dataset_util.bytes_feature(filename),
'image/encoded': dataset_util.bytes_feature(encoded_jpg),
'image/format': dataset_util.bytes_feature(image_format),
'image/object/bbox/xmin': dataset_util.float_list_feature(xmins),
'image/object/bbox/xmax': dataset_util.float_list_feature(xmaxs),
'image/object/bbox/ymin': dataset_util.float_list_feature(ymins),
'image/object/bbox/ymax': dataset_util.float_list_feature(ymaxs),
'image/object/class/text': dataset_util.bytes_list_feature(classes_text),
'image/object/class/label': dataset_util.int64_list_feature(classes),
}))
return tf_example
def main(_):
writer = tf.python_io.TFRecordWriter(FLAGS.output_path)
examples = pd.read_csv(FLAGS.csv_input)
for index, row in examples.iterrows():
tf_example = create_tf_example(row)
writer.write(tf_example.SerializeToString())
writer.close()
if __name__ == '__main__':
tf.app.run()将转换后的数据(train.record 和 test.record)放到 object_detection/data 目录下,针对训练数据,建立label标签文件,这里可以取名person_label_map.pbtxt,格式可以参考 kitti_label_map.pbtxt。
item {
  id: 1
  name: 'person'
}
三. 配置训练模型
训练数据准备完成后,需要选择模型进行训练,下载官方预训练模型【Github】
对于检测模型,可以考虑选择几种最常用的模型:
ssd_mobilenet_v1_coco
ssd_mobilenet_v2_coco
faster_rcnn_resnet50_coco
faster_rcnn_resnet101_coco
以ssd_mobilenet_v1_coco为例,按照如下步骤进行配置:
1)在 object_detection 下建立文件夹 pretrained_model,存放预训练模型
将下载的文件解压到该目录下(ssd_mobilenet_v1_coco_2018_01_28)
2)在 object_detection 下建立文件夹 training,存放训练数据
3)修改config文件
将 /samples/configs/ssd_mobilenet_v1_coco.config 拷贝到training目录,几个可能需要修改的地方:
- num_classes: 90 # 类别数量
- batch_size: 24 # 根据机器性能调整
- #fine_tune_checkpoint: "PATH_TO_BE_CONFIGURED/model.ckpt" # 预训练模型位置,可以修改为:
fine_tune_checkpoint: "training_model/ssd_mobilenet_v1_coco_2018_01_28/model.ckpt"
- num_steps: 200000 # 需要训练的step
- train_input_reader & eval_input_reader
input_path: "data/train.record" # 以及 test.record
label_map_path: "data/person_label_map.pbtxt" # train eval共用label_map
- num_examples: 8000 # eval样本数量,根据实际修改
四. 数据训练
Tensorflow object detection API 提供了训练脚本,在 object_detection 目录下执行:
# 调用model_main.py执行
python model_main.py --model_dir=training --pipeline_config_path=training/ssd_mobilenet_v1_coco.config --num_train_steps=60000 --num_eval_steps=20 --alsologtostderr
# 也可以使用旧版本训练
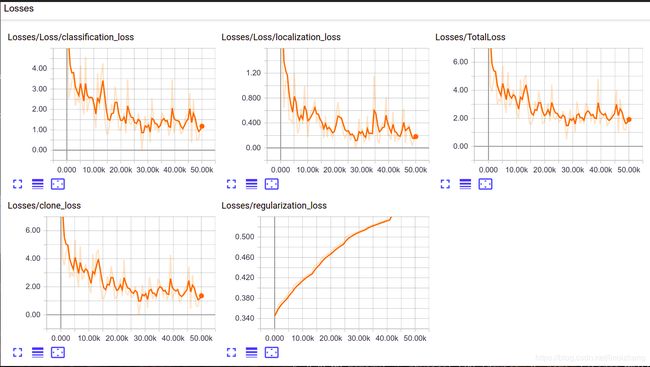
python legacy/train.py --train_dir=training/ --pipeline_config_path=training/ssd_mobilenet_v1_coco.config --logtostderr训练完成后,可以通过 tensorboard 查看训练过程曲线,在 object_detection 目录执行:
- tensorboard --logdir='training'
- 本地机器浏览 localhost:6006
训练效果 - 查看Loss:
五. 结果测试
训练完成后,首先将训练模型导出,这里可以采用自带的 export_inference_graph.py,根据上面的训练曲线,选择loss小的check point,通常可以选择最新的,在 object_detection 目录执行:
python export_inference_graph.py --input_type image_tensor --pipeline_config_path training/ssd_mobilenet_v1_coco.config --trained_checkpoint_prefix training/model.ckpt-xxxxx --output_directory person_inference_graph模型导出后,可以通过3种方式进行效果测试:
- 使用tensorflow直接加载模型
- 通过jupyter进行代码测试
- 基于opencv的inference
下面分别提供相关测试代码。
5.1 通过 tensorflow 加载
freeze完成后,可以通过原生的tensorflow加载,参考代码:
import numpy as np
import tensorflow as tf
import cv2 as cv

# Read the graph.
with tf.gfile.FastGFile('frozen_inference_graph.pb', 'rb') as f:
    graph_def = tf.GraphDef()
    graph_def.ParseFromString(f.read())

with tf.Session() as sess:
    # Restore session
    sess.graph.as_default()
    tf.import_graph_def(graph_def, name='')

    # Read and preprocess an image.
    img = cv.imread('example.jpg')
    inp = cv.resize(img, (300, 300))
    inp = inp[:, :, [2, 1, 0]]  # BGR2RGB

    # Run the model
    out = sess.run([sess.graph.get_tensor_by_name('num_detections:0'),
                    sess.graph.get_tensor_by_name('detection_scores:0'),
                    sess.graph.get_tensor_by_name('detection_boxes:0'),
                    sess.graph.get_tensor_by_name('detection_classes:0')],
                   feed_dict={'image_tensor:0': inp.reshape(1, inp.shape[0], inp.shape[1], 3)})

    # Visualize detected bounding boxes.
    num_detections = int(out[0][0])
    for i in range(num_detections):
        classId = int(out[3][0][i])
        score = float(out[1][0][i])
        bbox = [float(v) for v in out[2][0][i]]
        if score > 0.3:
            x = bbox[1] * img.shape[1]
            y = bbox[0] * img.shape[0]
            right = bbox[3] * img.shape[1]
            bottom = bbox[2] * img.shape[0]
            cv.rectangle(img, (int(x), int(y)), (int(right), int(bottom)), (255, 255, 0), thickness=1)

cv.imshow('TensorFlow MobileNet-SSD', img)
cv.waitKey()
5.2 jupyter
如果没有安装jupyter可以使用,pip install ipython jupyter 进行安装。
在 object_detection 目录下,执行jupyter notebook 打开该目录,双击 object_detection_tutorial.ipynb 即可,需要做一些修改,选择你自己的模型和Label:
"MODEL_NAME = 'ssd_mobilenet_v1_coco_2017_11_17'\n",
"PATH_TO_LABELS = os.path.join('data', 'mscoco_label_map.pbtxt')"
注:如果已经下载过模型的话,里面Download Model的部分可以删掉。
调用 jupyter nbconvert --to script object_detection_tutorial.ipynb 转换成python脚本。
5.3 基于opencv的inference
建议使用opencv版本4.0.0,因为从这个版本开始,opencv开始支持tensorflow的 Faster RCNN 和 Mask RCNN 模型。
步骤:
1)下载opencv源码,需要用到 samples/dnn 下的4个python脚本:
tf_text_graph_common.py tf_text_graph_ssd.py tf_text_graph_faster_rcnn.py tf_text_graph_mask_rcnn.py
2)转换pb,生成 pbtxt
python tf_text_graph_ssd.py --input /path/to/model.pb --config /path/to/example.config --output /path/to/graph.pbtxt
3)cv2 加载模型
参考代码:
import cv2 as cv

cvNet = cv.dnn.readNetFromTensorflow('frozen_inference_graph.pb', 'graph.pbtxt')

img = cv.imread('example.jpg')
cvNet.setInput(cv.dnn.blobFromImage(img, size=(300, 300), swapRB=True, crop=False))
cvOut = cvNet.forward()

for detection in cvOut[0,0,:,:]:
    score = float(detection[2])
    if score > 0.3:
        left = detection[3] * img.shape[1]
        top = detection[4] * img.shape[0]
        right = detection[5] * img.shape[1]
        bottom = detection[6] * img.shape[0]
        cv.rectangle(img, (int(left), int(top)), (int(right), int(bottom)), (255, 255, 0), thickness=1)

cv.imshow('img', img)
cv.waitKey()