linux系统中的iscsi网络磁盘共享及其卸载
- 什么是ISCSI
ISCSI主要是透过TCP/IP技术,将存储设备端透过iscsi target(iscsi 目标端)功能,做成可以提供磁盘的服务器端,再透过iscsi initiator(iscsi初始化用户)功能,做成能够挂载使用使用iscsi设置来进行磁盘的应用了。也就是说,iscsi这个架构主要将存储装置与使用的主机分为两部分,分别是:
(1)iscsi target:就是存储设备端,存放磁盘或RAID的设备。
(2)iscsi initiator:就是能够使用target的用户端,通常是服务器。也就是说,想要连接到iscsi target 的服务器,也必须要安装iscsi initistor 的相关功能后才能使用iscsi target 提供的磁盘。
一.iscsi网络磁盘的共享
服务端
fdisk -l 查看有几块磁盘,若只有一块磁盘,可以自行添加一块磁盘
创建新的磁盘
[root@localhost ~]# fdisk /dev/sdb

 Last sector, +sectors or +size{K,M,G} (2048-41943039, default 41943039): +1000M                建立一个1G的磁盘
Partition 1 of type Linux and of size 1000 MiB is set

Command (m for help): t
Selected partition 1
Hex code (type L to list all codes): 8e
Changed type of partition 'Linux' to 'Linux LVM'                    改名为lvm格式的
同步并且创建新的磁盘
[root@localhost ~]# partprobe /dev/sdb1                  同步更新
[root@localhost ~]# pvcreate /dev/sdb1
  Physical volume "/dev/sdb1" successfully created.
[root@localhost ~]# vgcreate  vg0 /dev/sdb1
  Volume group "vg0" successfully created
[root@localhost ~]# lvcreate -L 500M -n lv0 vg0
  Logical volume "lv0" created.
监视磁盘
[root@localhost ~]# watch -n 1 ‘pvs;echo==== ;vgs;echo====;lvs;’
yum install targetcli -y 下载插件
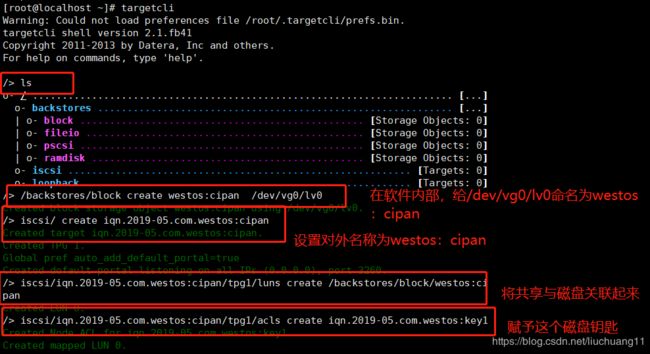
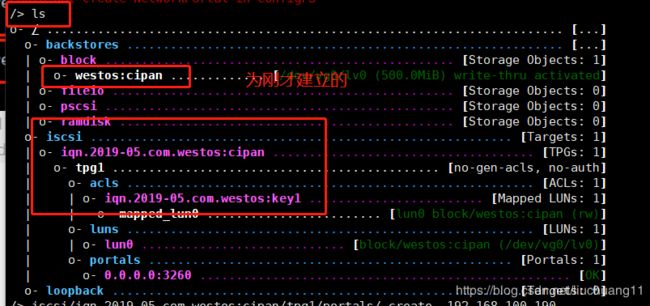
targetcli
targetcli 进入编辑页面
别人要访问你的话,必须是防火墙也是要通过的,所以要将共享磁盘的端口让防火墙允许通过的
[root@localhost ~]# firewall-cmd --add-port=3260/tcp      火墙允许通过3260这个端口
success
[root@localhost ~]# firewall-cmd --list-all
public (active)
  target: default
  icmp-block-inversion: no
  interfaces: ens33
  sources:
  services: dhcpv6-client ssh
  ports: 3260/tcp                  3260端口
  protocols:
  masquerade: no
  forward-ports:
  sourceports:
  icmp-blocks:
  rich rules:
开启服务:
[root@localhost ~]# systemctl start target.service
[root@localhost ~]# systemctl enable target.service
Created symlink from /etc/systemd/system/multi-user.target.wants/target.service to /usr/lib/systemd/system/target.service.
客户端:
1.安装iscsi客户端软件
yum install iscsi-initiator-utils.x86_64 -y 下载插件
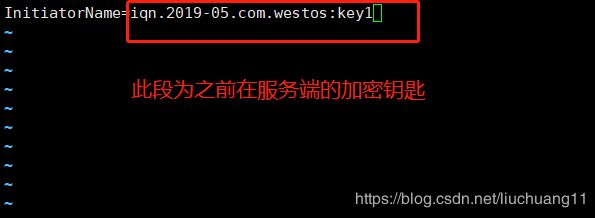
2.编辑配置文件
vim /etc/iscsi/initiatorname.iscsi 编辑读取文件
重启服务 systemctl restart iscsi
3.发现新磁盘
[root@server ~]# iscsiadm  -m discovery -t st -p 192.168.100.190
192.168.100.190:3260,1 iqn.2019-05.com.westos:cipan
-m 表示模式,方式
-t 表示类型(sendtargets发送目标)
-p 表示端口
4.可以使用共享磁盘
[root@server ~]# iscsiadm -m node -T iqn.2019-05.com.westos:cipan -p 192.168.100.190 -l           赋予权限可以让其使用磁盘
Logging in to [iface: default, target: iqn.2019-05.com.westos:cipan, portal: 192.168.100.190,3260] (multiple)
Login to [iface: default, target: iqn.2019-05.com.westos:cipan, portal: 192.168.100.190,3260] successful.
[root@server ~]#
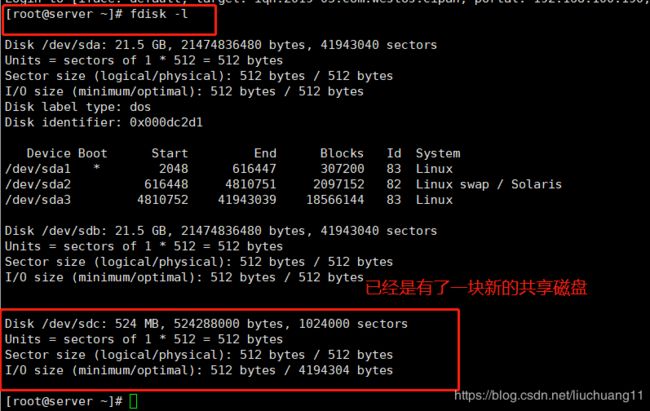
5,查看是否已经共享
[root@server ~]# mkfs.xfs /dev/sdc          格式化
meta-data=/dev/sdc               isize=512    agcount=4, agsize=32000 blks
         =                       sectsz=512   attr=2, projid32bit=1
         =                       crc=1        finobt=0, sparse=0
data     =                       bsize=4096   blocks=128000, imaxpct=25
         =                       sunit=0      swidth=0 blks
naming   =version 2              bsize=4096   ascii-ci=0 ftype=1
log      =internal log           bsize=4096   blocks=855, version=2
         =                       sectsz=512   sunit=0 blks, lazy-count=1
realtime =none                   extsz=4096   blocks=0, rtextents=0
二.iscsi 卸载共享磁盘
卸载共享磁盘主要是在客户端做的服务。
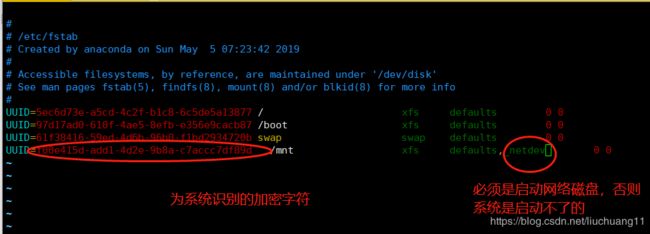
1. blkid 查看系统可识别的设备 ,查看共享磁盘/dev/sdc的UUID 加密字符
2.vim /etc/fstab 编辑永久挂载文件
3. reboot 重启 重启的时候,会一直卡着不动,然后重新强制关机,打开即可。
检查iscsi 查看是否存在并且时可以使用的 iscsiadm -m node -T iqn.2019-05.com.westos:cipan -p 192.168.100.200 -l
fdisk -l 查看有共享的磁盘
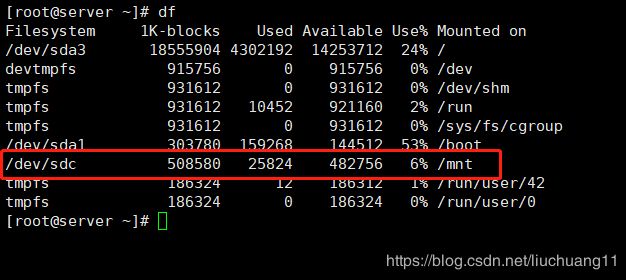
df 查看是已经挂载到/mnt目录下的

4. yum install tree.x86_64 -y 下载tree插件,查看目录的文件内容
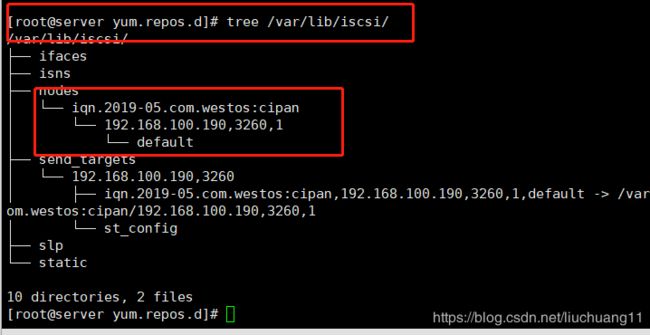
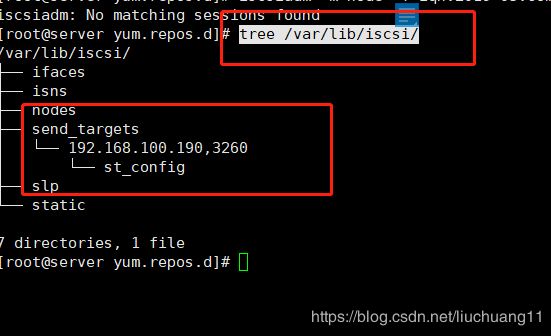
5. tree /var/lib/iscsi/ 查看默认目录的文件内容,是会出现具体信息的
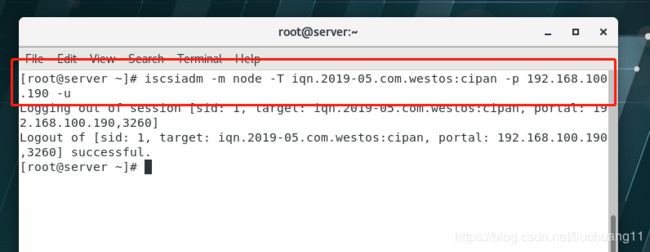
6.退出这块共享磁盘的使用
iscsiadm -m node -T iqn.2019-05.com.westos:cipan -p 192.168.100.190 -u
7,将/dev/vda1从/mnt上卸载,删除/etc/fstab中自动挂载的那一行
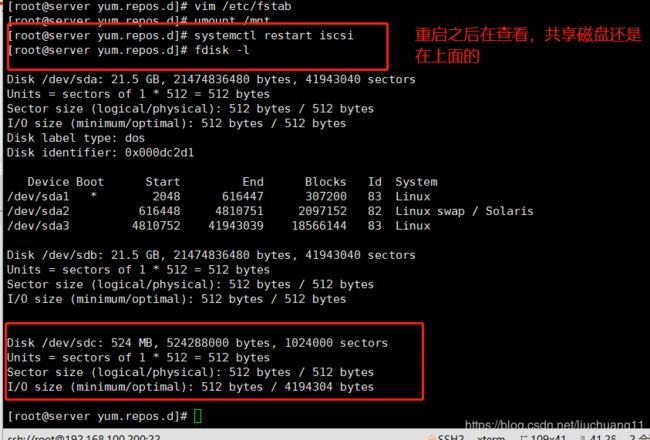
[root@server yum.repos.d]# vim /etc/fstab
8.这时候我们发现树形结构中的iscsi服务的内容还在,如果重新启动服务(systemctl restart iscsi),那么该分区又会回来
查看共享磁盘又出现,是因为这块磁盘的具体信息没有被删除查看共享磁盘又出现,是因为这块磁盘的具体信息没有被删除
tree /var/lib/iscsi/ 查看信息还是存在的
这个时候是需要采取另一种办法的,需要先退出磁盘的使用然后在进行删除
iscsiadm -m node -T iqn.2019-05.com.westos:cipan -p 192.168.100.190 -u 登出共享磁盘
iscsiadm -m node -T iqn.2019-05.com.westos:cipan -p 172.25.254.218 -o delete 删除共享磁盘
服务端:
注意:一定是客户端不工作了,服务端才能清除信息。不然先清除服务端信息,会导致客户端崩溃
clearconfig confirm=True 清除信息,exit退出。

