Spring Cloud终篇 | 总结 一:一个完整的企业级SpringCloud架构(Mybatis--多数据源)
一、简介
前面归纳了一些Spring Cloud组件的核心原理及用法,主要是开发这一块的Eureka、Ribbon、Feign、Hystrix、Zuul、Config等组件和其相关的扩展。当然Spring Cloud还有一些偏运维的zipkin(Sleuth 服务链路追踪)、Hystrix Dashboard/Turbine(断路器监控方面)等等组件,可以用来查看服务之间的调用、异常啊等功能,后面有时间了再回来梳理。
这里主要根据开发组件,讲解企业里的Spring Cloud+Mybatis(mysql多数据源,分页插件的用法、jasypt的加密等)的架构体系
本章案例 源码下载:链接: https://pan.baidu.com/s/1OjdiUiD5ZfUd4F2YTeT7Sg 提取码: n99m
或github下载:https://github.com/liujun19921020/SpringCloudDemo/tree/master/ProjectDemo/%E4%B8%80%E4%B8%AA%E5%AE%8C%E6%95%B4%E7%9A%84%E4%BC%81%E4%B8%9A%E7%BA%A7SpringCloud%E6%9E%B6%E6%9E%84
二、项目结构
本章先主讲正常够用的,通过mybatis持久mysql库的结构,后面再逐步补充定时器任务xxl-job工程,及Redis、MongoDB、Elasticsearch等的结合使用。
话不多说,先上结构图:

三、注册中心
该工程中,注册中心配置了用户安全认证,代码可以看源码,详细解说可以回顾一下《Spring Cloud教程 | 第一篇:Eureka 服务的注册与发现(Eureka Server与Eureka Client)》、《Spring Cloud教程 | 第二篇:Eureka Server的用户安全认证》,后面访问量增大,需要集群也可以回顾《Spring Cloud教程 | 第九篇:Eureka高可用的注册中心——集群配置》。
这里简单说下注意点:
pom.xml记得加安全认证的依赖包
   org.springframework.boot
   spring-boot-starter-security
application.yml文件配置认证密码、注册地址等
# 配置端口
server:
  port: 9000

# 配置注册中心服务配置
eureka:
  server:
    enable-self-preservation:  false # 关闭自我保护模式(缺省为启动,比如api提供者关闭了,但是eureka仍然会保留)
    eviction-interval-timer-in-ms: 10000 # 清理间隔(毫秒,默认 60秒),将有问题的api提供者或app消费者剔除掉
  instance:
    hostname: localhost
    prefer-ip-address: true
  client:
    #声明自己是服务端
    registerWithEureka: false
    fetchRegistry: false
    serviceUrl:
      defaultZone: http://root:123456@${eureka.instance.hostname}:${server.port}/eureka/

# 配置中心命名
spring:
  application:
    name: eureka-server
  # 安全认证的配置
  security:
    basic:
      enabled: true #开启认证
    user:
      name: root #用户名
password: 123456 #密码关闭csrf:
前面第三篇讲的是新建一个配置类WebSecurityConfig 继承 WebSecurityConfigurerAdapter,这里我们直接在Application启动类中写个内置类就好了
@SpringBootApplication
// 注册中心服务注解
@EnableEurekaServer
public class EurekaServerApplication {

    public static void main(String[] args) {
        SpringApplication.run(EurekaServerApplication.class, args);
    }

    /**
     * 开启注册中心安全认证(这里写一个内置类即可,也可单独新建一个类)
     */
    @EnableWebSecurity
    static class WebSecurityConfig extends WebSecurityConfigurerAdapter {
        @Override
        protected void configure(HttpSecurity http) throws Exception {
            http.csrf().disable(); //关闭csrf
            http.authorizeRequests().anyRequest().authenticated().and().httpBasic(); //开启认证
        }
    }
}
四、配置中心
该工程,大致与《Spring Cloud教程 | 第七篇:高可用的分布式配置中心(Spring Cloud Config)之本地VS远程Git仓库》相同,pom.xml依赖包后,Application启动类中的@EnableConfigServer注解,剩下的就是application.yml中配置注册中心和远程git仓库地址的配置了(如果想config有需要事实刷新的,可以安照《Spring Cloud教程 | 第八篇:消息总线(Spring Cloud Bus)下的及时刷新》,结合rabbitMQ或kafka等消息线刷新)
建议使用git仓库地址就好了
server:
  port: 8000

eureka:
  client:
    serviceUrl:
      defaultZone: http://root:123456@localhost:9000/eureka/
  instance:
    prefer-ip-address: true

spring:
  application:
    name: config-server #应用名
  cloud:
    config:
      label: master # 配置仓库的分支
      server:
        git:
          uri: https://github.com/liujun19921020/SpringCloudDemo.git  # 配置git仓库地址
          searchPaths: ConfigDemo # 配置仓库路径
          username: # 访问git仓库的用户名
          password: # 访问git仓库的用户密码
        native:
          search-locations: D:/javaProject/ConfigDemo/  #本地配置文件位置
五、通用方法集合
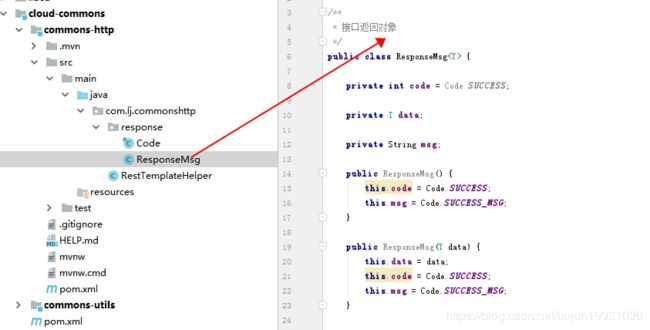
cloud-commons这个模块没啥好讲的,就是集中一些在项目中都会用到的工具、方法,在需要用到的项目工程中打包成jar集成使用。
例1:集成的commons-http目录下,存放一些常用的response,拥有接口返回的常量,或者json对象格式化等

和:
例2:集成的commons-utils目录下,存放一些常用的类辅助工具等。
Jasypt是一个加解密工具,这里主要做config文件中保存的数据库账号、密码加解密的作用,会在项目工程模块讲解的。

六、项目工程集合
因为cloud-modules中会集成很多小的项目工程,我们将项目工程常用的feign、Mybatis Plus、Mysql Driver、alibaba 数据库连接池、Log4j、springboot分页插件、fastJSON、jasypt加密配置......等等组件加载到其pom.xml中,避免里面的每个小项目要再配一遍的重复动作,具体组件可根据实际情况增删。
            org.springframework.cloud
            spring-cloud-starter-config


            org.springframework.boot
            spring-boot-starter-web


                    org.apache.logging.log4j
                    log4j-to-slf4j


                    spring-boot-starter-tomcat
                    org.springframework.boot


            org.springframework.boot
            spring-boot-starter-jetty


            org.springframework.boot
            spring-boot-starter-jdbc


            org.springframework.cloud
            spring-cloud-starter-openfeign


                    HdrHistogram
                    org.hdrhistogram


            com.baomidou
            mybatis-plus-boot-starter
            3.0.6


                    jsqlparser
                    com.github.jsqlparser


                    mybatis-spring
                    org.mybatis


                    mybatis
                    org.mybatis


            org.springframework.boot
            spring-boot-starter-data-redis


            mysql
            mysql-connector-java
            5.1.16


            com.alibaba
            druid-spring-boot-starter
            1.1.10


            org.apache.velocity
            velocity-engine-core
            2.0
            test


            org.slf4j
            slf4j-api
            1.7.25


            org.slf4j
            log4j-over-slf4j


            org.slf4j
            jcl-over-slf4j


            com.github.pagehelper
            pagehelper-spring-boot-starter
            1.2.3


            com.alibaba
            fastjson
            1.2.47


            com.github.ulisesbocchio
            jasypt-spring-boot-starter
            2.1.0
七、项目工程
下面详细介绍sc-item-demo项目工程的开发步骤
(执行源码中的demo-db-teble.sql脚本,会自动创建两个库cs1_db、cs2_db,假装有两个数据库地址的样子 ^-^...
然后我们来演示下多数据源联合查询(分页)、批量更新的功能)
先看看我们项目的结构,上图:
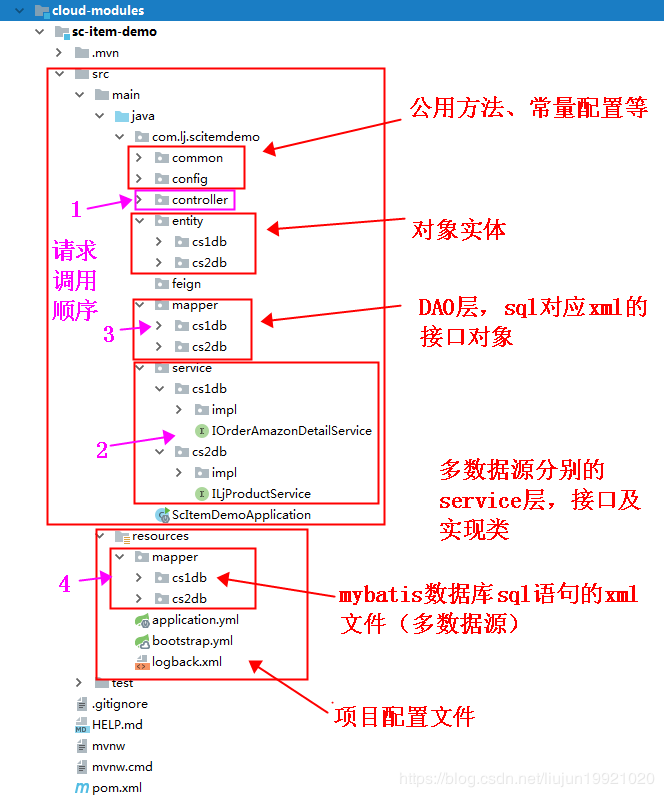
7.1、前期准备
在前面第四步"配置中心"中指明的git访问地址"https://github.com/liujun19921020/SpringCloudDemo.git"的对应"ConfigDemo"路径下创建sc-item-demo.properties 文件,用于后面存放项目的配置。
再次回顾第四步"配置中心"config-server工程的application.yml文件:

7.2、依赖包添加 pom.xml
因为会用到一些公用的方法,我们将前面介绍的cloud-commons目录下的两个公用项目打包过来使用
            com.lj
            commons-utils
            1.0-SNAPSHOT
            compile


            com.lj
            commons-http
            1.0-SNAPSHOT
            compile
7.3、bootstrap.yml配置文件
配置注册中心、config配置中心、logging日志打印、jasypt加密 (补充了一篇文章《Jasypt加密之行》)
bootstrap.yml如下:
eureka:
  client:
    serviceUrl:
      defaultZone: ${eureka_server_defaultzone:http://root:123456@localhost:9000/eureka/}
  instance:
    prefer-ip-address: true
spring:
  application:
    name: sc-item-demo
  cloud:
    config:
      discovery:
        service-id: config-server
        enabled: true
#设置日志打印配置
logging:
  config: classpath:logback.xml
#设置jasypt加密配置
jasypt:
  encryptor:
    password: ${jasypt_encryptor_password:lj&92&jm}
logging日志指明了配置文件为:classpath:logback.xml
logback.xml内容如下:
			%d{yyyy-MM-dd HH:mm:ss.SSS} [%thread] %-5level %logger{50} - %msg%n


		${LOG_PATH}/info.log

			${LOG_PATH}/info-%d{yyyyMMdd}.log.%i


				64MB

			30


			%d{yyyy-MM-dd HH:mm:ss.SSS} [%thread] %-5level %logger{36} -%msg%n


			ERROR

		${LOG_PATH}/error.log

			${LOG_PATH}/error-%d{yyyyMMdd}.log.%i


				64MB

			30


			%d{yyyy-MM-dd HH:mm:ss.SSS} [%thread] %-5level %logger{36}
				-%msg%n
config配置中心7.1步的时候说了 ,文件名称叫sc-item-demo.properties,这里spring.application.name就直接为sc-item-demo了。
git仓库,sc-item-demo.properties文件内容:
debug = true
logging.level.org.springframework.web = DEBUG
logging.level.root = WARN
logging.level.org.springframework.security = DEBUG
logging.level.org.hibernate = DEBUG
logging.level.org.apache.commons.dbcp2 = DEBUG

logging.level.com.lj.scitemdemo = DEBUG

server.port=8866

version=1.0-SNAPSHOT

#cs1_db 服务主机
cloud.cs1db.common.host=192.168.31.54
#cs1_db 端口
cloud.cs1db.common.port=3306
#cs1_db
cloud.cs1db.common.database=cs1_db
cloud.cs1db.common.username=ENC(1NmCzZBAyJC9qgbE40v8ug==)
cloud.cs1db.common.password=ENC(Em39zu4mO5gW7fW4/NgsSg==)


#cs2_db 服务主机
cloud.cs2db.common.host=192.168.31.54
#cs2_db 端口
cloud.cs2db.common.port=3306
#cs2_db
cloud.cs2db.common.database=cs2_db
cloud.cs2db.common.username=ENC(1NmCzZBAyJC9qgbE40v8ug==)
cloud.cs2db.common.password=ENC(Em39zu4mO5gW7fW4/NgsSg==)
再回到项目中,我们在application.yml文件中配置数据源:
feign的服务调用用法就看《Spring Cloud教程 | 第四篇:服务消费者(Feign调用)》。
(可以看到,数据源端口、库名、账号、密码等从git仓库获取)
spring:
  aop:
    proxy-target-class: true
    auto: true
  servlet:
    multipart:
      max-file-size: 3MB
      max-request-size: 3MB
  freemarker:
    cache: false
    template-loader-path: ["classpath:/webapp/"]
    prefer-file-system-access: false
  feign:
    hystrix:
      enabled: true
  datasource:
    druid:
      # cs1_db库
      cs1-db:
        url: jdbc:mysql://${cloud.cs1db.common.host}:${cloud.cs1db.common.port}/${cloud.cs1db.common.database}?useAffectedRows=true&useUnicode=true&characterEncoding=utf8&allowMultiQueries=true&serverTimezone=UTC&useSSL=false&verifyServerCertificate=false&autoReconnct=true&autoReconnectForPools=true&allowPublicKeyRetrieval=true&zeroDateTimeBehavior=convertToNull
        driver-class-name: com.mysql.jdbc.Driver
        username: ${cloud.cs1db.common.username}
        password: ${cloud.cs1db.common.password}
        initialSize: 5
        minIdle: 5
        maxActive: 20
      # cs2_db库
      cs2-db:
        url: jdbc:mysql://${cloud.cs2db.common.host}:${cloud.cs2db.common.port}/${cloud.cs2db.common.database}?useAffectedRows=true&useUnicode=true&characterEncoding=utf8&allowMultiQueries=true&serverTimezone=UTC&useSSL=false&verifyServerCertificate=false&autoReconnct=true&autoReconnectForPools=true&allowPublicKeyRetrieval=true&zeroDateTimeBehavior=convertToNull
        driver-class-name: com.mysql.jdbc.Driver
        username: ${cloud.cs2db.common.username}
        password: ${cloud.cs2db.common.password}
        initialSize: 5
        minIdle: 5
        maxActive: 20
7.4、代码实现
该配置的上述基本已经配置完毕,接下来代码实现功能了。
7.4.1、多数据源实现代码
先来张图给点大致印象 再来贴代码

DBTypeEnum枚举的值为application.yml中配置的数据源名称,自己对照的看就知道了:
/**
 *  数据源枚举类型
 */
public enum DBTypeEnum {
    cs1db("cs1-db"), cs2db("cs2-db");
    private String value;

    DBTypeEnum(String value) {
        this.value = value;
    }

    public String getValue() {
        return value;
    }
}
/**
* 数据源上下文
*/
public class DbContextHolder {
private static final ThreadLocal contextHolder = new ThreadLocal<>();
/**
* 设置数据源
* @param dbTypeEnum
*/
public static void setDbType(DBTypeEnum dbTypeEnum) {
contextHolder.set(dbTypeEnum.getValue());
}
/**
* 取得当前数据源
* @return
*/
public static String getDbType() {
return (String) contextHolder.get();
}
/**
* 清除上下文数据
*/
public static void clearDbType() {
contextHolder.remove();
}
}
在数据源的AOP实现中 我们默认根据包名的通配进行拦截赋予数据源的选择,也可以根据调用方法的注解来选择数据源:
/**
 *  数据源AOP注解实现
 */
@Component
@Aspect
@Order(-100)
public class DataSourceSwitchAspect {

    private Logger log= LoggerFactory.getLogger(DataSourceSwitchAspect.class);

    @Pointcut("execution(* com.lj.scitemdemo.service.cs1db..*.*(..))")
    private void cs1dbAspect() {
    }

    @Pointcut("execution(* com.lj.scitemdemo.service.cs2db..*.*(..))")
    private void cs2dbAspect() {
    }


    @Before( "cs1dbAspect()" )
    public void basic(JoinPoint joinPoint) {
        log.info("切换到cs1db 数据源...");
        setDataSource(joinPoint,DBTypeEnum.cs1db);
    }

    @Before("cs2dbAspect()" )
    public void order (JoinPoint joinPoint) {
        log.info("切换到cs2db 数据源...");
        setDataSource(joinPoint,DBTypeEnum.cs2db);
    }

    /**
     * 添加注解方式,如果有注解优先注解,没有则按传过来的数据源配置
     * @param joinPoint
     * @param dbTypeEnum
     */
    private void setDataSource(JoinPoint joinPoint, DBTypeEnum dbTypeEnum) {
        MethodSignature methodSignature = (MethodSignature) joinPoint.getSignature();
        DataSourceSwitch dataSourceSwitch = methodSignature.getMethod().getAnnotation(DataSourceSwitch.class);
        if (Objects.isNull(dataSourceSwitch) || Objects.isNull(dataSourceSwitch.value())) {
            DbContextHolder.setDbType(dbTypeEnum);
        }else{
            log.info("根据注解来切换数据源,注解值为:"+dataSourceSwitch.value());
            switch (dataSourceSwitch.value().getValue()) {
                case "cs1-db":
                    DbContextHolder.setDbType(DBTypeEnum.cs1db);
                    break;
                case "cs2-db":
                    DbContextHolder.setDbType(DBTypeEnum.cs2db);
                    break;
                default:
                    DbContextHolder.setDbType(dbTypeEnum);
            }
        }
    }
}
自定义数据源的注解:
/**
 *  数据源切换
 */
@Retention(RetentionPolicy.RUNTIME)
@Target({ElementType.METHOD})
public @interface DataSourceSwitch {
    //顺便设置下默认数据源
    DBTypeEnum value() default DBTypeEnum.cs1db;
}
SQL工厂配置:
/**
 *  多数据源的选择
 */
public class DynamicDataSource extends AbstractRoutingDataSource {
    /**
     * 取得当前使用哪个数据源
     * @return
     */
    @Override
    protected Object determineCurrentLookupKey() {
        return DbContextHolder.getDbType();
    }
}
/**
 *  持久化配置
 */
@Configuration
@MapperScan({"com.lj.scitemdemo.mapper.*"})
public class MybatisPlusConfig {

    /**
     * mapper-plus分页插件

     * 文档:http://mp.baomidou.com

     */
    @Bean
    public PaginationInterceptor paginationInterceptor() {
        PaginationInterceptor paginationInterceptor = new PaginationInterceptor();
        //paginationInterceptor.setLocalPage(true);// 开启 PageHelper 的支持
        return paginationInterceptor;
    }

    /**
     * mapper-plus SQL执行效率插件【生产环境可以关闭】
     */
    @Bean
    public PerformanceInterceptor performanceInterceptor() {
        return new PerformanceInterceptor();
    }

    @Bean(name = "cs1db")
    @ConfigurationProperties(prefix = "spring.datasource.druid.cs1-db" )
    public DataSource cs1db () {
        return DruidDataSourceBuilder.create().build();
    }

    @Bean(name = "cs2db")
    @ConfigurationProperties(prefix = "spring.datasource.druid.cs2-db" )
    public DataSource cs2db () {
        return DruidDataSourceBuilder.create().build();
    }

    /**
     * 动态数据源配置
     * @return
     */
    @Bean
    @Primary
    public DataSource multipleDataSource (@Qualifier("cs1db") DataSource cs1db,
                                          @Qualifier("cs2db") DataSource cs2db) {
        DynamicDataSource dynamicDataSource = new DynamicDataSource();
        Map< Object, Object > targetDataSources = new HashMap<>();
        targetDataSources.put(DBTypeEnum.cs1db.getValue(), cs1db );
        targetDataSources.put(DBTypeEnum.cs2db.getValue(), cs2db);

        dynamicDataSource.setTargetDataSources(targetDataSources);
        dynamicDataSource.setDefaultTargetDataSource(cs1db);//指定默认
        return dynamicDataSource;
    }

    @Bean("sqlSessionFactory")
    public SqlSessionFactory sqlSessionFactory() throws Exception {
        MybatisSqlSessionFactoryBean sqlSessionFactory = new MybatisSqlSessionFactoryBean();
        sqlSessionFactory.setDataSource(multipleDataSource(cs1db(),cs2db()));

        sqlSessionFactory.setMapperLocations(new PathMatchingResourcePatternResolver().getResources("classpath:/mapper/*/*Mapper.xml"));

        MybatisConfiguration configuration = new MybatisConfiguration();
        configuration.setJdbcTypeForNull(JdbcType.NULL);
        configuration.setMapUnderscoreToCamelCase(true);
        configuration.setCacheEnabled(false);
        sqlSessionFactory.setConfiguration(configuration);
        sqlSessionFactory.setPlugins(new Interceptor[]{
                paginationInterceptor()
        });
        return sqlSessionFactory.getObject();
    }


}
7.4.2、MVC结构的java业务代码
数据源配置的java代码完成,下面就是常见的MVC结构的java业务代码了:
上码:
@RestController
@RequestMapping("/orderProduct")
public class OrderProductController {
    private Logger logger = LoggerFactory.getLogger(this.getClass());

    @Autowired
    private IOrderAmazonDetailService orderAmazonDetailService;

    @Autowired
    private ILjProductService ljProductService;

    /**
     * 根据条件查询订单详细信息列表(分页)
     * @param data
     * @return
     */
    @PostMapping("/getOrderProductInfo")
    public ResponseMsg getOrderProductInfo(@RequestBody JSONObject data){
        try {
            Integer currentPage = data.getInteger("currentPage");
            Integer pageSize = data.getInteger("pageSize");
            String orderId = data.getString("orderId");
            String orderStatus = data.getString("orderStatus");
            String sku = data.getString("sku");

            //分页规则配置
            Page pagePrams = new Page(currentPage == null ? 1:currentPage, pageSize == null ? 20 : pageSize);
            //查询cs1db库订单数据
            List orderProductList = orderAmazonDetailService.getOrderListInfo(pagePrams, orderId, orderStatus, sku);

            if(orderProductList != null && orderProductList.size() > 0){
                for (OrderProductVo orderProduct : orderProductList) {
                    //查询cs2db商品信息
                    orderProduct.setProductName(ljProductService.getProductName(orderProduct.getSku()));
                }
            }

            pagePrams.setRecords(orderProductList);
            return new ResponseMsg(Code.SUCCESS, pagePrams,"查询订单信息成功");
        } catch (Exception e) {
            logger.error("查询订单信息失败!", e);
            e.printStackTrace();
            return new ResponseMsg<>(Code.FAIL, null, "查询订单信息失败==》" + e.getMessage());
        }

    }

    /**
     * 根据 订单号(批量)/商品sku 修改订单状态
     * @param data
     * @return
     */
    @PostMapping("/updateOrderStatus")
    public ResponseMsg updateOrderStatus(@RequestBody JSONObject data) {
        try {
            //参数校验
            String orderStatus = data.getString("orderStatus");
            if (StringUtils.isEmpty(orderStatus)) {
                return new ResponseMsg<>(Code.UNKNOW, 0, "修改状态orderStatus不可为空!");
            }

            List orderIdList = null;
            if (data.getJSONArray("orderIdList") != null && data.getJSONArray("orderIdList").size() != 0){
                orderIdList = data.getJSONArray("orderIdList").toJavaList(String.class);
            }
            String sku = data.getString("sku");
            if (orderIdList == null && sku == null){
                return new ResponseMsg(Code.UNKNOW,0,"参数orderIdList/sku不可都为空!");
            }

            //执行修改状态
            orderAmazonDetailService.updateOrderStatus(orderStatus, orderIdList, sku);

            return new ResponseMsg(Code.SUCCESS,null,"订单状态修改成功!");
        } catch (Exception e) {
            logger.error("订单状态修改失败!", e);
            e.printStackTrace();
            return new ResponseMsg<>(Code.FAIL, 0, "订单状态修改失败==》" + e.getMessage());
        }
    }
}
service接口与实现,分别:

cs1db:
/**
 * 订单表 Service 接口
 */
public interface IOrderAmazonDetailService {

    /**
     * 根据条件查询订单详细信息列表(分页)
     * @param pagePrams 分页插件配置
     * @param orderId 查询条件
     * @param orderStatus 查询条件
     * @param sku 查询条件
     * @return
     */
    List getOrderListInfo(Page pagePrams, String orderId, String orderStatus, String sku);

    /**
     * 根据 订单号/商品sku 批量修改订单状态
     * @param orderStatus 状态
     * @param orderIdList 批量订单号
     * @param sku 商品SKU
     * @return
     */
    Integer updateOrderStatus(String orderStatus, List orderIdList, String sku);
}
@Service
public class OrderAmazonDetailServiceImpl implements IOrderAmazonDetailService {

    @Autowired
    private OrderAmazonDetailMapper orderAmazonDetailMapper;

    /**
     * 根据条件查询订单详细信息列表(分页)
     * @param pagePrams 分页插件配置
     * @param orderId 查询条件
     * @param orderStatus 查询条件
     * @param sku 查询条件
     * @return
     */
    @Override
    @DataSourceSwitch(DBTypeEnum.cs1db)
    public List getOrderListInfo(Page pagePrams, String orderId, String orderStatus, String sku) {
        return orderAmazonDetailMapper.getOrderListInfo(pagePrams, orderId, orderStatus, sku);
    }

    /**
     * 根据 订单号/商品sku 批量修改订单状态
     * @param orderStatus 状态
     * @param orderIdList 批量订单号
     * @param sku 商品SKU
     * @return
     */
    @Override
    @Transactional
    @DataSourceSwitch(DBTypeEnum.cs1db)
    public Integer updateOrderStatus(String orderStatus, List orderIdList, String sku) {
        List list = new ArrayList<>();
        for (String orderId : orderIdList) {
            //通过Mybatis-Plus查看数据库表中 是否存在需要修改的数据(使用该方法是 Mapper接口需要继承BaseMapper)
            Integer orderNum = orderAmazonDetailMapper.selectCount(new QueryWrapper().eq("order_id", orderId));
            if (orderNum > 0) {
                list.add(orderId);
            }
        }

        //当存在修改条件时修改数据
        if (StringUtils.isNotEmpty(sku) || (list != null && list.size() != 0) ) {
            orderAmazonDetailMapper.updateOrderStatus(orderStatus, list, sku);
        }
        return null;
    }
}
cs2db:
/**
 * 商品表 Service 接口
 */
public interface ILjProductService {
    /**
     * 根据商品sku获取商品名称
     * @param sku
     * @return
     */
    String getProductName(String sku);
}
@Service
public class LjProductServiceImpl implements ILjProductService {
@Autowired
private LjProductMapper ljProductMapper;
/**
* 根据商品sku获取商品名称
* @param sku
* @return
*/
@Override
@DataSourceSwitch(DBTypeEnum.cs2db)
public String getProductName(String sku) {
return ljProductMapper.getProductName(sku);
}
同样dao层的mapper接口,分别:

cs1db:
/**
 * 订单表 Mapper 接口
 */
public interface OrderAmazonDetailMapper extends BaseMapper {

    /**
     * 根据条件查询订单详细信息列表(分页)
     * @param page 分页插件
     * @param orderId 批量订单号
     * @param orderStatus 订单状态
     * @param sku 商品sku
     * @return
     */
    List getOrderListInfo(Page page, @Param("orderId") String orderId, @Param("orderStatus") String orderStatus, @Param("sku") String sku);

    /**
     * 根据 订单号/商品sku 批量修改订单状态
     * @param orderStatus 订单状态
     * @param orderIdList 批量订单号
     * @param sku 商品SKU
     * @return
     */
    Integer updateOrderStatus(@Param("orderStatus") String orderStatus, @Param("orderIdList") List orderIdList, @Param("sku") String sku);
}
cs2db:
/**
 * 商品表 Mapper 接口
 */
public interface LjProductMapper extends BaseMapper {

    /**
     * 根据商品sku获取商品名称
     * @param sku
     * @return
     */
    String getProductName(@Param("sku") String sku);
}
sql实现的XML:
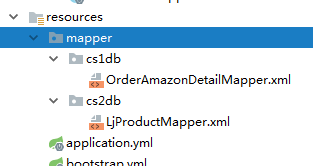
cs1db:
UPDATE order_amazon_detail
SET order_status = #{orderStatus}
order_id IN
#{orderId,jdbcType=VARCHAR}
AND sku = #{sku}
cs2db:
7.4.3、调用
OK!! 所有编程工作结束,依次启动eureka-server(注册中心)、config-server(配置中心)、和sc-item-demo(本项目工程),调用接口瞅瞅:


结束!!!
一章内容貌似有点多,涉及到注册中心、配置中心、以及项目的详细业务代码、加密、分页、多数据源等问题,想了想还是把代码都贴出来了,毕竟写了容易忘,再去开IDEA看项目又太繁琐,熟悉的东西翻翻网页就能找回记忆了不是。