Ardupilot IMU恒温控制代码学习
目录
文章目录
- 目录
- 摘要
- 第一章原理图学习
- 第二章恒温代码学习
- 1.目标温度怎么设置
摘要
本节主要学习ardupilot的IMU恒温控制代码,采用的飞控是pixhawk_v5,欢迎一起交流学习。
第一章原理图学习
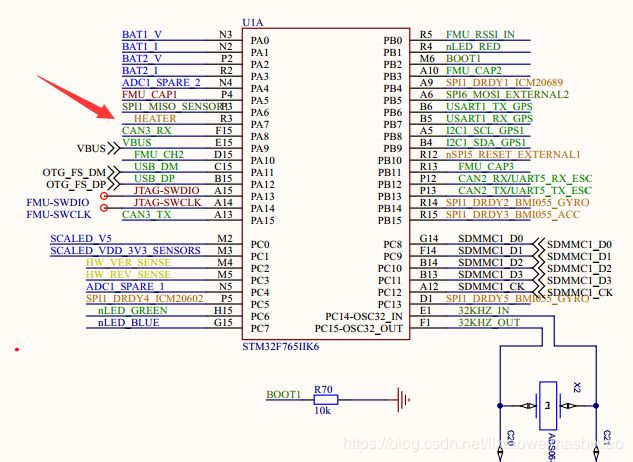
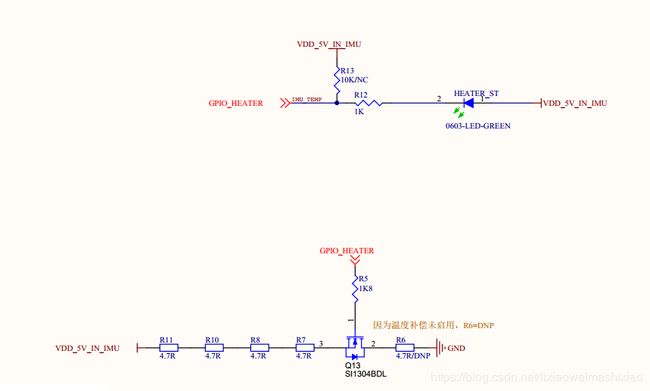
可以看出Pixhawk_v5 采用PA7进行恒温控制。
第二章恒温代码学习
进行温度更新,并且获取温度
1.
bool AP_InertialSensor_Invensense::update()
2.
_publish_temperature(_accel_instance, _temp_filtered);
3.
void AP_InertialSensor_Backend::_publish_temperature(uint8_t instance, float temperature)
{
    _imu._temperature[instance] = temperature;

    /* give the temperature to the control loop in order to keep it constant*/
    if (instance == 0)
    {
        hal.util->set_imu_temp(temperature); //设定恒温控制目标温度
    }
}
4.
void AP_InertialSensor_Backend::_publish_temperature(uint8_t instance, float temperature)
{
    _imu._temperature[instance] = temperature;

    /* give the temperature to the control loop in order to keep it constant*/
    if (instance == 0)
    {
        hal.util->set_imu_temp(temperature); //设定目标温度
    }
}
5.
开启恒温控制,设置参数
#ifndef HAL_HAVE_IMU_HEATER
#define HAL_HAVE_IMU_HEATER 1
#endif
#ifndef HAL_WITH_IO_MCU
#define HAL_WITH_IO_MCU 1
#endif
hal.util->set_imu_temp(temperature);
void Util::set_imu_temp(float current)
{
#if HAL_WITH_IO_MCU && HAL_HAVE_IMU_HEATER
    if (!heater.target || *heater.target == -1 || !AP_BoardConfig::io_enabled()) //三者必须全部不满足,才能进行恒温控制
    {
        return;
    }

    // 移除噪声影响,平均温度值----average over temperatures to remove noise
    heater.count++;
    heater.sum += current;

    // update once a second
    uint32_t now = AP_HAL::millis();
    if (now - heater.last_update_ms < 1000)  //1s进行一次恒温控制
    {
        return;
    }
    heater.last_update_ms = now;

    current = heater.sum / heater.count; //计算当前温度值
    heater.sum = 0;
    heater.count = 0;

    // experimentally tweaked for Pixhawk2
    const float kI = 0.3f;
    const float kP = 200.0f;
    float target = (float)(*heater.target); //思考这个目标温度怎么设置

    // limit to 65 degrees to prevent damage
    target = constrain_float(target, 0, 65);

    float err = target - current; //采用PID进行恒温控制

    heater.integrator += kI * err;
    heater.integrator = constrain_float(heater.integrator, 0, 70);

    float output = constrain_float(kP * err + heater.integrator, 0, 100);

    // hal.console->printf("integrator %.1f out=%.1f temp=%.2f err=%.2f\n", heater.integrator, output, current, err);

    iomcu.set_heater_duty_cycle(output);  //设定恒温控制函数
#endif // HAL_WITH_IO_MCU && HAL_HAVE_IMU_HEATER
}
1.目标温度怎么设置
void Copter::init_ardupilot()
{
  BoardConfig.init(); //板层初始化
}
void AP_BoardConfig::init()
{
    board_setup();

#if HAL_HAVE_IMU_HEATER
    // let the HAL know the target temperature. We pass a pointer as
    // we want the user to be able to change the parameter without
    // rebooting
    hal.util->set_imu_target_temp((int8_t *)&_imu_target_temperature); //设定目标温度
#endif

    AP::rtc().set_utc_usec(hal.util->get_hw_rtc(), AP_RTC::SOURCE_HW);
}
//设定恒温控制的目标温度
void Util::set_imu_target_temp(int8_t *target)
{
#if HAL_WITH_IO_MCU && HAL_HAVE_IMU_HEATER
    heater.target = target;
#endif
}
查看这个参数;_imu_target_temperature
#if HAL_HAVE_IMU_HEATER
    // @Param: IMU_TARGTEMP
    // @DisplayName: Target IMU temperature
    // @Description: This sets the target IMU temperature for boards with controllable IMU heating units. DO NOT SET -1 on The Cube. A value of -1 sets PH1 behaviour
    // @Range: -1 80
    // @Units: degC
    // @User: Advanced
    AP_GROUPINFO("IMU_TARGTEMP", 8, AP_BoardConfig, _imu_target_temperature, HAL_IMU_TEMP_DEFAULT),
#endif
iomcu.set_heater_duty_cycle(output); //设定恒温控制函数
void AP_IOMCU::set_heater_duty_cycle(uint8_t duty_cycle)
{
    heater_duty_cycle = duty_cycle;
    trigger_event(IOEVENT_SET_HEATER_TARGET); //这里是采用事件触发
}
像赫星的飞控自带恒温控制模块,雷迅的没有焊接恒温控制电路;赫星的飞控采用F1芯片最终控制温度,而pixhawk-v5则直接使用FMU的PA7引脚直接控制,因此我们需要修改这部分控制代码,才能实现PI调节的IMU恒温控制。
修改代码
1.修改APC-HAL_Chibios中hwdef文件夹中的fmuv5(hwdef.dat)
#IMU control temp
PA7  TIM3_CH2 TIM3 PWM(12) GPIO(84)
2.需要对PA7引脚进行初始化
 #define HAL_GPIO_NUM_GPIOA_7  84    //定义引脚PA7
 ```#
这部分代码可以放到LED初始化中
bool Ltr_PWMLed::init(void)
{
	    // setup the main LEDs as outputs

	    hal.gpio->pinMode(HAL_GPIO_NUM_GPIOA_7, HAL_GPIOH_OUTPUT);
	    hal.gpio->write(HAL_GPIO_NUM_GPIOA_7, HAL_GPIOA_IMU_CONT_TEMP_OFF);  //PA7
	    return 1;

}
3.修改恒温控制代码
void Util::set_imu_temp(float current)
{
#if HAL_WITH_IO_MCU && HAL_HAVE_IMU_HEATER
    if (!heater.target || *heater.target == -1 || !AP_BoardConfig::io_enabled()) {
        return;
    }
//    hal.uartC->printf("********\r\n");
//    hal.uartC->printf("current=%.3f\r\n",current);
//
//    hal.uartC->printf("#########\r\n");
    // average over temperatures to remove noise
    heater.count++;
    heater.sum += current;

    // update once a second
    uint32_t now = AP_HAL::millis();
    if (now - heater.last_update_ms < 1000) {
        return;
    }
    heater.last_update_ms = now;

    current = heater.sum / heater.count;
    heater.sum = 0;
    heater.count = 0;

    // experimentally tweaked for Pixhawk2
    const float kI = 0.3f;
    const float kP = 200.0f;
    float target = (float)(*heater.target);

    // limit to 65 degrees to prevent damage
    target = constrain_float(target, 0, 65);

    float err = target - current;

    heater.integrator += kI * err;
    heater.integrator = constrain_float(heater.integrator, 0, 70);

    float output = constrain_float(kP * err + heater.integrator, 0, 100);

  //添加代码部分
    if(output>0)
    {
       hal.gpio->write(HAL_GPIO_NUM_GPIOA_7, 1);  //PA7
    }
	else
	{
		hal.gpio->write(HAL_GPIO_NUM_GPIOA_7, 0);  //PA7
	}


//    iomcu.set_heater_duty_cycle(output);
#endif // HAL_WITH_IO_MCU && HAL_HAVE_IMU_HEATER
}
欢迎批评指正!!!


