springboot+springcloud+euruka+feign
参考大神网站:https://www.jianshu.com/p/004e391bb6c9
前言:在搭建微服务框架之前,请大家先弄懂springboot以及搭建springboot框架,当然,既然是搭建微服务,当然微服务的概念得搞明白。
微服务概念:https://blog.csdn.net/wuxiaobingandbob/article/details/78642020?locationNum=1&fps=1
OK,话不多说,现在搭框架。
1.在集成springcloud之前,大家得先搭建springboot框架,因为springcloud是基于springboot的。
2.搭建eruka服务,至于eruka的概念,这里就不多赘言了。
pom如下:
	4.0.0

	sbc_service
	sbc_service
	0.0.1-SNAPSHOT
	jar

	sbc_service
	http://maven.apache.org


		UTF-8


			junit
			junit
			3.8.1
			test


			org.springframework.cloud
			spring-cloud-starter-eureka-server


			ch.qos.logback
			logback-classic
			1.2.1


				org.springframework.cloud
				spring-cloud-dependencies
				Brixton.RELEASE
				pom
				import
3.配置application.properties,配置euruka配置
application.properties配置如下:
#######eureka配置##########
server.port=8888
# 不向注册中心注册自己
eureka.client.register-with-eureka=false
# 不需要检索服务
eureka.client.fetch-registry=false
eureka.client.serviceUrl.defaultZone=http://localhost:${server.port}/eureka/
4.编码注册中心启动类
EurekaApplication:
package com.cn;

import org.slf4j.Logger;
import org.slf4j.LoggerFactory;
import org.springframework.boot.SpringApplication;
import org.springframework.boot.autoconfigure.SpringBootApplication;
import org.springframework.cloud.netflix.eureka.server.EnableEurekaServer;

@EnableEurekaServer
@SpringBootApplication
public class EurekaApplication {

	private final static Logger logger = LoggerFactory.getLogger(EurekaApplication.class);
    public static void main(String[] args) {

        SpringApplication.run(EurekaApplication.class, args);
        logger.info("SpringBoot Start Success");
    }

}
5.启动服务之后浏览器输入:http://localhost:8888/
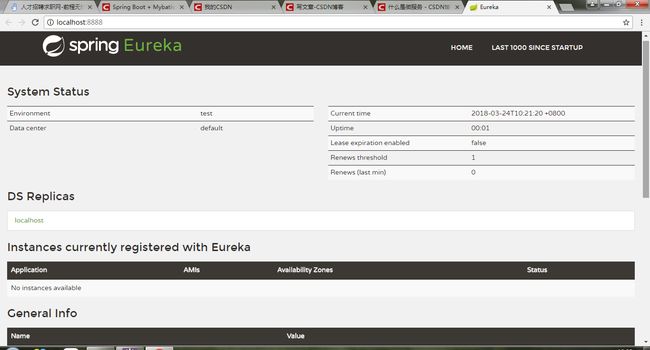
6.到此,注册中心算是搭建完成
7.创建服务者与消费者,个人理解,在编码中不存在绝对的服务者与消费者,消费者也有可能会是服务者,而服务者也可能会成为消费者,好了,到项目中来,我这里是先搭建服务者。创建一个springboot项目sbc_order,加入如下依赖包
pom.xml:
	4.0.0

	sbc_order
	sbc_order
	0.0.1-SNAPSHOT
	jar

	sbc_order
	http://maven.apache.org


		UTF-8
		UTF-8
		1.8
		Dalston.SR3


		org.springframework.boot
		spring-boot-starter-parent
		1.5.7.RELEASE


			org.springframework.cloud
			spring-cloud-starter-eureka


			org.springframework.boot
			spring-boot-starter-web


			org.springframework.boot
			spring-boot-starter-test
			test


				org.springframework.cloud
				spring-cloud-dependencies
				${spring-cloud.version}
				pom
				import


				org.springframework.boot
				spring-boot-maven-plugin
8.在application.properties里面加入euruka相关配置
application.properties:
####访问端口#####
server.port=8181

eureka.client.serviceUrl.defaultZone=http://localhost:8888/eureka/
####服务名####
spring.application.name=sbc-order
defaultZone为刚刚euruka注册中心的地址
9.编写启动文件以及测试用的controller
Start:
package com.cn;

import org.springframework.boot.SpringApplication;
import org.springframework.boot.autoconfigure.SpringBootApplication;
import org.springframework.boot.web.support.SpringBootServletInitializer;
import org.springframework.cloud.client.discovery.EnableDiscoveryClient;

@SpringBootApplication
@EnableDiscoveryClient
public class Start extends SpringBootServletInitializer {

	public static void main(String[] args) {
        SpringApplication.run(Start.class, args);
    }

}
OrderController:
package com.cn.controller;

import org.springframework.boot.autoconfigure.EnableAutoConfiguration;
import org.springframework.stereotype.Controller;
import org.springframework.web.bind.annotation.RequestMapping;
import org.springframework.web.bind.annotation.ResponseBody;

@Controller
@EnableAutoConfiguration
public class OrderController {

	@RequestMapping("/getOrder")
	@ResponseBody
	public String getOrder() {

		return "ajsdh";
	}

}
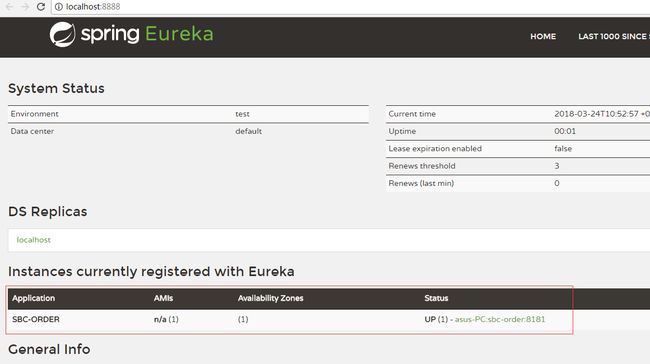
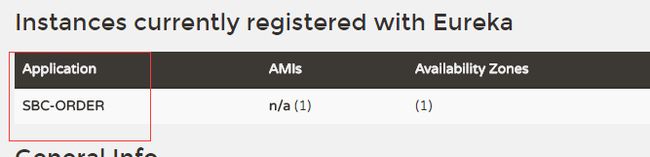
10.启动Start,此服务就注册到euruka注册中心了
11.服务者做好之后接下来就是消费者了,创建springboot项目,其依赖jar如下
pom.xml:
	4.0.0

	sbc_user
	sbc_user
	0.0.1-SNAPSHOT
	jar

	sbc_user
	http://maven.apache.org


		UTF-8
		UTF-8
		1.8
		Dalston.SR3


		org.springframework.boot
		spring-boot-starter-parent
		1.5.7.RELEASE


			org.springframework.cloud
			spring-cloud-starter-eureka


			org.springframework.boot
			spring-boot-starter-web


			org.springframework.boot
			spring-boot-starter-test
			test


			org.springframework.cloud
			spring-cloud-starter-ribbon


			com.alibaba
			fastjson
			1.2.28


				org.springframework.cloud
				spring-cloud-dependencies
				${spring-cloud.version}
				pom
				import


				org.springframework.boot
				spring-boot-maven-plugin
12.同样的,在application.properties中引入euruka配置
####访问端口#####
server.port=8080

eureka.client.serviceUrl.defaultZone=http://localhost:8888/eureka/
####服务名####
spring.application.name=sbc-user
13.因为我这里是用feign去做为调用服务方的方法,则在pom里面加入下依赖jar
为什么要用feign,以及feign的优势这里就不说,大家自己去google
			org.springframework.cloud
			spring-cloud-starter-feign
14.编写服务方接口
package com.cn.serviceImpl;

import org.springframework.cloud.netflix.feign.FeignClient;
import org.springframework.web.bind.annotation.RequestMapping;
import org.springframework.web.bind.annotation.RequestMethod;

@FeignClient(name = "sbc-order", fallback = FeginClient.class)
public interface FeginClient {

	@RequestMapping(value = "/getOrder", method = RequestMethod.GET)
	String getOrder();

}
这里的@FeignClient(name = "sbc-order", fallback = FeginClient.class),name里面的"sbc-order"为服务方在注册中心的name,而requestMapping中的value为服务方controller中的mapping
15.编写启动类以及controller
Start:
package com.cn;

import org.springframework.boot.SpringApplication;
import org.springframework.boot.autoconfigure.SpringBootApplication;
import org.springframework.boot.web.support.SpringBootServletInitializer;
import org.springframework.cloud.client.discovery.EnableDiscoveryClient;
import org.springframework.cloud.client.loadbalancer.LoadBalanced;
import org.springframework.cloud.netflix.feign.EnableFeignClients;
import org.springframework.context.annotation.Bean;
import org.springframework.web.client.RestTemplate;

@SpringBootApplication
@EnableDiscoveryClient
@EnableFeignClients
public class Start extends SpringBootServletInitializer {

	public static void main(String[] args) {
        SpringApplication.run(Start.class, args);
    }

	/*@Bean
    @LoadBalanced
	public RestTemplate restTemplate() {
        return new RestTemplate();
    }*/

}
UserControler:
package com.cn.controller;
import org.slf4j.Logger;
import org.slf4j.LoggerFactory;
import org.springframework.beans.factory.annotation.Autowired;
import org.springframework.boot.autoconfigure.EnableAutoConfiguration;
import org.springframework.http.ResponseEntity;
import org.springframework.stereotype.Controller;
import org.springframework.web.bind.annotation.RequestMapping;
import org.springframework.web.bind.annotation.ResponseBody;
import org.springframework.web.client.RestTemplate;
import com.alibaba.fastjson.JSON;
import com.cn.serviceImpl.FeginClient;
@Controller
@EnableAutoConfiguration
public class UserController {
/*@Autowired
private RestTemplate restTemplate;*/
@Autowired
private FeginClient feginClient;
private final static Logger logger = LoggerFactory.getLogger(UserController.class);
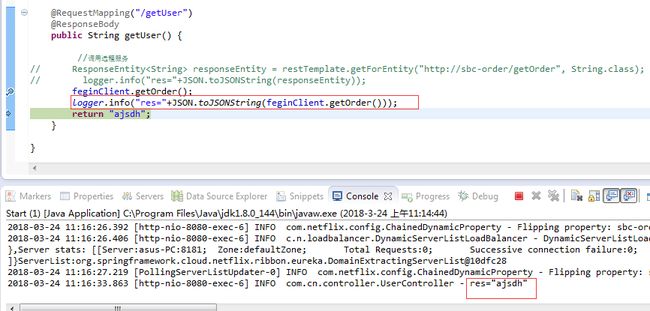
@RequestMapping("/getUser")
@ResponseBody
public String getUser() {
//调用远程服务
// ResponseEntity responseEntity = restTemplate.getForEntity("http://sbc-order/getOrder", String.class);
// logger.info("res="+JSON.toJSONString(responseEntity));
feginClient.getOrder();
logger.info("res="+JSON.toJSONString(feginClient.getOrder()));
return "ajsdh";
}
} 注入接口实现类FeginClient,调用对应的方法即可
16.启动Start,部署到注册中心,然后直接访问看能不能访问到sbc-order的接口。

17.一个简单的分式框架就算是大功告成了。在这个基础上,大家可以集成redis,swagger等等一系列技术。如果大家有什么疑问或者有更好的简洁,欢迎大家加群一起探讨。
QQ群:719431817