(十四)springboot实战rabbitmq --- Topic模式
这篇文章说的是rabbitmq的topic模式要想更好的了解rabbitmq请阅读[上一章direct模式]
(https://blog.csdn.net/m0_37034294/article/details/82842354)
源码下载地址 https://gitee.com/v_soul/boot-rabbitmq-produce,https://gitee.com/v_soul/boot-rabbitmq-consumer
Topic Exchange
topic模式按规则转发是最灵活的一种匹配方式
# 匹配一个或者多个
* 匹配一个
rounting_key(路由键) : 消息到交换机的时候,交互机会转发到对应的队列中,
那么究竟转发到哪个队列,就要根据该路由键去进行匹配。路由键必须是一串字符用 . 隔开
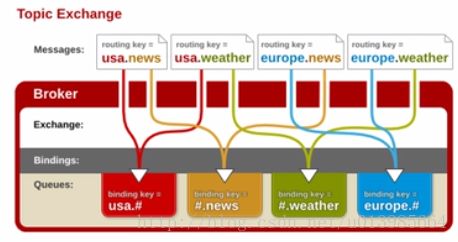
如上图所示:此类交换器使得来自不同的源头的消息可以到达一个对列,其实说的更明白一点就是模糊匹配的意思,例如:上图中红色对列的routekey为usa.#,#代表匹配任意字符,但是要想消息能到达此对列,usa.必须匹配后面的#好可以随意。图中usa.news,usa.weather都能找到红色队列,符号“#”匹配一个或多个词,符号“”匹配不多不少一个词。因此“usa.#”能够匹配到“usa.news.XXX”,但是“usa.” 只会匹配到“usa.XXX”。 注:交换器说到底是一个名称与队列绑定的列表。当消息发布到交换器时,实际上是由你所连接的信道,将消息路由键同交换器上绑定的列表进行比较,最后路由消息
生产者项目topic的bean配置
pom文件导入,和application.properties的配置和上篇文章相同,在这里就不赘述了。
package com.rabbit.produce.config;

import org.springframework.amqp.core.Binding;
import org.springframework.amqp.core.BindingBuilder;
import org.springframework.amqp.core.Queue;
import org.springframework.amqp.core.TopicExchange;
import org.springframework.context.annotation.Bean;
import org.springframework.context.annotation.Configuration;

@Configuration
public class TopicRabbitConfig {

    /**
     * 定义队列名称
     */
    final static String message = "topic.message";
    final static String messages = "topic.messages";

    @Bean
    public Queue queueMessage() {
        return new Queue(TopicRabbitConfig.message);
    }

    @Bean
    public Queue queueMessages() {
        return new Queue(TopicRabbitConfig.messages);
    }

    /**
     * 这里的exchange是交换机的名称字符串和发送消息时的名称必须相同
     * this.rabbitTemplate.convertAndSend("exchange", "topic.1", context);
     */
    @Bean
    TopicExchange exchange() {
        return new TopicExchange("exchange");
    }

    /**
     * @param queueMessage 队列
     * @param exchange     交换机
     *                     bindings 绑定交换机队列信息
     */
    @Bean
    Binding bindingExchangeMessage(Queue queueMessage, TopicExchange exchange) {
        return BindingBuilder.bind(queueMessage).to(exchange).with("topic.message");
    }

    @Bean
    Binding bindingExchangeMessages(Queue queueMessages, TopicExchange exchange) {
        return BindingBuilder.bind(queueMessages).to(exchange).with("topic.#");
    }
}
生产者消息发送
package com.rabbit.produce.controller;

import org.springframework.amqp.core.AmqpTemplate;
import org.springframework.beans.factory.annotation.Autowired;
import org.springframework.stereotype.Component;

@Component
public class TopicSender {

    @Autowired
    private AmqpTemplate rabbitTemplate;

    public void send() {
        String context = "hi, i am message all";
        System.out.println("Sender : " + context);
        this.rabbitTemplate.convertAndSend("exchange", "topic.1", context);
    }

    public void send1() {
        String context = "hi, i am message 1";
        System.out.println("Sender : " + context);
        this.rabbitTemplate.convertAndSend("exchange", "topic.message", context);
    }

    public void send2() {
        String context = "hi, i am messages 2";
        System.out.println("Sender : " + context);
        this.rabbitTemplate.convertAndSend("exchange", "topic.messages", context);

    }
}
消费者项目(或本项目)接受消息
队列topic.messages监听方法
- @RabbitListener 可以标注在类上面,需配合 @RabbitHandler 注解一起使用
- @RabbitListener 标注在类上面表示当有监听到队列topic.messages消息的时候,就交给 @RabbitHandler 的方法处理,具体使用哪个方法处理,根据 MessageConverter 转换后的参数类型
package com.rabbit.produce.controller;

import org.springframework.amqp.rabbit.annotation.RabbitHandler;
import org.springframework.amqp.rabbit.annotation.RabbitListener;
import org.springframework.stereotype.Component;

/**
 * @author : lqf
 * @Description :
 * @date : Create in 18:37 2018/9/26
 */
@Component
@RabbitListener(queues = "topic.messages")
public class TopicReceiver2 {
    @RabbitHandler
    public void process(String message) {
        System.out.println("TopicReceiver2  : " + message);
    }
}
队列topic.message监听方法
package com.rabbit.produce.controller;

import org.springframework.amqp.rabbit.annotation.RabbitHandler;
import org.springframework.amqp.rabbit.annotation.RabbitListener;
import org.springframework.stereotype.Component;

/**
 * @author : lqf
 * @Description :
 * @date : Create in 18:37 2018/9/26
 */
@Component
@RabbitListener(queues = "topic.message")
public class TopicReceiver {
    @RabbitHandler
    public void process(String message) {
        System.out.println("TopicReceiver1  : " + message);
    }
}
测试
package com.rabbit.produce;

import com.rabbit.produce.controller.HelloSender;
import com.rabbit.produce.controller.HelloSender2;
import com.rabbit.produce.controller.TopicSender;
import com.rabbit.produce.entrty.User;
import org.junit.Test;
import org.junit.runner.RunWith;
import org.springframework.beans.factory.annotation.Autowired;
import org.springframework.boot.test.context.SpringBootTest;
import org.springframework.test.context.junit4.SpringRunner;

@RunWith(SpringRunner.class)
@SpringBootTest
public class BootRabbitmqProduceApplicationTests {

    @Autowired
    private TopicSender topicSender;

    @Test
    public void topicExchange() throws Exception {
        topicSender.send();
        topicSender.send1();
        topicSender.send2();
    }

}
测试结果
TopicReceiver1  : hi, i am message 1
TopicReceiver2  : hi, i am message all
TopicReceiver2  : hi, i am message 1
TopicReceiver2  : hi, i am messages 2
通过上方的测试结果可以看出topic.messages队列也就是TopicReceiver2打印的内容监听了所有routing_key为topic.#的消息。看下面的配置信息
@Bean
    Binding bindingExchangeMessages(Queue queueMessages, TopicExchange exchange) {
        return BindingBuilder.bind(queueMessages).to(exchange).with("topic.#");
    }
通过上方代码可以看到我们将队列topic.messages绑定的routing_key为topic.#所以监听器在监听队列topic.messages的时候匹配的是所有以topic开头的rounting_key。这样就符合了上方的打印结果