1、tableView 的编辑模式
进入编辑模式
代码体现
// 设置 editing 属性tableView?.editing =true// 这个设置的时候是有动画效果的tableView.setEditing(true, animated:true)// 我一般喜欢的设置方式 (写在 btn 或者 item 的监听方法里面)// 实现编辑模式和非编辑模式的切换tableView.editing = !tableView.editing tableView.setEditing(!tableView.editing, animated:true)
@IBActionfunceditItemAction(sender: AnyObject){ tableView.editing = !tableView.editing// tableView.setEditing(!tableView.editing, animated: true)}
效果图
没有动画效果
tableView.editing = !tableView.editing
有动画效果
tableView.setEditing(!tableView.editing, animated: true)
2、 设置某一行能够进行编辑
cell 的默认编辑模式是 delete
// Individual rows can opt out of having the -editing property set for them. If not implemented, all rows are assumed to be editable.// 单行能够可选的设置编辑1. 设置 tableView 的 editing 属性2. 实现这个方法// tableView 的某一行能够进行编辑模式// 这个方法不实现,默认是每一行都进入编辑模式optionalpublicfunctableView(tableView: UITableView, canEditRowAtIndexPath indexPath: NSIndexPath)->Bool
@IBActionfunceditItemAction(sender: AnyObject){ tableView.setEditing(!tableView.editing, animated:true)}// 这是一个数据源方法// 设置 tableView 那一行进入编辑模式functableView(tableView: UITableView, canEditRowAtIndexPath indexPath: NSIndexPath)->Bool{// 双数 row 行进入编辑模式ifindexPath.row %2==0{returnfalse}returntrue}
3.gif
3、 设置某一行编辑模式的样式
cell 编辑模式枚举
publicenumUITableViewCellEditingStyle:Int{caseNone// 正常模式 (这一个主要用于 cell 的移动)caseDelete// 删除模式caseInsert// 插入模式}
cell 编辑模式设置
// Allows customization of the editingStyle for a particular cell located at 'indexPath'. If not implemented, all editable cells will have UITableViewCellEditingStyleDelete set for them when the table has editing property set to YES.// 允许用户通过实行这个方法来自定义 cell 的编辑样式, 如果没有实现这个方法, 所有的 cell 的默认编辑样式为 UITableViewCellEditingStyleDelete . 只有 editing 属性设置为 true 的时候才可以看到效果optionalpublicfunctableView(tableView: UITableView, editingStyleForRowAtIndexPath indexPath: NSIndexPath)->UITableViewCellEditingStyle
代码
/*!
设置某一行的编辑样式
*/
func tableView(tableView: UITableView, editingStyleForRowAtIndexPath indexPath: NSIndexPath) -> UITableViewCellEditingStyle {
let number = indexPath.row % 3
switch number {
case 0:
print("0")
return UITableViewCellEditingStyle.Delete
case 1:
print("1")
return UITableViewCellEditingStyle.Insert
default:
print("2")
return UITableViewCellEditingStyle.None
}
}
效果:
4.gif
上部分只是编辑样式的展示
4、 编辑模式的事件回调
@available(iOS2.0, *)// 编辑样式 add 和 delete 附加视图点击的回调optionalpublicfunctableView(tableView: UITableView, commitEditingStyle editingStyle: UITableViewCellEditingStyle, forRowAtIndexPath indexPath: NSIndexPath)
默认实现编辑事件回调方法:
functableView(tableView: UITableView, commitEditingStyle editingStyle: UITableViewCellEditingStyle, forRowAtIndexPath indexPath: NSIndexPath){// 没有添加任何的功能代码}
实现这个方法后,在非编辑模式下,左滑动 cell 会显示一个 delete 按钮。
效果:
9.gif
先进入了编辑模式,查看了每个 cell 的编辑模式的样式。(cell 的编辑模式的设置看上面的代码)
在非编辑模式下,只有 cell 的编辑模式是 delete 的,才可以进行左侧滑。
关于 cell 侧滑功能的实现可以先查看这段代码, 后续后详细说明!
事件的回调处理
实例代码
functableView(tableView: UITableView, commitEditingStyle editingStyle: UITableViewCellEditingStyle, forRowAtIndexPath indexPath: NSIndexPath){switcheditingStyle {case.Delete:print("Delete")// 移除模型数据(不移除就会报错)localData.removeAtIndex(indexPath.row)// 删除某一行 celltableView.deleteRowsAtIndexPaths([indexPath], withRowAnimation: .Automatic)case.Insert:print("Insert")letstr ="new"+ localData[indexPath.row]// 添加模型数据 (不插入就会报错)localData.insert(str, atIndex: indexPath.row)// 这一步只会刷新插入的哪一行tableView.insertRowsAtIndexPaths([indexPath], withRowAnimation: .Automatic)case.None:print("None")// None 样式 是给 cell 的移动准备的,这里永远也不会打印(移动的时候并不需要插入和删除)}}
/*!
设置某一行的编辑样式
*/functableView(tableView: UITableView, editingStyleForRowAtIndexPath indexPath: NSIndexPath)->UITableViewCellEditingStyle{print(#function)letnumber = indexPath.row %3switchnumber {case0:returnUITableViewCellEditingStyle.Deletecase1:returnUITableViewCellEditingStyle.Insertdefault:// None 样式 是给 cell 的移动准备的returnUITableViewCellEditingStyle.None} }
回调效果:
1.gif
进入到编辑模式后,会默认的调用func tableView(tableView: UITableView, editingStyleForRowAtIndexPath indexPath: NSIndexPath) -> UITableViewCellEditingStyle, 刷新每一行的 cell 编辑样式。
点击左边的删除按钮,cell 会出现侧滑,显示一个 delete,只有点击了 delete 之后才可以进行删除。 删除一个 cell 后,会再一次调用func tableView(tableView: UITableView, editingStyleForRowAtIndexPath indexPath: NSIndexPath) -> UITableViewCellEditingStyle方法,刷新每一个 cell 编辑样式 。(方法调用的个数变少了)
点击添加按钮,cell 不会出现侧滑, 直接调用回调方法。会再一次调用func tableView(tableView: UITableView, editingStyleForRowAtIndexPath indexPath: NSIndexPath) -> UITableViewCellEditingStyle方法,刷新每一个 cell 编辑样式 。(cell 个数增加了)
当 cell 的编辑样式是None的时候, 点击是没有任何效果的。
注意点:
由于进行 delete 和 Insert 操作的回调func tableView(tableView: UITableView, editingStyleForRowAtIndexPath indexPath: NSIndexPath) -> UITableViewCellEditingStyle方法。
所以, cell 编辑模式需要用一个 数组来记录。来保证, delete 和 Insert 操作之后,和之前 cell 的编辑样式是对应的。
// 定义一个 空的数组
var cellEditingStyle: [Int] = []
// 设置默认值
for index in 0 ..< localData.count {
cellEditingStyle.append(index)
}
functableView(tableView: UITableView, commitEditingStyle editingStyle: UITableViewCellEditingStyle, forRowAtIndexPath indexPath: NSIndexPath){switcheditingStyle {case.Delete:print("Delete") localData.removeAtIndex(indexPath.row)// 编辑模式数据删除cellEditingStyle.removeAtIndex(indexPath.row) tableView.deleteRowsAtIndexPaths([indexPath], withRowAnimation: .Automatic)case.Insert:print("Insert") localData.insert("new"+ localData[indexPath.row], atIndex: indexPath.row)// 编辑模式数据添加 (设置为 删除)cellEditingStyle.insert(0, atIndex: indexPath.row) tableView.insertRowsAtIndexPaths([indexPath], withRowAnimation: .Automatic)case.None:print("None")// None 样式 是给 cell 的移动准备的,这里永远也不会打印}}functableView(tableView: UITableView, editingStyleForRowAtIndexPath indexPath: NSIndexPath)->UITableViewCellEditingStyle{print(#function)// 获取对应的数据进行设置letnumber = cellEditingStyle[indexPath.row] %3switchnumber {case0:returnUITableViewCellEditingStyle.Deletecase1:returnUITableViewCellEditingStyle.Insertdefault:returnUITableViewCellEditingStyle.None}}
使用这种方式
3.gif
编辑模式的数据可以和 cell 对应的模型数据绑定。一种 MVC 的思想
5、 编辑模式中的选中操作
编辑模式中的选中操作用到的 API:
// 允许在编辑模式下进行单选// 默认为 NopublicvarallowsSelectionDuringEditing:Bool// default is NO. Controls whether rows can be selected when in editing mode// 允许在编辑模式进行多选// 默认为 NopublicvarallowsMultipleSelectionDuringEditing:Bool// default is NO. Controls whether multiple rows can be selected simultaneously in editing mode// 当前选中的索引的获取// 获取当前选中单行的索引publicvarindexPathForSelectedRow:NSIndexPath? {get}// returns nil or index path representing section and row of selection.// 获取当前选中多行的索引publicvarindexPathsForSelectedRows: [NSIndexPath]? {get}// returns nil or a set of index paths representing the sections and rows of the selection.
代码演示:
// 进入编辑模式tableView.editing = !tableView.editing// 编辑模式下单选tableView.allowsSelectionDuringEditing =true// 编辑模式下多选tableView.allowsMultipleSelectionDuringEditing =true
我使用的是tableView.allowsMultipleSelectionDuringEditing = true来实现单选和多选操作。
tableView.allowsSelectionDuringEditing = true效果后面介绍。
这种效果也是我们在项目中最常见的
关键代码@IBActionfunceditItemAction(sender: AnyObject){// 非动画// tableView.editing = !tableView.editing// tableView.allowsSelectionDuringEditing = !tableView.editing// 在编辑模式下多选tableView.allowsMultipleSelectionDuringEditing = !tableView.editing// 动画 ( 建议使用这个 )tableView.setEditing(!tableView.editing, animated:true)}/* 注释掉这个代码就可实现多选 */// cell 将要选中的回调代理// 在这个方法中主要进行的是取消上一次选中functableView(tableView: UITableView, willSelectRowAtIndexPath indexPath: NSIndexPath)->NSIndexPath? {// 这个方法第一次调用的时候 indexPath 为 nilifletselectedRowIndexPath = tableView.indexPathForSelectedRow {// 去除上一次选中tableView.deselectRowAtIndexPath(selectedRowIndexPath, animated:true) }returnindexPath}
选中效果演示:
单选

多选操作
当前选中的索引的获取
// 获取当前选中单行的索引
public var indexPathForSelectedRow: NSIndexPath? { get }
// 获取当前选中多行的索引
public var indexPathsForSelectedRows: [NSIndexPath]? { get }
最简单的获取选中 cell 的方式就是下面的两个接口。使用这两个接口,我们就不需要另外的再去定义变量记录选中的 cell 。
tableView.allowsSelectionDuringEditing = true 的特别说明:
这个tableView.allowsSelectionDuringEditing设置效果是有点让人疑惑的。在看到多选的效果后,我一直以为 编辑模式下,单选 的效果 和 多选的效果类似,也应该有个圈圈事实证明我是错的!
单选和多选的效果:
普通模式下的不能选择,单选和多选:
// 这个属性,默认是 true 的,设置为 false 后,不能进行 cell 的选中操作。// 同时也禁止了 代理方法选中的回调tableView.allowsSelection =false
点击 cell 没人任何效果!
tableView.allowsSelection = false
tableView.allowsSelection =true
tableView.allowsSelection = true
// 多选为 true 后,单选肯定也为 truetableView.allowsMultipleSelection =true
3.gif
编辑模式下的单选:
tableView.editing =true// 编辑模式下,cell 默认是不能进行选中操作的tableView.allowsSelectionDuringEditing =false
在编辑模式下,默认 cell 默认是不能响应点击事件的。并且,control view 还是会根据 cell 编辑模式的进行显示(我们看到的加号 ,减号,空白)。
tableView.allowsMultipleSelection = false
tableView.editing =truetableView.allowsSelectionDuringEditing =true
单选是没有圈圈效果的,就是单纯的 cell 高亮。并且,control view 还是会根据 cell 编辑模式的进行显示(我们看到的加号 ,减号,空白)。
tableView.allowsSelectionDuringEditing = true
tableView.editing =truetableView.allowsMultipleSelectionDuringEditing =true
多选模式下,会修改 control view 的显示,将 加号,减号,空白替换为圈圈

4.gif
6、 编辑模式中 cell 的 Move (移动操作)
默认情况下tableView 中的 cell 是不能进行移动操作, 只有在编辑模式下,tableView 的 cell 可以进行移动操作。
简单的显示 cell 移动的附加视图
这只是简单的效果显示
// Data manipulation - reorder / moving supportoptionalpublicfunctableView(tableView: UITableView, moveRowAtIndexPath sourceIndexPath: NSIndexPath, toIndexPath destinationIndexPath: NSIndexPath)// 进入编辑模式tableView.editing = !tableView.editing// cell 的移动和排序操作 ( 方法的简单实现)functableView(tableView: UITableView, moveRowAtIndexPath sourceIndexPath: NSIndexPath, toIndexPath destinationIndexPath: NSIndexPath){}// 消除不必要的影响/*!
设置某一行的编辑样式
*/functableView(tableView: UITableView, editingStyleForRowAtIndexPath indexPath: NSIndexPath)->UITableViewCellEditingStyle{// 获取 cell 对应的编辑模式的缓存数据letnumber = cellEditingStyle[indexPath.row] %3switchnumber {// 注释这里,主要是为了消除,其他功能的影响。// case 0:// print("0")// return UITableViewCellEditingStyle.Delete// case 1:// print("1")// return UITableViewCellEditingStyle.Insertdefault:print("2")// 这一个模式是用来排序移动准备用的returnUITableViewCellEditingStyle.None}}
效果:
4.gif
7、 编辑模式中指定某一行 cell 可以 Move
// 指定哪一个 cell 能够移动functableView(tableView: UITableView, canMoveRowAtIndexPath indexPath: NSIndexPath)->Bool{// 单数 row 行进入可移动模式ifindexPath.row %2==0{returnfalse}returntrue}
效果:
4.gif
3、tableView 的移动和排序
// Moving/reordering// Allows the reorder accessory view to optionally be shown for a particular row. By default, the reorder control will be shown only if the datasource implements -tableView:moveRowAtIndexPath:toIndexPath:// 允许某一行的排序的附加视图显示,只用在数据源 实现了 -tableView:moveRowAtIndexPath:toIndexPath: 方法的时候 这个方法才有效@available(iOS2.0, *)optionalpublicfunctableView(tableView: UITableView, canMoveRowAtIndexPath indexPath: NSIndexPath)->Bool
传说中支持移动和排序的方法
// Data manipulation - reorder / moving support@available(iOS2.0, *)optionalpublicfunctableView(tableView: UITableView, moveRowAtIndexPath sourceIndexPath: NSIndexPath, toIndexPath destinationIndexPath: NSIndexPath)
代码体现
// cell 的移动和排序操作functableView(tableView: UITableView, moveRowAtIndexPath sourceIndexPath: NSIndexPath, toIndexPath destinationIndexPath: NSIndexPath){}// 指定哪一个 cell 能够移动functableView(tableView: UITableView, canMoveRowAtIndexPath indexPath: NSIndexPath)->Bool{// 单数 row 行进入可移动模式ifindexPath.row %2==0{returnfalse}returntrue}
效果图
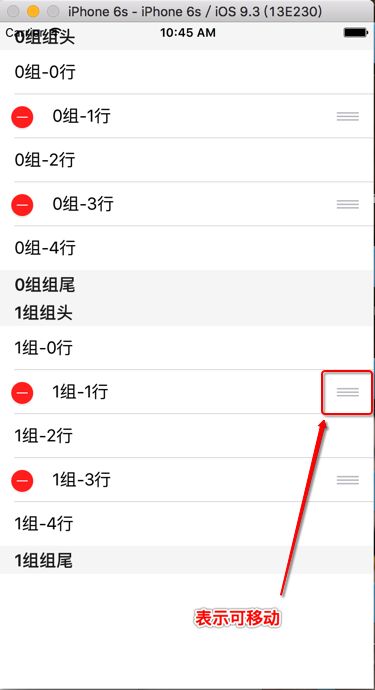
Snip20160602_31.png
4、tableView 索引设置
// Index@available(iOS2.0, *)// 通过实行这个方法,返回一个 string 的数组就可以设置索引optionalpublicfuncsectionIndexTitlesForTableView(tableView: UITableView)-> [String]?// return list of section titles to display in section index view (e.g. "ABCD...Z#")@available(iOS2.0, *)// 索引选中的回调optionalpublicfunctableView(tableView: UITableView, sectionForSectionIndexTitle title: String, atIndex index: Int)->Int// tell table which section corresponds to section title/index (e.g. "B",1))
单独设置索引
// 索引设置funcsectionIndexTitlesForTableView(tableView: UITableView)-> [String]? {return["A","B","C","D","E","F","G"]}
效果图
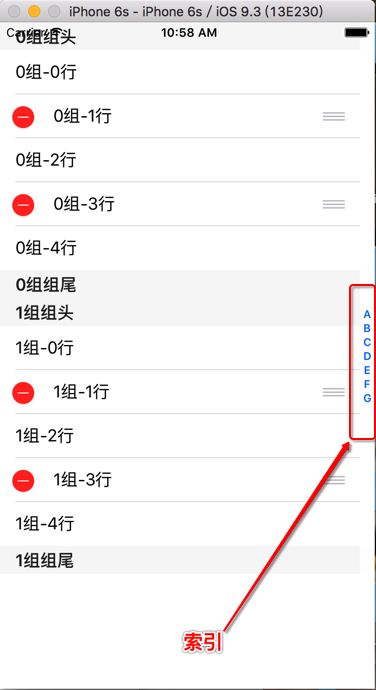
Snip20160602_32.png
当只实行单独设置索引的方法,点击索引会默认的滚动到索引对应顺序的组。
// 索引设置funcsectionIndexTitlesForTableView(tableView: UITableView)-> [String]? {return["A","B","C","D","E","F","G"]}// 告诉表部分对应部分标题/索引(当点击索引的时候回调用这个方法)/*
实现这个方法,点击索引的只会滚动一次,滚动后执行的是索引的回调
*/functableView(tableView: UITableView, sectionForSectionIndexTitle title: String, atIndex index: Int)->Int{print(title , index)return3}
作者:Laughingg
链接:http://www.jianshu.com/p/aaf2c88c58f0
來源:
著作权归作者所有。商业转载请联系作者获得授权,非商业转载请注明出处。