Nginx安装配置详解 + 反向代理部署 + 搭建NFS共享存储
WebServer—Nginx
1.认识Nginx
1.轻量级web服务器(相对于apache占用更少的内存及存储资源)
2.反向代理服务器
3.采用epoll网络IO模型,响应速度极快,处理高并发能力强
epoll工作原理:
内存映射(memory map)
事件通知机制(event notice)
epoll在Linux中的实现过程可以参考:http://blog.csdn.net/xiajun07061225/article/details/9250579
在生产环境中,Nginx多被用作在前端提供负载均衡的反向代理服务
2.Nginx安装与配置(安装步骤在最后面)
nginx有一堆的优化参数,主要是和tcp协议和linux内核有关
user  nginx;
# 工作进程:自动(由CPU核数确定)
worker_processes  auto;

# 配置错误日志
参考配置:error_log  /var/log/nginx/error.log
#error_log  logs/error.log;
#error_log  logs/error.log  notice;
#error_log  logs/error.log  info;

#pid        logs/nginx.pid;

events {
    # 工作连接数目,代表一个进程里面最多开启多少线程
    worker_connections  1024;
}

http {
    include       mime.types;
    default_type  application/octet-stream;

    # 定义日志的格式(main是起的别名)
    log_format  main  '$remote_addr - $remote_user [$time_local] "$request" '
                     '$status $body_bytes_sent "$http_referer" '
                     '"$http_user_agent" "$http_x_forwarded_for"';
    # 自定义日志格式:hahaha
    log_format  hahaha  '$remote_addr - $remote_user "$request" '
                     '$status $body_bytes_sent';


    # 设置全局的访问日志路径
    # access_log  logs/access.log  main;
    access_log  logs/access.log  hahaha;

    sendfile        on;
    #tcp_nopush     on;

    #keepalive_timeout  0;
    keepalive_timeout  65;

    #gzip  on;

    server {
        # 监听端口··
        listen       80;
        server_name  localhost;

        #charset koi8-r;

        # 本机的log日志
        # access_log  logs/host.access.log  main;

        # 静态文件访问的根路径
        location / {
            root   html;
            # 自动查找文件(支持自定义)
            index  index.html index.php index.htm;
        }

        # 将not fount页面重定向到静态页面 /404.html
        error_page  404              /404.html;
        location = /404.html {
            root   html;
        }

        # 将服务器错误页面重定向到静态页面 /50x.html
        # redirect server error pages to the static page /50x.html
        error_page   500 502 503 504  /50x.html;
        location = /50x.html {
            root   html;
        }


        # proxy the PHP scripts to Apache listening on 127.0.0.1:80
        #
        #location ~ \.php$ {
        #    proxy_pass   http://127.0.0.1;
        #}

        # pass the PHP scripts to FastCGI server listening on 127.0.0.1:9000
        #
        location ~ \.php$ {
            root           html;
            fastcgi_pass   127.0.0.1:9000;
            fastcgi_index  index.php;
            fastcgi_param  SCRIPT_FILENAME  $document_root$fastcgi_script_name;
            include        fastcgi_params;
        }

        # deny access to .htaccess files, if Apache's document root
        # concurs with nginx's one
        #
        #location ~ /\.ht {
        #    deny  all;
        #}
    }


    # another virtual host using mix of IP-, name-, and port-based configuration
    #
    #server {
    #    listen       8000;
    #    listen       somename:8080;
    #    server_name  somename  alias  another.alias;

    #    location / {
    #        root   html;
    #        index  index.html index.htm;
    #   }
    #}


    # 配置HTTPS server
    #
    #server {
    #    listen       443 ssl;
    #    server_name  localhost;

    #    ssl_certificate      cert.pem;
    #    ssl_certificate_key  cert.key;

    #    ssl_session_cache    shared:SSL:1m;
    #    ssl_session_timeout  5m;

    #    ssl_ciphers  HIGH:!aNULL:!MD5;
    #    ssl_prefer_server_ciphers  on;

    #    location / {
    #        root   html;
    #        index  index.html index.htm;
    #    }
    #}

}
3.反向代理
代理:A访问B,A把自己的请求让C代理,C去访问B
正向代理: 请求经过代理服务器从局域网发出,向互联网上的服务器发起请求,拿到结果后返回。比如A明确的知道自己的代理C的存在,并明确的指定自己的代理地址是C ,让C去访问B,拿到结果后再返回给A。
特点: 正向代理的对象是客户端,而服务端并不知道真正的客户端是谁。

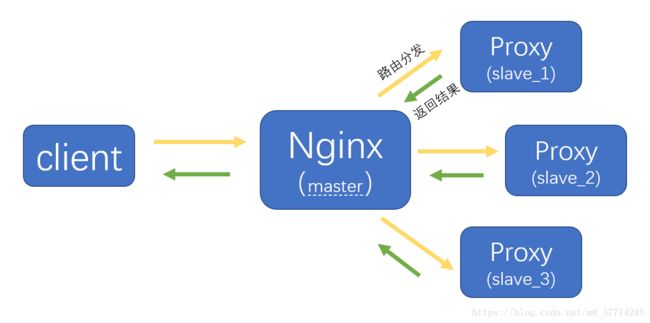
反向代理:用户请求发给nginx后,由nginx负载给代理的机器,拿到结果,再由nginx返回给客户端(如此,nginx便把一堆自己代理的机器隐藏到后端,外界访问的就是nginx)
特点: 反向代理的对象是服务端,客户端并不知道真正的服务端是谁。

透明代理:用户不知道代理的存在,用户->交换机->路由器->代理服务器,代理服务器可以控制用户的上网行为,比如限制用户可以访问和不可以访问的网站,多用于用户行为管理
- 关于讲解正向代理,反向代理,透明代理的链接:
http://blog.csdn.net/u012572955/article/details/49357219
4.关于Nginx负载均衡调度的方法
即Nginx配置中的upstream参数可选的负载均衡算法
round_robin(默认方式):**每个请求访问按照时间顺序逐一分配到不同的服务器端,如果后端某台服务器宕机时,故障系统会被自动的剔除,使用户访问不受影响。Weight(权重)指定轮询的权值,Weight值越大,分配到的访问几率越高,主要用于服务器端性能不均的情况下。
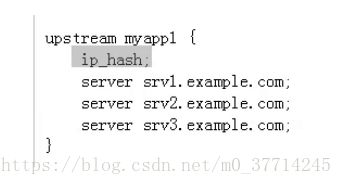
ip_hash:每个请求按照访问的IP的Hash值进行分配,这行来自同一个IP的用户将会固定到后端的一个服务器,固定服务器后可以有效的解决网页存在的session共享的问题(会话保持)。

fair:该算法可以根据页面大小和加载时间长短智能的进行决策负载均衡,即根据后端服务器的响应时间来分配请求,响应时间段的优先分配。Nginx本身未集成fair模块,如果需要该调度算法,必须下载Nginx的upstream_fair模块,然后在config中配置加载。
url_hash:此调度算法是根据访问的url的hash结果来分配请求,使每个url定向到同一个后端服务器,可以进一步的提高后端服务器的效率。Nginx本身未集成该模块,如果使用需安装Nginx的hash包,并编译加载到nginx。
5.反向代理Demo
Demo环境
使用Docker开启3个centos容器,并在容器中安装配置nginx ,也可以再增加3台虚拟机
master : 192.168.11.240
slave_1 : 192.168.11.241
slave_2 : 192.168.11.242
slave_3 : 192.168.11.243
配置master主机中的Nginx.conf
http {

    upstream pythonweb  {
        server 192.168.11.241:80;
        server 192.168.11.242:80;
        server 192.168.11.243:80;
    }

    include       mime.types;
    default_type  application/octet-stream;

    log_format  main  '$remote_addr - $remote_user [$time_local] "$request" '
                      '$status $body_bytes_sent "$http_referer" '
                      '"$http_user_agent" "$http_x_forwarded_for"';

    access_log  logs/access.log  main;

    sendfile        on;
    #tcp_nopush     on;

    #keepalive_timeout  0;
    keepalive_timeout  65;

    #gzip  on;

    server {
        listen       80;
        server_name  localhost;

        #charset koi8-r;

        # access_log  logs/host.access.log  ;

        location / {
            proxy_pass http://pythonweb;
        }

        error_page  404              /404.html;
        location = /404.html {
            root   html;
        }

        # redirect server error pages to the static page /50x.html
        #
        error_page   500 502 503 504  /50x.html;
        location = /50x.html {
            root   html;
        }
6.搭建Nginx的共享存储
在前面搭建的反向代理环境中,Nginx在响应时获取的是本机中独立的存储资源,会导致用户访问相同的url时,获取的资源不同步,所以必须搭建共享存储
目的:让Nginx代理拥有相同的存储资源
NFS(Network File System )
7.安装nginx
1.环境安装脚本
#!/bin/sh
LANG=C
if [ -d “/usr/local/nginx/” ];then
echo “nginx is install”
exit 1
else
echo “nginx in not install”
fi
my_gcc=rpm -qa gcc
if [[ -n “$my_gcc” ]];then
echo “$my_gcc”
else
yum -y install gcc
fi
my_gcc_c=rpm -qa gcc-c++
if [[ -n “$my_gcc_c” ]];then
echo “$my_gcc_c”
else
yum -y install gcc-c++
fi
my_make=rpm -qa make
if [[ -n “$my_make” ]];then
echo “$my_make”
else
yum -y install make
fi
my_tar=rpm -qa tar
if [[ -n “$my_tar” ]];then
echo “$my_tar”
else
yum -y install tar
fi
my_pcre=rpm -qa pcre
if [[ -n “$my_pcre” ]];then
echo “$my_pcre”
else
yum -y install pcre
fi
my_pcre_devel=rpm -qa pcre-devel
if [[ -n “$my_pcre_devel” ]];then
echo “$my_pcre_devel”
else
yum -y install pcre-devel
fi
my_zlib=rpm -qa zlib
if [[ -n “$my_zlib” ]];then
echo “$my_zlib”
else
yum -y install zlib
fi
my_zlib_devel=rpm -qa zlib-devel
if [[ -n “$my_zlib_devel” ]];then
echo “$my_zlib_devel”
else
yum -y install zlib-devel
fi
my_openssl=rpm -qa openssl
if [[ -n “$my_openssl” ]];then
echo “$my_openssl”
else
yum -y install openssl
fi
my_openssl_devel=rpm -qa openssl-devel
if [[ -n “$my_openssl_devel” ]];then
echo “$my_openssl_devel”
else
yum -y install openssl-devel
fi
2.下载nginx源码包
链接:http://nginx.org/en/download.html
源代码的放置目录:/usr/local/src
源码安装的目录:/usr/local/
3.编译安装:
cd /usr/local/src
tar -zxvf nginx-1.14.0.tar.gz
cd nginx-1.14.0
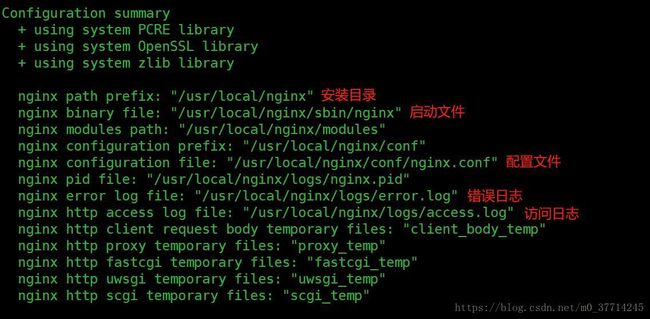
./configure --prefix=/usr/local/nginx --with-http_ssl_module
make && make install
安装脚本:
if [ $? -ne 0 ];then
echo “configure error. exit 2”
exit 2
fi
echo “*********************************”
echo “configure success”
echo “*********************************”
echo “sleep 5, and begin make and make install”
sleep 5
make
make install
echo “install nginx success. nginx is in /usr/local/nginx”
exit 0
nginx安装完成后,查看nginx版本:
/usr/local/nginx/sbin/nginx -V
4.配置开机自启
https://www.jianshu.com/p/b5fa86d54685


