Ansible的用法
对于运维人员来讲,每天可能要处理的是多台电脑,而且每天大量的而且重复的执行相同的操作是很耗费精神的事情。
经常接触到的运维工具
Zabbix
Zabbix是一款入门简单、上手简单、功能强大的开源监控工具,其易于管理和配置,能生成比较漂亮的数据图,其自动发现功能大大减轻日常管理的工作量,丰富的数据采集方式和API接口可以让用户灵活进行数据采集,而分布式系统架构可以支持监控更多的设备。理论上,通过Zabbix提供的插件式架构,可以满足企业的任何需求。对于一般中小型企业可以选择Zabbix作为监控工具。
Fabric
Fabric是基于Python实现的SSH命令行工具,简化了SSH的应用程序部署及系统管理任务,它提供了系统基础的操作组件,可以实现本地或远程shell命令
包括:命令执行、文件上传、下载及完整执行日志输出等功能。Fabric在Paramiko的基础上做了更高一层的封装,操作起来会更加简单。
Ansible
部署简单,只需在主控端部署 Ansible 环境,被控端无需做任何操作。
默认使用 SSH(Secure Shell)协议对设备进行管理。主从集中化管理。
配置简单、功能强大、扩展性强。支持 API 及自定义模块,可通过 Python 轻松扩展。对云计算平台、大数据都有很好的支持。提供一个功能强大、操作性强的 Web 管理界面和 REST API 接口 ---- AWX 平台
- 部署简单,只需在主控端部署Ansible环境,被控端无需做任何操作;
- 默认使用SSH协议对设备进行管理;
- 主从集中化管理;
- 配置简单、功能强大、扩展性强;
- 支持API及自定义模块,可通过Python轻松扩展;
- 通过Playbooks来定制强大的配置、状态管理;
- 对云计算平台、大数据都有很好的支持;
- 提供一个功能强大、操作性强的Web管理界面和REST API接口——AWX平台。
- 幂等性:一种操作重复多次结果相同
总结
简评:
(1)、轻量级,无需在客户端安装agent,更新时,只需在操作机上进行一次更新即可;
(2)、批量任务执行可以写成脚本,而且不用分发到远程就可以执行;
(3)、使用python编写,维护更简单,ruby语法过于复杂;
(4)、支持sudo。
我们这个博客主要讲解一下Ansible的用法
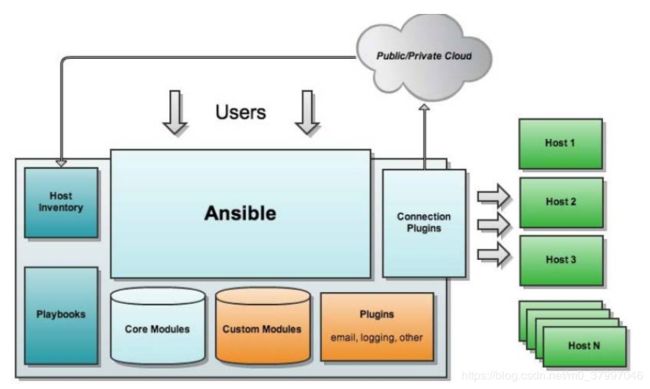
架构图
- Ansible:Ansible的核心程序
- Host Lnventory:记录了每一个由Ansible管理的主机信息,信息包括ssh端口,root帐号密码,ip地址等等。可以通过file来加载,可以通过CMDB加载
- Playbooks:YAML格式文件,多个任务定义在一个文件中,使用时可以统一调用,“剧本”用来定义那些主机需要调用那些模块来完成的功能.
- CoreModules:Ansible执行任何管理任务都不是由Ansible自己完成,而是由核心模块完成;Ansible管理主机之前,先调用core Modules中的模块,然后指明管理Host Lnventory中的主机,就可以完成管理主机。
- Custom Modules:自定义模块,完成Ansible核心模块无法完成的功能,此模块支持任何语言编写。
- Connection Plugins:连接插件,Ansible和Host通信使用
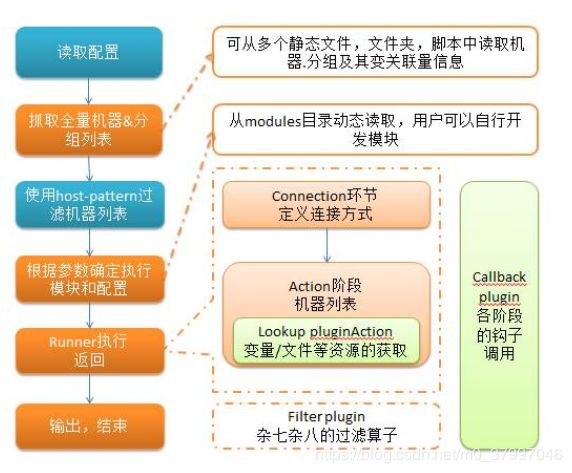
执行过程
环境配置
| Hosts | Ip |
|---|---|
| master 安装有Ansible | 192.168.194.148 |
| node1 Ansible所管理的物理机 | 192.168.194.144 |
设置免密码登陆
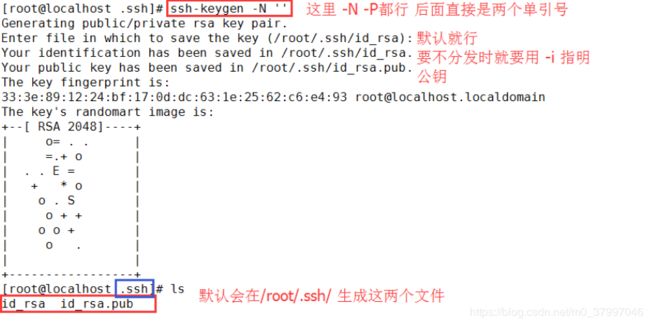
生成公钥/私钥
将生成的密钥/公钥发送到node上
ssh-copy-id [email protected]
在Master上进行查看

在node1上进行查看

如果两边已经都生成的话就说明两边可以免密码连接了
测试
[root@localhost .ssh]# ssh 192.168.194.144
Last login: Mon Nov 12 18:03:14 2018 from 192.168.194.1
连接成功
在master安装Ansible
yum -y install Ansible
修改配置文件
vi /etc/ansible/ansible.cfg
host_key_checking = False
将node加入Ansible所控制的host中
vi /etc/ansible/hosts
定义方式:
直接指明主机地址或主机名
blue.example.com
192.168.194.144
定义一个主机组[组名]把地址或主机名加进去
[webservers]
master
node
192.168.194.148
192.168.194.144
#组成员可以使用通配符来匹配,如下
www[001:006].example.com #表示从www001-www006主机
如果你没有使用公钥,想要使用密码,你也可以这样写(适用于第一次登陆控制)
格式:【主机名】 【主机地址】 【主机密码】 默认是root用户来进行的
[keepalived]
keepalived1 ansible_ssh_host=192.168.146.136 ansible_ssh_pass=“test”
keepalived2 ansible_ssh_host=192.168.146.137 ansible_ssh_pass=“test”
Ansible基本模块的使用
command的使用(不支持管道命令)
作用:在master端通过命令远程控制node
creates:一个文件名,当该文件存在,则该命令不执行
free_form:要执行的linux指令
chdir:在执行指令之前,先切换到该目录
removes:一个文件名,当该文件不存在,则该选项不执行
executable:切换shell来执行指令,该执行路径必须是一个绝对路径
[root@bogon ~]# ansible 192.168.194.144 -m command -a "id root"
192.168.194.144 | SUCCESS | rc=0 >>
uid=0(root) gid=0(root) 组=0(root)
shell:在远程主机上调用shell解释器运行命令,支持shell的各种功能,例如管道等 ;
ping:探测目标主机是否存活;
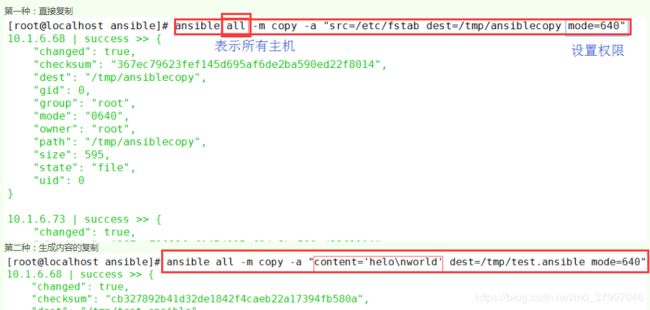
copy:复制文件到远程主机,可以改权限等
backup:在覆盖之前,将源文件备份,备份文件包含时间信息。有两个选项:yes|no
content:用于替代“src”,可以直接设定指定文件的值
dest:必选项。要将源文件复制到的远程主机的绝对路径,如果源文件是一个目录,那么该路径也必须是个目录
directory_mode:递归设定目录的权限,默认为系统默认权限
force:如果目标主机包含该文件,但内容不同,如果设置为yes,则强制覆盖,如果为no,则只有当目标主机的目标位置不存在该文件时,才复制。默认为yes
others:所有的file模块里的选项都可以在这里使用
src:被复制到远程主机的本地文件,可以是绝对路径,也可以是相对路径。如果路径是一个目录,它将递归复制。在这种情况下,如果路径使用“/”来结尾,则只复制目录里的内容,如果没有使用“/”来结尾,则包含目录在内的整个内容全部复制,类似于rsync。
file :设置文件属性。
force:需要在两种情况下强制创建软链接,一种是源文件不存在,但之后会建立的情况下;另一种是目标软链接已存在,需要先取消之前的软链,然后创建新的软链,有两个选项:yes|no
group:定义文件/目录的属组
mode:定义文件/目录的权限
owner:定义文件/目录的属主
path:必选项,定义文件/目录的路径
recurse:递归设置文件的属性,只对目录有效
src:被链接的源文件路径,只应用于state=link的情况
dest:被链接到的路径,只应用于state=link的情况
state:
directory:如果目录不存在,就创建目录
file:即使文件不存在,也不会被创建
link:创建软链接
hard:创建硬链接
touch:如果文件不存在,则会创建一个新的文件,如果文件或目录已存在,则更新其最后修改时间
absent:删除目录、文件或者取消链接文件
fetch: 从远程某一个主机获取文件到本地
cron: 管理cron计划任务
- a “”: 设置管理节点生成定时任务
action: cron
backup= # 如果设置,创建一个crontab备份
cron_file= #如果指定, 使用这个文件cron.d,而不是单个用户crontab
day= # 日应该运行的工作( 1-31, *, */2, etc )
hour= # 小时 ( 0-23, *, */2, etc )
job= #指明运行的命令是什么
minute= #分钟( 0-59, *, */2, etc )
month= # 月( 1-12, *, */2, etc )
name= #定时任务描述
reboot # 任务在重启时运行,不建议使用,建议使用special_time
special_time # 特殊的时间范围,参数:reboot(重启时),annually(每年),monthly(每月),weekly(每周),daily(每天),hourly(每小时)
state #指定状态,prsent表示添加定时任务,也是默认设置,absent表示删除定时任务
user # 以哪个用户的身份执行
weekday # 周 ( 0-6 for Sunday-Saturday, *, etc )
conf_file #设定远程yum安装时所依赖的配置文件。如配置文件没有在默认的位置。
disable_gpg_check #是否禁止GPG checking,只用于present' orlatest’。
disablerepo #临时禁止使用yum库。 只用于安装或更新时。
enablerepo #临时使用的yum库。只用于安装或更新时。
name= #所安装的包的名称
state #present安装, latest安装最新的, absent 卸载软件。
update_cache #强制更新yum的缓存。
service: 服务程序管理
arguments #命令行提供额外的参数
enabled #设置开机启动。
name= #服务名称
runlevel #开机启动的级别,一般不用指定。
sleep #在重启服务的过程中,是否等待。如在服务关闭以后等待2秒再启动。
state #started启动服务, stopped停止服务, restarted重启服务, reloaded重载配置
启动httpd服务:

ansible all -m service -a 'name=httpd state=started'
开机自启动

ansible all -m service -a "name=httpd  enabled=true"
group: 组管理
[root@node1 ~]# ansible-doc -s group
- name: 添加或删除组
action: group
gid       # 设置组的GID号
name=     # 管理组的名称
state     # 指定组状态,默认为创建,设置值为absent为删除
system    # 设置值为yes,表示为创建系统组
User:用户管理
-a “”
action: user
comment # 用户的描述信息
createhom # 是否创建家目录
force # 在使用state=absent'是, 行为与userdel --force’一致.
group # 指定基本组
groups # 指定附加组,如果指定为(‘groups=’)表示删除所有组
home # 指定用户家目录
login_class #可以设置用户的登录类 FreeBSD, OpenBSD and NetBSD系统.
move_home # 如果设置为home='时, 试图将用户主目录移动到指定的目录 name= # 指定用户名 non_unique # 该选项允许改变非唯一的用户ID值 password # 指定用户密码 remove # 在使用state=absent’时, 行为是与 `userdel --remove’一致.
shell # 指定默认shell
state #设置帐号状态,不指定为创建,指定值为absent表示删除
system # 当创建一个用户,设置这个用户是系统用户。这个设置不能更改现有用户。
uid #指定用户的uid
update_password # 更新用户密码
expires #指明密码的过期时间
setup:获取指定主机的facts。
当我们要一次性的执行多条命令时,可以采用yml文件方式
2 编写.yml文件
---

- hosts: 192.168.1.141

 remote_user: root


 tasks:

   - name: "demo shell"

     shell: echo helloworld I love ansible >> /home/web2.log

     shell: ls /home/ >> /home/web2.log
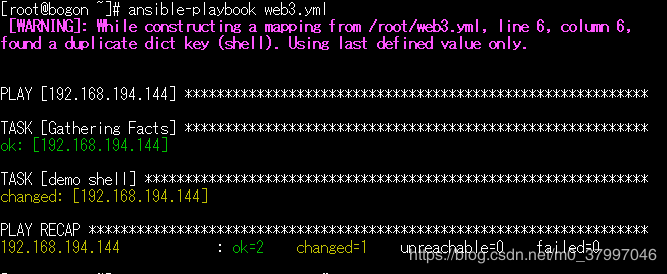
3 运行.yml文件
ansible-playbook web3.yml
如何向yml文件中传参数
---

- hosts: 192.168.1.141

 remote_user: root

 vars:

  download: '{{ new_name }}'

 tasks:

 - name: 开始下载'{{ new_name }}'

   yum: name='{{ new_name }}' state=latest
如何运行:
ansible-playbook web3.yml --extra-vars "{'new_name':'tree'}"
如何将yml文件和python脚本结合起来:
1 首先在网上下载python的API脚本文件,在该文件上进行修改
#!/usr/bin/env python

import sys

import json

import shutil

from collections import namedtuple

from ansible.parsing.dataloader import DataLoader

from ansible.vars.manager import VariableManager

from ansible.inventory.manager import InventoryManager

from ansible.playbook.play import Play

from ansible.executor.task_queue_manager import TaskQueueManager

from ansible.plugins.callback import CallbackBase

import ansible.constants as C

from ansible.executor.playbook_executor import PlaybookExecutor


class ResultCallback(CallbackBase):

   """A sample callback plugin used for performing an action as results come in


   If you want to collect all results into a single object for processing at

   the end of the execution, look into utilizing the ``json`` callback plugin

   or writing your own custom callback plugin

   """

   def v2_runner_on_ok(self, result, **kwargs):

       """Print a json representation of the result


       This method could store the result in an instance attribute for retrieval later

       """

       host = result._host

       print(json.dumps({host.name: result._result}, indent=4))


# since API is constructed for CLI it expects certain options to always be set, named tuple 'fakes' the args parsing options object

Options = namedtuple('Options', ['connection', 'module_path', 'forks', 'become', 'become_method', 'become_user', 'check', 'diff','listhosts','listtasks','listtags','syntax'])

options = Options(connection='ssh', module_path=['/to/mymodules'], forks=10, become=None, become_method=None, become_user=None, check=False, diff=False,listhosts=False,listtasks=False,listtags=False,syntax=False)


# initialize needed objects

loader = DataLoader() # Takes care of finding and reading yaml, json and ini files

passwords = dict(vault_pass='secret')


# Instantiate our ResultCallback for handling results as they come in. Ansible expects this to be one of its main display outlets

results_callback = ResultCallback()


# create inventory, use path to host config file as source or hosts in a comma separated string

inventory = InventoryManager(loader=loader, sources='/etc/ansible/hosts')


# variable manager takes care of merging all the different sources to give you a unifed view of variables available in each context

variable_manager = VariableManager(loader=loader, inventory=inventory)


# create datastructure that represents our play, including tasks, this is basically what our YAML loader does internally.

cmd=input("请输入你要执行的命令:")

play_source =  dict(

       name = "Ansible Play",

       hosts = 'webservers',

       gather_facts = 'no',

       tasks = [

           dict(action=dict(module='shell', args=cmd), register='shell_out'),

           dict(action=dict(module='debug', args=dict(msg='{{shell_out.stdout}}')))

        ]

   )

#----------------------------------------

def playbookrun(playbook_path):


   variable_manager.extra_vars = {'customer': 'test', 'disabled': 'yes'}

   playbook = PlaybookExecutor(playbooks=playbook_path,

                                   inventory=inventory,

                                   variable_manager=variable_manager,

                                   loader=loader, options=options, passwords=passwords)

   result = playbook.run()

   return result


path=input("请输入你要上传的文件:")

s1=playbookrun(playbook_path=[path])

print(s1)

#----------------------------------------


# Create play object, playbook objects use .load instead of init or new methods,

# this will also automatically create the task objects from the info provided in play_source

play = Play().load(play_source, variable_manager=variable_manager, loader=loader)


# Run it - instantiate task queue manager, which takes care of forking and setting up all objects to iterate over host list and tasks

tqm = None

try:

   tqm = TaskQueueManager(

             inventory=inventory,

             variable_manager=variable_manager,

             loader=loader,

             options=options,

             passwords=passwords,

             stdout_callback=results_callback,  # Use our custom callback instead of the ``default`` callback plugin, which prints to stdout

         )

   result = tqm.run(play) # most interesting data for a play is actually sent to the callback's methods

finally:

   # we always need to cleanup child procs and the structres we use to communicate with them

   if tqm is not None:

       tqm.cleanup()


   # Remove ansible tmpdir

   shutil.rmtree(C.DEFAULT_LOCAL_TMP, True)
运行脚本
[root@bogon python_code]# python3 phon.py

请输入你要执行的命令:ls

请输入你要上传的文件:/root/web2.yml

[WARNING]: While constructing a mapping from /root/web2.yml, line 6, column 7, found a duplicate dict key (shell). Using last

defined value only.


PLAY [192.168.1.141] ****************************************************************************************************************


TASK [Gathering Facts] **************************************************************************************************************

ok: [192.168.1.141]


TASK [demo shell] *******************************************************************************************************************

changed: [192.168.1.141]


PLAY RECAP **************************************************************************************************************************

192.168.1.141              : ok=2    changed=1    unreachable=0    failed=0


0
