Spring Cloud之统一配置中心(Spring Cloud Config,Spring Cloud Bus自动刷新功能)
环境
jdk1.8,maven,idea,rabbitmq,docker,码云。
配置中心
使用配置中心的目的,一个是方便维护,一个是为了配置内容的安全和权限,因为各自有各自的配置在远端git上。这样的话就进行隔离。最重要的一点是自动刷新配置。
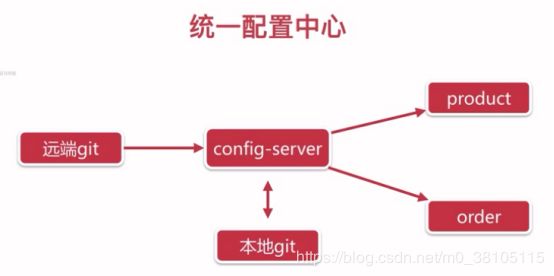
远端git我这里用的是码云,这张图就是说config-server从远端git把配置拉下来,然后在本地git同步一份,如果远端不能使用,那么能使用本地,然后再给服务使用。

创建项目,进行配置
1,创建一个项目,作为config使用。
在启动类上添加注解
@EnableConfigServer

3,在config-server端进行填写配置
spring:
  application:
    name: config-server
  cloud:
    config:
      server:
        git:
          uri: git远端的url
          username: 用户名
          password: 密码
          basedir: 存放配置的本地路径
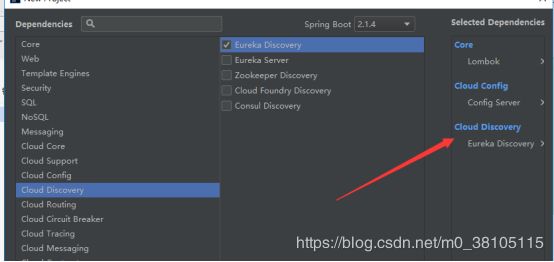
4,在客户端进行添加依赖和配置
            org.springframework.cloud
            spring-cloud-config-client
spring:
  application:
    name: order
  cloud:
    config:
#    发现配置中新的服务器端
      discovery:
        enabled: true
        service-id: CONFIG-SERVER
#        文件名
      profile: test
在这里我们应该注意,这是我们访问的格式

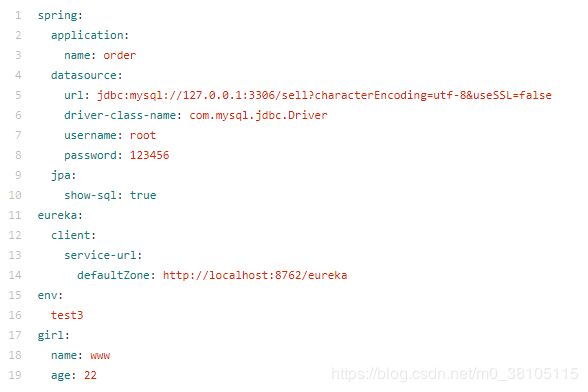
当远端有order.yml和order-test.yml两个配置文件的时候,优先访问order.yml,这样的话,如果两个配置了一样的文件,但是端口号不同,这个时候就会出现访问的不是你要的。
此时配置已经完成,启动Eureka和Config配置中心,直接进行访问远端的配置文件。
http://localhost:8080/order-profile.yml
这里的profile可以随意填写,上面有格式可以参考。
自动刷新配置
我们平常比较困难的一个地方就是重写配置之后进行刷新的话必须要重新运行方法。
1,运行你的rabbitmq,可以不在docker上,这里docker运行rabbitmq不做介绍。
2,服务器端配置
【application.yml】
spring:
  application:
    name: config-server
  cloud:
    config:
      server:
        git:
          uri: git远端的url
          username: 用户名
          password: 密码
          basedir: 存放配置的本地路径
#自动刷新
    bus:
      refresh:
        enabled: true
  rabbitmq:
    host: rabbitmq的主机名
eureka:
  client:
    service-url:
      defaultZone: http://localhost:8762/eureka/
#进行暴露服务
management:
  endpoints:
    web:
      exposure:
        include: "*"
我们可以看到这是rabbitmq的默认配置

【启动类上】
@EnableConfigServer
【pom.xml】
    4.0.0

        org.springframework.boot
        spring-boot-starter-parent
        2.0.6.RELEASE


    com.springcloud
    config
    0.0.1-SNAPSHOT
    config
    Demo project for Spring Boot


        1.8
        Finchley.SR2


            org.springframework.cloud
            spring-cloud-config-server


            org.springframework.cloud
            spring-cloud-starter-netflix-eureka-client


            org.springframework.cloud
            spring-cloud-starter-bus-amqp


            org.projectlombok
            lombok
            true


            org.springframework.boot
            spring-boot-starter-test
            test


                org.springframework.cloud
                spring-cloud-dependencies
                ${spring-cloud.version}
                pom
                import


                org.springframework.boot
                spring-boot-maven-plugin
3,客户端配置
【bootstrap.yml】
bootstrap.yml和application.yml的区别就是
bootstrap.yml先加载,bootstrap.yml 由父Spring ApplicationContext加载。
父ApplicationContext 被加载到使用 application.yml 的之前。
spring:
  application:
    name: order
  cloud:
    config:
#    发现配置中新的服务器端
      discovery:
        enabled: true
        service-id: CONFIG-SERVER
#        文件名
      profile: test
#      自动刷新
    bus:
      refresh:
        enabled: true
  rabbitmq:
    host: rabbitmq的主机名
eureka:
  client:
    service-url:
      defaultZone: http://localhost:8762/eureka
【pom.xml】
        order
        com.springcloud
        0.0.1-SNAPSHOT

    4.0.0

    order-server


            org.springframework.cloud
            spring-cloud-starter-netflix-eureka-client


            org.springframework.cloud
            spring-cloud-config-client


            org.springframework.boot
            spring-boot-starter-web


            org.springframework.boot
            spring-boot-starter-test
            test


            org.springframework.boot
            spring-boot-starter-data-jpa


            mysql
            mysql-connector-java


            org.projectlombok
            lombok


            com.google.code.gson
            gson


            org.springframework.cloud
            spring-cloud-starter-openfeign


            com.springcloud
            product-common
            0.0.1-SNAPSHOT


            com.springcloud
            product-client


            com.springcloud
            order-common


            org.springframework.cloud
            spring-cloud-config-client


            org.springframework.cloud
            spring-cloud-starter-bus-amqp


                org.springframework.boot
                spring-boot-maven-plugin
【GirlConfig.java】
@Data
@Component
//扫描配置
@ConfigurationProperties("girl")
//刷新哪个类就在那个上面加上这个注解
@RefreshScope
public class GirlConfig {
    private String name;
    private Integer age;
}
【GirlController.java】
@RestController
public class GirlController {
    @Autowired
    private GirlConfig girlConfig;

    @GetMapping("/girl/print")
    public String print(){
        return "name:"+girlConfig.getName()+",age:"+girlConfig.getAge();
    }
}
注意
在进行配置改变刷新之前要进行一步post提交操作。我们可以在码云上进行配置一下,或者每次都进行手动提交。
【手动提交】
curl -v -X POST “http://localhost:8080/actuator/bus-refresh”。
这里的端口号是config-server的。
【自动提交】
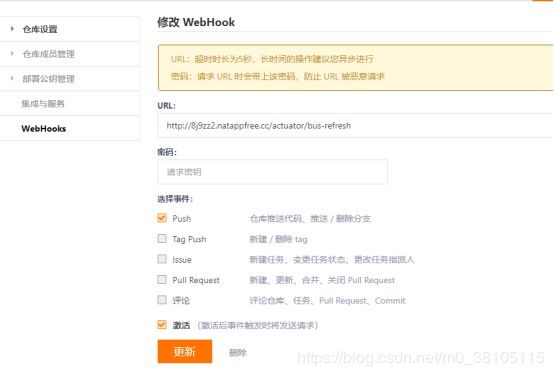
spring cloud bus就是用来操作消息队列,config-server和product,order进行消息通信。config-server提供了消息通信后对外提供一个消息接口/bus-refresh。远端的git进行访问这个接口。Git接口一般提供webhooks这个功能。
提交之后rabbitmq会有这样的变化。

码云上配置一下。

坑
1,版本要一致
2,一定要写双引号""
management:
  endpoints:
    web:
      exposure:
        include: "*"

