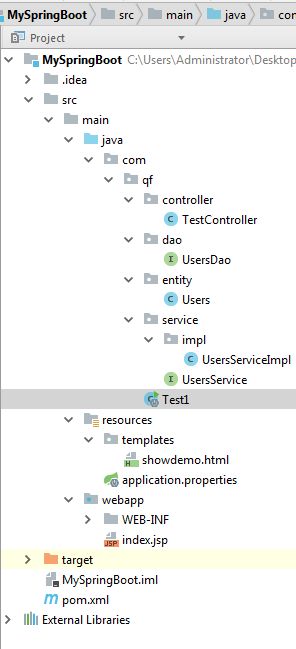
springboot使用thymeleaf与页面整合-----以案例呈现
使用thymeleaf主要就是导入了它的依赖。其实主要内容还是springboot
本案例创建的是IDEA的maven的web项目
步骤一:在sprin.xml中导入springboot的依赖和数据库连接的依赖:
  <!--parent是继承,描述关系.体现maven的继承性-->
  <parent>
    <groupId>org.springframework.boot</groupId>
    <artifactId>spring-boot-starter-parent</artifactId>
    <version>1.4.5.RELEASE</version>
    <relativePath/>
  </parent>
注意< dependency>标签放在< dependencies>标签中的。而 < parent>标签放在< dependencies>标签之上的
   <!-- mvc,aop的依赖包。SpringBoot导进来的所有包都是通过这个依赖导进来的,体现maven的依赖性 -->
    <dependency>
      <groupId>org.springframework.boot</groupId>
      <artifactId>spring-boot-starter-web</artifactId>
      <!-- 由于我们在上面指定了parent,这里就不需要指定版本号 -->
    </dependency>
    <!--处理springboot的json数据中日期的依赖-->
    <dependency>
      <groupId>com.alibaba</groupId>
      <artifactId>fastjson</artifactId>
      <version>1.2.15</version>
    </dependency>
    <dependency>
      <groupId>org.springframework.boot</groupId>
      <artifactId>spring-boot-starter-data-jpa</artifactId>
      <version>1.5.2.RELEASE</version>
    </dependency>
    <dependency>
      <groupId>mysql</groupId>
      <artifactId>mysql-connector-java</artifactId>
      <version>5.1.41</version>
    </dependency>
    <!--thymeleaf依赖包-->
    <dependency>
      <groupId>org.springframework.boot</groupId>
      <artifactId>spring-boot-starter-thymeleaf</artifactId>
    </dependency>
步骤二:在resources下创建application.properties属性文件,配置数据库连接,页面返回的相关信息
application.properties是固定名称,低层只会读到这个
##链接数据库信息
spring.datasource.url=jdbc:mysql://localhost:3306/day06
spring.datasource.username=root
spring.datasource.password=root
##数据库连接驱动地址.这里试着手打,不然可能会报datasources错误
spring.datasource.driverClassName=com.mysql.jdbc.Driver
##活跃数量
spring.datasource.max-active=20
##最大连接池数量
spring.datasource.max-idle=8
##最小连接池数量
spring.datasource.min-idle=8

spring.datasource.initial-size=10

### spring jpa配置信息
##指定那个数据库
spring.jpa.database=MYSQL
##展示sql语句
spring.jpa.show-sql=true
##生成数据表
spring.jpa.hibernate.ddl-auto=update
##指定数据表的生成规则(即表名和类名相同)
spring.jpa.hibernate.naming-strateg=org.hibernate.cfg.ImprovedNamingStrategy
##方言,此处是mysql的数据库方言
spring.jpa.properties.hibernate.dialect=org.hibernate.dialect.MySQL5Dialect


# 以下都是默认配置,所以用注释注释起来的。想改的话把注释打开即可
#找页面时自动去templates文件夹下找页面。相当于也是设置controller那return时的页面前缀
#spring.thymeleaf.prefix=classpath:/templates/

#设置controller那return时的后缀
#spring.thymeleaf.suffix=.html

#页面用h5的语法
#spring.thymeleaf.mode=html5

#编码用utf-8
#spring.thymeleaf.encoding=utf-8

#类型是text/html
#spring.thymeleaf.content-type=text/html


#取消缓存。保证每次页面都是最新的数据
spring.thymeleaf.cache=false
步骤三:在resources下创建templates文件,用于存放controller层跳转的页面
templates是固定名称,低层会自动读取templates文件夹下的页面。
本案例在该文件夹下创建的页面命名为:showdemo.html
<!DOCTYPE html>
<html lang="en" xmlns:th="http://www.w3.org/1999/xhtml">
<head>
    <meta charset="UTF-8"/>
    <title>Title</title>
</head>
<body>

<h1>demo1.html</h1>
<li th:each="user : ${userlist}"> <!--遍历controller传过来的userlist集合-->
    <span th:text="${user.username}"></span>
</li>
</body>
</html>
上面SpringBoot加springData数据库基本整合完了。下面开始使用。
步骤三:定义实体类(使用springdata的规则,指定数据库与实体类的关系)
将该实体类命名为:Users
package com.qf.entity;

import com.alibaba.fastjson.annotation.JSONField;

import javax.persistence.*;
import java.text.Format;
import java.util.Date;
@Entity
public class Users {
    @Id
    @GeneratedValue(strategy = GenerationType.IDENTITY)//自增。sqlserver和mysql数据库用IDENTITY,Oracle数据库用.SEQUENCE
    private Integer userId;
    @Column
    private String username;
    @Column
    @JSONField(format = "yyyy-MM-dd HH:mm:ss")
    private Date birthday;
    @Column
    private Integer age;

    public String getUsername() {
        return username;
    }

    public void setUsername(String username) {
        this.username = username;
    }

    public Date getBirthday() {
        return birthday;
    }

    public void setBirthday(Date birthday) {
        this.birthday = birthday;
    }

    public Integer getUserId() {
        return userId;
    }

    public void setUserId(Integer userId) {
        this.userId = userId;
    }

    public Integer getAge() {
        return age;
    }

    public void setAge(Integer age) {
        this.age = age;
    }

    @Override
    public String toString() {
        return "Users{" +
                "userId=" + userId +
                ", username='" + username + '\'' +
                ", birthday=" + birthday +
                ", age=" + age +
                '}';
    }
}
步骤四:在dao层下定义dao接口,主要为了继承JpaRepository
将该接口命名为:UsersDao
package com.qf.dao;

import com.qf.entity.Users;
import org.springframework.data.jpa.repository.JpaRepository;

public interface UsersDao extends JpaRepository<Users,Integer>{//继承JpaRepository后记得加,不然会报UsersDao对象创建错误,Integer为实体类对应表的主键类型。因为是全查,所以没写方法

}
步骤五:设置service层接口及实现类
将接口定义为:UsersService
package com.qf.service;

        import com.qf.entity.Users;

        import java.util.List;

public interface UsersService {
    public List<Users> getall();
}
将实现类定义为:UsersServiceImpl
package com.qf.service.impl;

import com.qf.dao.UsersDao;
import com.qf.entity.Users;
import com.qf.service.UsersService;
import org.springframework.stereotype.Service;

import javax.annotation.Resource;
import java.util.List;
@Service
public class UsersServiceImpl implements UsersService {
    @Resource
    UsersDao usersDao;
    @Override
    public List<Users> getall() {
        return usersDao.findAll();//UserDao继承的JpaRepository类提供的findAll()方法
    }
}
步骤六:在controller层中创建和前端页面数据交互的类
将该类命名为:TestController
package com.qf.controller;
import com.qf.entity.Users;
import com.qf.service.UsersService;
import org.apache.catalina.User;
import org.springframework.stereotype.Controller;
import org.springframework.ui.ModelMap;
import org.springframework.web.bind.annotation.RequestMapping;
import javax.annotation.Resource;
import javax.servlet.http.HttpServletResponse;
import java.util.Date;
import java.util.List;

//RestController将方法返回结果转换成json格式并创建当前类对象。
@Controller//用的是Controller不是RestController,因为要跳转页面
public class TestController {
    @Resource
    private UsersService usersService;
    @RequestMapping("/getUsers")//地址栏访问请求的地址http://localhost:8080/getUsers
    public String test3(ModelMap map, HttpServletResponse response){
        response.setContentType("text/html;charset=utf-8");
        List<Users> list = usersService.getall();
        map.addAttribute("userlist",list);
          return "showdemo";//实际是templates/showdemo.html
    }

}
步骤七:创建启动类(该类必须继承WebMvcConfigurerAdapter )
将该类命名为:Test1
package com.qf;

        import com.alibaba.fastjson.serializer.SerializerFeature;
        import com.alibaba.fastjson.support.config.FastJsonConfig;
        import com.alibaba.fastjson.support.spring.FastJsonHttpMessageConverter;
        import org.springframework.boot.SpringApplication;
        import org.springframework.boot.autoconfigure.SpringBootApplication;
        import org.springframework.boot.autoconfigure.web.HttpMessageConverters;
        import org.springframework.context.annotation.Bean;
        import org.springframework.http.converter.HttpMessageConverter;
        import org.springframework.web.servlet.config.annotation.WebMvcConfigurerAdapter;

        import java.util.List;

@SpringBootApplication//声明这是springBoot的启动类。该启动类必须放在要启动的类(即含有@RestController)的父包里。不然会运行不成功
public class Test1 extends WebMvcConfigurerAdapter {
    //重写configureMessageConverters,使实体类中的日期格式生效
    @Override
    public void configureMessageConverters(List<HttpMessageConverter<?>> converters) {//无返回值方法
        FastJsonHttpMessageConverter converter = new FastJsonHttpMessageConverter();//创建 FastJsonHttpMessageConverter对象
        FastJsonConfig config = new FastJsonConfig();//创建FastJsonConfig对象
        config.setSerializerFeatures(SerializerFeature.PrettyFormat);//设置格式的参数,SerializerFeature是一个枚举,里面有很多参数
       converter.setFastJsonConfig(config);
       converters.add(converter);

    }


    public static void main(String[] args) {
        SpringApplication.run(Test1.class, args);//固定格式,Test1为本类类名。启动controller类,相当于SSM中启动Tomcat的步骤
    }


}
