(描述可能不是很准确,多多包涵)zipkin类似于日志的高级版,跟踪监控,监控每一次请求链。
zipkin的一些理解:
cs Client Send 客户端发起请求
sr Server Receive 服务器接收请求,开始处理
ss Server Send 服务器完成处理,给客户端应答
cr Client Receive 客户端接受应答从服务器
traceId:标记一次请求的跟踪,相关的Spans都有相同的traceId;
id:span id;
name:span的名称,一般是接口方法的名称;
parentId:可选的id,当前Span的父Span id,通过parentId来保证Span之间的依赖关系,如果没有parentId,表示当前Span为根Span;
timestamp:Span创建时的时间戳,使用的单位是微秒(而不是毫秒),所有时间戳都有错误,包括主机之间的时钟偏差以及时间服务重新设置时钟的可能性,
出于这个原因,Span应尽可能记录其duration;
duration:持续时间使用的单位是微秒(而不是毫秒);
annotations:注释用于及时记录事件;有一组核心注释用于定义RPC请求的开始和结束;
cs:Client Send,客户端发起请求;
sr:Server Receive,服务器接受请求,开始处理;
ss:Server Send,服务器完成处理,给客户端应答;
cr:Client Receive,客户端接受应答从服务器;
binaryAnnotations:二进制注释,旨在提供有关RPC的额外信息。
其实就是描述了一次请求的详细信息这些,比如时间等,如果请求失败(报bug或者服务器当掉),就可以通过zipkin来查看请求是执行到了哪一台服务器后失败的,从而得知哪台服务器有问题或者是出bug了。
若要查看zipkin面板其他属性的含义可以查看此博客:
https://segmentfault.com/a/1190000012342007
此过程是使用idea创建的。
共需要创建四个项目:
eurekaserver 注册中心
zipkin-service 本文核心内容zipkin
product-service 服务提供
order-service 服务调用
首先新建一个eureka注册中心:
目录结构如下:注:此图中的application-peer1.properties和application-peer2.properties以及static目录不需理会。

然后添加依赖:
    org.springframework.boot
    spring-boot-starter-parent
    1.4.4.RELEASE


    UTF-8
    UTF-8
    1.8


        org.springframework.cloud
        spring-cloud-starter


        org.springframework.boot
        spring-boot-starter-web


        org.springframework.cloud
        spring-cloud-starter-eureka-server


        org.springframework.boot
        spring-boot-starter-test
        test


        org.springframework.boot
        spring-boot-starter-thymeleaf


        org.springframework.boot
        spring-boot-starter-actuator


            org.springframework.cloud
            spring-cloud-dependencies
            Camden.SR6
            pom
            import


            org.springframework.boot
            spring-boot-maven-plugin
|
配置文件application.properties中添加配置:
spring.application.name=eureka-server


server.port=1111
eureka.instace.hostname=127.0.0.1
#注册中心不需要注册自己
eureka.client.register-with-eureka=false
eureka.client.fetch-registry=false
eureka.client.serviceUrl.defaultZone=http://127.0.0.1:1111/eureka/
|
编辑主类:
import org.springframework.boot.SpringApplication;
import org.springframework.boot.autoconfigure.SpringBootApplication;
import org.springframework.cloud.netflix.eureka.server.EnableEurekaServer;

@EnableEurekaServer
@SpringBootApplication
public class EurekaserverApplication {

    public static void main(String[] args) {
        SpringApplication.run(EurekaserverApplication.class, args);
    }
}
|
运行效果图为:

创建zipkin-service项目:
目录结构:

添加依赖为:
    org.springframework.boot
    spring-boot-starter-parent
    1.4.4.RELEASE


    UTF-8
    UTF-8
    1.8


        org.springframework.cloud
        spring-cloud-starter


        org.springframework.boot
        spring-boot-starter


        org.springframework.boot
        spring-boot-starter-test
        test


        io.zipkin.java
        zipkin-autoconfigure-ui
        runtime


        io.zipkin.java
        zipkin-server


        org.springframework.boot
        spring-boot-starter-actuator


        org.springframework.cloud
        spring-cloud-starter-eureka


            org.springframework.cloud
            spring-cloud-dependencies
            Camden.SR6
            pom
            import


            org.springframework.boot
            spring-boot-maven-plugin
|
配置文件application.properties的配置为:
spring.application.name=zipkin-service
server.port=9411
eureka.client.serviceUrl.defaultZone=http://127.0.0.1:1111/eureka/
|
编辑主类:
import org.slf4j.Logger;
import org.slf4j.LoggerFactory;
import org.springframework.boot.SpringApplication;
import org.springframework.boot.autoconfigure.SpringBootApplication;
import org.springframework.cloud.client.discovery.EnableDiscoveryClient;
import zipkin.server.EnableZipkinServer;


@EnableDiscoveryClient
@EnableZipkinServer
@SpringBootApplication
public class ZipkinServiceApplication {

    private static Logger logger=LoggerFactory.getLogger(ZipkinServiceApplication.class);

    public static void main(String[] args) {

        SpringApplication.run(ZipkinServiceApplication.class, args);
    }
}
|
运行效果图:

此时上图中的Service Name和Span Name下拉框是没有下拉选项的。
创建product-service项目:
目录结构为:

添加依赖为:
    org.springframework.boot
    spring-boot-starter-parent
    1.4.4.RELEASE


    UTF-8
    UTF-8
    1.8


        org.springframework.cloud
        spring-cloud-starter


        org.springframework.boot
        spring-boot-starter


        org.springframework.boot
        spring-boot-starter-test
        test


        org.springframework.cloud
        spring-cloud-starter-sleuth


        org.springframework.cloud
        spring-cloud-sleuth-zipkin


        org.springframework.cloud
        spring-cloud-starter-eureka


        org.springframework.boot
        spring-boot-starter-actuator


            org.springframework.cloud
            spring-cloud-dependencies
            Camden.SR6
            pom
            import


            org.springframework.boot
            spring-boot-maven-plugin
|
配置文件application.properties添加配置为:
spring.application.name=product-service
server.port=9002
spring.zipkin.base-url=http://127.0.0.1:9411/
eureka.client.serviceUrl.defaultZone=http://127.0.0.1:1111/eureka/
|
编辑主类:
import org.slf4j.Logger;
import org.slf4j.LoggerFactory;
import org.springframework.boot.SpringApplication;
import org.springframework.boot.autoconfigure.SpringBootApplication;
import org.springframework.cloud.client.discovery.EnableDiscoveryClient;
import org.springframework.http.HttpStatus;
import org.springframework.http.ResponseEntity;
import org.springframework.web.bind.annotation.RequestMapping;
import org.springframework.web.bind.annotation.RequestMethod;
import org.springframework.web.bind.annotation.RestController;

@EnableDiscoveryClient
@SpringBootApplication
@RestController
public class ProductServiceApplication {

    private static Logger logger=LoggerFactory.getLogger(ProductServiceApplication.class);


    public static void main(String[] args) {

        SpringApplication.run(ProductServiceApplication.class, args);
    }


    @RequestMapping(value="hello",method = RequestMethod.GET)
    public ResponseEntity hello(){
        logger.info("called by product-service");
        return new ResponseEntity<>("hello product service!",HttpStatus.OK);
    }

}
|
效果图:不需要
创建order-service项目:
目录结构:

添加依赖:和product-service依赖一样。
配置文件application.properties的配置为:
spring.application.name=order-service
server.port=9001
spring.zipkin.base-url=http://127.0.0.1:9411/
eureka.client.serviceUrl.defaultZone=http://127.0.0.1:1111/eureka/
|
编辑主类:
import org.slf4j.Logger;
import org.slf4j.LoggerFactory;
import org.springframework.beans.factory.annotation.Autowired;
import org.springframework.boot.SpringApplication;
import org.springframework.boot.autoconfigure.SpringBootApplication;
import org.springframework.cloud.client.discovery.EnableDiscoveryClient;
import org.springframework.cloud.client.loadbalancer.LoadBalanced;
import org.springframework.context.annotation.Bean;
import org.springframework.http.HttpStatus;
import org.springframework.http.ResponseEntity;
import org.springframework.web.bind.annotation.RequestMapping;
import org.springframework.web.bind.annotation.RequestMethod;
import org.springframework.web.bind.annotation.RestController;
import org.springframework.web.client.RestTemplate;

@EnableDiscoveryClient
@SpringBootApplication
@RestController
public class OrderServiceApplication {

    private static Logger logger=LoggerFactory.getLogger(OrderServiceApplication.class);

    @Bean
    @LoadBalanced
    RestTemplate restTemplate(){
        return new RestTemplate();
    }

    @Autowired
    RestTemplate restTemplate;

    public static void main(String[] args) {
        SpringApplication.run(OrderServiceApplication.class, args);

    }

    @RequestMapping(value = "/hello",method = RequestMethod.GET)
    public ResponseEntity hello(){
        return  new ResponseEntity("hello order service!", HttpStatus.OK);
    }

    @RequestMapping(value = "/product/hello",method = RequestMethod.GET)
    public  String productHello(){
        logger.info("order-service calling product-service!");
        return restTemplate.getForEntity("http://PRODUCT-SERVICE/hello",String.class).getBody();
    }
}
|
效果图:不需要。
至此所有项目已经建立完成,先启动注册中心,再启动zipkin,最后启动剩余的项目。
所有项目启动完成后注册中心应该多了这些服务:

而zipkin面板无变化。
访问此路径,在此路径下多刷新几次(5/6次多吧)

然后回到zipkin面板,Service Name下拉框则就有了下拉选项:
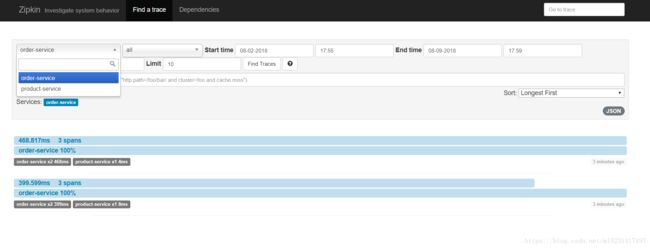
点击Find Traces则就出现此面板下面的信息(蓝色背景部分)。
至此zipkin已经搭建并简单测试完成。
对了,我在maven添加依赖中有个jar包没有下载下来(不知是网络原因还是怎么着):
最后索性使用手动添加方式:通过此命令添加到本地仓库中(需要配置maven环境变量):
查看是否配置maven环境变量:

下载jar包后使用此命令将jar包添加到本地仓库中:
当maven项目下载jar包失败(网络不好)时,使用此命令手动安装jar包到maven仓库
mvn install:install-file -Dfile=D:\kaptcha-2.3.2.jar -DgroupId=com.google.code -DartifactId=kaptcha -Dversion=2.3.2 -Dpackaging=jar |
也可自行百度手动添加jar包到maven仓库教程。如有不足,还望大家大佬们多多指教。