flume导入日志数据之hive分区
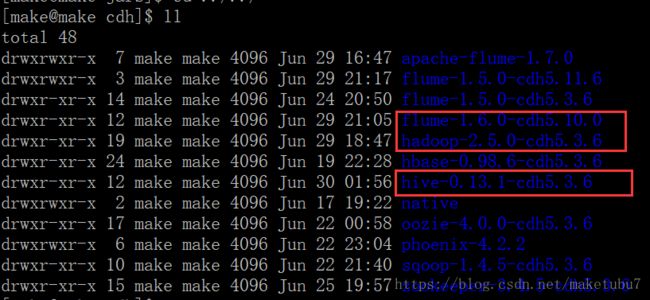
1、环境配置,截图如下
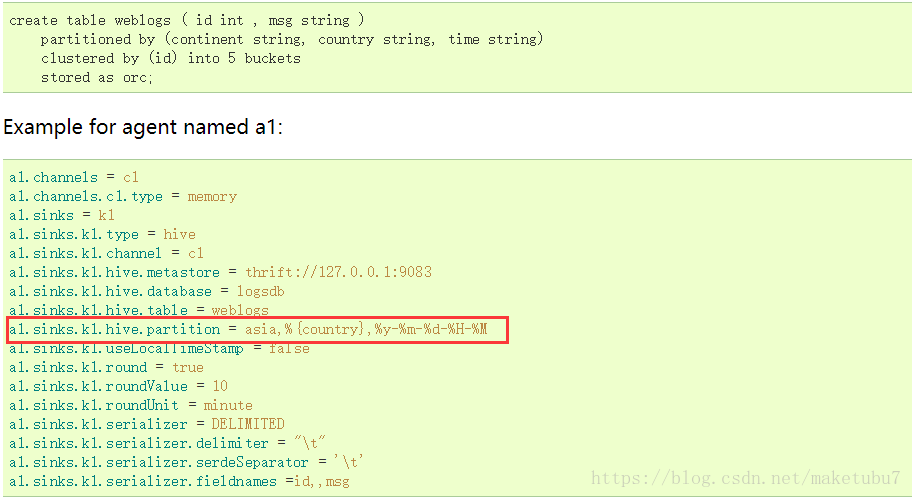
2、我们知道sink-hive官网上有一个分区的示例,我们看一下
但是这个示例我没有看懂什么意思,所以作为小白的我,开始了另一种分区的方式
2.1首先我们看看我们需要分区的日志文件的格式
"27.38.5.159" "-" "31/Aug/2015:00:04:37 +0800" "GET /course/view.php?id=27 HTTP/1.1" "303" "440" - "http://www.ibeifeng.com/user.php?act=mycourse" "Mozilla/5.0 (Windows NT 6.1; WOW64) AppleWebKit/537.36 (KHTML, like Gecko) Chrome/31.0.1650.63 Safari/537.36" "-" "learn.ibeifeng.com"
"27.38.5.159" "-" "31/Aug/2015:00:04:37 +0800" "GET /login/index.php HTTP/1.1" "303" "465" - "http://www.ibeifeng.com/user.php?act=mycourse" "Mozilla/5.0 (Windows NT 6.1; WOW64) AppleWebKit/537.36 (KHTML, like Gecko) Chrome/31.0.1650.63 Safari/537.36" "-" "learn.ibeifeng.com"
这是其中两条的数据,我们作为我们的source数据来源,
首先,我们要知道,我们的日志文件是要按照时间来进行二级分区,如果我们做过二级分区表的测试,应该知道他在hdfs上的一个目录结构,所以我们就按照分区的目录结构,通过flume来生成对应的目录结构在hdfs中,这里要确定好分区的字段,我们这里为了好测试,用的是day、hour进行二级分区
2.2分析好了第一步之后,我们来创建一个表,这一步也可以最后做,我就在这里做了,因为我们的日志数据的格式,不是很好,所以我们要对数据进行一个清洗,利用我们的正则,可以参考这个:
正则对日志数据的清洗 ==> https://blog.csdn.net/maketubu7/article/details/80472952
建表如下
create table IF NOT EXISTS  log_src (
remote_addr string,
remote_user string,
time_local string,
request string,
status string,
body_bytes_sent string,
request_body string,
http_referer string,
http_user_agent string,
http_x_forwarded_for string,
host string
)
partitioned by (day string,hour string)
ROW FORMAT SERDE 'org.apache.hadoop.hive.serde2.RegexSerDe'
WITH SERDEPROPERTIES (
  "input.regex" = "(\"[^ ]*\") (\"[-|^ ]*\") (\"[^}]*\") (\"[^}]*\") (\"[0-9]*\") (\"[0-9]*\") ([-|^ ]*) (\"[^ ]*\") (\"[^\"]*\") (\"[-|^ ]*\") (\"[^ ]*\")"
)
STORED AS TEXTFILE;
2.3对agent进行编程,具体如下,这里为了达到和hive分区的文件目录格式一样,利用了两个static拦截器,对其进行处理
##对log的完成数据,进行数据抽取,并对文件夹下所有文件进行实时监视

###define agent
a11.sources = r11
a11.channels = c11
a11.sinks = k11

#define sources
a11.sources.r11.type = exec
a11.sources.r11.command = tail -f /opt/module/cdh/flume-1.6.0-cdh5.10.0/data/apache.log
a11.sources.r11.shell = /bin/bash -c

#define interceptors_1
a11.sources.r11.interceptors = i1 i2
a11.sources.r11.interceptors.i2.type = static
a11.sources.r11.interceptors.i2.preserveExisting = true
a11.sources.r11.interceptors.i2.key = partition_2
a11.sources.r11.interceptors.i2.value = hour=

#define interceptors_2
a11.sources.r11.interceptors.i1.type = static
a11.sources.r11.interceptors.i1.preserveExisting = true
a11.sources.r11.interceptors.i1.key = partition_1
a11.sources.r11.interceptors.i1.value = day=

#define channels
a11.channels.c11.type = file
a11.channels.c11.checkpointDir = /opt/module/cdh/flume-1.5.0-cdh5.11.6/flume_file/checkpoint
a11.channels.c11.dataDirs = /opt/module/cdh/flume-1.5.0-cdh5.11.6/flume_file/data

#define sinks
a11.sinks.k11.type = hdfs
a11.sinks.k11.hdfs.useLocalTimeStamp = true
a11.sinks.k11.hdfs.path = /flume_hdfs_part/%{partition_1}%Y%m%d/%{partition_2}%H
a11.sinks.k11.hdfs.fileType = DataStream
a11.sinks.k11.hdfs.writeFormat = Text
a11.sinks.k11.hdfs.batchSize= 11
a11.sinks.k11.hdfs.filePrefix = apache
a11.sinks.k11.hdfs.fileSuffix = log
#控制 inuse_suff 的时间
a11.sinks.k11.hdfs.rollInterval = 3600
#控制 inuse_suff 的大小
a11.sinks.k11.hdfs.rollSize = 1000000
#控制event的数量
a11.sinks.k11.hdfs.rollCount = 1000
a11.sinks.k11.hdfs.round = true
a11.sinks.k11.hdfs..roundValue = 1
a11.sinks.k11.hdfs.roundUnit = hour
a11.sinks.k11.hdfs.batchSize= 10

#bind
a11.sources.r11.channels = c11
a11.sinks.k11.channel = c11
我们上面监控的日志使我们自己创建的一个文件,但是日志的格式,是正式的Apache日志,和实际工作中的格式是一样的,下面我们启动这个agent
bin/flume-ng agent \
--name a11 \
--conf conf \
--conf-file conf/a11_hdfs_par.conf \
-Dflume.root.logger=DEBUG,console
因为我们之前表中有数据,所以我们对时间进行修改后,在对.log文件进行数据插入,这样就可以生成新的分区
我们把时间改为2018/07/01 13:05:00,如下
然后我们对数据进行插入,这里可以多插入几条,重复也没有关系
/user/hive/warehouse/log_src
echo '"27.38.5.159" "-" "31/Aug/2015:00:04:37 +0800" "GET /login/index.php HTTP/1.1" "303" "465" - "http://www.ibeifeng.com/user.php?act=mycourse" "Mozilla/5.0 (Windows NT 6.1; WOW64) AppleWebKit/537.36 (KHTML, like Gecko) Chrome/31.0.1650.63 Safari/537.36" "-" "learn.ibeifeng.com"' >> /opt/module/cdh/flume-1.6.0-cdh5.10.0/data/apache.log;
echo '"27.38.5.159" "-" "31/Aug/2015:00:04:37 +0800" "GET /login/index.php HTTP/1.1" "303" "465" - "http://www.ibeifeng.com/user.php?act=mycourse" "Mozilla/5.0 (Windows NT 6.1; WOW64) AppleWebKit/537.36 (KHTML, like Gecko) Chrome/31.0.1650.63 Safari/537.36" "-" "learn.ibeifeng.com"' >> /opt/module/cdh/flume-1.6.0-cdh5.10.0/data/apache.log;然后再改一次时间
这里我么你想要的数据就拿到了,然后我们把这个文件夹的数据放到我们的表的目录下啊,当然我们也可以直接输出到我们的表的目录下
3、但是我们的数据,并不知道多了一个这样的分区,所以把数据拷贝过来后,在对其进行修复,就OK
拷贝后的表的目录结构如下
然后我们对表进行,修复,可以看到修复了我们新增的两个分区,
然后我们对数据进行查询
4、这里的数据带有引号,所以我们复习一下前面的知识,自定义一个去引号的UDF,代码如下
package make.hive.com;

import org.apache.commons.lang.StringUtils;
import org.apache.hadoop.hive.ql.exec.UDF;
import org.apache.hadoop.io.Text;

public class move_quotes extends UDF {

	public Text evaluate(Text str) {
		String date = null;
		if (str == null) {
			return new Text();
		}
		if (StringUtils.isBlank(str.toString())) {
			return new Text();
		}

		String result_str = str.toString().replaceAll("\"", "");

		return new Text(result_str);

	}
}
添加jar 在hive中 ==> add jar path/xxx.jar
创建函数 在hive中 ==> create temporary function move_quotes as "make.hive.com.move_quotes"
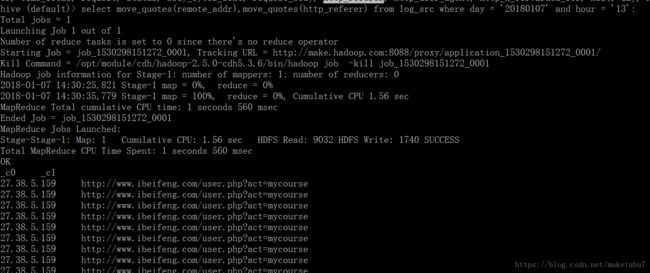
查询验证
大功告成,到这里我们运用flume对hive的分区就做到了,以上


