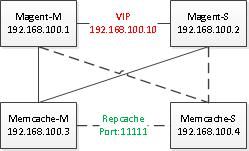
Memcached集群配置
1.集群架构方案
magent+keepalived+memcached+repcache
1)magent:代理memcached实现负载均衡
2)keepalived:magent主从HA高可用
3)memcached:缓存对象
groupadd memcache
magent下载地址
-p 监听的端口
-l 连接的IP地址, 默认是0.0.0.0
-d start 启动memcached服务
-d restart 重起memcached服务
-d stop|shutdown 关闭正在运行的memcached服务
-d install 安装memcached服务
-d uninstall 卸载memcached服务
-u 以的身份运行 (仅在以root运行的时候有效)
-m 最大内存使用,单位MB。默认64MB
-M 内存耗尽时返回错误,而不是删除项
-c 最大同时连接数,默认是1024
-f 块大小增长因子,默认是1.25
-n 最小分配空间,key+value+flags默认是48
-x 设置从哪个IP上进行数据同步
-X 设置数据同步的端口号
-u 以的身份运行
-n 最大同时连接数,默认是4096
-p 监听的端口,默认11211
-s master memcached ip and port
-b backup memcached ip and port
-l 连接的IP地址, 默认是0.0.0.0
1)安装依赖包
vi /etc/init.d/keepalived
magent+keepalived+memcached+repcache
1)magent:代理memcached实现负载均衡
2)keepalived:magent主从HA高可用
3)memcached:缓存对象
4)repcache:实现memcached单点恢复数据同步
2.安装libevent
libevent下载地址tar -zxvf libevent-2.1.8-stable.tar.gz
cd libevent-2.1.8-stable
./configure
make && make install测试是否安装
# ls -la /usr/local/lib | grep libevent-
lrwxrwxrwx   1 root root      21 May 16 16:04 libevent-2.1.so.6 -> libevent-2.1.so.6.0.2
-rwxr-xr-x   1 root root 1128436 May 16 16:04 libevent-2.1.so.6.0.2
lrwxrwxrwx   1 root root      21 May 16 16:04 libevent.so -> libevent-2.1.so.6.0.2
注:安装libevent前不要升级本机openssl
3.安装memcached
memcached下载地址
memcached-repcached补丁下载地址
1)安装memcached
tar -zxvf memcached-1.4.13.tar.gz
gzip -d repcached-2.3.1-1.4.13.patch.gz
./configure --prefix=/usr/local/memcached-1.4.13
patch -p1 -i ../repcached-2.3.1-1.4.13.patch         #在memcached打repcached补丁
./configure --prefix=/usr/local/memcached-1.4 -enable-replication --enable-64bit
make && make installgroupadd memcache
useradd memcache -g memcache -M
3)设置环境变量
vi /etc/profile.d/memcache.sh
MEMCACHE_HOME=/usr/local/memcached-1.4
export PATH=$MEMCACHE_HOME/bin:$PATH
source /etc/profile.d/memcache.sh4)创建memcached的pid文件存法目录
mkdir /var/run/memcached
chown memcache. /var/run/memcached
5)测试repcached是否安装
# memcached -h
memcached 1.4.13
repcached 2.3.1magent下载地址
1)安装依赖包
yum install -y glibc glibc-devel
cp /usr/lib64/libm.so /usr/lib64/libm.a
ln -s /usr/local/lib/libevent* /usr/lib64/2)编译生成magent文件
mkdir magent-0.6
tar -zxvf magent-0.6.tar.gz -C magent-0.6
cd magent-0.6
vi Makefile
将
CFLAGS = -Wall -g -O2 -I/usr/local/include $(M64)
改为
CFLAGS = -lrt -Wall -g -O2 -I/usr/local/include $(M64)vi magent.c #在43行前加入
#ifndef SSIZE_MAX
#define SSIZE_MAX 32767
#endif/sbin/ldconfig
sed -i "s#LIBS = -levent#LIBS = -levent -lm#g" Makefile
make
生成magent文件
cp magent /usr/local/bin/3)测试magent是否安装成功
# magent
please provide -s "ip:port" argument
memcached agent v0.6 Build-Date: May 16 2011 10:09:221)192.168.100.3上启动memcached
memcached -v -d -m 4096 -u memcache -p 11211 -c 10240 -P /var/run/memcached.pid -x 192.168.100.3 -X 111112)192.168.100.4上启动memcached
memcached -v -d -m 4096 -u memcache -p 11211 -c 10240 -P /var/run/memcached.pid -x 192.168.100.4 -X 11111-p 监听的端口
-l 连接的IP地址, 默认是0.0.0.0
-d start 启动memcached服务
-d restart 重起memcached服务
-d stop|shutdown 关闭正在运行的memcached服务
-d install 安装memcached服务
-d uninstall 卸载memcached服务
-u 以的身份运行 (仅在以root运行的时候有效)
-m 最大内存使用,单位MB。默认64MB
-M 内存耗尽时返回错误,而不是删除项
-c 最大同时连接数,默认是1024
-f 块大小增长因子,默认是1.25
-n 最小分配空间,key+value+flags默认是48
-x 设置从哪个IP上进行数据同步
-X 设置数据同步的端口号
-h 显示帮助
6.启动magent
1)192.168.100.1上启动master magent
magent -u memcache -n 51200 -p 11200 -s 192.168.100.3:11211 -b 192.168.100.4:112112)192.168.100.2上启动backup magent
magent -u memcache -n 51200 -p 11200 -s 192.168.100.3:11211 -b 192.168.100.4:11211-u 以的身份运行
-n 最大同时连接数,默认是4096
-p 监听的端口,默认11211
-s master memcached ip and port
-b backup memcached ip and port
-l 连接的IP地址, 默认是0.0.0.0
注:如果有多个master可写成magent -u memcache -n 51200 -p 11200 -s{mastar ip}:port -s{mastar ip}:port -b{backup ip}:port
7.安装keepalived
keepalived下载地址1)安装依赖包
yum -y install openssl-develmkdir /etc/keepalived
tar -zxvf keepalived-1.4.4.tar.gz
cd keepalived-1.4.4
./configure --prefix=/usr/local/keepalived-1.4 --disable-lvs-syncd --disable-lvs --sysconf=/etc/
make && make install
cp /usr/local/keepalived-1.4/sbin/keepalived /usr/sbin/
chmod +x /etc/sysconfig/keepalived
vi /etc/keepalived/keepalived.conf
! Configuration File for keepalived

global_defs {
     router_id test02                            //标识本节点的字条串,通常为hostname
}

vrrp_script magent_chk {
        script "/opt/shell/magent_chk.sh"    	 //监测脚本路径
        interval 1                               //监控时间,以秒为单位
}

vrrp_instance VI_1 {
    state MASTER                 //主节点为MASTER,对应的备份节点为BACKUP
    interface eth0               //监控网卡
    virtual_router_id 51         //虚拟路由编号,主辅要一致
    priority 150                 //权重值MASTER一定要大于BACKUP
    mcast_src_ip 192.168.100.3   //本机IP地址
    nopreempt                    //优先级高的设置nopreempt解决异常恢复后再次抢占的问题
    advert_int 1                 //检查间隔时间,单位为1秒
    authentication {
        auth_type PASS           //验证类型主要有PASS、AH 两种,通常使用的类型为PASS,据说AH 使用时有问题
        auth_pass test.com       //验证密码为明文,主从服务器要一致
    }

    track_script {
        magent_chk               //执行监控的服务
    }

    virtual_ipaddress {
        192.168.100.10           //定义虚拟IP,可以有多个,分行写入
    }
}
vi /etc/keepalived/keepalived.conf
! Configuration File for keepalived

global_defs {
     router_id test03
}

vrrp_script magent_chk {
        script "/opt/shell/magent_chk.sh"
        interval 1
}

vrrp_instance VI_1 {
    state BACKUP
    virtual_router_id 51
    priority 100
    mcast_src_ip 192.168.100.4
    advert_int 1
    authentication {
        auth_type PASS
        auth_pass test.com
    }

    track_script {
        magent_chk
    }

    virtual_ipaddress {
        192.168.100.10
    }
}vi magent_chk.sh
#!/bin/bash
if [ $(ps -C magent --no-header | wc -l) -eq 0 ]; then
/etc/init.d/keepalived stop
fi
chmod +x magent_chk.shvi /etc/init.d/keepalived
#!/bin/sh
#
# keepalived   High Availability monitor built upon LVS and VRRP
#
# chkconfig:   - 86 14
# description: Robust keepalive facility to the Linux Virtual Server project \
#              with multilayer TCP/IP stack checks.

### BEGIN INIT INFO
# Provides: keepalived
# Required-Start: $local_fs $network $named $syslog
# Required-Stop: $local_fs $network $named $syslog
# Should-Start: smtpdaemon httpd
# Should-Stop: smtpdaemon httpd
# Default-Start:
# Default-Stop: 0 1 2 3 4 5 6
# Short-Description: High Availability monitor built upon LVS and VRRP
# Description:       Robust keepalive facility to the Linux Virtual Server
#                    project with multilayer TCP/IP stack checks.
### END INIT INFO

# Source function library.
. /etc/rc.d/init.d/functions

exec="/usr/sbin/keepalived"
prog="keepalived"
config="/etc/keepalived/keepalived.conf"

[ -e /etc/sysconfig/$prog ] &&  /etc/sysconfig/$prog

lockfile=/var/lock/subsys/keepalived

start() {
    [ -x $exec ] || exit 5
    [ -e $config ] || exit 6
    echo -n $"Starting $prog: "
    daemon $exec $KEEPALIVED_OPTIONS
    retval=$?
    echo
    [ $retval -eq 0 ] && touch $lockfile
    return $retval
}

stop() {
    echo -n $"Stopping $prog: "
    killproc $prog
    retval=$?
    echo
    [ $retval -eq 0 ] && rm -f $lockfile
    return $retval
}

restart() {
    stop
    start
}

reload() {
    echo -n $"Reloading $prog: "
    killproc $prog -1
    retval=$?
    echo
    return $retval
}

force_reload() {
    restart
}

rh_status() {
    status $prog
}

rh_status_q() {
    rh_status &>/dev/null
}


case "$1" in
    start)
        rh_status_q && exit 0
        $1
        ;;
    stop)
        rh_status_q || exit 0
        $1
        ;;
    restart)
        $1
        ;;
    reload)
        rh_status_q || exit 7
        $1
        ;;
    force-reload)
        force_reload
        ;;
    status)
        rh_status
        ;;
    condrestart|try-restart)
        rh_status_q || exit 0
        restart
        ;;
    *)
        echo $"Usage: $0 {start|stop|status|restart|condrestart|try-restart|reload|force-reload}"
        exit 2
esac
exit $?

chmod +x /etc/init.d/keepalived
chkconfig --add keepalived
chkconfig --level 2345 keepalived on