oraclelinux下使用VNC远程安装oracle11g
首先关闭selinux,防火墙:
setenforce 0
service firewalld stop
service iptables stop
安装依赖包:
yum -y install  binutils
yum -y install  compat-libstdc++
yum -y install  glibc
yum -y install  elfutils-libelf
yum -y install  elfutils-libelf-devel
yum -y install  libaio
yum -y install  libgcc
yum -y install  libstdc++
yum -y install  make
yum -y install  compat-libcap1
yum -y install  gcc
yum -y install  gcc-c++
yum -y install  glibc-devel
yum -y install  libaio-devel
yum -y install  libstdc++-devel
yum -y install  sysstat
创建运行oracle数据库的系统用户和用户组:
su root  #切换到root
groupadd oinstall  #创建用户组oinstall
groupadd dba  #创建用户组dba
useradd -g oinstall -g dba -m oracle  #创建oracle用户,并加入到oinstall和dba用户组
passwd oracle  #设置用户oracle的登陆密码,不设置密码,在CentOS的图形登陆界面没法登陆
id oracle # 查看新建的oracle用户
修改操作系统核心参数:
在Root用户下执行以下步骤:
1)修改用户的SHELL的限制,修改/etc/security/limits.conf文件
输入命令:vi /etc/security/limits.conf,按i键进入编辑模式,将下列内容加入该文件。
oracle soft nproc 2047
oracle hard nproc 16384
oracle soft nofile 1024
oracle hard nofile 65536
2)修改/etc/pam.d/login 文件,输入命令:vi /etc/pam.d/login,按i键进入编辑模式,将下列内容加入该文件。
session required /lib/security/pam_limits.so
session required pam_limits.so
3)修改linux内核,修改/etc/sysctl.conf文件,输入命令: vi /etc/sysctl.conf ,按i键进入编辑模式,将下列内容加入该文件
fs.file-max = 6815744
fs.aio-max-nr = 1048576
kernel.shmall = 2097152
kernel.shmmax = 2147483648
kernel.shmmni = 4096
kernel.sem = 250 32000 100 128
net.ipv4.ip_local_port_range = 9000 65500
net.core.rmem_default = 4194304
net.core.rmem_max = 4194304
net.core.wmem_default = 262144
net.core.wmem_max = 1048576 各参数详解:
kernel.shmmax:
是核心参数中最重要的参数之一,用于定义单个共享内存段的最大值。
设置应该足够大,能在一个共享内存段下容纳下整个的SGA ,
设置的过低可能会导致需要创建多个共享内存段,这样可能导致系统性能的下降。
至于导致系统下降的主要原因为在实例启动以及ServerProcess创建的时候,
多个小的共享内存段可能会导致当时轻微的系统性能的降低(在启动的时候需要去创建多个虚拟地址段,在进程创建的时候要让进程对多个段进行“识别”,
会有一些影响),但是其他时候都不会有影响。
官方建议值:
32位linux系统:可取最大值为4GB(4294967296bytes)-1byte,即4294967295。建议值为多于内存的一半,所以如果是32为系统,
一般可取值为4294967295。
32位系统对SGA大小有限制,所以SGA肯定可以包含在单个共享内存段中。
64位linux系统:可取的最大值为物理内存值-1byte,建议值为多于物理内存的一半,一般取值大于SGA_MAX_SIZE即可,可以取物理内存-1byte。
例如,如果为12GB物理内存,可取12*1024*1024*1024-1=12884901887,
SGA肯定会包含在单个共享内存段中。
kernel.shmall:
该参数控制可以使用的共享内存的总页数。Linux共享内存页大小为4KB,共享内存段的大小都是共享内存页大小的整数倍。一个共享内存段的最大大
小是16G,那么需要共享内存页数是16GB/4KB=16777216KB /4KB=4194304(页),也就是64Bit系统下16GB物理内存,
设置kernel.shmall = 4194304才符合要求(几乎是原来设置2097152的两倍)。这时可以将shmmax参数调整到16G了,
同时可以修改SGA_MAX_SIZE和SGA_TARGET为12G(您想设置的SGA最大大小,当然也可以是2G~14G等,还要协调PGA参数及OS等其他内存使用,
不能设置太满,比如16G)参考:linux安装oracle时的核心参数修改详解
4)要使 /etc/sysctl.conf 更改立即生效,执行以下命令。 输入:sysctl -p 显示如下:
linux:~ # sysctl -p
net.ipv4.icmp_echo_ignore_broadcasts = 1
net.ipv4.conf.all.rp_filter = 1
fs.file-max = 6815744
fs.aio-max-nr = 1048576
kernel.shmall = 2097152
kernel.shmmax = 2147483648
kernel.shmmni = 4096
kernel.sem = 250 32000 100 128
net.ipv4.ip_local_port_range = 9000 65500
net.core.rmem_default = 4194304
net.core.rmem_max = 4194304
net.core.wmem_default = 262144
net.core.wmem_max = 1048576
5)编辑 /etc/profile ,输入命令:vi /etc/profile,按i键进入编辑模式,将下列内容加入该文件。
if [ $USER = "oracle" ]; then
    if [ $SHELL = "/bin/ksh" ]; then
        ulimit -p 16384
        ulimit -n 65536
    else
        ulimit -u 16384 -n 65536
    fi
fi 6)创建数据库软件目录和数据文件存放目录,目录的位置,根据自己的情况来定,
注意磁盘空间即可,这里我把其放到oracle用户下,例如:
输入命令:
mkdir /home/oracle/app
mkdir /home/oracle/app/oracle
mkdir /home/oracle/app/oradata
mkdir /home/oracle/app/oracle/product
7)更改目录属主为Oracle用户所有,属组为oinstall输入命令:
chown -R oracle:oinstall /home/oracle/app 8)配置oracle用户的环境变量(环境变量可在安装完成后配置)
输入:su – oracle ,然后再输入 : vi .bash_profile
按i编辑 .bash_profile,进入编辑模式,增加以下内容:
export ORACLE_BASE=/home/oracle/app
export ORACLE_HOME=$ORACLE_BASE/oracle/product/11.2.0/dbhome_1
export ORACLE_SID=orcl
export PATH=$PATH:$HOME/bin:$ORACLE_HOME/bin
export LD_LIBRARY_PATH=$ORACLE_HOME/lib:/usr/lib 编辑完成后按Esc键,输入“:wq”存盘退出
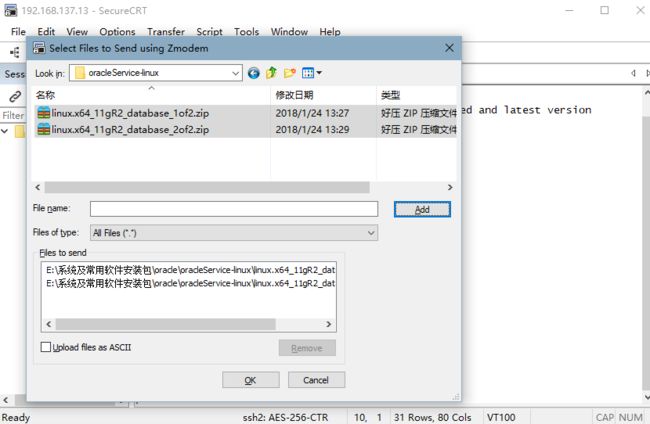
使用securtCRT连接服务器(此次安装为虚拟机中),上传下载文件需要安装rz,sz
yum install lrzsz -y使用rz命令上传oracle安装文件(我一般是将oracle下载至本地,需要安装时上传到服务器)
待上传完毕,查看
[root@localhost ~]# ls
anaconda-ks.cfg  initial-setup-ks.cfg               Pictures
Desktop          linux.x64_11gR2_database_1of2.zip  Public
Documents        linux.x64_11gR2_database_2of2.zip  Templates
Downloads        Music                              Videos
[root@localhost ~]#
解压压缩文件准备安装:
unzip linux.x64_11gR2_database_1of2.zip
unzip linux.x64_11gR2_database_2of2.zip
解压后在当前目录中生成了一个database的文件夹,解压过程中将两个压缩文件的内容解压到了database文件夹中
[root@localhost ~]# ls
anaconda-ks.cfg  Downloads                          Music      Videos
database         initial-setup-ks.cfg               Pictures
Desktop          linux.x64_11gR2_database_1of2.zip  Public
Documents        linux.x64_11gR2_database_2of2.zip  Templates
[root@localhost ~]# cd database/
[root@localhost database]# ls
doc  install  response  rpm  runInstaller  sshsetup  stage  welcome.html
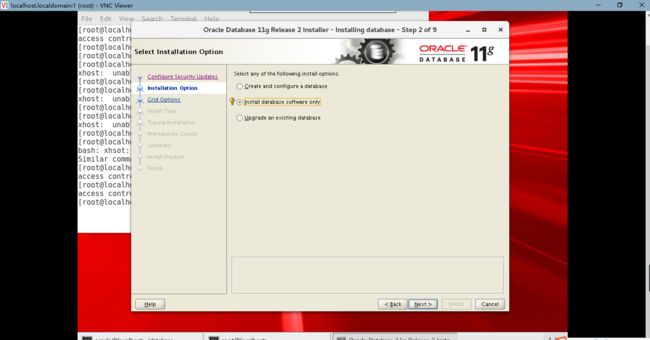
此次安装使用图形安装,远程连接服务器(安装VNC)使用图形界面安装
vnc是linux下的一个远程显示桌面的服务
---------------------------------在linux下安装vnc-----------------------------------------------
安装:
yum install tigervnc-server -y配置:
vim /etc/sysconfig/vncservers
修改(添加):
 VNCSERVERS="1:root"
 VNCSERVERARGS[2]="-geometry 800x600 -nolisten tcp -localhost"
第一次修改密码:
vncserver
[root@localhost ~]# vncserver

You will require a password to access your desktops.

Password:
Verify:
Would you like to enter a view-only password (y/n)? y
Password:
Verify:
xauth:  file /root/.Xauthority does not exist

New 'localhost.localdomain:1 (root)' desktop is localhost.localdomain:1

Creating default startup script /root/.vnc/xstartup
Creating default config /root/.vnc/config
Starting applications specified in /root/.vnc/xstartup
Log file is /root/.vnc/localhost.localdomain:1.log
查看会话
vncserver -list
在windows主机上安装VNC客户端,安装后连接服务器:
访问:vnc客户端:
输入IP:1
--------------------------------------------VNC安装配置结束----------------------------------------------------
安装oracle:
将database文件夹移动到oracle的家目录中:
[root@localhost ~]#mv database/ /home/oracle/
改变database目录的属主、属组:
[root@localhost ~]# chown -R oracle.oinstall /home/oracle/database/
切换到oracle用户
[root@localhost ~]# su - oracle
Last login: Tue Jun  5 19:04:09 CST 2018 on pts/2
[oracle@localhost ~]$
[oracle@localhost ~]$ ls -al
total 24
drwx------. 7 oracle dba      4096 Jun  5 19:05 .
drwxr-xr-x. 4 root   root       38 Jun  5 18:06 ..
drwxr-xr-x. 4 oracle oinstall   35 Jun  5 18:39 app
-rw-r--r--. 1 oracle dba        18 May 27  2017 .bash_logout
-rw-r--r--. 1 oracle dba       415 Jun  5 18:40 .bash_profile
-rw-r--r--. 1 oracle dba       231 May 27  2017 .bashrc
drwxr-xr-x. 3 oracle dba        18 Jun  5 18:40 .cache
drwxr-xr-x. 3 oracle dba        18 Jun  5 18:40 .config
drwxr-xr-x. 8 oracle oinstall 4096 Aug 21  2009 database
drwxr-xr-x. 4 oracle dba        39 Jun  5 17:08 .mozilla
-rw-------. 1 oracle dba       648 Jun  5 18:40 .viminfo
[oracle@localhost ~]$
database目录的属主为oracle,属组为oinstall
(在vnc客户端)打开命令行,切换到解压生成的database文件夹下,运行安装文件./runInstaller
安装时注意安装目录,于此前设置的path文件中的路径一致
[oracle@localhost ~]$ cd database/
[oracle@localhost database]$ ./runInstaller
可能会出现报错:
Checking monitor: must be configured to display at least 256 colors
    >>> Could not execute auto check for display colors using command /usr/bin/xdpyinfo.
        Check if the DISPLAY variable is set.    Failed <<<<

Some requirement checks failed. You must fulfill these requirements before
解决:参考:https://blog.csdn.net/u013743980/article/details/44496707
在root下
xhost +
export DISPLAY=local_host:0.0 export DISPLAY=local_host:0.0 [oracle@localhost database]$ su - root
Password:
Last login: Tue Jun 5 19:19:45 CST 2018 on pts/2
[root@localhost ~]# export DISPLAY=:0.0
[root@localhost ~]# xhost +
access control disabled, clients can connect from any host
[root@localhost ~]# su - oracle
Last login: Tue Jun 5 19:19:55 CST 2018 on pts/2
[oracle@localhost ~]$ export DISPLAY=0:0
[oracle@localhost database]$ export DISPLAY=:0.0
[oracle@localhost database]$ ./runInstaller
Starting Oracle Universal Installer...
Checking Temp space: must be greater than 120 MB. Actual 44415 MB Passed
Checking swap space: must be greater than 150 MB. Actual 2038 MB Passed
Checking monitor: must be configured to display at least 256 colors. Actual 16777216 Passed
Preparing to launch Oracle Universal Installer from /tmp/OraInstall2018-06-05_07-25-09PM.
Please wait ...[oracle@localhost database]$
在此处碰到一个问题,提示已经通过检查,waiting...然后会退出,检查虚拟机发现虚拟机桌面出现了安装界面,但是VNC没有
参考:https://blog.csdn.net/imliuqun123/article/details/79106917
ps -ef | grep oracle
kill -9 xxx.pid
1、DISPLAY
首先在oracle用户下面执行
export DISPLAY=192.168.1.14:1.0  (192.168.1.14是你服务器的ip地址)
我们来查看下刚才的设置
env|grep DIS
这是我们要切换到root用户,来执行
xhost +
显示access control disabled, clients can connect from any host
再次切换到Oralce用户,执行runInstaller命令,错误消失
接下来的检查先决条件,此次安装时提示全部失败,检查了依赖包均已安装,故忽略,过程中有报错,继续即可
安装后按照提示使用root用户执行两个脚本:
bash /home/oracle/app/oracle/product/11.2.0/dbhome_1/root.sh
bash /home/oracle/orainventory/orainstRoot.sh
[root@localhost dbhome_1]# ./root.sh
Running Oracle 11g root.sh script...
The following environment variables are set as:
ORACLE_OWNER= oracle
ORACLE_HOME= /home/oracle/app/oracle/product/11.2.0/dbhome_1
Enter the full pathname of the local bin directory: [/usr/local/bin]:
Copying dbhome to /usr/local/bin ...
Copying oraenv to /usr/local/bin ...
Copying coraenv to /usr/local/bin ...
Creating /etc/oratab file...
Entries will be added to the /etc/oratab file as needed by
Database Configuration Assistant when a database is created
Finished running generic part of root.sh script.
Now product-specific root actions will be performed.
Finished product-specific root actions.
[root@localhost dbhome_1]#
[root@localhost dbhome_1]# cd ..
[root@localhost 11.2.0]# ls
dbhome_1
[root@localhost 11.2.0]# cd ..
[root@localhost product]# ls
11.2.0
[root@localhost product]# cd ..
[root@localhost oracle]# ls
product
[root@localhost oracle]# cd ..
[root@localhost app]# ls
checkpoints oracle oradata
[root@localhost app]# cd ..
[root@localhost oracle]# ls
app Downloads oraInventory Videos
database linux.x64_11gR2_database_1of2.zip Pictures
Desktop linux.x64_11gR2_database_2of2.zip Public
Documents Music Templates
[root@localhost oracle]# cd oraInventory/
[root@localhost oraInventory]# ls
ContentsXML logs oraInst.loc oui
install.platform oraInstaller.properties orainstRoot.sh
[root@localhost oraInventory]# ./orainstRoot.sh
Changing permissions of /home/oracle/oraInventory.
Adding read,write permissions for group.
Removing read,write,execute permissions for world.
Changing groupname of /home/oracle/oraInventory to dba.
The execution of the script is complete.
[root@localhost oraInventory]#
修改oracle用户家目录下的.bash_profile,加入/usr/bin,/sbin,/usr/sbin
PATH=$PATH:$HOME/.local/bin:$HOME/bin:/usr/bin:/sbin:/usr/sbin输入dbca命令弹出建库界面则环境变量设置完成
到此安装完成


