k8s使用nfs持久化存储
阿里云1000元通用代金券点此领取
原文地址:http://blog.csdn.net/boling_cavalry/article/details/79516039
本章内容
本章目标是用最少的步骤和时间体验PV,所以先不展开每个配置和开发的细节,主要完成以下操作:
1. 准备知识列表;
2. 实战网络环境介绍;
3. 搭建NFS Server;
4. 创建静态PV;
5. Kubernetes上部署Tomcat的service;
6. 运行客户端,上传本地文件到Tomcat;
7. 去NFS Server检查上传的文件;
准备知识列表
为了能顺利完成实战,您需要做好以下的准备工作:
1. 搭建NFS服务器,请参考《Ubuntu16环境安装和使用NFS》;
2. 有个可用的Kubernetes环境,请参考以下三篇文章:
《rancher下的kubernetes之一:构建标准化vmware镜像》;
《 rancher下的kubernetes之二:安装rancher和kubernetes》;
《 rancher下的kubernetes之三:在linux上安装kubectl工具》;
3. 文件上传服务相关的知识点,请参考以下三篇文章:
《Docker下Java文件上传服务三部曲之一:准备环境》;
《Docker下Java文件上传服务三部曲之二:服务端开发》;
《Docker下Java文件上传服务三部曲之三:wireshark抓包分析》;
实战环境
- NFS Server对Kubernetes环境提供远程存储服务;
- PV1是个静态的PersistentVolume,类型为NFS,对应着NFS Server的/usr/local/work/nfs目录;
- Client是个java的程序,可以将本地文件POST到服务器上;
- Kubernetes环境中部署了一个Pod,里面有个Tomcat容器运行springboot应用,收到Client上传的文件后存储在本地的/usr/local/uploadfiles目录下;
- Tomcat容器的本地目录/usr/local/uploadfiles,在容器的存储卷配置中设置为mount到PV1;
本章用到的文件下载
您可以在GitHub下载本章用到的4个文件,地址和链接信息如下表所示:
| 名称 | 链接 | 备注 |
|---|---|---|
| 项目主页 | https://github.com/zq2599/blog_demos | 该项目在GitHub上的主页 |
| git仓库地址(https) | https://github.com/zq2599/blog_demos.git | 该项目源码的仓库地址,https协议 |
| git仓库地址(ssh) | [email protected]:zq2599/blog_demos.git | 该项目源码的仓库地址,ssh协议 |
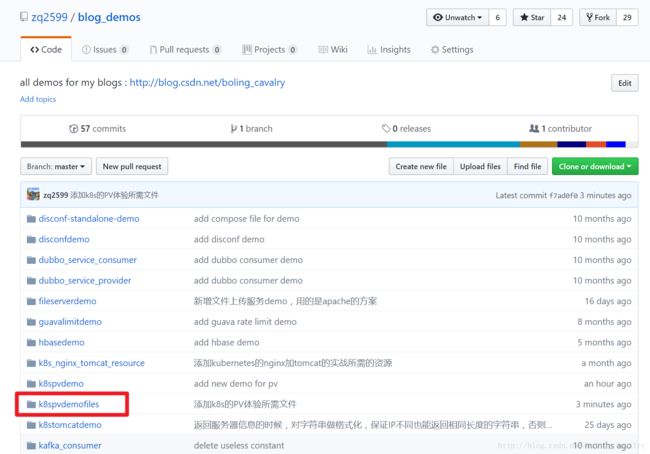
这个git项目中有多个目录,本次所需的资源放在k8spvdemofiles目录下,如下图红框所示:

这个文件夹下面有四个文件,功能如下所示,请下载下来,稍后会用到:
1. pv1.yaml—创建pv时用到的配置文件;
2. pvc1.yaml—创建pvc时用到的配置文件;
3. k8spvdemo.yaml—创建web服务的Pod用到的配置文件;
4. k8spvdemo-svc.yaml—暴露web服务到外部用到的配置文件;
准备工作已经完成,接下来可以实战体验了;
搭建NFS Server
找一台电脑,部署NFSServer,具体操作可以参照《Ubuntu16环境安装和使用NFS》,假设该电脑的IP地址是192.168.119.128,共享目录是/usr/local/work/nfs;
创建静态PV
将下载好的pv1.yaml和pvc1.yaml文件放在一个目录下,然后执行命令kubectl create -f pv1.yaml,pvc1.yaml即可创建PV和PVC,再执行命令kubectl get pv查看是否创建成功,如下:
root@maven:/usr/local/work/k8spv# kubectl create -f pv1.yaml,pvc1.yaml
persistentvolume "pv1" created
persistentvolumeclaim "pvc1" created
root@maven:/usr/local/work/k8spv# kubectl get pv
NAME      CAPACITY   ACCESS MODES   RECLAIM POLICY   STATUS    CLAIM          STORAGECLASS   REASON    AGE
pv1       1Gi        RWO            Recycle          Bound     default/pvc1                            1m
- 1
- 2
- 3
- 4
- 5
- 6
可见pv1已经绑定到pvc1,接下来创建Pod挂载pvc1;
Kubernetes上部署Tomcat的service
将下载好的k8spvdemo.yaml和k8spvdemo-svc.yaml文件放在一个目录下,然后执行命令kubectl create -f k8spvdemo.yaml,k8spvdemo-svc.yaml即可创建Pod和Service,打开dashboard页面,可以看到已经部署好的容器情况,如下图:

服务部署完毕了,接下来试试上传文件到服务端,看是PV是否有效;
运行客户端,上传本地文件到Tomcat
- 创建一个maven工程,pom.xml如下:
<project xmlns="http://maven.apache.org/POM/4.0.0"
         xmlns:xsi="http://www.w3.org/2001/XMLSchema-instance"
         xsi:schemaLocation="http://maven.apache.org/POM/4.0.0 http://maven.apache.org/xsd/maven-4.0.0.xsd">
    <modelVersion>4.0.0modelVersion>

    <groupId>com.bolingcavalrygroupId>
    <artifactId>uploadfileclientartifactId>
    <version>1.0-SNAPSHOTversion>


    <properties>
        <project.build.sourceEncoding>UTF-8project.build.sourceEncoding>
    properties>

    <dependencies>
        <dependency>
            <groupId>org.apache.httpcomponentsgroupId>
            <artifactId>httpclientartifactId>
            <version>4.3.5version>
        dependency>

        <dependency>
            <groupId>org.apache.httpcomponentsgroupId>
            <artifactId>httpmimeartifactId>
            <version>4.3.5version>
        dependency>
    dependencies>

project>
- 1
- 2
- 3
- 4
- 5
- 6
- 7
- 8
- 9
- 10
- 11
- 12
- 13
- 14
- 15
- 16
- 17
- 18
- 19
- 20
- 21
- 22
- 23
- 24
- 25
- 26
- 27
- 28
- 29
- 30
2. 工程中创建一个java类,源码如下:
package com.bolingcavalry;

import org.apache.http.HttpEntity;
import org.apache.http.client.ClientProtocolException;
import org.apache.http.client.config.RequestConfig;
import org.apache.http.client.methods.CloseableHttpResponse;
import org.apache.http.client.methods.HttpPost;
import org.apache.http.entity.ContentType;
import org.apache.http.entity.mime.MultipartEntityBuilder;
import org.apache.http.entity.mime.content.FileBody;
import org.apache.http.entity.mime.content.StringBody;
import org.apache.http.impl.client.CloseableHttpClient;
import org.apache.http.impl.client.HttpClients;
import org.apache.http.util.EntityUtils;

import java.io.File;
import java.io.IOException;

/**
 * @Description : 上传文件的类,将本地文件POST到server
 * @Author : [email protected]
 * @Date : 2018-02-24 18:12
 */
public class UploadFileClient {

    /**
     * 文件服务的ULR
     */
    private static final String POST_URL = "http://192.168.119.153:30010//upload";

    /**
     * 要上传的本地文件的完整路径加文件名
     */
    private static final String UPLOAD_FILE_FULLPATH = "D:\\temp\\201802\\21\\abc.zip";

    public static void main(String[] args) throws Exception{
        System.out.println("start upload");
        CloseableHttpClient httpclient = HttpClients.createDefault();
        try {
            HttpPost httppost = new HttpPost(POST_URL);

            //基本的配置信息
            RequestConfig requestConfig = RequestConfig.custom().setConnectTimeout(200000).setSocketTimeout(200000).build();

            httppost.setConfig(requestConfig);

            //要上传的文件
            FileBody bin = new FileBody(new File(UPLOAD_FILE_FULLPATH));

            //在POST中添加一个字符串请求参数
            StringBody comment = new StringBody("This is comment", ContentType.TEXT_PLAIN);

            HttpEntity reqEntity = MultipartEntityBuilder.create().addPart("file", bin).addPart("comment", comment).build();

            httppost.setEntity(reqEntity);

            System.out.println("executing request " + httppost.getRequestLine());

            //发起POST
            CloseableHttpResponse response = httpclient.execute(httppost);

            try {

                HttpEntity resEntity = response.getEntity();
                if (resEntity != null) {
                    String responseEntityStr = EntityUtils.toString(response.getEntity());
                    System.out.println("response status : " + response.getStatusLine());
                    System.out.println("response content length: " + resEntity.getContentLength());
                    System.out.println("response entity str : " + responseEntityStr);
                }
                EntityUtils.consume(resEntity);
            } finally {
                response.close();
            }
        } catch (ClientProtocolException e) {
            e.printStackTrace();
        } catch (IOException e) {
            e.printStackTrace();
        } finally {
            try {
                httpclient.close();
            } catch (IOException e) {
                e.printStackTrace();
            }
        }

        System.out.println("end upload");
    }
}
- 1
- 2
- 3
- 4
- 5
- 6
- 7
- 8
- 9
- 10
- 11
- 12
- 13
- 14
- 15
- 16
- 17
- 18
- 19
- 20
- 21
- 22
- 23
- 24
- 25
- 26
- 27
- 28
- 29
- 30
- 31
- 32
- 33
- 34
- 35
- 36
- 37
- 38
- 39
- 40
- 41
- 42
- 43
- 44
- 45
- 46
- 47
- 48
- 49
- 50
- 51
- 52
- 53
- 54
- 55
- 56
- 57
- 58
- 59
- 60
- 61
- 62
- 63
- 64
- 65
- 66
- 67
- 68
- 69
- 70
- 71
- 72
- 73
- 74
- 75
- 76
- 77
- 78
- 79
- 80
- 81
- 82
- 83
- 84
- 85
- 86
- 87
- 88
- 89
- 90
以上源码中,有两处要注意:
第一,POST_URL = “http://192.168.119.153:30010//upload”中的192.168.119.153是Pod所在的节点机器的IP地址,请替换为您的k8s环境中的节点IP地址;
第二,UPLOAD_FILE_FULLPATH = “D:\temp\201802\21\abc.zip”,这里配置的是要上传的本地文件的路径,请替换为您要上传的文件路径;
3. 直接运行UploadFileClient.java,看到控制台输出如下信息表示上传成功:
start upload
executing request POST http://192.168.119.153:30010//upload HTTP/1.1
response status : HTTP/1.1 200
response content length: 40
response entity str : SpringBoot环境下,上传文件成功
end upload

Process finished with exit code 0
- 1
- 2
- 3
- 4
- 5
- 6
- 7
- 8
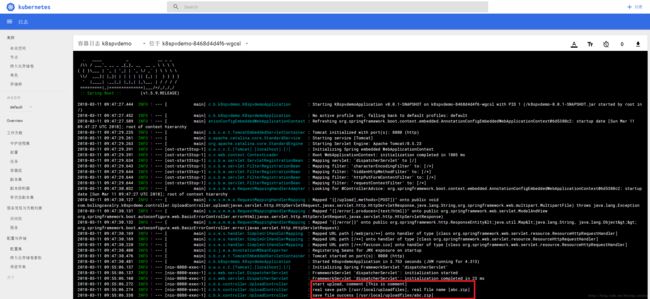
上传成功了,在dashboard上查看容器的日志,能看到上传有关的日志如下图红框所示:

现在理论上现在文件已经保存在NFS Server的/usr/local/work/nfs目录下了,去检查一下;
去NFS Server检查上传的文件
登录NFS Server,进入/usr/local/work/nfs,查看文件信息如下:
root@nfs:/usr/local/work/nfs# ll
total 160
drwxrwxrwx 2 root   root      4096 Mar 11 06:02 ./
drwxr-xr-x 5 root   root      4096 Mar  8 20:31 ../
-rw-r--r-- 1 nobody nogroup 153035 Mar 11 03:24 abc.zip
- 1
- 2
- 3
- 4
- 5
可见k8s上的tomcat应用可以通过PVC的方式将客户端上传的文件保存在NFS服务器上;
至此,对k8s持久卷服务的体验就完成了,后续章节我们将深入以上内容的细节,对PV做进一步了解;
