Linux-yum更新仓库
话说
各位小伙伴,晚上好。这里终结一下yum仓库更新的方式。之所以总结这个,是因为上一篇在ECS安装MySQL虽然受挫但终究或多或少有点点收获,那就是yum的基本运作原理。这里会按照官网方式介绍yum如何安装MySQL来说明寡人对yum安装的进一步认识。
目录
1、如何更新yum固有的仓库?
2、如何选择yum默认安装的版本?
3、原理总结
1、如何更新yum固有的仓库?
地球人都知道,Yum是在线安装。在线安装的好处就是不用下载包包。坏处呢?坏处就是你得知道你要安装的版本这个yum仓库中有,否则你的yum -y install mysql就默认安装的是仓库中固有的版本。但是我想安装最新版本呢?我怎么查看仓库已有什么版本?
查看yum可以按照的版本
yum list | grep ^mysql如果版本中没有最新的MySQL8.0呢?怎么办?
1)去MySQL官网下载rpm包;
2)上传并执行命令
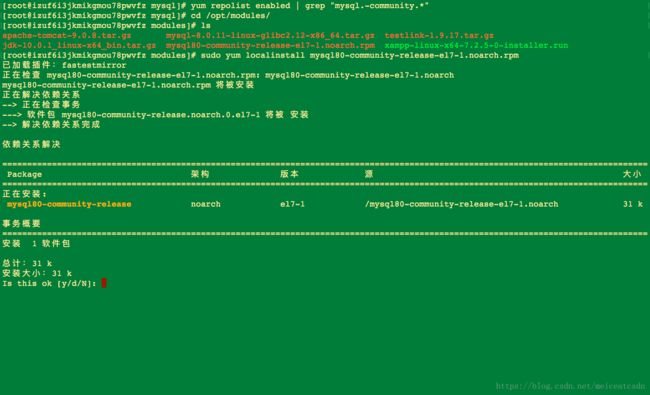
sudo yum localinstall platform-and-version-specific-package-name.rpm效果如图:
如何查看呢?
[root@izuf6i3jkmikgmou78pwvfz ~]# yum repolist enabled | grep "mysql.*-community.*"
mysql-connectors-community/x86_64 MySQL Connectors Community                  51
mysql-tools-community/x86_64      MySQL Tools Community                       63
mysql80-community/x86_64          MySQL 8.0 Community Server                  17
[root@izuf6i3jkmikgmou78pwvfz ~]#
当然也可以这么查看
[root@izuf6i3jkmikgmou78pwvfz ~]# yum list | grep ^mysql
mysql-community-client.x86_64            8.0.11-1.el7                  @mysql80-community
mysql-community-common.x86_64            8.0.11-1.el7                  @mysql80-community
mysql-community-libs.x86_64              8.0.11-1.el7                  @mysql80-community
mysql-community-libs-compat.x86_64       8.0.11-1.el7                  @mysql80-community
mysql-community-server.x86_64            8.0.11-1.el7                  @mysql80-community
mysql80-community-release.noarch         el7-1                         installed
mysql++.x86_64                           3.1.0-12.el7                  epel
mysql++-devel.x86_64                     3.1.0-12.el7                  epel
mysql++-manuals.x86_64                   3.1.0-12.el7                  epel
mysql-community-client.i686              8.0.11-1.el7                  mysql80-community
mysql-community-common.i686              8.0.11-1.el7                  mysql80-community
mysql-community-devel.i686               8.0.11-1.el7                  mysql80-community
mysql-community-devel.x86_64             8.0.11-1.el7                  mysql80-community
mysql-community-embedded-compat.i686     8.0.11-1.el7                  mysql80-community
mysql-community-embedded-compat.x86_64   8.0.11-1.el7                  mysql80-community
mysql-community-libs.i686                8.0.11-1.el7                  mysql80-community
mysql-community-libs-compat.i686         8.0.11-1.el7                  mysql80-community
mysql-community-release.noarch           el7-5                         mysql-connectors-community
mysql-community-test.x86_64              8.0.11-1.el7                  mysql80-community
mysql-connector-java.noarch              1:5.1.25-3.el7                base
mysql-connector-odbc.x86_64              8.0.11-1.el7                  mysql-connectors-community
mysql-connector-odbc-debuginfo.x86_64    8.0.11-1.el7                  mysql-connectors-community
mysql-connector-odbc-setup.x86_64        8.0.11-1.el7                  mysql-connectors-community
mysql-connector-python.noarch            2.0.4-1.el7                   mysql-connectors-community
mysql-connector-python.x86_64            8.0.11-1.el7                  mysql-connectors-community
mysql-connector-python-cext.x86_64       8.0.11-1.el7                  mysql-connectors-community
mysql-connector-python-debuginfo.x86_64  2.1.7-1.el7                   mysql-connectors-community
mysql-mmm.noarch                         2.2.1-15.el7                  epel
mysql-mmm-agent.noarch                   2.2.1-15.el7                  epel
mysql-mmm-monitor.noarch                 2.2.1-15.el7                  epel
mysql-mmm-tools.noarch                   2.2.1-15.el7                  epel
mysql-proxy.x86_64                       0.8.5-2.el7                   epel
mysql-proxy-devel.x86_64                 0.8.5-2.el7                   epel
mysql-ref-manual-8.0-en-html-chapter.noarch
mysql-ref-manual-8.0-en-pdf.noarch       1-20180420                    mysql80-community
mysql-router.x86_64                      8.0.11-1.el7                  mysql-tools-community
mysql-router-debuginfo.x86_64            8.0.11-1.el7                  mysql-tools-community
mysql-shell.x86_64                       8.0.11-1.el7                  mysql-tools-community
mysql-shell-debuginfo.x86_64             8.0.11-1.el7                  mysql-tools-community
mysql-utilities.noarch                   1.6.5-1.el7                   mysql-tools-community
mysql-utilities-extra.noarch             1.5.6-1.el7                   mysql-tools-community
mysql-workbench-community.x86_64         6.3.10-1.el7                  mysql-tools-community
mysql-workbench-community-debuginfo.x86_64
mysqlreport.noarch                       3.5-11.el7                    epel
mysqltuner.noarch                        1.6.0-1.el7                   epel
[root@izuf6i3jkmikgmou78pwvfz ~]#
2、如何选择yum默认安装的版本?
0k!上面表明,yum源里面已经有这个包包了,那么如果执行yum -y install mysql,到底安装的是哪个版本呢?
[root@izuf6i3jkmikgmou78pwvfz ~]# yum repolist all | grep mysql
mysql-cluster-7.5-community/x86_64 MySQL Cluster 7.5 Community      禁用
mysql-cluster-7.5-community-source MySQL Cluster 7.5 Community - So 禁用
mysql-cluster-7.6-community/x86_64 MySQL Cluster 7.6 Community      禁用
mysql-cluster-7.6-community-source MySQL Cluster 7.6 Community - So 禁用
mysql-connectors-community/x86_64  MySQL Connectors Community       启用:     51
mysql-connectors-community-source  MySQL Connectors Community - Sou 禁用
mysql-tools-community/x86_64       MySQL Tools Community            启用:     63
mysql-tools-community-source       MySQL Tools Community - Source   禁用
mysql-tools-preview/x86_64         MySQL Tools Preview              禁用
mysql-tools-preview-source         MySQL Tools Preview - Source     禁用
mysql55-community/x86_64           MySQL 5.5 Community Server       禁用
mysql55-community-source           MySQL 5.5 Community Server - Sou 禁用
mysql56-community/x86_64           MySQL 5.6 Community Server       禁用
mysql56-community-source           MySQL 5.6 Community Server - Sou 禁用
mysql57-community/x86_64           MySQL 5.7 Community Server       禁用
mysql57-community-source           MySQL 5.7 Community Server - Sou 禁用
mysql80-community/x86_64           MySQL 8.0 Community Server       启用:     17
mysql80-community-source           MySQL 8.0 Community Server - Sou 禁用
[root@izuf6i3jkmikgmou78pwvfz ~]#
yum list all | grep mysql
这个命令可以让我们非常清楚的看清楚默认启用的版本。这个默认启动,就是yum -y install默认安装的版本,当然你可以随心所欲的修改。
问题关键来了,如何修改默认启动版本?
两种方式:
方式一:命令
方式二:配置
核心命令就2个
yum-config-manager --disable mysql80-community
yum-config-manager --enable mysql80-community
要想使用yum-config-manager,需要先安装下:yum -y install yum-utils (CentOS 7.5)
[root@izuf6i3jkmikgmou78pwvfz ~]# yum -y install yum-utils
已加载插件:fastestmirror
Loading mirror speeds from cached hostfile
软件包 yum-utils-1.1.31-45.el7.noarch 已安装并且是最新版本
无须任何处理
然后就是enabled disabled的事情了。
方式一:命令
[root@izuf6i3jkmikgmou78pwvfz yum.repos.d]# yum-config-manager --disable mysql80-community
已加载插件:fastestmirror
==================================================== repo: mysql80-community =====================================================
[mysql80-community]
async = True
bandwidth = 0
base_persistdir = /var/lib/yum/repos/x86_64/7
baseurl = http://repo.mysql.com/yum/mysql-8.0-community/el/7/x86_64/
cache = 0
cachedir = /var/cache/yum/x86_64/7/mysql80-community
check_config_file_age = True
compare_providers_priority = 80
cost = 1000
deltarpm_metadata_percentage = 100
deltarpm_percentage =
enabled = 0
enablegroups = True
exclude =
failovermethod = priority
ftp_disable_epsv = False
gpgcadir = /var/lib/yum/repos/x86_64/7/mysql80-community/gpgcadir
gpgcakey =
gpgcheck = True
gpgdir = /var/lib/yum/repos/x86_64/7/mysql80-community/gpgdir
gpgkey = file:///etc/pki/rpm-gpg/RPM-GPG-KEY-mysql
hdrdir = /var/cache/yum/x86_64/7/mysql80-community/headers
http_caching = all
includepkgs =
ip_resolve =
keepalive = True
keepcache = False
mddownloadpolicy = sqlite
mdpolicy = group:small
mediaid =
metadata_expire = 21600
metadata_expire_filter = read-only:present
metalink =
minrate = 0
mirrorlist =
mirrorlist_expire = 86400
name = MySQL 8.0 Community Server
old_base_cache_dir =
password =
persistdir = /var/lib/yum/repos/x86_64/7/mysql80-community
pkgdir = /var/cache/yum/x86_64/7/mysql80-community/packages
proxy = False
proxy_dict =
proxy_password =
proxy_username =
repo_gpgcheck = False
retries = 10
skip_if_unavailable = False
ssl_check_cert_permissions = True
sslcacert =
sslclientcert =
sslclientkey =
sslverify = True
throttle = 0
timeout = 30.0
ui_id = mysql80-community/x86_64
ui_repoid_vars = releasever,
   basearch
username =
如何恢复呢?
#恢复过来也一样:
[root@izuf6i3jkmikgmou78pwvfz yum.repos.d]# yum-config-manager --enable mysql80-community
已加载插件:fastestmirror
==================================================== repo: mysql80-community =====================================================
[mysql80-community]
async = True
bandwidth = 0
base_persistdir = /var/lib/yum/repos/x86_64/7
baseurl = http://repo.mysql.com/yum/mysql-8.0-community/el/7/x86_64/
cache = 0
cachedir = /var/cache/yum/x86_64/7/mysql80-community
check_config_file_age = True
compare_providers_priority = 80
cost = 1000
deltarpm_metadata_percentage = 100
deltarpm_percentage =
enabled = 1
enablegroups = True
exclude =
failovermethod = priority
ftp_disable_epsv = False
gpgcadir = /var/lib/yum/repos/x86_64/7/mysql80-community/gpgcadir
gpgcakey =
gpgcheck = True
gpgdir = /var/lib/yum/repos/x86_64/7/mysql80-community/gpgdir
gpgkey = file:///etc/pki/rpm-gpg/RPM-GPG-KEY-mysql
hdrdir = /var/cache/yum/x86_64/7/mysql80-community/headers
http_caching = all
includepkgs =
ip_resolve =
keepalive = True
keepcache = False
mddownloadpolicy = sqlite
mdpolicy = group:small
mediaid =
metadata_expire = 21600
metadata_expire_filter = read-only:present
metalink =
minrate = 0
mirrorlist =
mirrorlist_expire = 86400
name = MySQL 8.0 Community Server
old_base_cache_dir =
password =
persistdir = /var/lib/yum/repos/x86_64/7/mysql80-community
pkgdir = /var/cache/yum/x86_64/7/mysql80-community/packages
proxy = False
proxy_dict =
proxy_password =
proxy_username =
repo_gpgcheck = False
retries = 10
skip_if_unavailable = False
ssl_check_cert_permissions = True
sslcacert =
sslclientcert =
sslclientkey =
sslverify = True
throttle = 0
timeout = 30.0
ui_id = mysql80-community/x86_64
ui_repoid_vars = releasever,
   basearch
username =

[root@izuf6i3jkmikgmou78pwvfz yum.repos.d]#
方式二:配置
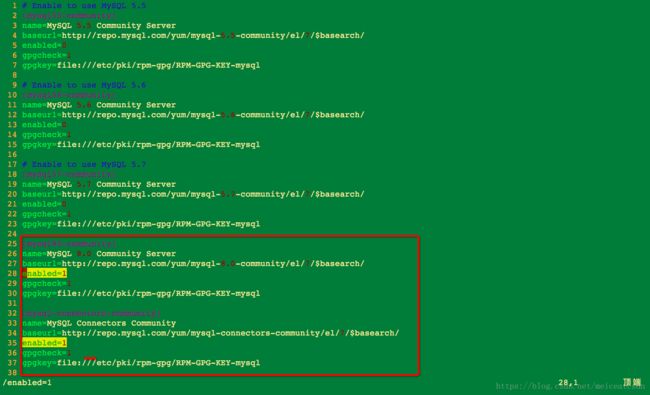
上面每个命令对应的都是修改配置文件。
Besides using yum-config-manager or the dnf config-manager command, you can also select a release series by editing manually the/etc/yum.repos.d/mysql-community.repo file. This is a typical entry for a release series’ subrepository in the file:
[root@izuf6i3jkmikgmou78pwvfz yum.repos.d]# pwd
/etc/yum.repos.d
[root@izuf6i3jkmikgmou78pwvfz yum.repos.d]# ls -l
总用量 16
-rw-r–r– 1 root root 675 5月 30 11:47 CentOS-Base.repo
-rw-r–r– 1 root root 230 5月 30 11:47 epel.repo
-rw-r–r– 1 root root 1864 6月 23 16:54 mysql-community.repo
-rw-r–r– 1 root root 1885 2月 22 16:49 mysql-community-source.repo
[root@izuf6i3jkmikgmou78pwvfz yum.repos.d]#
3、原理总结
我们知道了:如何增强yum源固有的库?和如何自主选择安装库中的版本?从中,我们很容易明白:当你执行yum -y install的时候,其实就是去Yum源的地方去下载rpm包安装后的东东,所以如果我们需要yum源中本来不存在的或者未及时更新的包包,就要去官网下载rpm包,然后解压安装:
sudo yum localinstall platform-and-version-specific-package-name.rpm这个时候,yum源中就有了我们想要安装的版本;如果是最新的,默认就是启动的。如果你还想对安装的版本”为所欲为“,那么就需要enabled和disable部分包包:
yum-config-manager --disable mysql80-community
yum-config-manager --enable mysql80-community
或者去修改配置文件:Besides using yum-config-manager or the dnf config-manager command, you can also select a release series by editing manually the/etc/yum.repos.d/mysql-community.repo file. This is a typical entry for a release series’ subrepository in the file:
,就是这样的流程。
好了,晚安。


