上一篇 “分发层 + 应用层” 双层nginx 架构 之 分发, 主要讲解了基于openResty部署 nginx 分发层,及如何提高nginx 缓存命中率,本篇继续上两篇话题,实现应用层数据缓存更新,为模板提供数据来源。
应用层 nginx 思路逻辑
- 分发层nginx 请求应用层,nginx lua 接收请求
- 获取请求参数
- 根据请求参数到nginx本地缓存获取数据
- nginx 本地缓存没有数据,请求缓存服务(数据获取
顺序: redis > ehcache > mysql)获取数据,并设置本地缓存 - nginx 数据组装,动态渲染网页模板,响应分发层nginx
下面利用上两篇准备好的环境,来实现上面逻辑,以下操作基于应用层nginx (192.168.0.16,192.168.0.17)来操作
为了实现以上逻辑,我们还需要为nginx 提供http、template 支持,因此需要为应用层nginx test 项目引入http 、template 依赖
引入 http 依赖
cd /usr/local/test/lualib/resty
wget https://raw.githubusercontent.com/pintsized/lua-resty-http/master/lib/resty/http_headers.lua
wget https://raw.githubusercontent.com/pintsized/lua-resty-http/master/lib/resty/http.lua
引入 template 依赖
cd /usr/local/test/lualib/resty
wget https://raw.githubusercontent.com/bungle/lua-resty-template/master/lib/resty/template.lua
mkdir /usr/local/test/lualib/resty/html
cd /usr/local/test/lualib/resty/html
wget https://raw.githubusercontent.com/bungle/lua-resty-template/master/lib/resty/template/html.lua
创建html 模板位置,编写 html templates 模板代码
- 创建模板路径
mkdir /usr/local/test/templates
- 编写模板代码 - product.html
vim product.html
加入以下代码:
    商品详情页


         商品id: {* productId *}

         商品名称: {* productName *}

         商品图片列表: {* productPictureList *}

         商品规格: {* productSpecification *}

         商品售后服务: {* productService *}

         商品颜色: {* productColor *}

         商品大小: {* productSize *}

         店铺id: {* shopId *}

         店铺名称: {* shopName *}

         店铺等级: {* shopLevel *}

         店铺好评率: {* shopRate*}
定义 nginx 本地缓存
cd /usr/local/servers/nginx/conf && vim nginx.conf
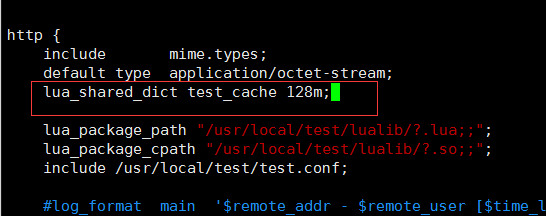
在 http 里面加上以下内容:
lua_shared_dict test_cache 128m; 声明一个 大小128m 的 test_cache 对象
在test 项目中配置 template 路径信息
vim /usr/local/test/test.conf
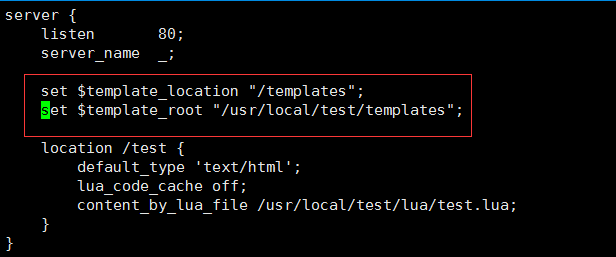
在 server 里面加上以下内容:
set $template_location "/templates";
set $template_root "/usr/local/test/templates";
实现应用层nginx 代码逻辑
vim /usr/local/test/lua/test.lua
代码如下:
// 获取请求参数
local uri_args = ngx.req.get_uri_args()
local product_id = uri_args["productId"]
local shop_id = uri_args["shopId"]
// 获取之前声明的test_cache 缓存对象
local cache_ngx = ngx.shared.test_cache
//组装商品、店铺缓存key
local product_cache_key = "product_info_"..product_id
local shop_cache_key = "shop_info_"..shop_id
// 从nginx 本地缓存中获取商品、店铺信息
local product_cache = cache_ngx:get(product_cache_key)
local shop_cache = cache_ngx:get(shop_cache_key)
// 判断 商品缓存 是否有数据,如果没有,发送请求到商品缓存服务获取
if product_cache == "" or product_cache == nil then
      local http = require("resty.http")
      local httpc = http.new()
       // 发送请求到商品缓存服务获取
      local resp, err = httpc:request_uri("http://192.168.0.3:81",{
            method = "GET",
            path = "/getProductInfo?productId="..product_id
      })
      // 获取请求响应数据,并设置nginx 本地缓存,过期时间为 10 分钟
      product_cache = resp.body
      cache_ngx:set(product_cache_key, product_cache, 10 * 60)
end
// 判断 店铺缓存 是否有数据,如果没有,发送请求到店铺缓存服务获取
if shop_cache == "" or shop_cache == nil then
      local http = require("resty.http")
      local httpc = http.new()
     // 发送请求到店铺缓存服务获取
      local resp, err = httpc:request_uri("http://192.168.0.3:81",{
            method = "GET",
            path = "/getShopInfo?shopId="..shop_id
      })
       // 获取请求响应数据,并设置nginx 本地缓存,过期时间为 10 分钟
      shop_cache = resp.body
      cache_ngx:set(shop_cache_key, shop_cache, 10 * 60)
end
// 引入json 解析类库
local cjson = require("cjson")
// 对商品、店铺数据进行json 转换
local product_cache_json = cjson.decode(product_cache)
local shop_cache_json = cjson.decode(shop_cache)
// 构造模板渲染对象
local context = {
      productId = product_cache_json.id,
      productName = product_cache_json.name,
      productPrice = product_cache_json.price,
      productPictureList = product_cache_json.pictureList,
      productSecification = product_cache_json.secification,
      productService = product_cache_json.service,
      productColor = product_cache_json.color,
      productSize = product_cache_json.size,
      shopId = shop_cache_json.id,
      shopName = shop_cache_json.name,
      shopLevel = shop_cache_json.level,
      shopRate = shop_cache_json.rate
}
// 引入template 解析渲染类库
local template = require("resty.template")
// 渲染模板
template.render("product.html", context)
验证应用层
nginx 校验 及 重载
/usr/local/servers/nginx/sbin/nginx -t && /usr/local/servers/nginx/sbin/nginx -s reload
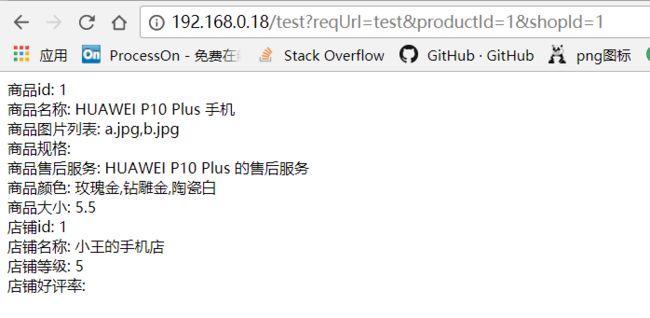
浏览器验证
http://192.168.0.18/test?reqUrl=test&productId=1&shopId=1
通过上面可以看出,当第一次访问是,应用层nginx 缓存没有数据,故请求后端服务获取数据;第二次请求是,直接nginx 缓存取数据,没有走后端服务。
总结:用户请求nginx 后,首先从nginx 本地缓存获取数据,后端服务获取。这里我们的目的就达到了
以上就是本章内容,如有不对的地方,请多多指教,谢谢!
为了方便有需要的人,本系列全部软件都在 https://pan.baidu.com/s/1qYsJZfY
下章预告:主要讲解 分布式缓存重建并发冲突问题以及zookeeper分布式锁解决方案
作者:逐暗者 (转载请注明出处)


