医学图像预处理(三)——windowing(ct对比增强)
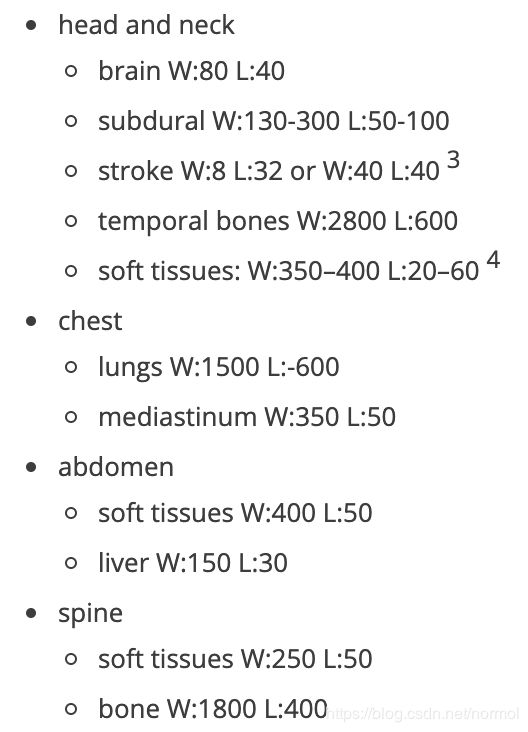
若是dicom格式的图片,得先转化为hu值(即ct图像值,若图片本来就是ct,则不需要转换)(见下面更新内容) ,因为hu值是与设备无关的,不同范围之内的值可以代表不同器官。常见的对应如下(w代表ct值width,L代表ct值level,即 [level - width/2 , level + width/2]为其窗口化目标范围):
2019-7-24更新
其实无论对于dcm还是nii格式的图片,只要是ct图,就都可以选择将储存的原始数据转化为Hu值,因为Hu值即代表了物体真正的密度。
对于nii格式的图片,经过测试,nibabel, simpleitk常用的api接口,都会自动的进行上述转化过程,即取出来的值已经是Hu了。
(除非专门用nib.load('xx').dataobj.get_unscaled()或者itk.ReadImage('xx').GetPixel(x,y,z)才能取得原始数据)
对于dcm格式的图片,经过测试,simpleitk, pydicom常用的api接口都不会将原始数据自动转化为Hu!!(itk snap软件读入dcm或nii都不会对数据进行scale操作)
下面是做的测试
import nibabel as nib
import SimpleITK as itk
import pydicom


nii_file = r'G:\data\LITS17\LITS17_vol\volume-0.nii'

dcm_file = r'G:\data\3Dircadb\3Dircadb1.1\PATIENT_DICOM\image_0'

img = nib.load(nii_file)
"""
经过测试get_fdata会自动根据头文件数据中的
inter, slope 将raw data转换到hu data
img.dataobj.get_unscaled获取的就是未转化的
raw data。还需要注意的是,img.header中的
scl_slope, scl_inter为nan,因为对于转换后的
hu data而言,这两个值已经不重要了
想要知道的话,可以专门用
img.dataobj.slope, img.dataobj.inter 获取
"""
hu_data = img.get_fdata()  # Hu data
pixel_data = img.dataobj.get_unscaled() # raw data

seg = itk.ReadImage(nii_file)
segimg = itk.GetArrayFromImage(seg)  # == img.get_fdata(), Hu data
print(seg.GetPixel(0, 0, 0))  # unscale, raw data
"""经过测试,itk里的头文件不会像nib将inter和slope抹去"""
# for key in seg.GetMetaDataKeys():
#     print("{0}:{1}".format(key, seg.GetMetaData(key)))

print('---------------')

dcm_itk = itk.ReadImage(dcm_file)
# for key in dcm_itk.GetMetaDataKeys():
#     print("{0}:{1}".format(key, dcm_itk.GetMetaData(key)))

print(dcm_itk.GetPixel(0, 0, 0))  # -1024 unscaled, raw data
data_itk = itk.GetArrayFromImage(dcm_itk)
print(data_itk)  # -1024,unscaled, raw data

print(pydicom.dcmread(dcm_file).pixel_array)  # == data_itk,unscaled, raw data
文章目录
- dicom转化为hu的示例代码
- windowing
- Window width
- Wide window
- Narrow window
- Window level/center
- Upper and lower grey level calculation
- windowing代码
dicom转化为hu的示例代码
如下:
def get_pixels_hu(scans):
    #type(scans[0].pixel_array)
    #Out[15]: numpy.ndarray
    #scans[0].pixel_array.shape
    #Out[16]: (512, 512)
    # image.shape: (129,512,512)
    image = np.stack([s.pixel_array for s in scans])
    # Convert to int16 (from sometimes int16),
    # should be possible as values should always be low enough (<32k)
    image = image.astype(np.int16)

    # Set outside-of-scan pixels to 1
    # The intercept is usually -1024, so air is approximately 0
    image[image == -2000] = 0

    # Convert to Hounsfield units (HU)
    intercept = scans[0].RescaleIntercept
    slope = scans[0].RescaleSlope

    if slope != 1:
        image = slope * image.astype(np.float64)
        image = image.astype(np.int16)

    image += np.int16(intercept)

    return np.array(image, dtype=np.int16)
windowing
然而,hu的范围一般来说很大,这就导致了对比度很差,如果需要针对具体的器官进行处理,效果会不好,于是就有了windowing的方法:
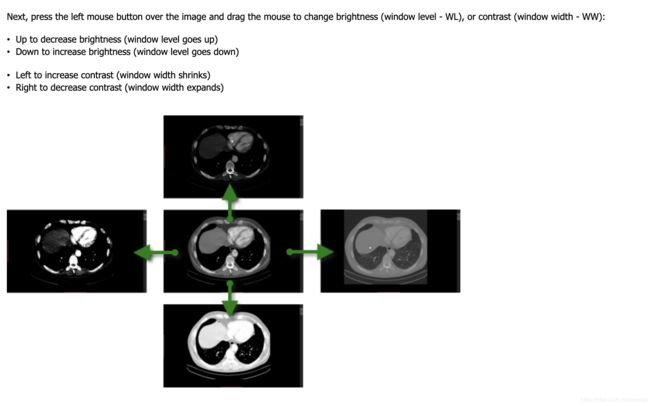
Windowing, also known as grey-level mapping, contrast stretching, histogram modification or contrast enhancement is the process in which the CT image greyscale component of an image is manipulated via the CT numbers; doing this will change the appearance of the picture to highlight particular structures. The brightness of the image is, adjusted via the window level. The contrast is adjusted via the window width.
图像的亮度取决于window level,图像的对比度取决于window width。
Window width
The window width (WW) as the name suggests is the measure of the range of CT numbers that an image contains.
窗口宽度就是一幅ct图片包含的ct值范围。
A wider window width (2000 HU), therefore, will display a wider range of CT numbers. Consequently, the transition of dark to light structures will occur over a larger transition area to that of a narrow window width (<1000 HU).
更宽的窗口,相对于窄的窗口来说,从暗到亮的结构过度将会在发生在更大的过度区域。
Accordingly, it is important to note, that a significantly wide window displaying all the CT numbers will result in different attenuations between soft tissues to become obscured.
因此,一个展示了所有ct值的宽窗口,将导致软组织间不同的ct值变得模糊。
Wide window
Defined as 400-2000 HU best used in areas of acute differing attenuation values, a good example is lungs or cortical tissue, where air and vessels will sit side by side.
宽窗口经常用于ct值变化很大的领域,比如肺部或外皮组织,这些地方空气和血管将会一同出现。
Narrow window
Defined as 50-350 HU are excellent when examining areas of similar attenuation, for example, soft tissue.
窄的窗口常用于ct值相似的区域,例如软组织。
Window level/center
The window level (WL), often also referred to as window center, is the midpoint of the range of the CT numbers displayed.
窗口水平,也经常成为窗口中心,是ct值的中点。
When the window level is decreased the CT image will be brighter and vice versa.
窗口level减少,图片将变亮,level增大,图片变暗。
Upper and lower grey level calculation
When presented with a WW and WL one can calculate the upper and lower grey levels i.e. values over x will be white and values below y will be black.
当给定了window width和window level后,就能计算出窗口的上下界。
超过上界的,是白色,低于下界的,是黑色。
下面是计算方法和举例。
the upper grey level (x) is calculated via WL + (WW ÷ 2)
the lower grey level (y) is calculated via WL - (WW ÷ 2)
For example, a brain is W:80 L:40, therefore, all values above +80 will be white and all values below 0 are black.
windowing代码
def transform_ctdata(self, windowWidth, windowCenter, normal=False):
        """
        注意,这个函数的self.image一定得是float类型的,否则就无效!
        return: trucated image according to window center and window width
        """
        minWindow = float(windowCenter) - 0.5*float(windowWidth)
        newimg = (self.image - minWindow) / float(windowWidth)
        newimg[newimg < 0] = 0
        newimg[newimg > 1] = 1
        if not normal:
            newimg = (newimg * 255).astype('uint8')
        return newimg
2019-10-9 更新
windowCenter和windowWidth的选择:
一是可以根据所需部位的hu值(对于CT数据而言)分布范围选取(注意若是增强ct的话hu值会有一些差别,可以画一下几个随机数据的hu分布图看一看)
二是可以根据图像的统计信息,例如图像均值作为窗口中心,正负2.5(这个值并非固定)的方差作为窗口宽度
下面是github上,vnet一个预处理过程,使用了基于统计的窗口化操作
class StatisticalNormalization(object):
    """
    Normalize an image by mapping intensity with intensity distribution
    """

    def __init__(self, sigma):
        self.name = 'StatisticalNormalization'
        assert isinstance(sigma, float)
        self.sigma = sigma

    def __call__(self, sample):
        image, label = sample['image'], sample['label']
        statisticsFilter = sitk.StatisticsImageFilter()
        statisticsFilter.Execute(image)

        intensityWindowingFilter = sitk.IntensityWindowingImageFilter()
        intensityWindowingFilter.SetOutputMaximum(255)
        intensityWindowingFilter.SetOutputMinimum(0)
        intensityWindowingFilter.SetWindowMaximum(
            statisticsFilter.GetMean() + self.sigma * statisticsFilter.GetSigma())
        intensityWindowingFilter.SetWindowMinimum(
            statisticsFilter.GetMean() - self.sigma * statisticsFilter.GetSigma())

        image = intensityWindowingFilter.Execute(image)

        return {'image': image, 'label': label}