redhat7安装Oracle12c数据库过程
一、Linux系统安装前准备
Linux系统版本为
1.调整系统swap分区大小
root用户下
[root@localhost ~]# fdisk /dev/sdb
Welcome to fdisk (util-linux 2.23.2).
Changes will remain in memory only, until you decide to write them.
Be careful before using the write command.
Device does not contain a recognized partition table
Building a new DOS disklabel with disk identifier 0x833eb6d8.
Command (m for help): n
Partition type:
p primary (0 primary, 0 extended, 4 free)
e extended
Select (default p): e
Partition number (1-4, default 1): 4
First sector (2048-125829119, default 2048):
Using default value 2048
Last sector, +sectors or +size{K,M,G} (2048-125829119, default 125829119): +20G
Partition 4 of type Extended and of size 20 GiB is set
Command (m for help): n
Partition type:
p primary (0 primary, 1 extended, 3 free)
l logical (numbered from 5)
Select (default p): l
Adding logical partition 5
First sector (4096-41945087, default 4096): “回车”
Using default value 4096
Last sector, +sectors or +size{K,M,G} (4096-41945087, default 41945087): “回车”
Using default value 41945087
Partition 5 of type Linux and of size 20 GiB is set
Command (m for help): w
The partition table has been altered!
Calling ioctl() to re-read partition table.
Syncing disks.
[root@localhost ~]# partprobe
Warning: Unable to open /dev/sr0 read-write (Read-only file system). /dev/sr0 has been opened read-only.
Warning: Unable to open /dev/sr0 read-write (Read-only file system). /dev/sr0 has been opened read-only.
Warning: Unable to open /dev/sr0 read-write (Read-only file system). /dev/sr0 has been opened read-only.
[root@localhost ~]# mkswap /dev/sdb5
Setting up swapspace version 1, size = 20970492 KiB
no label, UUID=c985adf5-dbba-48e8-803b-cc34bd0c33b1
[root@localhost ~]# vim /etc/fstab
添加如下:
UUID=c985adf5-dbba-48e8-803b-cc34bd0c33b1 swap swap defaults 0 0
[root@localhost ~]# df -h
Filesystem Size Used Avail Use% Mounted on
/dev/mapper/rhel-root 36G 6.2G 30G 18% /
devtmpfs 1.9G 0 1.9G 0% /dev
tmpfs 1.9G 140K 1.9G 1% /dev/shm
tmpfs 1.9G 8.8M 1.9G 1% /run
tmpfs 1.9G 0 1.9G 0% /sys/fs/cgroup
/dev/sr0 3.5G 3.5G 0 100% /media/cdrom
/dev/sda1 497M 119M 379M 24% /boot
[root@localhost ~]# free -h
total used free shared buffers cached
Mem: 3.7G 853M 2.9G 9.7M 1.4M 252M
-/+ buffers/cache: 599M 3.1G
Swap: 23G 0B 23G
2.配置yum仓库(本地磁盘镜像iso)
[root@localhost ~]mkdir /media/cdrom
[root@localhost ~]vim /etc/fstab
/dev/cdrom /media/cdrom iso9660 defaults 0 0
[root@localhost ~]mount -a
3.关闭防火墙和selinux
[root@localhost ~]# vim /etc/selinux/config
SELINUX=disabled
[root@localhost ~]# systemctl stop iptables.service
二、Oracle安装
1.下载Oracle需要的依赖包
yum -y install gcc gcc-c++ make binutils compat-libstdc++-33 glibc glbic-devel libaio libaio-devel libgcc libstdc++ libstdc++-devel unixODBC-devel sysstat ksh unzip compat-libcap*
2.添加账号跟用户组
[root@localhost ~]# groupadd dba
[root@localhost ~]# groupadd oinstall
[root@localhost ~]# tail -5 /etc/group
sshd:x:74:
tcpdump:x:72:
yaopeidong:x:1000:
dba:x:1001:
oinstall:x:1002:
[root@localhost ~]# useradd -g dba -G oinstall oracle
[root@localhost ~]# id oracle
uid=1001(oracle) gid=1001(dba) groups=1001(dba),1002(oinstall)
[root@localhost ~]#
nging password for user oracle.
passwd: all authentication tokens updated successfully.
[root@localhost ~]# chown -R oracle:oinstall /u01
3.下载xshell 5
新建连接,输入IP地址,Linux系统root用户名和密码
创建存储文件目录,输入“rz”,调出上传文件窗口,选中文件,点击打开
4.配置Oracle环境变量
[root@localhost ~]# vim /home/oracle/.bash_profile
# .bash_profile
# Get the aliases and functions
if [ -f ~/.bashrc ]; then
. ~/.bashrc
fi
# User specific environment and startup programs
PATH=$PATH:$HOME/.local/bin:$HOME/bin
export ORACLE_BASE=/u01/app/oracle
export ORACLE_HOME=$ORACLE_BASE/product/12.1.0/db_1
export ORACLE_SID=oaec
export PATH=$ORACLE_HOME/bin:$PATH
5.修改/etc/sysctl.conf配置文件,红色字体为添加内容
[root@localhost ~]# vim /etc/sysctl.conf
# System default settings live in /usr/lib/sysctl.d/00-system.conf.
# To override those settings, enter new settings here, or in an /etc/sysctl.d/#
# For more information, see sysctl.conf(5) and sysctl.d(5).
fs.aio-max-nr = 1048576

fs.file-max = 6815744

kernel.shmall = 2097152

kernel.shmmax = 4294967295

kernel.shmmni = 4096

kernel.sem = 250 32000 100 128

net.ipv4.ip_local_port_range = 9000 65500

net.core.rmem_default = 262144

net.core.rmem_max = 4194304

net.core.wmem_default = 262144

net.core.wmem_max = 1048576
[root@localhost ~]# /sbin/sysctl -p
fs.aio-max-nr = 1048576
fs.file-max = 6815744
kernel.shmall = 2097152
kernel.shmmax = 4294967295
kernel.shmmni = 4096
kernel.sem = 250 32000 100 128
net.ipv4.ip_local_port_range = 9000 65500
net.core.rmem_default = 262144
net.core.rmem_max = 4194304
net.core.wmem_default = 262144
net.core.wmem_max = 1048576
6.修改/etc/security/limits.conf 红色字体添加到文档末尾
[root@localhost ~]# vim /etc/security/limits.conf
oracle soft nproc 2047
oracle hard nproc 16384
oracle soft nofile 1024
oracle hard nofile 65536
oracle soft stack 10240
7.修改/etc/pam.d/login 红色字体为添加内容
[root@localhost ~]# vim /etc/pam.d/login
#%PAM-1.0
auth [user_unknown=ignore success=ok ignore=ignore default=bad] pam_securetty.so
auth substack system-auth
auth include postlogin
account required pam_nologin.so
account include system-auth
password include system-auth
# pam_selinux.so close should be the first session rule
session required pam_selinux.so close
session required pam_loginuid.so
session optional pam_console.so
# pam_selinux.so open should only be followed by sessions to be executed in the user context
session required pam_selinux.so open
session required pam_namespace.so
session optional pam_keyinit.so force revoke
session include system-auth
session include postlogin
-session optional pam_ck_connector.so
session required pam_limits.so
8.修改/etc/profile 文件末尾添加内容
[root@localhost ~]# vim /etc/profile
unset -f pathmunge
if [ $USER = "oracle" ];then
if [ $SHELL = "/bin/ksh" ];then
ulimit -p 16384
ulimit -n 65536
else
ulimit -u 16384 -n 65536
fi
umask 022
fi
三、开始安装Oracle
1.解压Oracledatabase的zip文件 必须切换到oracle用户进行解压
[root@localhost ~]# su - oracle
[oracle@localhost ~]$ ls /var/oracledata/
linuxx64_12201_database.zip
[oracle@localhost ~]$ unzip /var/oracledata/linuxx64_12201_database.zip
2.oracle用户下,执行如下
报错:Checking monitor: must be configured to display at least 256 colors
解决方法:
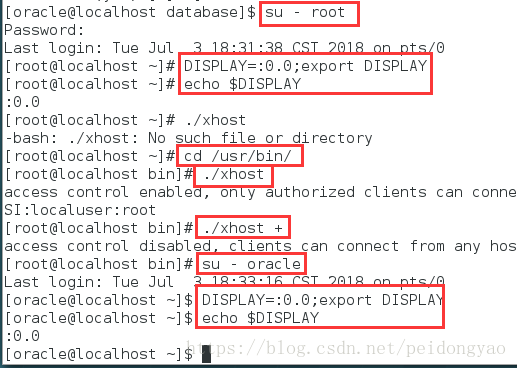
(1)切换到root用户
[root@localhost ~]# DISPLAY=:0.0;export DISPLAY
[root@localhost ~]# echo $DISPLAY
:0.0
[root@localhost ~]# cd /usr/bin/
[root@localhost bin]# ./xhost
access control enabled, only authorized clients can connect
SI:localuser:root
[root@localhost bin]# ./xhost +
access control disabled, clients can connect from any host
(2)切换到oracle用户
[oracle@localhost ~]$ DISPLAY=:0.0;export DISPLAY
[oracle@localhost ~]$ echo $DISPLAY
:0.0
如没有报错请从这里开始继续往下
[oracle@localhost ~]$ cd database/
[oracle@localhost database]$ ls
install response rpm runInstaller sshsetup stage welcome.html
[oracle@localhost database]$ ./runInstaller
3.出现Oracle安装图形界面
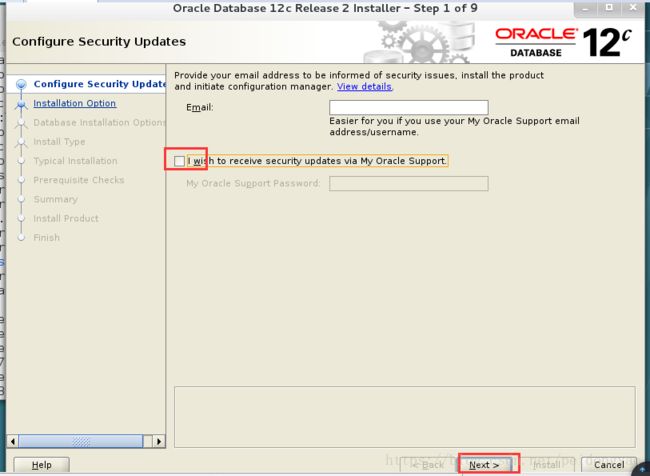
(1)取消勾选
(2)选择仅安装数据库软件
(3)选择单实例数据库安装
(4)选择企业版安装
(5)按照上面的步骤执行下来,此步骤的默认目录就不需要修改
(6)选择对产品清单有写权限的用户组
(7)选择对数据库有操作权限的用户组
(8)前置检查中若报错,参数文件大小,请参照https://blog.csdn.net/peidongyao/article/details/80905428
修改完后,reboot重启虚拟机,ulimit -a 检查配置参数
(9)前置检验通过,展示概要信息,点击install
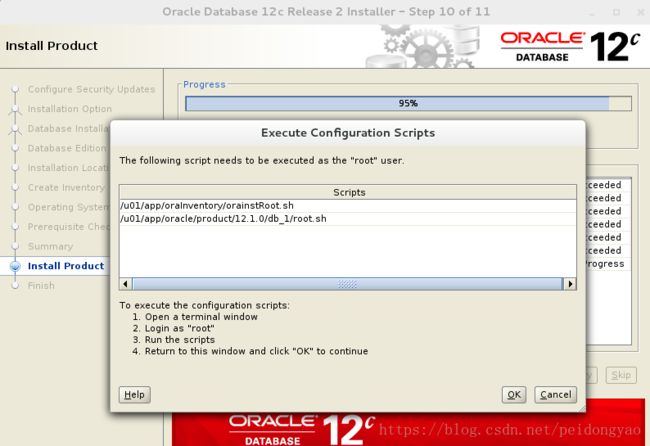
(10)安装到95%是提示,如下图所示,对提示中的.sh文件在root用户下执行
(11)完成安装,点击finish
四、创建实例库
1.oracle用户下执行dbca,弹出Oracle界面
[oracle@localhost ~]$ dbca
2.选择建库模式
3.选择一般用途或事务处理
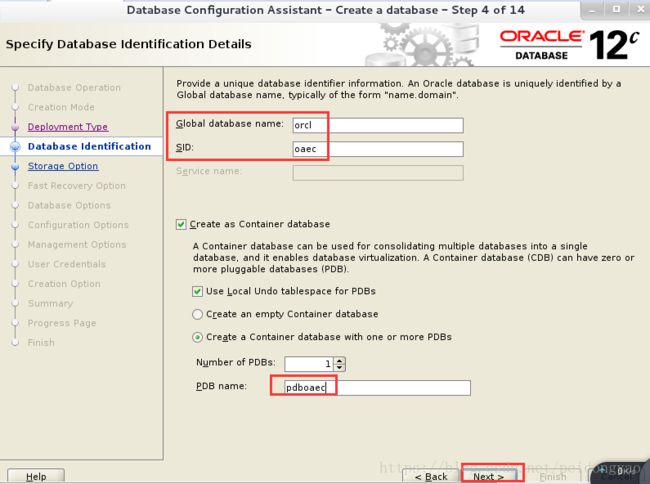
4.输入全局数据库名orcl SID为oaec PDB库名称pdboaec
5.经过两个默认配置,配置到监听,名称填listener
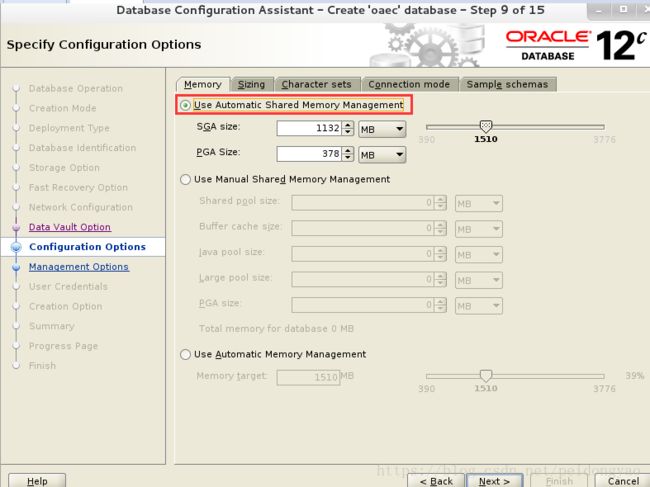
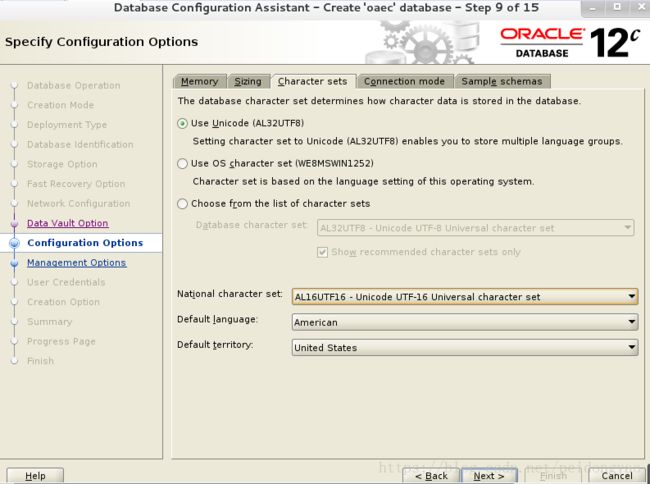
6.选择sga与pga自动管理,进程内存区大小300M,语言设置
7.选择EM端口为5500
8.设置数据库用户密码,建议全部设置一样的,好记忆。
9.创建数据库
10.显示概要信息(忘记截图),点击安装
11.提示finish,点击close
12.测试监听服务
[oracle@localhost ~]$ lsnrctl status
13.尝试连接数据库服务
[oracle@localhost ~]$ sqlplus / as sysdba
至此安装结束。


