TensorFlow实战笔记之(5):卷积神经网络 实现CIFAR-10数据集分类
一、CIFAR-10数据集
1.简介
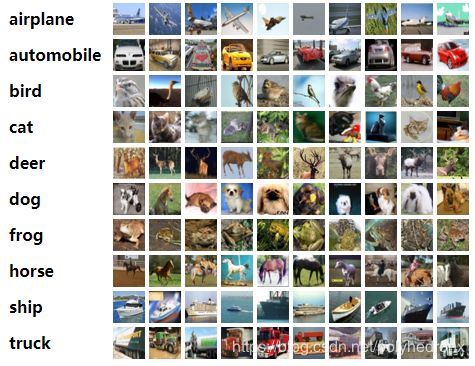
CIFAR-10是一个经典的数据集,包含60000张RGB 32x32像素的图像,其中训练集50000张,测试集10000张。CIFAR-10即标注为10类,每一类图片6000张,如下图。
数据集下载地址:https://www.cs.toronto.edu/~kriz/cifar.html
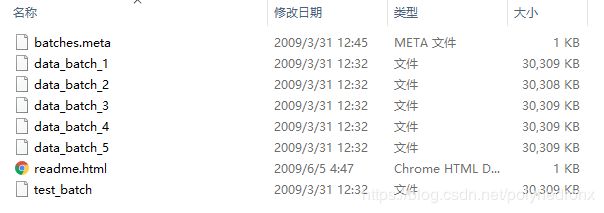
下载下来的数据集中包含下面的一些文件:
这里共有六个主要文件,其中五个训练数据文件,文件名为:data_batch_1.bin,…, data_batch_5.bin,一个测试数据文件,名为test_batch.bin。每个文件都是用cPickle生成的python“pickled”对象。下面是python3例程,可以打开此类文件并返回字典:
def unpickle(file):
    import pickle
    with open(file, 'rb') as fo:
        dict = pickle.load(fo, encoding='bytes')
    return dict
以这种方式加载的每个批处理文件都包含一个字典,包含以下元素:
- data -- 10000x3072 的uint8s格式numpy数组。数组的每一行存储一个32x32的彩色图像,按顺序包含红色、绿色和蓝色三个通道的值,因此每行的长度为32x32x3=3072。图像按行进行存储,如数组的前32个值是图像第一行的红色通道值。
- labels -- 取值为0-9的包含10000个数字的list。索引i处的数字表示数组data中第i个图像的标签。
数据集中还有另一个名为batches.meta.txt的文件,它也包含一个python字典对象:
- label_names -- 一个10元素的list,为上述labels的具体名称。如, label_names[0] == "airplane", label_names[1] == "automobile" 等。
2.读取数据集
为了读取CIFAR-10中的图像数据,你可以像上面的例程那样自己写一个读取数据的程序,比如这样。
另一种方法是使用tfds.load,即
dataset = tfds.load(name='cifar10', split=split)具体见https://www.tensorflow.org/datasets/api_docs/python/tfds/load。
当然,最傻瓜的方法还是直接使用官方提供的代码,当然官方代码里面也是用tfds.load实现的。
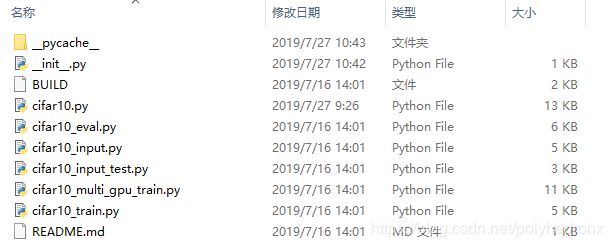
代码下载地址:https://github.com/tensorflow/models/tree/master/tutorials/image/cifar10,包含以下内容:
读取数据集的代码在cifar10_input.py文件中,这个文件里的代码会不定时的更新,所以如果直接使用以前别人博客或书里的调用例程可能会出现一些错误,目前cifar10_input.py文件里主要有以下内容:
_get_images_labels():获取图像以及标签数据。
DataPreprocessor():数据预处理类。
distorted_inputs():构建训练数据并进行预处理。
inputs():构建测试数据并进行预处理(也可以用在训练集上)。
调用方法:
from cifar10 import cifar10_input

# 训练集
images_train, labels_train = cifar10_input.distorted_inputs(batch_size=batch_size)

# 测试集
images_test, labels_test = cifar10_input.inputs(eval_data=True, batch_size=batch_size)
需要注意的是,这里对训练集数据进行了数据增强(Data Augmentation),具体可查看cifar10_input里的DataPreprocessor类,其中的数据增强操作包括随机剪切一块24×24大小的图片(tf.random_crop),随机的水平翻转(tf.image.random_flip_left_right),设置随机的亮度和对比度(tf.image.random_brightness、tf.image.random_contrast),以及对数据进行标准化(tf.image.per_image_standardization,减去均值并除以像素的方差,使模型对图像的动态范围变化不敏感)。如下图:
对于测试集数据,裁剪出24×24大小的图像的中心(tf.image.resize_image_with_crop_or_pad)。
调用上述语句时,如果你还未下载过CIFAR-10数据集,则程序会自动下载并解压到默认位置;如果默认位置已经有该数据集,则会直接读取数据。此外,如果你想下载到指定的位置,则需要对官方程序做一些改动,因为官方程序并未提供此接口,不过改起来也非常简单,给cifar10_input._get_images_labels函数里的tfds.load传一个参数“data_dir”就可以了。
二、卷积神经网络设计
1. 卷积神经网络的结构
下表给出了整个神经网络从输入到输出的流程,以及使用到的主要函数。可以观察到,设计CNN主要就是安排卷积层、池化层、全连接层的分布和顺序,以及其中超参数的设置、Trick的使用等。
| 层名称 | 说明 |
|---|---|
| conv1 | tf.nn.conv2d 、tf.layers.batch_normalization和 tf.nn.relu 激活函数。 |
| pool1 | tf.nn.max_pool。 |
| conv2 | tf.nn.conv2d 、tf.layers.batch_normalization和 tf.nn.relu 激活函数。 |
| pool2 | tf.nn.max_pool。 |
| local3 | 全连接层和ReLU激活函数。 |
| local4 | 全连接层和ReLU激活函数。 |
| logits | 输出层。 |
在卷积神经网络模型中,使用的一些Trick:
- 数据增强:对输入图片进行翻转、随机剪切等,制造更多的样本。
- 对权重进行L2正则化。
- 指数衰减学习率。
- 在每个卷积层后面使用了BN层,增强了模型的泛化能力。
2. Batch Normalization原理与使用方法
上述表格中使用到的大部分函数都已在我的上一篇博客里进行了详细的介绍(见参考文献4),这里主要学习一下tf.layers.batch_normalization函数的用法。
2.1 Batch Normalization的基本原理
Batch Normalization是用来解决“Internal Covariate Shift”问题的,简单来说,就是训练过程中由于参数的变化,网络内部层的输入值的分布也不停变化,使用Batch Normalization就是为了让每一层输入的分布都相同。准确来说,BN就是通过一定的规范化手段,把每层神经网络任意神经元的输入值分布变为均值为0方差为1的标准正态分布。
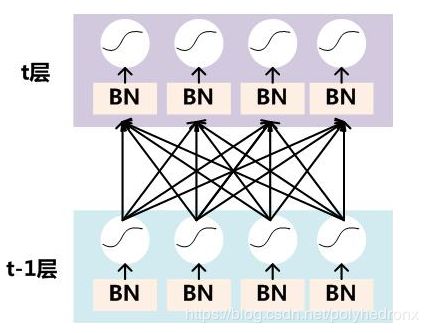
在训练过程中,要对每个隐层神经元的激活值做BN,可以想象成每个隐层又加上了一层BN操作层,它位于X=WU+B激活值获得之后,非线性函数变换之前,其图示如下:
对于Mini-Batch SGD来说,一次训练过程里面包含m个训练实例,其具体BN操作就是对于隐层内每个神经元的激活值来说,进行如下变换:
要注意,这里t层某个神经元的x(k)不是指原始输入,就是说不是t-1层每个神经元的输出,而是t层这个神经元的线性激活x=WU+B,这里的U才是t-1层神经元的输出。变换的意思是:某个神经元对应的原始的激活x通过减去mini-Batch内m个实例获得的m个激活x求得的均值E(x)并除以求得的方差Var(x)来进行转换。
变换后某个神经元的激活x形成了均值为0,方差为1的正态分布,但是这样会一定程度上限制网络的表达能力,为了防止这一点,每个神经元增加两个调节参数(scale和shift),这两个参数是通过训练来学习到的,用来对变换后的激活反变换,使得网络表达能力增强,即对变换后的激活进行如下的scale和shift操作:
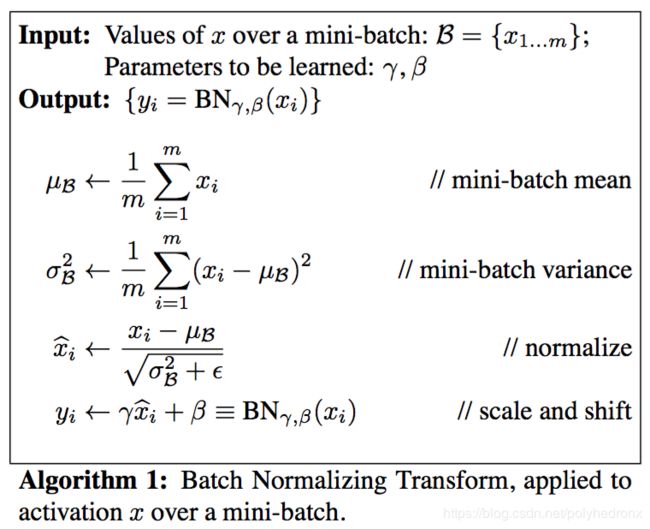
具体的算法流程如下:
在训练时,我们可以计算出batch的均值和方差,迭代训练过程中,均值和方差一直在发生变化。在推理(Inference)时,采用滑动平均MovingAverage的方法,公式为: moving_average_value * momentum + value * (1 - momentum),其中value为当前batch的平均值或方差,moving_average_value为滑动均值或滑动方差。最终,模型训练完毕后,在推理时使用滑动平均值moving_mean和滑动方差moving_variance对feature maps进行变换。
使用BN有很多好处:
- 极大提升了训练速度,收敛过程大大加快;
- 具有提高网络泛化能力的特性,一种解释是这是类似于Dropout的一种防止过拟合的正则化表达方式,所以不用Dropout也能达到相当的效果;
- 调参过程简单,对于初始化要求没那么高,而且可以选择比较大的初始学习率等。
2.2 tf.layers.batch_normalization简介
tf.layers.batch_normalization(
    inputs,
    axis=-1,
    momentum=0.99,
    epsilon=0.001,
    center=True,
    scale=True,
    beta_initializer=tf.zeros_initializer(),
    gamma_initializer=tf.ones_initializer(),
    moving_mean_initializer=tf.zeros_initializer(),
    moving_variance_initializer=tf.ones_initializer(),
    beta_regularizer=None,
    gamma_regularizer=None,
    beta_constraint=None,
    gamma_constraint=None,
    training=False,
    trainable=True,
    name=None,
    reuse=None,
    renorm=False,
    renorm_clipping=None,
    renorm_momentum=0.99,
    fused=None,
    virtual_batch_size=None,
    adjustment=None
)- axis的值取决于按照input的哪一个维度进行BN,例如输入为channel_last format,即[batch_size, height, width, channel],则axis应该设定为4,如果为channel_first format,则axis应该设定为1.
- momentum,滑动平均的动量,用在训练时以滑动平均的方式计算滑动平均值moving_mean和滑动方差moving_variance。
- center为True时,添加位移因子beta到该BN层,否则不添加。添加beta是对BN层的变换加入位移操作。注意,beta一般设定为可训练参数,即trainable=True。
- scale为True是,添加缩放因子gamma到该BN层,否则不添加。添加gamma是对BN层的变化加入缩放操作。注意,gamma一般设定为可训练参数,即trainable=True。
- training表示模型当前的模式,如果为True,则模型为训练模式,否则为推理模式。如果在训练时采用了默认值False,则滑动均值moving_mean和滑动方差moving_variance都不会根据当前batch的数据更新,这就意味着在推理模式下,均值和方差都是其初始值,因为这两个值并没有在训练迭代过程中滑动更新。
2.3 tf.layers.batch_normalization使用方法
BN层一般在卷积层或全连接层之后,非线性激活函数(如ReLU)之前使用,例如:
# 卷积层1
weight1 = variable_with_weight_loss(shape=[5, 5, 3, 64], stddev=5e-2, w1=0.0)
kernel1 = tf.nn.conv2d(image_in, weight1, strides=[1, 1, 1, 1], padding='SAME')
bias1 = tf.Variable(tf.constant(0.0, shape=[64]))
active1 = tf.nn.bias_add(kernel1, bias1)
bn1 = tf.layers.batch_normalization(active1, training=is_training)
conv1 = tf.nn.relu(bn1)
pool1 = tf.nn.max_pool(conv1, ksize=[1, 3, 3, 1], strides=[1, 2, 2, 1], padding='SAME')
TensorFlow中模型训练时的梯度计算、参数优化等train_op并没有依赖滑动均值moving_mean和滑动方差moving_variance,moving_mean和moving_variance不会自动更新,所以必须加入负责更新这些参数的update_ops到依赖中,且应该在执行前向计算结束后、后向计算开始前执行update_ops,添加依赖的位置不能出错。
update_ops = tf.get_collection(tf.GraphKeys.UPDATE_OPS)
with tf.control_dependencies(update_ops):  # 保证train_op在update_ops执行之后再执行
    train_op = tf.train.AdamOptimizer(1e-3).minimize(loss)
此外,对于tf.layers.batch_normalization的training参数,在训练(train)时应该设为True,在推理(inference)时应该设为False。
3. 程序和结果
程序运行版本为:python-->3.7.3,tensorflow-->1.13.1 。
batch的大小为128,训练次数为5000。对两个全连接层的权重进行L2正则化约束,正则项的系数设为0.004。
使用指数衰减学习率,学习率初始值设为0.001,衰减步长设为训练集的batch个数(50000/128=390),衰减率设为0.9,优化算法采用Adam。程序如下。
from cifar10 import cifar10_input
import tensorflow as tf
import time
import math
import numpy as np
import matplotlib.pyplot as plt

# move warning
import os
os.environ['TF_CPP_MIN_LOG_LEVEL'] = '2'
old_v = tf.logging.get_verbosity()
tf.logging.set_verbosity(tf.logging.ERROR)

# 训练参数
BATCH_SIZE = 128
TRAINING_STEPS = 5000

# 指数衰减学习率参数
LEARNING_RATE_BASE = 0.001
LEARNING_RATE_DECAY = 0.9


# 定义初始化权值函数
def variable_with_weight_loss(shape, stddev, w1):
    var = tf.Variable(tf.truncated_normal(shape, stddev=stddev))
    if w1 is not None:
        # w1控制L2正则化的大小
        weight_loss = tf.multiply(tf.nn.l2_loss(var), w1, name='weight_loss')
        tf.add_to_collection('losses', weight_loss)
    return var


# 训练集
images_train, labels_train = cifar10_input.distorted_inputs(batch_size=BATCH_SIZE)

# 测试集
images_test, labels_test = cifar10_input.inputs(eval_data=True, batch_size=BATCH_SIZE)

# 输入层
image_in = tf.placeholder(tf.float32, [BATCH_SIZE, 24, 24, 3])  # 裁剪后尺寸为24×24,彩色图像通道数为3
label_in = tf.placeholder(tf.int32, [BATCH_SIZE])
is_training = tf.placeholder(tf.bool, [])

# 卷积层1
weight1 = variable_with_weight_loss(shape=[5, 5, 3, 64], stddev=5e-2, w1=0.0)  # 5×5的卷积核,3个通道,64个滤波器
kernel1 = tf.nn.conv2d(image_in, weight1, strides=[1, 1, 1, 1], padding='SAME')
bias1 = tf.Variable(tf.constant(0.1, shape=[64]))
active1 = tf.nn.bias_add(kernel1, bias1)
bn1 = tf.layers.batch_normalization(active1, training=is_training)
conv1 = tf.nn.relu(bn1)
pool1 = tf.nn.max_pool(conv1, ksize=[1, 3, 3, 1], strides=[1, 2, 2, 1], padding='SAME')

# 卷积层2
weight2 = variable_with_weight_loss(shape=[5, 5, 64, 64], stddev=5e-2, w1=0.0)  # 5×5的卷积核,第一个卷积层输出64个通道,64个滤波器
kernel2 = tf.nn.conv2d(pool1, weight2, strides=[1, 1, 1, 1], padding='SAME')
bias2 = tf.Variable(tf.constant(0.1, shape=[64]))
active2 = tf.nn.bias_add(kernel2, bias2)
bn2 = tf.layers.batch_normalization(active2, training=is_training)
conv2 = tf.nn.relu(bn2)
pool2 = tf.nn.max_pool(conv2, ksize=[1, 3, 3, 1], strides=[1, 2, 2, 1], padding='SAME')

# 全连接层1
reshape = tf.reshape(pool2, [BATCH_SIZE, -1])  # 将数据变为1D数据
dim = reshape.get_shape()[1].value  # 获取维度
weight3 = variable_with_weight_loss(shape=[dim, 384], stddev=0.04, w1=0.004)
bias3 = tf.Variable(tf.constant(0.1, shape=[384]))
local3 = tf.nn.relu(tf.matmul(reshape, weight3) + bias3)

# 全连接层2
weight4 = variable_with_weight_loss(shape=[384, 192], stddev=0.04, w1=0.004)
bias4 = tf.Variable(tf.constant(0.1, shape=[192]))
local4 = tf.nn.relu(tf.matmul(local3,  weight4) + bias4)

# 输出层
weight5 = variable_with_weight_loss(shape=[192, 10], stddev=1/192.0, w1=0.0)
bias5 = tf.Variable(tf.constant(0.0, shape=[10]))
logits = tf.add(tf.matmul(local4, weight5), bias5)


# 计算loss
def loss(logits, labels):
    labels = tf.cast(labels, tf.int64)
    cross_entropy = tf.nn.sparse_softmax_cross_entropy_with_logits(logits=logits, labels=labels,
                                                                   name='cross_entropy_per_example')
    cross_entropy_mean = tf.reduce_mean(cross_entropy, name='cross_entropy')
    tf.add_to_collection('losses', cross_entropy_mean)
    return tf.add_n(tf.get_collection('losses'), name='total_loss')


# training operation
global_step = tf.Variable(0, trainable=False)
learning_rate = tf.train.exponential_decay(LEARNING_RATE_BASE, global_step, int(5e4/BATCH_SIZE), LEARNING_RATE_DECAY)
loss = loss(logits, label_in)
update_ops = tf.get_collection(tf.GraphKeys.UPDATE_OPS)
with tf.control_dependencies(update_ops):  # 保证train_op在update_ops执行之后再执行
    train_op = tf.train.AdamOptimizer(learning_rate).minimize(loss, global_step=global_step)
top_k_op = tf.nn.in_top_k(logits, label_in, 1)  # 得分最高的那一类的准确率
sess = tf.InteractiveSession()
tf.global_variables_initializer().run()

# 启动线程,使用16个线程来加速
tf.train.start_queue_runners()

# 训练
losss = []
steps = []
rates = []
for step in range(TRAINING_STEPS):
    start_time = time.time()
    image_batch, label_batch = sess.run([images_train, labels_train])
    _, loss_value, _, now_learn_rate = sess.run([train_op, loss, global_step, learning_rate],
                                                feed_dict={image_in: image_batch, label_in: label_batch,
                                                           is_training: True})
    duration = time.time() - start_time  # 运行时间
    if step % 20 == 0:
        losss.append(loss_value)
        steps.append(step)
        rates.append(now_learn_rate)
        sec_per_batch = float(duration)  # 每个batch的时间
        format_str = 'step %d, loss=%.2f(%.3f sec/batch), learning_rate=%f'
        print(format_str % (step, loss_value, sec_per_batch, now_learn_rate))

# 测试模型准确率
num_examples = 10000
num_iter = int(math.ceil(num_examples / BATCH_SIZE))
true_count = 0
total_sample_count = num_iter * BATCH_SIZE
step = 0
while step < num_iter:
    image_batch, label_batch = sess.run([images_test, labels_test])
    predictions = sess.run([top_k_op], feed_dict={image_in: image_batch, label_in: label_batch, is_training: False})
    true_count += np.sum(predictions)
    step += 1
precision = true_count / total_sample_count
print('precision: %.3f' % precision)

# learning rate
plt.figure()
plt.plot(steps, rates)
plt.xlabel('Number of steps')
plt.ylabel('Learning rate')

# loss
plt.figure()
plt.plot(steps, losss)
plt.xlabel('Number of steps')
plt.ylabel('Loss')
plt.show()

tf.logging.set_verbosity(old_v)
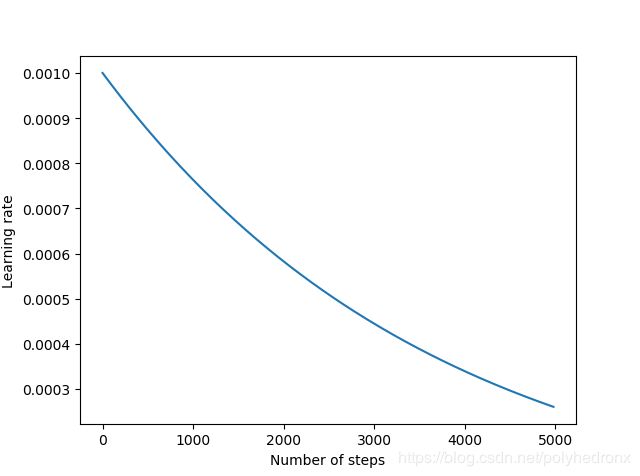
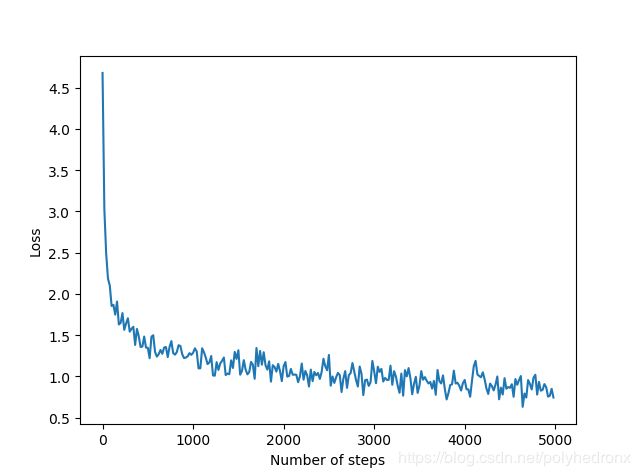
学习率和Loss随训练次数变化的曲线如下图所示,最终准确度约为75.7%。
参考文献
1. 《TensorFlow实战》 -- 黄文坚著
2. https://www.tensorflow.org/tutorials/images/deep_cnn?hl=zh_cn
3. TensorFlow 笔记(十一):CNN示例代码CIFAR-10分析(上)
4. TensorFlow实战笔记之(4):卷积神经网络(CNN) 实现手写数字识别
5. https://www.tensorflow.org/api_docs/python/tf/layers/batch_normalization
6. Batch Normalization的正确打开方式
7. 【深度学习】深入理解 Batch normalization批标准化
8. 深度网络里白化、Batch Normalization、LRN的使用区别
9. tensorflow batch_normalization的正确使用姿势
10. TensorFlow 中 Batch Normalization API 的一些坑
11. Tensorflow中的tf.layers.batch_normalization()用法
