Spring Security入门实例
目录
第一章 程序架构
1.1 appliacition.properties的编写
第二章 代码编写
2.1 domain层的编写
2.1.1 SysUser
2.1.2 SysRole
2.1.3 Msg
2.2 dao层的编写
2.3 service层的编写
2.4 config的编写
2.4.1 SecurityConfiguration的编写
2.4.2 WebMvcConfig的编写
2.5 controller的编写
2.6 temeplates的书写
第三章 操作之前的准备
3.1 运行的时候可能出现的错误
3.1.1 There is no PasswordEncoder mapped for the id “null”
参考:There is no PasswordEncoder mapped for the id “null”
3.1.2 Encoded password does not look like BCrypt
3.2 数据库的配置
第四章 具体的操作
前言:这个通过SpringSecurity实现了一个权限控制访问,拥有指定权限的用户才能访问指定的网页.
SpringBoot的版本为2.1.1,springSecurity的版本为5.1.2,前端用的是thymeleaf.
第一章 程序架构
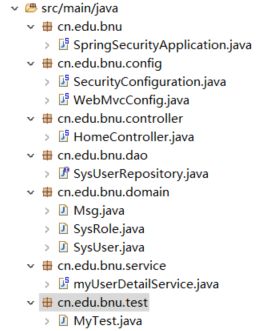
config存放了配置文件,controller就是传统上的控制页面跳转的,domain里面装的是数据模型,dao就是SpringJPA那一套,service里放了一个自己实现的UserDetailsService,test用来测试一些东西
1.1 appliacition.properties的编写
这是复制的以前的项目的一个properties,和此项目相关性不大,只是为了能用省事,可根据自己的情况来配置
spring.datasource.url=jdbc:mysql://localhost:3306/testSpringSecurity?serverTimezone=GMT%2B8&useUnicode=true&characterEncoding=UTF-8&useSSL=true
spring.datasource.username=root
spring.datasource.password=123456
spring.datasource.driver-class-name=com.mysql.cj.jdbc.Driver
spring.thymeleaf.prefix=classpath:/templates/

spring.jpa.open-in-view=true

spring.jpa.properties.hibernate.enable_lazy_load_no_trans=true

spring.jpa.show-sql = true
spring.jpa.hibernate.ddl-auto=update
spring.thymeleaf.cache=false

logging.level.org.springframework.data=DEBUG

server.servlet.session.timeout=3600
server.servlet.context-path=/SpringSecurity
spring.jpa.database-platform=org.hibernate.dialect.MySQL5InnoDBDialect
第二章 代码编写
2.1 domain层的编写
SysUser与SysRole是多对多的关系
2.1.1 SysUser
实现UserDetails是因为需要一个实现此接口的类来提供权限等信息.
@Entity
public class SysUser implements UserDetails{
	private static final long serialVersionUID = 1L;
	@Id
	@GeneratedValue(strategy=GenerationType.IDENTITY)
	private Long id;
	@Column
	private String username;
	@Column
	private String password;
	@ManyToMany(cascade= {CascadeType.REFRESH},fetch=FetchType.EAGER)
	private List  roles;
	public SysUser() {
	}
	@Override
	public Collection getAuthorities() {
		System.out.println("进入了cellection");
		List auths = new ArrayList();
		List roles=this.getRoles();
		for(SysRole role:roles)
			{
				auths.add(new SimpleGrantedAuthority(role.getName()));
			}
		return auths;
	}

	@Override
	public boolean isAccountNonExpired() {
		return true;
	}

	@Override
	public boolean isAccountNonLocked() {
		return true;
	}

	@Override
	public boolean isCredentialsNonExpired() {
		return true;
	}

	@Override
	public boolean isEnabled() {
		return true;
	}

	//省略get,set...
}
2.1.2 SysRole
@Entity
public class SysRole {
	@Id
	@GeneratedValue(strategy=GenerationType.IDENTITY)
	private Long id;
	@Column
	private String name;
	//省略get,set...


}
2.1.3 Msg
这个domain主要是我们为了测试一下controller与themeleaf运行的正确性
public class Msg {
	private String title;
	private String content;
	private String etraInfo;
	public  Msg(String title,String conten,String etraInfo) {
		super();
		this.title=title;
		this.content = conten;
		this.etraInfo = etraInfo;
	}
    //省略get,set...

}
2.2 dao层的编写
只要能根据用户名查找用户即可
public interface SysUserRepository extends JpaRepository{
	SysUser findByUsername(String username);
}
2.3 service层的编写
SpringSecurity将调用实现了UserDetailService的类返回User
@Component
public class myUserDetailService implements UserDetailsService {
	@Autowired
	SysUserRepository sysUserRepository;
	@Override
	public UserDetails loadUserByUsername(String username) throws UsernameNotFoundException {
		SysUser user = sysUserRepository.findByUsername(username);
		if(user==null) {

			System.out.println("没有查找到用户");
		}
		return user;
	}

}
2.4 config的编写
2.4.1 SecurityConfiguration的编写
@Configuration
public class SecurityConfiguration extends WebSecurityConfigurerAdapter{

    //这里将我们刚才写的myUserDetailsService,将调用它返回user
	@Bean
	protected UserDetailsService myUserDetailsService() {
		return new myUserDetailService();
	}
    //将加密器注册为BEAN
	@Bean
	protected PasswordEncoder  PasswordEncoder() {
		return new BCryptPasswordEncoder();
	}
    //这是新版SpringSecurity的要求,要求必须指定加密器,不然会报null的错误,这里我们表示将用
//BCryptPasswordEncoder()来加密解密密码.
	@Override
	protected void configure(AuthenticationManagerBuilder auth) throws Exception {
		auth.userDetailsService(myUserDetailsService()).passwordEncoder(new BCryptPasswordEncoder());
	}
	@Override
	protected void configure(HttpSecurity http) throws Exception {
		http.authorizeRequests() //给请求授权,定义哪些URL需要被保护、哪些不需要被保护
			.antMatchers("/test1/**").hasRole("ADMIN")
			.antMatchers("/test2/**").hasRole("USER")
			.antMatchers("/test3/**").hasRole("TEACHER")
			.anyRequest().authenticated() //任何没有匹配上的其他的url请求,都需要用户被验证
			.and()
			.formLogin()   //定义登陆的一些事项
				.loginPage("/login") //  定义当需要用户登录时候,转到的登录页面
				.failureUrl("/login?error")
				.permitAll()
			.and()
			.logout().permitAll();
	}
}
2.4.2 WebMvcConfig的编写
这里就配置了一个页面跳转,和再controller配置效果是一样的.
@Configuration
public class WebMvcConfig implements WebMvcConfigurer{

	@Override
	public void addViewControllers(ViewControllerRegistry registry) {
		WebMvcConfigurer.super.addViewControllers(registry);
		registry.addViewController("/login").setViewName("login");
	}

}
2.5 controller的编写
这里登陆成功会自动跳转到主页.
@Controller
public class HomeController {
	@RequestMapping("/")
	public String index(Model model) {
		Msg msg = new Msg("测试标题", "测试内容", "额外信息,只对管理员显示");
		model.addAttribute("msg", msg);
		return "home";
	}
	@RequestMapping("/test1")
	public String  test1(Model model) {
		Msg msg = new Msg("测试标题", "测试内容", "额外信息,只对管理员显示");
		model.addAttribute("msg", msg);
		return "test1";
	}

	@RequestMapping("/test2")
	public String  test2(Model model) {
		Msg msg = new Msg("测试标题", "测试内容", "额外信息,只对管理员显示");
		model.addAttribute("msg", msg);
		return "test2";
	}

	@RequestMapping("/test3")
	public String  test3(Model model) {
		Msg msg = new Msg("测试标题", "测试内容", "额外信息,只对管理员显示");
		model.addAttribute("msg", msg);
		return "test3";
	}

}
2.6 temeplates的书写
home:
无更多信息显示
test1:
这是test1
test2:
这是test2
test3:
这是test3
login:
登陆页面
首页
已成功注销
有错误,请重试
第三章 操作之前的准备
3.1 运行的时候可能出现的错误
3.1.1 There is no PasswordEncoder mapped for the id “null”
参考:There is no PasswordEncoder mapped for the id “null”
就是没用类似BCrypt的加密器,现在这个版本的必须要用这个加密,按上面的加个BCrypt的Bean就好了.
3.1.2 Encoded password does not look like BCrypt
参考:https://blog.csdn.net/zhuyongru/article/details/82108543
就是数据库的密码不是加密过的,因为我们设置了加密器,所以加密器要求我们数据的密码是加密过的,具体的形式如下图.
如何插入加密后的密码?见下图,将用户的密码取出并加密
@SpringBootTest
@RunWith(SpringRunner.class)
public class MyTest {

	@Autowired
	SysUserRepository sysUserRepository;
	@Test
	public void test1() {
		System.out.println("第一个测试");
		SysUser user = sysUserRepository.findByUsername("zhangchen");
		BCryptPasswordEncoder passwordEncoder = new BCryptPasswordEncoder();
		user.setPassword(passwordEncoder.encode(user.getPassword()));
		sysUserRepository.save(user);
	}

}
3.2 数据库的配置
sys_role
注意,数据库里的权限我们要加上ROLE_
sys_user
sys_user_roles
第四章 具体的操作
打开登陆页面
此时我们发现无论访问什么url都会跳转到登陆,于是我们输入账号密码进行登陆,登陆后跳转到首页
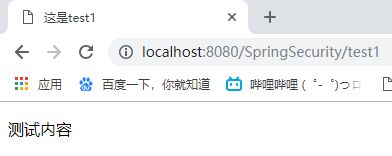
我们尝试访问/test1
再尝试访问/test2,可以访问被禁止了,因为没有USER权限
我们加上USER权限,再重新登陆,再访问test2,成功了


