Android 性能优化(一) —— 启动优化提升60%
本文已授权微信公众号:鸿洋(hongyangAndroid)原创首发。
转载请标明出处:
https://blog.csdn.net/qian520ao/article/details/81908505
本文出自凶残的程序员的博客
文章目录
- 应用启动速度
- 视觉优化
- 启动主题优化
- 1.默认情况
- 2.透明主题优化
- 3.设置闪屏图片主题
- 代码优化
- 冷启动耗时统计
- adb 命令统计
- 系统日志统计
- 代码优化
- Application 优化
- 闪屏页业务优化
- 广告页优化
- 优化效果
- 启动窗口
- 总结
- 参考
应用启动速度
一个应用App的启动速度能够影响用户的首次体验,启动速度较慢(感官上)的应用可能导致用户再次开启App的意图下降,或者卸载放弃该应用程序。
本文将从两个方向优化应用的启动速度 :
- 视觉体验优化
- 代码逻辑优化
视觉优化
谷歌开发文档.
应用程序启动有三种状态,每种状态都会影响应用程序对用户可见所需的时间:冷启动,热启动和温启动。
在冷启动时,应用程序从头开始。在其他状态下,系统需要将正在运行的应用程序从后台运行到前台。我们建议您始终根据冷启动的假设进行优化。这样做也可以改善热启动和温启动的性能。
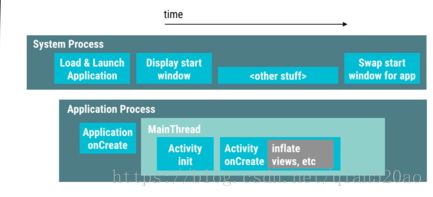
在冷启动开始时,系统有三个任务。这些任务是:
- 加载并启动应用程序。
- 启动后立即显示应用程序空白的启动窗口。
- 创建应用程序进程。
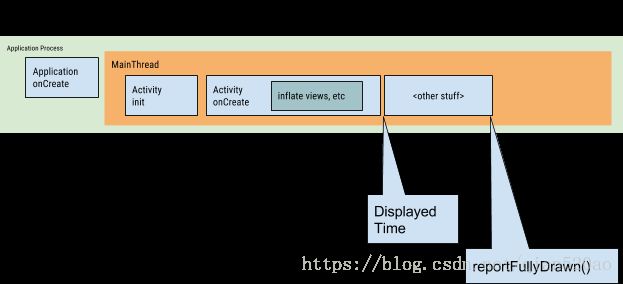
一旦系统创建应用程序进程,应用程序进程就会负责下一阶段。这些阶段是:
- 创建app对象.
- 启动主线程(main thread).
- 创建应用入口的Activity对象.
- 填充加载布局Views
- 在屏幕上执行View的绘制过程.measure -> layout -> draw
应用程序进程完成第一次绘制后,系统进程会交换当前显示的背景窗口,将其替换为主活动。此时,用户可以开始使用该应用程序。
因为App应用进程的创建过程是由手机的软硬件决定的,所以我们只能在这个创建过程中视觉优化。
启动主题优化
冷启动阶段 :
- 加载并启动应用程序。
- 启动后立即显示应用程序空白的启动窗口。
- 创建应用程序进程。
所谓的主题优化,就是应用程序在冷启动的时候(1~2阶段),设置启动窗口的主题。
因为现在 App 应用启动都会先进入一个闪屏页(LaunchActivity) 来展示应用信息。
1.默认情况
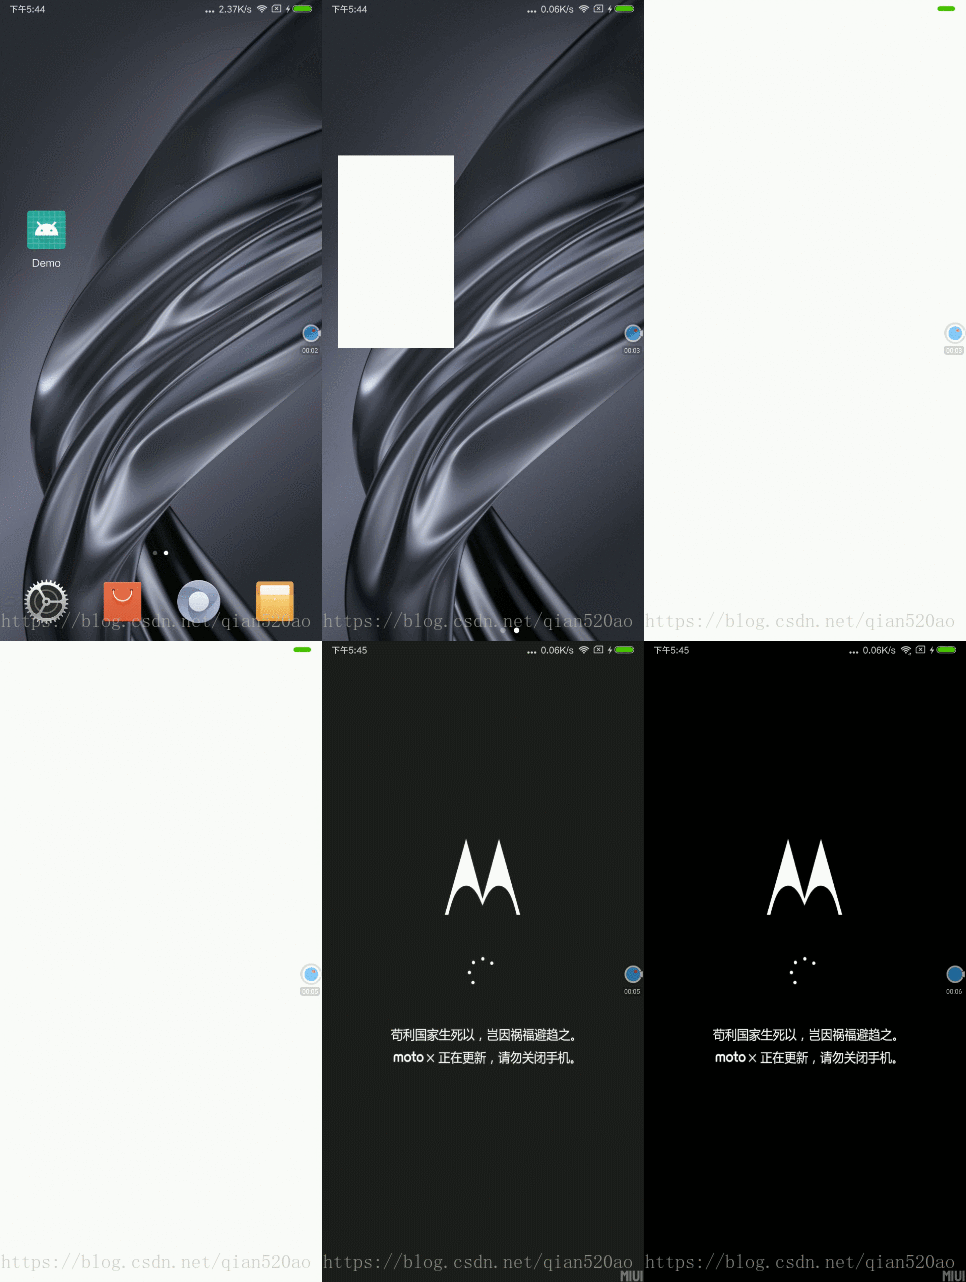
如果我们对App没有做处理(设置了默认主题),并且在 Application 初始化了其它第三方的服务(假设需要加载2000ms),那么冷启动过程就会如下图 :
系统默认会在启动应用程序的时候 启动空白窗口 ,直到 App 应用程序的入口 Activity 创建成功,视图绘制完毕。( 大概是onWindowFocusChanged方法回调的时候 )
2.透明主题优化
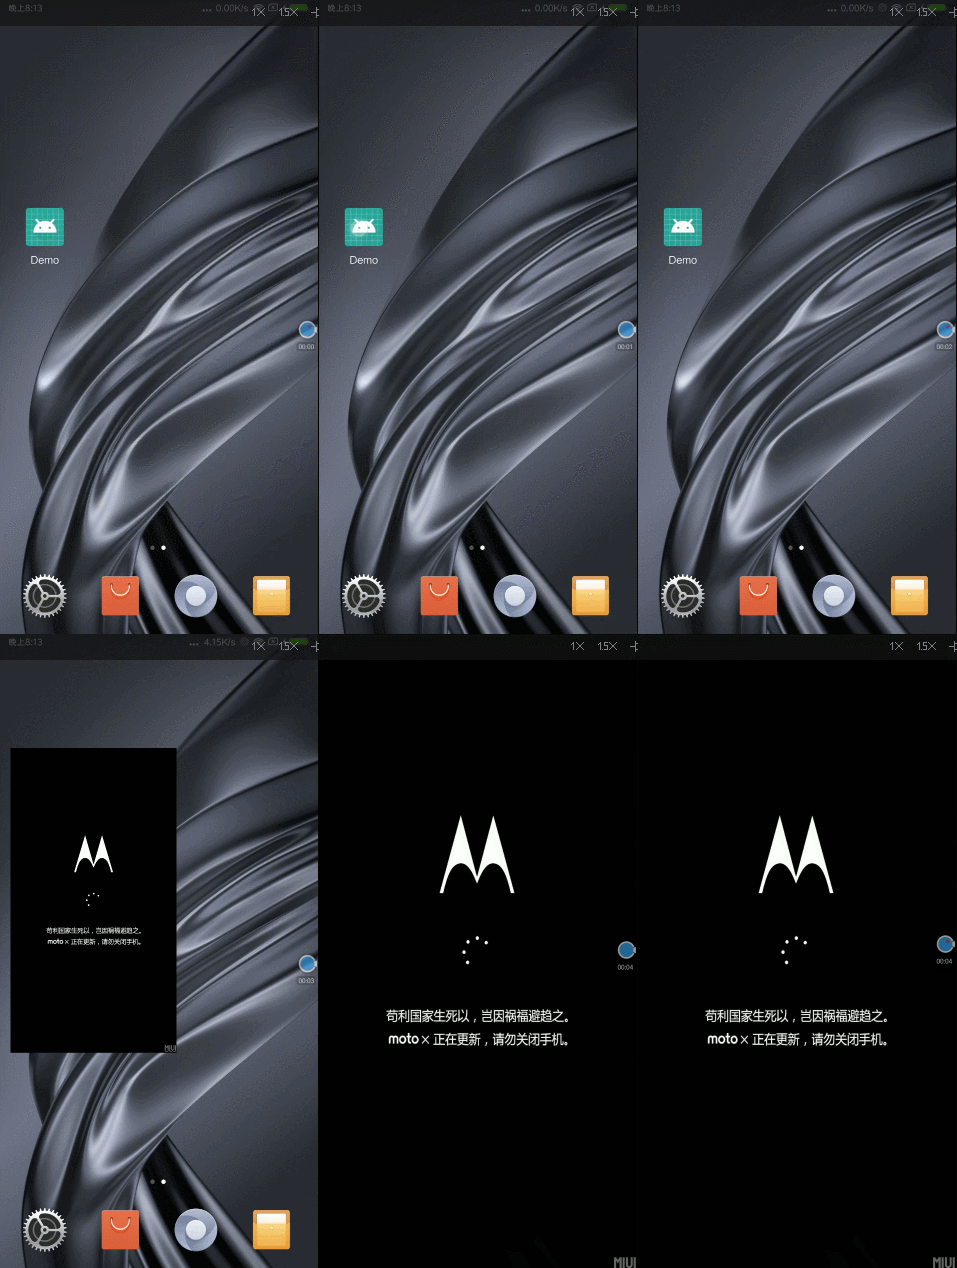
为了解决启动窗口白屏问题,许多开发者使用透明主题来解决这个问题,但是治标不治本。
虽然解决了上面这个问题,但是仍然有些不足。
    <!-- Base application theme. -->
    <style name="AppTheme" parent="Theme.AppCompat.Light.DarkActionBar">
        <item name="android:windowFullscreen">true</item>
        <item name="android:windowIsTranslucent">true</item>
    </style>
3.设置闪屏图片主题
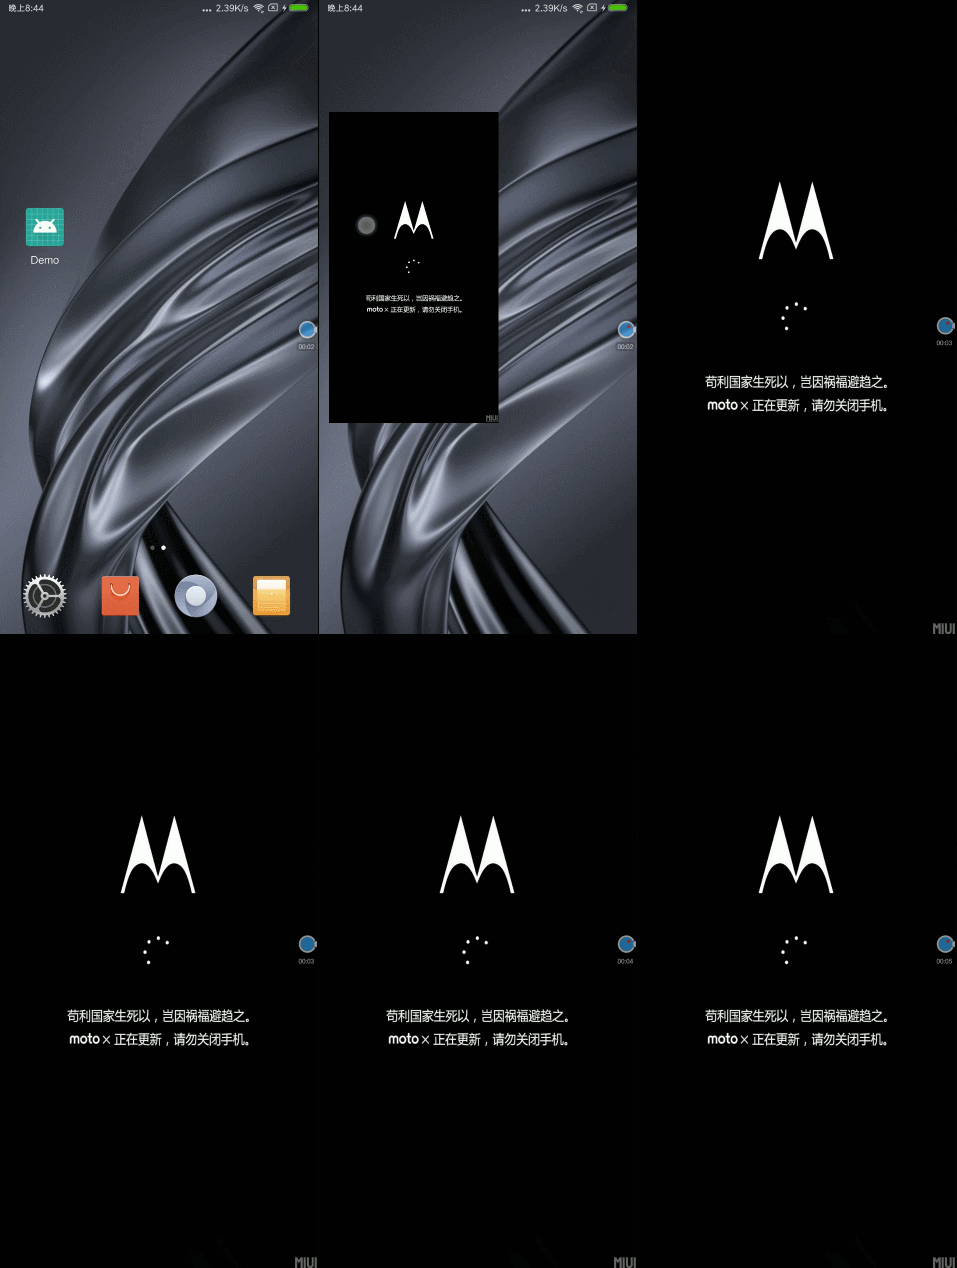
为了更顺滑无缝衔接我们的闪屏页,可以在启动 Activity 的 Theme中设置闪屏页图片,这样启动窗口的图片就会是闪屏页图片,而不是白屏。
    <style name="AppTheme" parent="Theme.AppCompat.Light.NoActionBar">
        <item name="android:windowBackground">@drawable/lunch</item>  //闪屏页图片
        <item name="android:windowFullscreen">true</item>
        <item name="android:windowDrawsSystemBarBackgrounds">false</item><!--显示虚拟按键,并腾出空间-->
    </style>
这样设置的话,就会在冷启动的时候,展示闪屏页的图片,等App进程初始化加载入口 Activity (也是闪屏页) 就可以无缝衔接。
其实这种方式并没有真正的加速应用进程的启动速度,而只是通过用户视觉效果带来的优化体验。
代码优化
当然上面使用设置主题的方式优化用户体验效果治标不治本,关键还在于对代码的优化。
首先我们可以统计一下应用冷启动的时间。
冷启动耗时统计
adb 命令统计
参考如何计算 App 的启动时间
adb命令 : adb shell am start -S -W 包名/启动类的全限定名 , -S 表示重启当前应用
更多adb命令
C:\Android\Demo>adb shell am start -S -W com.example.moneyqian.demo/com.example.moneyqian.demo.MainActivity
Stopping: com.example.moneyqian.demo
Starting: Intent { act=android.intent.action.MAIN cat=[android.intent.category.LAUNCHER] cmp=com.example.moneyqian.demo/.MainActivity }
Status: ok
Activity: com.example.moneyqian.demo/.MainActivity
ThisTime: 2247
TotalTime: 2247
WaitTime: 2278
Complete
- ThisTime : 最后一个 Activity 的启动耗时(例如从 LaunchActivity - >MainActivity「adb命令输入的Activity」 , 只统计 MainActivity 的启动耗时)
- TotalTime : 启动一连串的 Activity 总耗时.(有几个Activity 就统计几个)
- WaitTime : 应用进程的创建过程 + TotalTime .
- 在第①个时间段内,AMS 创建 ActivityRecord 记录块和选择合理的 Task、将当前Resume 的 Activity 进行 pause.
- 在第②个时间段内,启动进程、调用无界面 Activity 的 onCreate() 等、 pause/finish 无界面的 Activity.
- 在第③个时间段内,调用有界面 Activity 的 onCreate、onResume.
//ActivityRecord

    private void reportLaunchTimeLocked(final long curTime) {
		``````
        final long thisTime = curTime - displayStartTime;
        final long totalTime = stack.mLaunchStartTime != 0 ? (curTime - stack.mLaunchStartTime) : thisTime;
    }
最后总结一下 : 如果需要统计从点击桌面图标到 Activity 启动完毕,可以用WaitTime作为标准,但是系统的启动时间优化不了,所以优化冷启动我们只要在意 ThisTime 即可。
系统日志统计
另外也可以根据系统日志来统计启动耗时,在Android Studio中查找已用时间,必须在logcat视图中禁用过滤器(No Filters)。因为这个是系统的日志输出,而不是应用程序的。你也可以查看其它应用程序的启动耗时。
代码优化
根据上面启动时间的输出统计,我们就可以先记录优化前的冷启动耗时,然后再对比优化之后的启动时间。
Application 优化
Application 作为 应用程序的整个初始化配置入口,时常担负着它不应该有的负担~
有很多第三方组件(包括App应用本身)都在 Application 中抢占先机,完成初始化操作。
但是在 Application 中完成繁重的初始化操作和复杂的逻辑就会影响到应用的启动性能
通常,有机会优化这些工作以实现性能改进,这些常见问题包括:
- 复杂繁琐的布局初始化
- 阻塞主线程 UI 绘制的操作,如 I/O 读写或者是网络访问.
- Bitmap 大图片或者 VectorDrawable加载
- 其它占用主线程的操作
我们可以根据这些组件的轻重缓急之分,对初始化做一下分类 :
- 必要的组件一定要在主线程中立即初始化(入口 Activity 可能立即会用到)
- 组件一定要在主线程中初始化,但是可以延迟初始化。
- 组件可以在子线程中初始化。
放在子线程的组件初始化建议延迟初始化 ,这样就可以了解是否会对项目造成影响!
所以对于上面的分析,我们可以在项目中 Application 的加载组件进行如下优化 :
- 将Bugly,x5内核初始化,SP的读写,友盟等组件放到子线程中初始化。(子线程初始化不能影响到组件的使用)
        new Thread(new Runnable() {
            @Override
            public void run() {
                //设置线程的优先级,不与主线程抢资源
                Process.setThreadPriority(Process.THREAD_PRIORITY_BACKGROUND);
				//子线程初始化第三方组件
				Thread.sleep(5000);//建议延迟初始化,可以发现是否影响其它功能,或者是崩溃!
            }
        }).start();
- 将需要在主线程中初始化但是可以不用立即完成的动作延迟加载(原本是想在入口 Activity 中进行此项操作,不过组件的初始化放在 Application 中统一管理为妙.)
        handler.postDelayed(new Runnable() {
            @Override
            public void run() {
				//延迟初始化组件
            }
        }, 3000);
闪屏页业务优化
最后还剩下那些为数不多的组件在主线程初始化动作,例如埋点,点击流,数据库初始化等,不过这些消耗的时间可以在其它地方相抵。
需求背景 : 应用App通常会设置一个固定的闪屏页展示时间,例如2000ms,所以我们可以根据用户手机的运行速度,对展示时间做出调整,但是总时间仍然为 2000ms。
闪屏页政展示总时间 = 组件初始化时间 + 剩余展示时间。
也就是2000ms的总时间,组件初始化了800ms,那么就再展示1200ms即可。
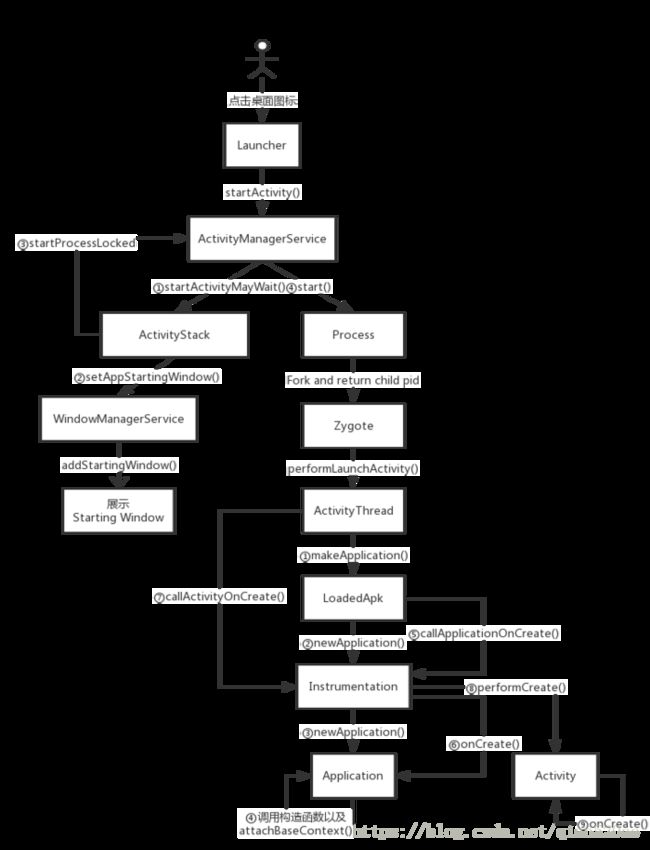
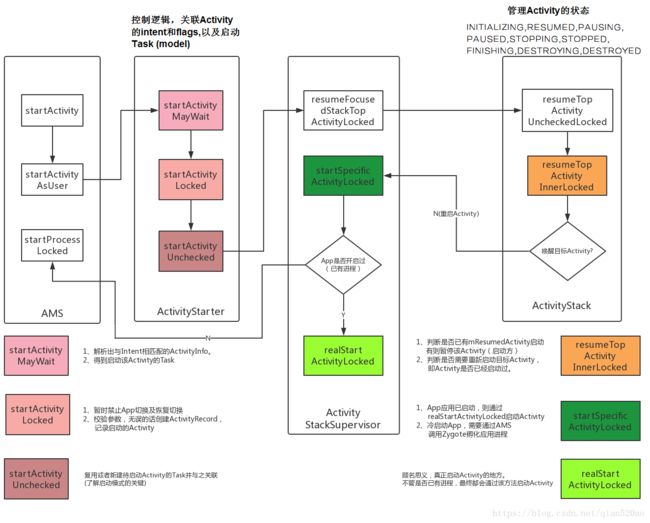
我们先了解一下 Application的启动过程,图片摘自 : 如何统计Android App启动时间
虽然这个以下图片的源码并不是最新源码(5.0源码),不过不影响整体流程。(7.0,8.0方法名会有所改变)。
冷启动的过程中系统会初始化应用程序进程,创建Application等任务,这时候会展示一个 启动窗口 Starting Window,上面分析了过,如果没有优化主题的话,那么就是白屏。
如果要了解更多启动过程源码,可以看我的博客 : Launcher 启动 Activity 的工作过程
分析源码后,我们可以知道 Application 初始化后会调用 attachBaseContext() 方法,再调用 Application 的 onCreate(),再到入口 Activity的创建和执行 onCreate() 方法。所以我们就可以在 Application 中记录启动时间。
//Application

    @Override
    protected void attachBaseContext(Context base) {
        super.attachBaseContext(base);
		SPUtil.putLong("application_attach_time", System.currentTimeMillis());//记录Application初始化时间
    }
有了启动时间,我们得知道入口的 Acitivty 显示给用户的时间(View绘制完毕),在博客( View的工作流程)中了解到,在onWindowFocusChanged()的回调时机中表示可以获取用户的触摸时间和View的流程绘制完毕,所以我们可以在这个方法里记录显示时间。
//入口Activity

    @Override
    public void onWindowFocusChanged(boolean hasFocus) {
        super.onWindowFocusChanged(hasFocus);

          long appAttachTime = SPUtil.getLong("application_attach_time");
          long diffTime = System.currentTimeMillis() - appAttachTime;//从application到入口Acitity的时间

		 //所以闪屏页展示的时间为 2000ms - diffTime.
    }
所以我们就可以动态的设置应用闪屏的显示时间,尽量让每一部手机展示的时间一致,这样就不会让手机配置较低的用户感觉漫长难熬的闪屏页时间(例如初始化了2000ms,又要展示2000ms的闪屏页时间.),优化用户体验。
广告页优化
闪屏页过后就要展示金主爸爸们的广告页了。
因为项目中广告页图片有可能是大图,APng动态图片,所以需要将这些图片下载到本地文件,下载完成后再显示,这个过程往往会遇到以下两个问题 :
- 广告页的下载,由于这个是一个异步过程,所以往往不知道加载到页面的合适时机。
- 广告页的保存,因为保存是 I/O 流操作,很有可能被用户中断,下次拿到破损的图片。
因为不清楚用户的网络环境,有些用户下载广告页可能需要一段时间,这时候又不可能无限的等候。所以针对这个问题我们可以开启 IntentService 用来下载广告页图片。
- 在入口 Acitivity 中开启 IntentService 来下载广告页。 或者是其它异步下载操作。
- 在广告页图片 文件流完全写入后 记录图片大小,或者记录一个标识。
在下次的广告页加载中可以判断是否已经下载好了广告页图片以及图片是否完整,否则删除并且再次下载图片。
另外因为在闪屏页中仍然有 剩余展示时间,所以在这个时间段里如果用户已经下载好了图片并且图片完整,就可以显示广告页。否则进入主 Activity , 因为 IntentService 仍然在后台继续默默的下载并保存图片~
优化效果
优化前 : (小米6)
| Displayed | LaunchActivity | MainActivity |
|---|---|---|
| +2s526ms | +1s583ms | |
| +2s603ms | +1s533ms | |
| +2s372ms | +1s556ms |
优化后 : (小米6)
| Displayed | LaunchActivity | MainActivity |
|---|---|---|
| +995ms | +1s191ms | |
| +911ms | +1s101ms | |
| +903ms | +1s187ms |
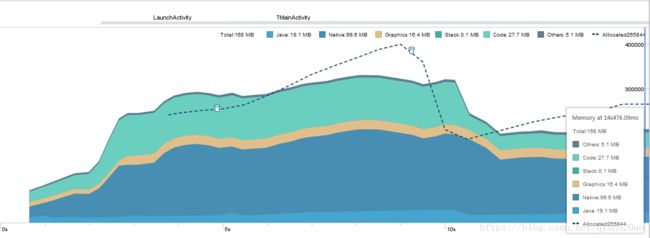
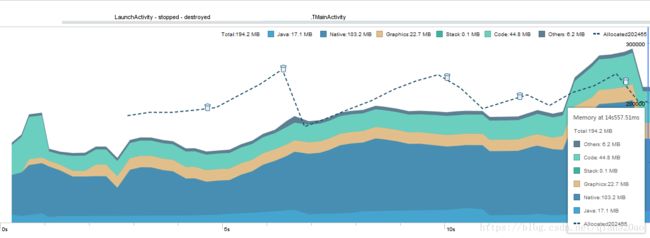
通过手上 小米6,小米 mix2s,还有小米 2s的启动测试,发现优化后App冷启动的启动速度均提升了 60% !!! ,并且我们可以再看一下手机冷启动时候的内存情况 :
优化前 : 伴随着大量对象的创建回收,15s内系统GC 5次。内存使用波澜荡漾。
查看大图
优化后 : 趋于平稳上升状态创建对象,15s内系统GC 2次。(后期业务拓展加入新功能,所以代码量增加。)之后总内存使用平缓下降。
- Other :应用使用的系统不确定如何分类的内存。
- Code :应用用于处理代码和资源(如 dex 字节码、已优化或已编译的 dex 码、.so 库和字体)的内存。
- Stack : 应用中的原生堆栈和 Java 堆栈使用的内存。 这通常与您的应用运行多少线程有关。
- Graphics :图形缓冲区队列向屏幕显示像素(包括 GL 表面、GL 纹理等等)所使用的内存。 (请注意,这是与 CPU 共享的内存,不是 GPU 专用内存。)
- Native :从 C 或 C++ 代码分配的对象内存。即使应用中不使用 C++,也可能会看到此处使用的一些原生内存,因为 Android 框架使用原生内存代表处理各种任务,如处理图像资源和其他图形时,即使编写的代码采用 Java 或 Kotlin 语言。
- Java :从 Java 或 Kotlin 代码分配的对象内存。
- Allocated :应用分配的 Java/Kotlin 对象数。 它没有计入 C 或 C++ 中分配的对象。
更多查看 : 谷歌开发文档
启动窗口
优化完我们的代码后,分析一下启动窗口的源码。基于 android-25 (7.1.1)
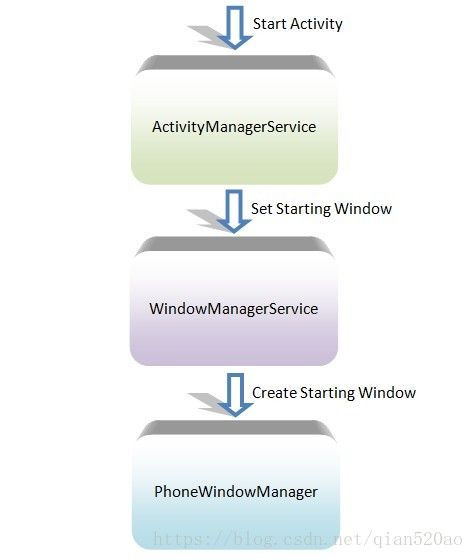
启动窗口是由 WindowManagerService 统一管理的 Window窗口,一般作为冷启动页入口 Activity 的预览窗口,启动窗口由 ActivityManagerService 来决定是否显示的,并不是每一个 Activity 的启动和跳转都会显示这个窗口。
WindowManagerService 通过窗口管理策略类 PhoneWindowManager 来创建启动窗口。
拿我之前源码分析的文章中的启动流程图来看看大致 : Launcher 启动 Activity 的工作过程
直奔主题,在 ActivityStarter的startActivityUnchecked()方法中,调用了ActivityStack(Activity 状态管理)的startActivityLocked()方法。此时Activity 还在启动过程中,窗口并未显示。
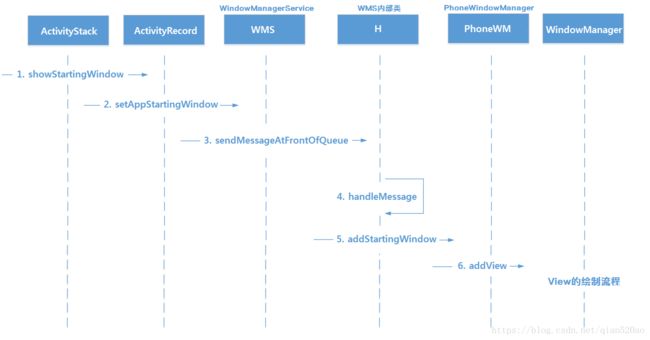
先上一张流程图,展示了启动窗口的显示过程。
首先,由 Activity 状态管理者ActivityStack开始执行显示启动窗口的流程。
//ActivityStack


 final void startActivityLocked(ActivityRecord r, boolean newTask, boolean keepCurTransition,
            ActivityOptions options) {

		``````
        if (!isHomeStack() || numActivities() > 0) {//HOME_STACK表示Launcher桌面所在的Stack
	        // 1.首先当前启动栈不在Launcher的桌面栈里,并且当前系统已经有激活过Activity

            // We want to show the starting preview window if we are
            // switching to a new task, or the next activity's process is
            // not currently running.

            boolean doShow = true;
            if (newTask) {
	            // 2.要将该Activity组件放在一个新的任务栈中启动

                // Even though this activity is starting fresh, we still need
                // to reset it to make sure we apply affinities to move any
                // existing activities from other tasks in to it.
                if ((r.intent.getFlags() & Intent.FLAG_ACTIVITY_RESET_TASK_IF_NEEDED) != 0) {
                    resetTaskIfNeededLocked(r, r);
                    doShow = topRunningNonDelayedActivityLocked(null) == r;
                }
            } else if (options != null && options.getAnimationType()
                    == ActivityOptions.ANIM_SCENE_TRANSITION) {
                doShow = false;
            }
            if (r.mLaunchTaskBehind) {
	            //3. 热启动,不需要启动窗口

                // Don't do a starting window for mLaunchTaskBehind. More importantly make sure we
                // tell WindowManager that r is visible even though it is at the back of the stack.
                mWindowManager.setAppVisibility(r.appToken, true);
                ensureActivitiesVisibleLocked(null, 0, !PRESERVE_WINDOWS);
            } else if (SHOW_APP_STARTING_PREVIEW && doShow) {

				``````
				//4. 显示启动窗口
                r.showStartingWindow(prev, showStartingIcon);
            }
        } else {
	        // 当前启动的是桌面Launcher (开机启动)
            // If this is the first activity, don't do any fancy animations,
            // because there is nothing for it to animate on top of.
			``````
        }

    }
- 首先判断当前要启动的 Activity 不在Launcher栈里
- 要启动的 Activity 是否处于新的 Task 里,并且没有转场动画
- 如果是热/温启动则不需要启动窗口,直接设置App的Visibility
接下来调用 ActivityRecord 的showStartingWindow()方法来设置启动窗口并且改变当前窗口的状态。
如果 App 的应用进程创建完成,并且入口 Activity 准备就绪,就可以根据 mStartingWindowState 来判断是否需要关闭启动窗口。
//ActivityRecord


    void showStartingWindow(ActivityRecord prev, boolean createIfNeeded) {
        final CompatibilityInfo compatInfo =
                service.compatibilityInfoForPackageLocked(info.applicationInfo);
        final boolean shown = service.mWindowManager.setAppStartingWindow(
                appToken, packageName, theme, compatInfo, nonLocalizedLabel, labelRes, icon,
                logo, windowFlags, prev != null ? prev.appToken : null, createIfNeeded);
        if (shown) {
            mStartingWindowState = STARTING_WINDOW_SHOWN;
        }
    }
WindowManagerService 会对当前 Activity 的token和主题进行判断。
//WindowManagerService

 @Override
    public boolean setAppStartingWindow(IBinder token, String pkg,
            int theme, CompatibilityInfo compatInfo,
            CharSequence nonLocalizedLabel, int labelRes, int icon, int logo,
            int windowFlags, IBinder transferFrom, boolean createIfNeeded) {

        synchronized(mWindowMap) {

			//1. 启动窗口也是需要token的
            AppWindowToken wtoken = findAppWindowToken(token);

			//2. 如果已经设置过启动窗口了,不继续处理
            if (wtoken.startingData != null) {
                return false;
            }

            // If this is a translucent window, then don't
            // show a starting window -- the current effect (a full-screen
            // opaque starting window that fades away to the real contents
            // when it is ready) does not work for this.
            if (theme != 0) {
                AttributeCache.Entry ent = AttributeCache.instance().get(pkg, theme,
                        com.android.internal.R.styleable.Window, mCurrentUserId);

               //3. 一堆代码对主题判断,不符合要求则不显示启动窗口(如透明主题)
                if (windowIsTranslucent) {
                    return false;
                }
                if (windowIsFloating || windowDisableStarting) {
                    return false;
                }
				``````
            }

			//4. 创建StartingData,并且通过Handler发送消息

            wtoken.startingData = new StartingData(pkg, theme, compatInfo, nonLocalizedLabel,
                    labelRes, icon, logo, windowFlags);
            Message m = mH.obtainMessage(H.ADD_STARTING, wtoken);
            // Note: we really want to do sendMessageAtFrontOfQueue() because we
            // want to process the message ASAP, before any other queued
            // messages.

            mH.sendMessageAtFrontOfQueue(m);
        }
        return true;
    }
- 启动窗口也需要和 Activity 拥有同样令牌 token ,虽然启动窗口可能是白屏,或者一张图片,但是仍然需要走绘制流程已经通过WMS显示窗口。
- StartingData对象用来表示启动窗口的相关数据,描述了启动窗口的视图信息。
- 如果当前 Activity 是透明主题或者是浮动窗口等,那么就不需要启动窗口来过渡启动过程,所以在上面视觉优化中的设置透明主题就没有显示白色的启动窗口。
- 显示启动窗口也是一件心急火燎的事情,WMS的内部类
H(handler) 处于主线程处理消息,所以需要将当前Message放置队列头部。
PS : 为什么需要通过 Handler 发送消息 ?
你可以在各大服务Service中见到 Handler 的身影,并且它们可能都有一个很吊的命名 H ,因为可能调用这个服务的某个执行方法处于子线程中,所以 Handler 的职责就是将它们切换到主线程中,并且也可以统一管理调度。更多 Handler 了解可以查阅文章 : 你真的了解Handler?
//WindowManagerService --> H

        public void handleMessage(Message msg) {
            switch (msg.what) {

                case ADD_STARTING: {
                    final AppWindowToken wtoken = (AppWindowToken)msg.obj;
                    final StartingData sd = wtoken.startingData;

                    View view = null;
                    try {
                        final Configuration overrideConfig = wtoken != null && wtoken.mTask != null
                                ? wtoken.mTask.mOverrideConfig : null;
                        view = mPolicy.addStartingWindow(wtoken.token, sd.pkg, sd.theme,
                            sd.compatInfo, sd.nonLocalizedLabel, sd.labelRes, sd.icon, sd.logo,
                            sd.windowFlags, overrideConfig);
                    } catch (Exception e) {
                        Slog.w(TAG_WM, "Exception when adding starting window", e);
                    }

                    ``````

                } break;
   }
在当前的handleMessage方法中,会处于主线程处理消息,拿到token和StartingData启动数据后,便通过mPolicy.addStartingWindow()方法将启动窗口添加到WIndow上。
mPolicy为PhoneWindowManager,控制着启动窗口的添加删除和修改。
在PhoneWindowManager对启动窗口进行配置,获取当前Activity设置的主题和资源信息,设置到启动窗口中。
//PhoneWindowManager


@Override
    public View addStartingWindow(IBinder appToken, String packageName, int theme,
            CompatibilityInfo compatInfo, CharSequence nonLocalizedLabel, int labelRes,
            int icon, int logo, int windowFlags, Configuration overrideConfig) {

         //可以通过SHOW_STARTING_ANIMATIONS设置不显示启动窗口
        if (!SHOW_STARTING_ANIMATIONS) {
            return null;
        }
        WindowManager wm = null;
        View view = null;

        try {
	        //1. 获取上下文Context和主题theme以及标题
            Context context = mContext;
            if (theme != context.getThemeResId() || labelRes != 0) {
                try {
                    context = context.createPackageContext(packageName, 0);
                    context.setTheme(theme);
                } catch (PackageManager.NameNotFoundException e) {
                    // Ignore
                }
            }

			//2. 创建PhoneWindow 用来显示
            final PhoneWindow win = new PhoneWindow(context);
            win.setIsStartingWindow(true);

			//3. 设置当前窗口type和flag,源码注释中描述的很清晰...
            win.setType(
                WindowManager.LayoutParams.TYPE_APPLICATION_STARTING);

            // Force the window flags: this is a fake window, so it is not really
            // touchable or focusable by the user.  We also add in the ALT_FOCUSABLE_IM
            // flag because we do know that the next window will take input
            // focus, so we want to get the IME window up on top of us right away.
            win.setFlags(
                windowFlags|
                WindowManager.LayoutParams.FLAG_NOT_TOUCHABLE|
                WindowManager.LayoutParams.FLAG_NOT_FOCUSABLE|
                WindowManager.LayoutParams.FLAG_ALT_FOCUSABLE_IM,
                windowFlags|
                WindowManager.LayoutParams.FLAG_NOT_TOUCHABLE|
                WindowManager.LayoutParams.FLAG_NOT_FOCUSABLE|
                WindowManager.LayoutParams.FLAG_ALT_FOCUSABLE_IM);

            win.setLayout(WindowManager.LayoutParams.MATCH_PARENT,
                    WindowManager.LayoutParams.MATCH_PARENT);

			``````

            view = win.getDecorView();

			//4. WindowManager的绘制流程
            wm.addView(view, params);

            return view.getParent() != null ? view : null;
        } catch (WindowManager.BadTokenException e) {
            // ignore
        } catch (RuntimeException e) {
            // don't crash if something else bad happens, for example a
            // failure loading resources because we are loading from an app
            // on external storage that has been unmounted.
            Log.w(TAG, appToken + " failed creating starting window", e);
        }
        return null;
    }
- 如果theme和labelRes的值不为0,那么说明开发者指定了启动窗口的主题和标题,那么就需要从当前要启动的Activity中获取这些信息,并设置到启动窗口中。
- 和其它窗口一样,启动窗口也需要通过PhoneWindow来设置布局信息DecorView。所以在上面视觉优化中的设置闪屏图片主题的启动窗口显示的就是图片内容。
- 启动窗口和普通窗口的不同之处在于它是 fake window ,不需要触摸事件
- 最后通过WindowManger走View的绘制流程(measure-layout-draw)将启动窗口显示出来,最后会请求WindowManagerService为启动窗口添加一个WindowState对象,真正的将启动窗口显示给用户,并且可以对启动窗口进行管理。
更多WindowManager的addView流程可以查阅 : View的工作流程
总结
至此应用程序的启动优化和启动窗口的源码分析已经总结完毕,在项目的开发中要知其然而之所以然
,并且对源码的分析有助于我们了解原理和解决问题的根源。
参考
谷歌开发文档
如何统计Android App启动时间
