Ipa-server部署文档
Ipa-server服务主要提供域标识,账户认证,策略管理
其中所需要的服务组件包括,DS ldap dns Kerberos ntp web-ui 等
搭建准备:
1两台机器 centos7 静态ip
192.168.1.133 用于服务端
192.168.1.134 用于客户端
2规划主机名 hosts主机名做解析
192.168.1.133 server.test.co server
192.168.1.134 client.test.co client
3 关闭防火墙(或者开通防火墙和服务)
4 开启ntp时间同步 (设置本地ntp同步或者用阿里ntp)
部署步骤:
在192.168.1.133上搭建ipa-server服务端:
1,设置静态IP
vi /etc/sysconfig/network-scripts/ifcfg-eth0
TYPE=Ethernet
BOOTPROTO=static
DEFROUTE=yes
PEERDNS=yes
PEERROUTES=yes
IPV4_FAILURE_FATAL=no
NAME=eth0
DEVICE=eth0
ONBOOT=yes
IPADDR=192.168.1.133
NETMASK=255.255.255.0
GATEWAY=192.168.1.1
DNS1=114.114.114.114
DNS2=8.8.8.8
保存重启网络
systemctl restart network
2,设置主机名
hostnamectl set-hostname server.test.co
hostname server.test.co
vi /etc/hosts
添加域名解析
192.168.1.133 server.test.co server
3 关闭防火墙
iptables -F
systemctl stop iptables
systemctl disable iptables
systemctl stop firewalld
systemctl disable firewalld
关闭selinux
setenforce 0
vi /etc/selinux/conf
设置SELINUX=disabled
4 修改时间同步
vi /etc/chrony.conf 注释掉时间服务
添加 server ntp1.aliyun.com iburst
保存后 重启时间服务
systemctl restart chronyd.service
5 配置阿里yum源
cd /etc/yum.repos.d/
wget http://mirrors.aliyun.com/repo/epel-7.repo
wget http://mirrors.aliyun.com/repo/Centos-7.repo
6 安装ipa-server
需要的包:ipa-server bind bind-dyndb-ldap ipa-server-dns
bind 提供dns服务
bind-dyndb-ldap提供dns和ldap连接
ipa-server-dns提供ipa-server与dns连接
用yum 安装
yum install -y ipa-server bind bind-dyndb-ldap ipa-server-dns
7 配置ipa-server
执行ipa-server-install --setup-dns
Server host name [server.test.co]: ---回车键(默认)
Please confirm the domain name [test.co]: ---回车键(默认)
Please provide a realm name [TEST.CO]: ---回车键(默认)
Directory Manager password: ---设置目录管理的密码 最少是8位
IPA admin password: ---设置ipa 管理员admin的密码 最少8位 一定要记住,后面要用到
Do you want to configure DNS forwarders? [yes]: no ---你想配置dns为转发器吗? 选择no
Do you want to search for missing reverse zones? [yes]: yes --你想配置dns的反向域吗?选择yes
Continue to configure the system with these values? [no]: yes --继续配置系统其他的值? 选择yes
接着执行下列命令
systemctl enable sssd 开机启动sssd
systemctl start sssd 开启服务
authconfig --enablemkhomedir –update 创建用户,家目录 更新认证
8 验证ipa-server和dns
[root@server ~]# kinit admin 登录admin管理
Password for [email protected]: 输入前面设置的admin密码
[root@server ~]# ipa user-find –all 查看所有域用户信息
-------
已匹配1个用户
-------
dn: uid=admin,cn=users,cn=accounts,dc=test,dc=co
用户登录名: admin
姓: Administrator
全名: Administrator
主目录: /home/admin
GECOS: Administrator
登录shell: /bin/bash
主体别名: [email protected]
UID: 903400000
GID: 903400000
禁用账户: False
备用用户: False
组成员: admins, trust admins
ipauniqueid: 380eaae6-9643-11e8-8769-aa47bf0d9338
krbextradata: AAJS5WJbcm9vdC9hZG1pbkBURVNULkNPAA==
krblastpwdchange: 20180802110450Z
krbpasswordexpiration: 20181031110450Z
objectclass: top, person, posixaccount, krbprincipalaux, krbticketpolicyaux, inetuser, ipaobject, ipasshuser, ipaSshGroupOfPubKeys
验证dns解析
[root@server ~]# dig -t a server.test.co
[root@server ~]# dig -t ptr 133.1.168.192.in-addr.apra
9 配置结束 重启系统
执行reboot
10 界面添加用户和主机
设置本地机器host 添加192.168.1.133 server.test.co
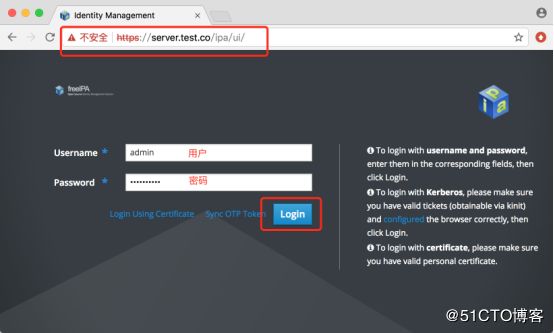
浏览器访问https://server.test.co/ipa/ui/ 用admin登录
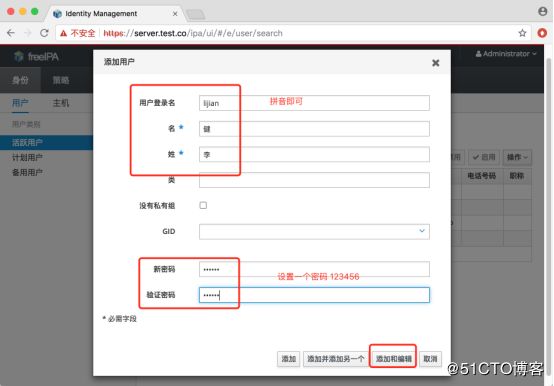
添加用户 lijian 初始密码设置123456
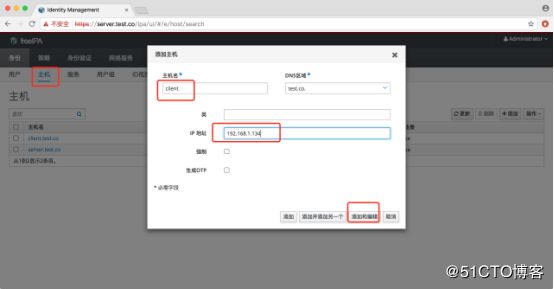
接着添加host主机 填写客户端主机名 和 ip
出现下一个窗口后 点击OK即可创建主机
//////////////////////////////////
//////////////////////////////////
下面部署客户端192.168.1.134
1 客户端机器基础配置参考 服务端的1-5步骤设置,分别是IP hosts 防火墙 时间同步 yum源
2修改客户端的dns解析,添加ipa-server的ip
vi /etc/resolv.conf
# Generated by NetworkManager
search test.co
nameserver 192.168.1.133 #添加这个解析
nameserver 114.114.114.114
nameserver 8.8.8.8
3安装ipa-client
yum install -y ipa-client
4 配置client 加入域
执行ipa-client-install --domain=test.co --no-ntp --realm=TEST.CO –mkhomedir
然后根据提示输入对应设置
Continue to configure the system with these values? [no]: yes ---继续配置系统其他的值? 选择yes
User authorized to enroll computers: admin ---域管理员
Password for admin@TEST.CO: ---密码
5 验证用户能否登录
[root@client ~]# ssh [email protected]
Password: ---输入页面设置的密码123456
Password expired. Change your password now.
Current Password:
New password: ---设置新密码
Retype new password:
Creating home directory for lijian.
[lijian@client ~]$ 已成功登录
到此 整个基础配置已经完成
剩下的需要在server界面上根据需求完善配置用户 主机 服务 策略等信息


