Sublime Text 3 python 配置
一、环境准备
1、官方网站地址
2、Windows 10
3、Sublime Text 3 + 官网购买license(Just a suggestion,$80)
购买链接,Sublime Text may be downloaded and evaluated for free, however a license must be purchased for continued use。如果资金紧张,可以搜索破解版License(建议支持正版,本文Lisence 来源于网络)。
Sublime text3 注册码
—– BEGIN LICENSE —–
sgbteam
Single User License
EA7E-1153259
8891CBB9 F1513E4F 1A3405C1 A865D53F
115F202E 7B91AB2D 0D2A40ED 352B269B
76E84F0B CD69BFC7 59F2DFEF E267328F
215652A3 E88F9D8F 4C38E3BA 5B2DAAE4
969624E7 DC9CD4D5 717FB40C 1B9738CF
20B3C4F1 E917B5B3 87C38D9C ACCE7DD8
5F7EF854 86B9743C FADC04AA FB0DA5C0
F913BE58 42FEA319 F954EFDD AE881E0B
—— END LICENSE ——
二、安装Sublime Text 3
1、双击下载的.exe文件安装,安装路径不要有中文目录
2、安装Sublime Text 3时,勾选“Add to explorer context menu”,可以在文件右键菜单添加“Open with Sublime Text”,方便使用Sublime Text打开文件。
三、配置Python环境
运行环境
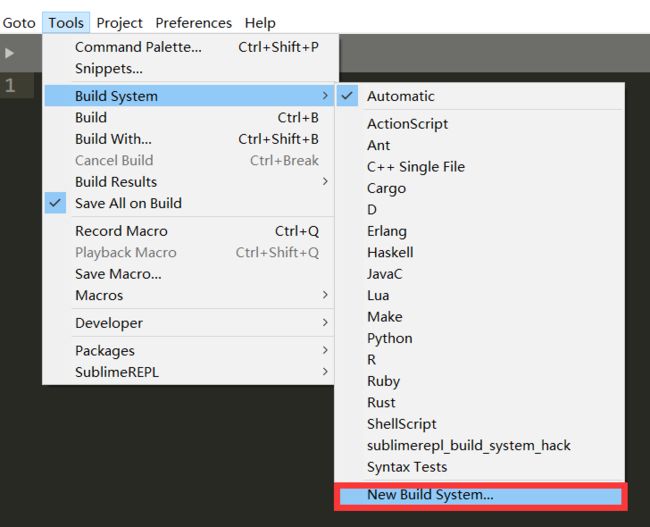
1、打开Tools > Build System > New Build System..
2、点击New Build System后,会生成一个空配置文件,在这个配置文件内覆盖配置信息,本文python安装路径为“C:/Users/Administrator/AppData/Local/Programs/Python/Python36/python.exe”,(注意区分正反斜杠,请将路径换成python实际安装路径),然后按ctrl+s,将文件保存在默认路径,文件名命名为“Python3”
{
    "encoding":"utf-8",
    "cmd": ["C:/Users/Administrator/AppData/Local/Programs/Python/Python36/python.exe","-u","$file"],
    "file_regex": "^[ ]*File \"(...*?)\", line ([0-9]*)",
    "selector": "source.python",
}
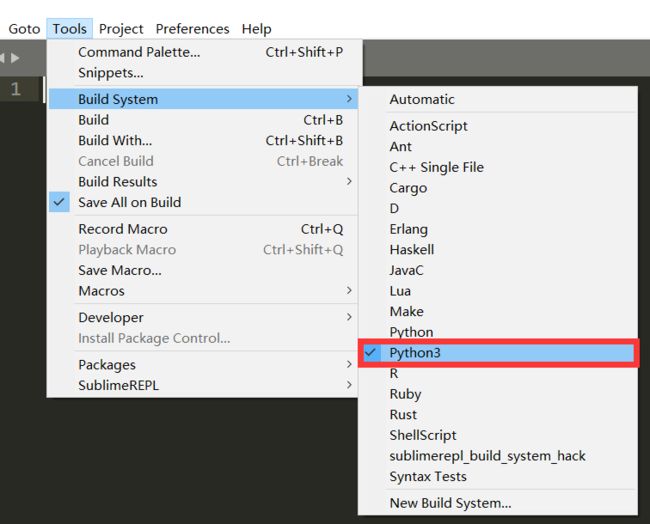
3、打开Tools > Build System,选择新建好的Python3即可
测试
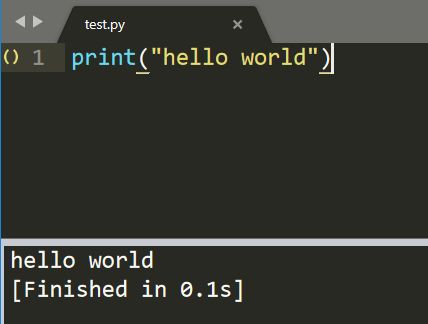
1、新建test.py文件,输入简单python语句,按Ctrl+B运行
字体及字号
1、打开Preferences –>>Settings(Settings User),在右侧添加如下代码(font_face及font_size可根据个人喜好更改)
{
     "color_scheme": "Packages/Color Scheme - Default/Monokai.sublime-color-scheme",
    "font_face": "Consolas"   ,
     "font_size": 14,
     "ignored_packages": [ "Vintage" ]
 }
2、效果如下
四、安装Package Control(官网教程)
第一种方法:在线安装
通过快捷键[ctrl+`]或“View > Show Console”菜单打开控制台,将下面的Python代码粘贴到控制台里
import urllib.request,os,hashlib; h = '6f4c264a24d933ce70df5dedcf1dcaee' + 'ebe013ee18cced0ef93d5f746d80ef60'; pf = 'Package Control.sublime-package'; ipp = sublime.installed_packages_path(); urllib.request.install_opener( urllib.request.build_opener( urllib.request.ProxyHandler()) ); by = urllib.request.urlopen( 'http://packagecontrol.io/' + pf.replace(' ', '%20')).read(); dh = hashlib.sha256(by).hexdigest(); print('Error validating download (got %s instead of %s), please try manual install' % (dh, h)) if dh != h else open(os.path.join( ipp, pf), 'wb' ).write(by)注:上面代码仅适用于Sublime Text 3,如果是Sublime Text2请使用如下代码:
import urllib2,os,hashlib; h = '6f4c264a24d933ce70df5dedcf1dcaee' + 'ebe013ee18cced0ef93d5f746d80ef60'; pf = 'Package Control.sublime-package'; ipp = sublime.installed_packages_path(); os.makedirs( ipp ) if not os.path.exists(ipp) else None; urllib2.install_opener( urllib2.build_opener( urllib2.ProxyHandler()) ); by = urllib2.urlopen( 'http://packagecontrol.io/' + pf.replace(' ', '%20')).read(); dh = hashlib.sha256(by).hexdigest(); open( os.path.join( ipp, pf), 'wb' ).write(by) if dh == h else None; print('Error validating download (got %s instead of %s), please try manual install' % (dh, h) if dh != h else 'Please restart Sublime Text to finish installation')关掉并重新打开Sublime Text 3,如果在Perferences->package settings中能看到package control这一项,则表示安装成功。
第二种方法:手动安装
1、点击 Preferences > Browse Packages… 菜单
2、Browse up a folder and then into the Installed Packages/ folder
3、Download Package Control.sublime-package and copy it into the Installed Packages/ directory
4、Restart Sublime Text
1、通过Package Control安装其他插件
1.按下Ctrl+Shift+P调出命令面板
2.输入install 调出 Install Package
3.在列表中选中要安装的插件,或者输入插件名,根据命令面板中的过滤结果,选择要安装的插件
2、通过Package Control查看已安装的插件
1. 按下Ctrl+Shift+P调出命令面板
2. 输入"package",在下拉列表找到"Package Control: list packages",选中后回车,可以显示全部插件列表。
五、常用插件介绍及安装
SublimeCodeIntel
介绍
Full-featured code intelligence and smart autocomplete engine
-
Jump to Symbol Definition - Jump to the file and line of the definition of a symbol.
-
Imports autocomplete - Shows autocomplete with the available modules/symbols in real time.
-
Function Call tooltips - Displays information in the status bar about the working function.
支持语言
JavaScript, ES6, Mason, XBL, XUL, RHTML, SCSS, Python, HTML, Ruby, Python, XML, XSLT, Django, HTML5, Perl, CSS, Twig, Less, Smarty, Node.js, Tcl, TemplateToolkit, PHP.
Installation
1.Control+Shift+P打开Package Control控制台
2.输入install,选择关联出来的install package
3.输入sublimecodeintel,然后点击列表提示的sublimecodeintel安装
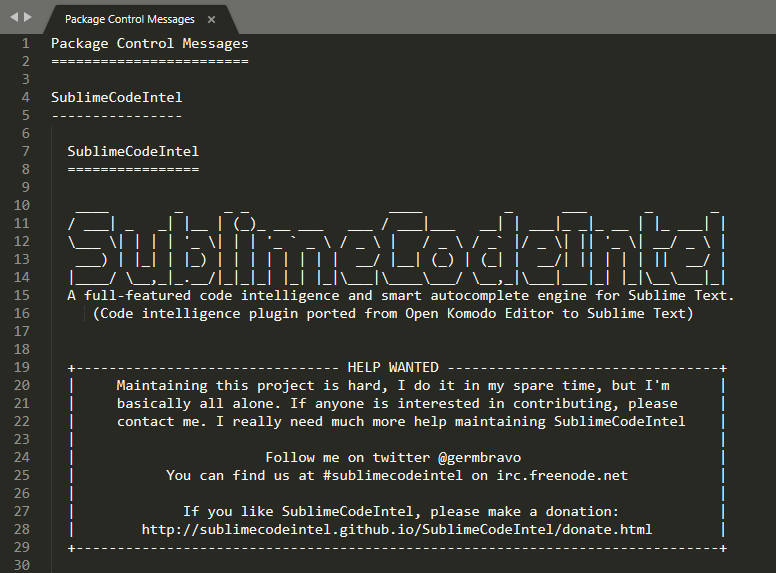
4.安装完成之后,文本框会出现如下显示,或者可以通过【Preferences>Package Settings】中查看到已安装的sublimecodeintel插件
5.打开preferences->packages settings ->Package Control ->Settings-User,检查是否有如下红框代码,如果没有得手动添加
6.点击preferences中的browse Packages,进入SublimeCodeIntel文件夹,在当前的路径下新建.codeintel文件夹(windows中文件命名的时候为 .codeintel. ),之后进入到 .codeintel文件夹中,新建文件“config.log”文件,打开输入(下文以路径'C:/Users/Adminstrator/AppData/Local/Programs/Python/Python36/python.exe'为例,实际配置时请根据具体安装路径修改):
"Python3": {
        "python":"C:/Users/Adminstrator/AppData/Local/Programs/Python/Python36/python.exe",
        "pythonExtraPaths":
            [
                "C:/Users/Adminstrator/AppData/Local/Programs/Python/Python36",
                 "C:/Users/Adminstrator/AppData/Local/Programs/Python/Python36/DLLs",
                 "C:/Users/Adminstrator/AppData/Local/Programs/Python/Python36/Lib",
                 "C:/Users/Adminstrator/AppData/Local/Programs/Python/Python36/Lib/lib-tk",
                 "C:/Users/Adminstrator/AppData/Local/Programs/Python/Python36/Lib/site-packages"
            ]
}
7.保存,重启Sublime Text 3
测试
新建文件并保存为.py文件,输入代码测试
SublimeREPL
介绍
添加快捷键后,可直接运行当前文件,非常方便
-
Launch python in local or remote(1) virtualenv.
-
Quickly run selected script or launch PDB.
-
Use SublimeText Python console with history and multiline input.
使用方法
1、安装SublimeREPL插件后,打开Preferences->Key Bindings,添加快捷键:
可以同时配置python2和python3
 {
        "keys": ["f5"],
        "caption": "SublimeREPL: Python - RUN current file",
        "command": "run_existing_window_command",
        "args": {
            "id": "repl_python_run",
            "file": "config/Python/Main.sublime-menu"
        }
    },
    {   "keys":["ctrl+f5"],
        "command": "repl_open",
        "caption": "Python",
        "id": "repl_python",
        "mnemonic": "P",
        "args": {
            "type": "subprocess",
            "encoding": "utf8",
            "cmd": ["python", "-i", "-u", "$file_basename"],
            "cwd": "$file_path",
            "syntax": "Packages/Python/Python.tmLanguage",
            "external_id": "python",
            "extend_env": {"PYTHONIOENCODING": "utf-8"}
        }
    },
    {
        "keys": ["f6"],
        "caption": "SublimeREPL: Pytho3 - RUN current file",
        "command": "run_existing_window_command",
        "args": {
            "id": "repl_python_run3",
            "file": "config/Python/Main.sublime-menu"
        }
    },
    {   "keys": ["ctrl+f6"],
        "command": "repl_open",
        "caption": "Python3",
        "id": "repl_python3",
        "mnemonic": "P",
        "args": {
            "type": "subprocess",
            "encoding": "utf8",
            "cmd": ["python3", "-i", "-u", "$file_basename"],
            "cwd": "$file_path",
            "syntax": "Packages/Python/Python.tmLanguage",
            "external_id": "python3",
            "extend_env": {"PYTHONIOENCODING": "utf-8"}
            }
    }
F5为运行python2, ctrl+F5为以命令行的方式运行文件
F6为运行python3, ctrl+F6为以命令行的方式运行文件
如果同时配置python3,需要对以下文件做出修改:
找到Packages\SublimeREPL\config\Python\Main.sublime-commands
修改如下:(其实就是将配置文件的内容,复制一遍之后做出修改,凡是调用python的地方修改为python3)
[
     {
        "id": "tools",
        "children":
        [{
            "caption": "SublimeREPL",
            "mnemonic": "R",
            "id": "SublimeREPL",
            "children":
            [
                {"caption": "Python",
                "id": "Python",

                 "children":[
                    {"command": "repl_open",
                     "caption": "Python",
                     "id": "repl_python",
                     "mnemonic": "P",
                     "args": {
                        "type": "subprocess",
                        "encoding": "utf8",
                        "cmd": ["python", "-i", "-u", "$file_basename"],
                        "cwd": "$file_path",
                        "syntax": "Packages/Python/Python.tmLanguage",
                        "external_id": "python",
                        "extend_env": {"PYTHONIOENCODING": "utf-8"}
                        }
                    },
                    {"command": "python_virtualenv_repl",
                     "id": "python_virtualenv_repl",
                     "caption": "Python - virtualenv"},
                    {"command": "repl_open",
                     "caption": "Python - PDB current file",
                     "id": "repl_python_pdb",
                     "mnemonic": "D",
                     "args": {
                        "type": "subprocess",
                        "encoding": "utf8",
                        "cmd": ["python", "-i", "-u", "-m", "pdb", "$file_basename"],
                        "cwd": "$file_path",
                        "syntax": "Packages/Python/Python.tmLanguage",
                        "external_id": "python",
                        "extend_env": {"PYTHONIOENCODING": "utf-8"}
                        }
                    },
                    {"command": "repl_open",
                     "caption": "Python - RUN current file",
                     "id": "repl_python_run",
                     "mnemonic": "R",
                     "args": {
                        "type": "subprocess",
                        "encoding": "utf8",
                        "cmd": ["python", "-u", "$file_basename"],
                        "cwd": "$file_path",
                        "syntax": "Packages/Python/Python.tmLanguage",
                        "external_id": "python",
                        "extend_env": {"PYTHONIOENCODING": "utf-8"}
                        }
                    },
                    {"command": "repl_open",
                     "caption": "Python - IPython",
                     "id": "repl_python_ipython",
                     "mnemonic": "I",
                     "args": {
                        "type": "subprocess",
                        "encoding": "utf8",
                        "autocomplete_server": true,
                        "cmd": {
                            "osx": ["python", "-u", "${packages}/SublimeREPL/config/Python/ipy_repl.py"],
                            "linux": ["python", "-u", "${packages}/SublimeREPL/config/Python/ipy_repl.py"],
                            "windows": ["python", "-u", "${packages}/SublimeREPL/config/Python/ipy_repl.py"]
                        },
                        "cwd": "$file_path",
                        "syntax": "Packages/Python/Python.tmLanguage",
                        "external_id": "python",
                        "extend_env": {
                            "PYTHONIOENCODING": "utf-8",
                            "SUBLIMEREPL_EDITOR": "$editor"
                            }
                        }
                    },
					{"command": "repl_open",
                     "caption": "Python3",
                     "id": "repl_python3",
                     "mnemonic": "P",
                     "args": {
                        "type": "subprocess",
                        "encoding": "utf8",
                        "cmd": ["python3", "-i", "-u", "$file_basename"],
                        "cwd": "$file_path",
                        "syntax": "Packages/Python/Python.tmLanguage",
                        "external_id": "python3",
                        "extend_env": {"PYTHONIOENCODING": "utf-8"}
                        }
                    },
                    {"command": "python_virtualenv_repl",
                     "id": "python_virtualenv_repl3",
                     "caption": "Python3 - virtualenv"},
                    {"command": "repl_open",
                     "caption": "Python3 - PDB current file",
                     "id": "repl_python_pdb3",
                     "mnemonic": "D",
                     "args": {
                        "type": "subprocess",
                        "encoding": "utf8",
                        "cmd": ["python3", "-i", "-u", "-m", "pdb", "$file_basename"],
                        "cwd": "$file_path",
                        "syntax": "Packages/Python/Python.tmLanguage",
                        "external_id": "python3",
                        "extend_env": {"PYTHONIOENCODING": "utf-8"}
                        }
                    },
                    {"command": "repl_open",
                     "caption": "Python3 - RUN current file",
                     "id": "repl_python_run3",
                     "mnemonic": "R",
                     "args": {
                        "type": "subprocess",
                        "encoding": "utf8",
                        "cmd": ["python3", "-u", "$file_basename"],
                        "cwd": "$file_path",
                        "syntax": "Packages/Python/Python.tmLanguage",
                        "external_id": "python3",
                        "extend_env": {"PYTHONIOENCODING": "utf-8"}
                        }
                    },
                    {"command": "repl_open",
                     "caption": "Python3 - IPython",
                     "id": "repl_python_ipython3",
                     "mnemonic": "I",
                     "args": {
                        "type": "subprocess",
                        "encoding": "utf8",
                        "autocomplete_server": true,
                        "cmd": {
                            "osx": ["python3", "-u", "${packages}/SublimeREPL/config/Python/ipy_repl.py"],
                            "linux": ["python3", "-u", "${packages}/SublimeREPL/config/Python/ipy_repl.py"],
                            "windows": ["python3", "-u", "${packages}/SublimeREPL/config/Python/ipy_repl.py"]
                        },
                        "cwd": "$file_path",
                        "syntax": "Packages/Python/Python.tmLanguage",
                        "external_id": "python3",
                        "extend_env": {
                            "PYTHONIOENCODING": "utf-8",
                            "SUBLIMEREPL_EDITOR": "$editor"
                            }
                        }
                    }
                ]}
            ]
        }]
    }
]
具体修改如下:(主要就是修改id/external_id)
测试
1、新建test.py文件,例如:
2、上文中SublimeREPL插件设置的快捷键是F5,所以按F5运行成功如下
F5为运行python2,
ctrl+F5为在python2以命令行的方式运行文件
F6为运行python3,
ctrl+F6为在python3以命令行的方式运行文件
SublimeTmpl
介绍
安装插件后,可以通过快捷键按照模板快速新建文件
使用方法
1、安装SublimeTmpl插件后,打开Preferences->Package Settings->SublimeTmpl->Settings User,添加以下内容
{
    "disable_keymap_actions": false, // "all"; "html,css"
    "date_format" : "%Y-%m-%d %H:%M:%S",
    "attr": {
        "author": "Jimy_Fengqi",
        "email": "[email protected]",
        "link": "https://blog.csdn.net/qiqiyingse"  ,
        "id": "V1.0"
    }
}
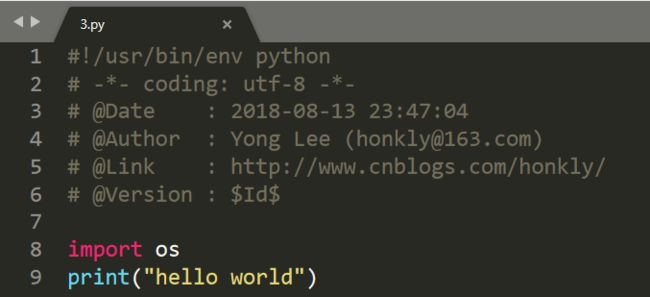
点击浏览插件目录,打开Packages\SublimeTmpl\templates\python.tmpl 修改如下
# -*- coding: utf-8 -*-
# @Date     : ${date}
# @Author   : ${author} (${email})
# @Link     : ${link}
# @Version  : ${id}

${1:import os}
${2:import sys}
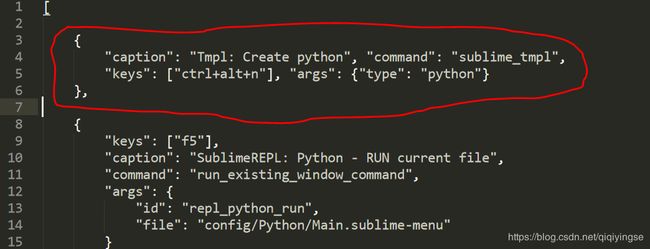
2、添加快捷键,打开Preferences->Key Bindings,添加红框中的快捷键代码
    {
        "caption": "Tmpl: Create python", "command": "sublime_tmpl",
        "keys": ["ctrl+alt+n"], "args": {"type": "python"}
    },
如图:
测试
打开Sublime Text 3,上文中SublimeTmpl插件设置的快捷键是"Ctrl+alt+n",按快捷键后成功新建文件如下
ColorSublime
介绍
提供了主题更换功能,可根据个人喜好选择
使用方法
1、安装ColorSublime插件完成后,打开Preferences->Color Scheme...,选择主题
Anaconda
介绍
代码提示等许多功能,必备
安装方法
1、Preferences->Package Settings->Anaconda->Settings Default,修改"python_interpreter"为实际Python安装路径
2、Preferences->Package Settings->Anaconda->Settings User,添加如下内容
{
    "python_interpreter":"C:/Users/Adminstrator/AppData/Local/Programs/Python/Python36",
    "suppress_word_completions":true,
     "suppress_explicit_completions":true,
    "comlete_parameters":true,
    "swallow_startup_errors":true,
     "anaconda_linting":false
 }
汉化
插件localization
Installation
1.Control+Shift+P打开Package Control控制台
2.输入install,选择关联出来的install package
3.输入localization,点击即可安装
更新最新版本3207版本注册方法
linux版本
- 首先,修改hosts(/etc/hosts),避免注册不了
127.0.0.1 www.sublimetext.com 127.0.0.1 sublimetext.com 127.0.0.1 sublimehq.com 127.0.0.1 telemetry.sublimehq.com 127.0.0.1 license.sublimehq.com 127.0.0.1 45.55.255.55 127.0.0.1 45.55.41.223 - 首先从Sublime Text官网下载合适的包;
- 然后使用下面的命令,解压并且移动到/opt目录下
tar -xvvf sublime_text_3_build_3207_x64.tar.bz2 mv sublime_text_3 /opt/ - 找到移动后的sublime_text_3文件夹,进入终端,使用以上命令修改sublime_text.desktop。修改如下
vim /opt/sublime_text_3/sublime_text.desktopExec=/opt/sublime_text_3/sublime_text %F Icon=/opt/sublime_text_3/Icon/256x256/sublime-text.png以上代码只是需要修改的地方。
- 在终端编辑sublime_text 执行文件,也就是windows 中的.exe文件(root权限下)
使用二进制编辑器打开sublime_text(记得获取root权限)
可以使用exhexeditor来查看sudo apt-get install wxhexeditor查找97 94 0D替换成0000 00,然后保存退出
-
接下来输入注册码就可以了
—– BEGIN LICENSE —–
TwitterInc
200 User License
EA7E-890007
1D77F72E 390CDD93 4DCBA022 FAF60790
61AA12C0 A37081C5 D0316412 4584D136
94D7F7D4 95BC8C1C 527DA828 560BB037
D1EDDD8C AE7B379F 50C9D69D B35179EF
2FE898C4 8E4277A8 555CE714 E1FB0E43
D5D52613 C3D12E98 BC49967F 7652EED2
9D2D2E61 67610860 6D338B72 5CF95C69
E36B85CC 84991F19 7575D828 470A92AB
—— END LICENSE ——
Windows
windows平台比较好办
链接: https://pan.baidu.com/s/1R_umpduvBAAR0vYDbaY29Q 提取码: 2ues
