【git学习】在CenterOS系统上安装GitLab并自定义域名访问GitLab管理页面
目前就职的公司一直使用SVN作为版本管理,现在打算尝试从SVN迁移到Git。安排我来预言并搭建好相关的环境以及自己尝试使用Git。今天我就尝试在Center OS系统上安装GitLab,现在在此记录一下整个安装过程。
第一步 查看GitLab的官方网站
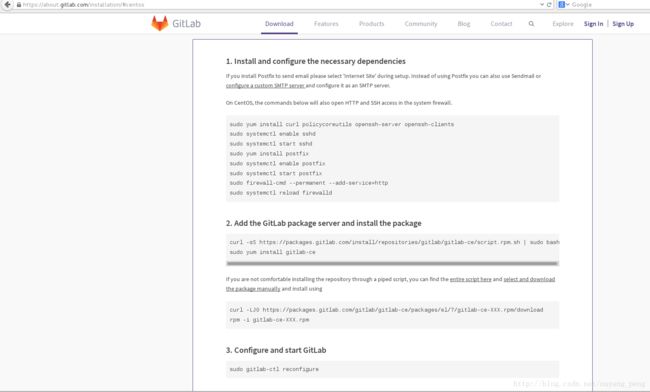
GitLab的官方网站关于安装gitlab的介绍页面如下:
https://about.gitlab.com/installation/
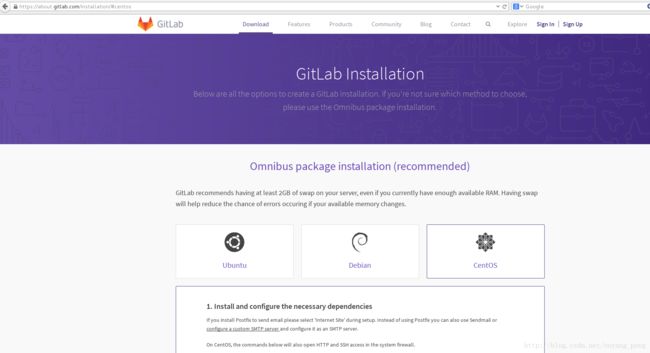
按照如上图的步骤,一步一步的来即可安装成功。
第二步 安装GitLab
1. 安装和配置必要的依赖
如果你安装postfix发送邮件,请选择“网站设置”中。而不是使用后缀也可以使用sendmail配置自定义SMTP服务器配置为SMTP服务器。
在CentOS的,下面的命令将在系统防火墙打开HTTP和SSH访问。
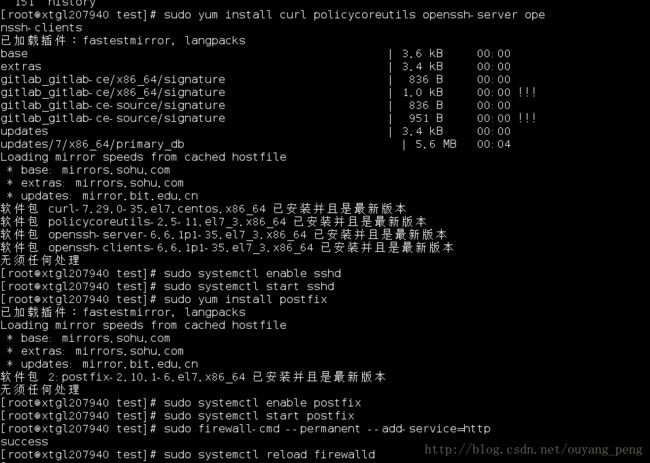
之前没有参考官方文档,去百度搜索其他人的安装gitlab教程后,在CenterOS本机上可以正常访问gitlab的管理页面,但是其他的电脑因为防火墙的原因都不能访问gitlab的管理页面。所以这边一定要先配置好以下命令。
sudo yum install curl policycoreutils openssh-server openssh-clients
sudo systemctl enable sshd
sudo systemctl start sshd
sudo yum install postfix
sudo systemctl enable postfix
sudo systemctl start postfix
sudo firewall-cmd --permanent --add-service=http
sudo systemctl reload firewalld
2. 添加GitLab包服务器安装包
2.1 Gitlab官方下载安装
curl -sS https://packages.gitlab.com/install/repositories/gitlab/gitlab-ce/script.rpm.sh | sudo bash

sudo yum install gitlab-ce
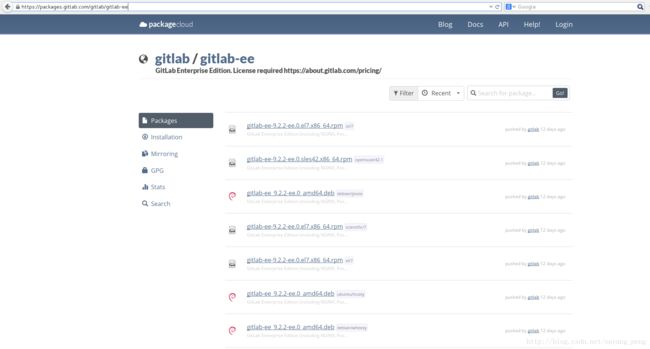
如果您不喜欢这种安装方式,你可以通过管道脚本来安装库,您可以在这里找到整个脚本,网站地址:https://packages.gitlab.com/gitlab/gitlab-ee/install
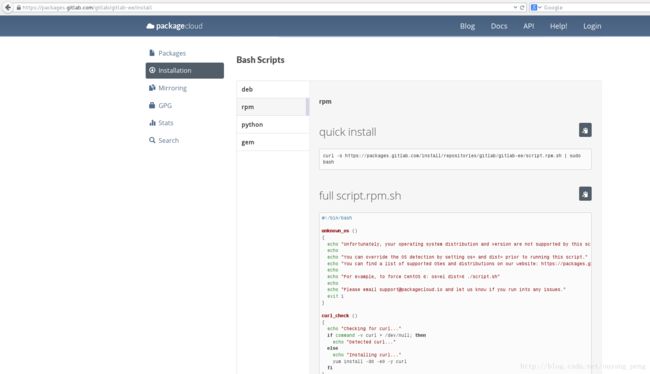
并选择和下载相应的安装包 网站地址:https://packages.gitlab.com/gitlab/gitlab-ee
然后使用下面的命令手动安装和使用
curl -LJO https://packages.gitlab.com/gitlab/gitlab-ce/packages/el/7/gitlab-ce-XXX.rpm/download
rpm -i gitlab-ce-XXX.rpm
2.2 Gitlab国内镜像下载安装
参考地址:
https://mirror.tuna.tsinghua.edu.cn/help/gitlab-ce/
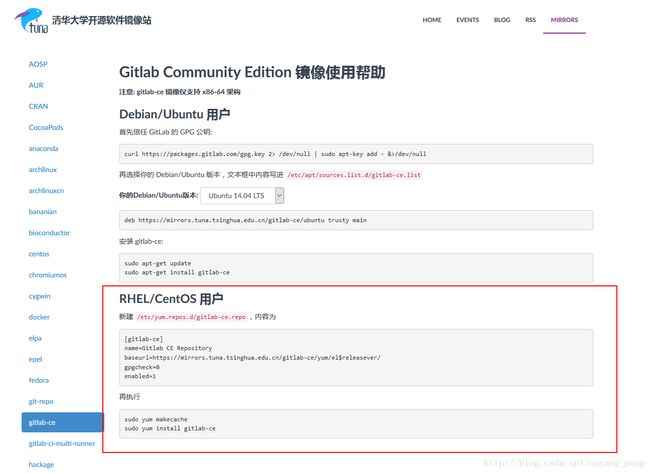
有时候,天朝访问国外网站的速度是龟速,受不了的话,可以使用清华大学的国内镜像,如上图所示,可以有Ubuntu、CenerOS等系统的不同添加国内镜像的方式。
2.2.1 Debian/Ubuntu 用户
1、首先信任 GitLab 的 GPG 公钥:
curl https://packages.gitlab.com/gpg.key 2> /dev/null | sudo apt-key add - &>/dev/null2、再选择你的 Debian/Ubuntu 版本,文本框中内容写进 /etc/apt/sources.list.d/gitlab-ce.list
比如我选择系统版本为Ubuntu 14.04,则生成的文本如下
deb https://mirrors.tuna.tsinghua.edu.cn/gitlab-ce/ubuntu trusty main然后使用vi命令操作/etc/apt/sources.list.d/gitlab-ce.list文件,将上面的文本添加到/etc/apt/sources.list.d/gitlab-ce.list文件中。
3、安装 gitlab-ce:
sudo apt-get update
sudo apt-get install gitlab-ce也可以安装指定的版本,比如:sudo apt-get install gitlab-ce=9.4.3-ce.0 就可以安装 9.4.3-ce.0版本了。
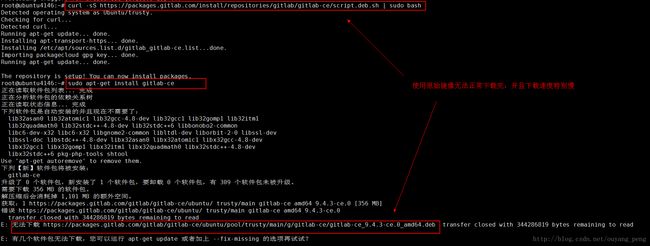
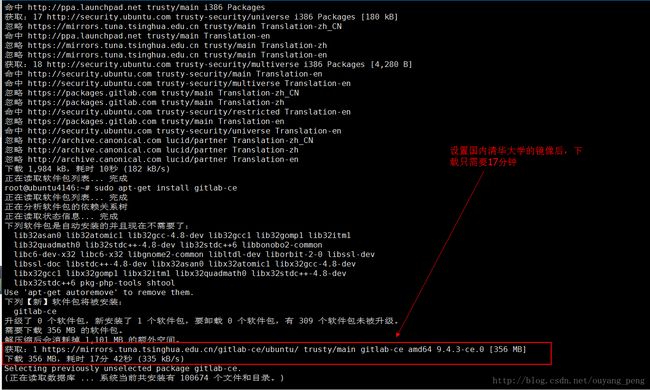
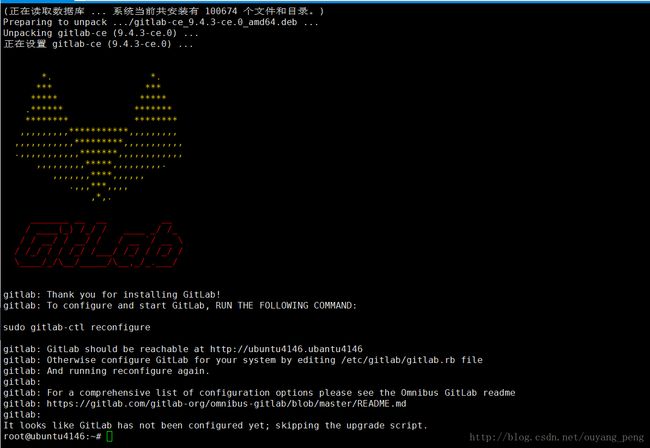
实战截图:
使用原始的gitlab镜像,下载失败
使用国内清华大学镜像,下载成功,只需要17分钟
下载完毕,安装成功截图
2.2.2 RHEL/CentOS 用户
新建 /etc/yum.repos.d/gitlab-ce.repo,内容为
[gitlab-ce]
name=Gitlab CE Repository
baseurl=https://mirrors.tuna.tsinghua.edu.cn/gitlab-ce/yum/el$releasever/
gpgcheck=0
enabled=1
再执行下面命令即可。
sudo yum makecache
sudo yum install gitlab-ce
3.配置GitLab主机名
这一步在官方的文档里面没有,但是如果没有配置的话,直接启动GitLab,会出现不正确的FQDN错误,导致无法正常启动。因此必须做配置。
1. 修改/etc/gitlab/gitlab.rb文件
执行如下命令,使用gedit打开/etc/gitlab/gitlab.rb文件
sudo mkdir -p /etc/gitlab
sudo touch /etc/gitlab/gitlab.rb
sudo chmod 600 /etc/gitlab/gitlab.rb
sudo gedit /etc/gitlab/gitlab.rb
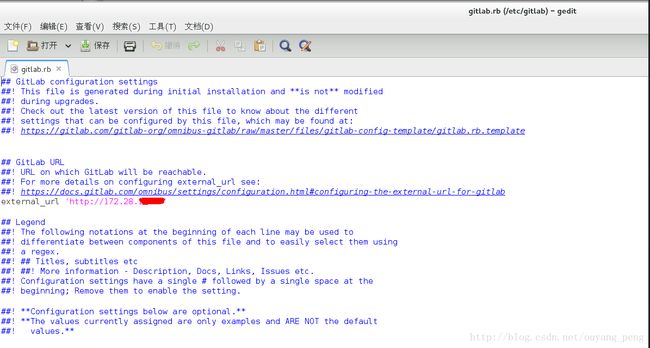
找到如下这段代码,把external_url改成部署机器的域名或者IP地址,如我的电脑ip地址就是 172.28.255.100
## GitLab URL
##! URL on which GitLab will be reachable.
##! For more details on configuring external_url see:
##! https://docs.gitlab.com/omnibus/settings/configuration.html#configuring-the-external-url-for-gitlab
external_url 'http://172.28.255.100'

## Legend
##! The following notations at the beginning of each line may be used to
##! differentiate between components of this file and to easily select them using
##! a regex.
##! ## Titles, subtitles etc
##! ##! More information - Description, Docs, Links, Issues etc.
##! Configuration settings have a single # followed by a single space at the
##! beginning; Remove them to enable the setting.

##! **Configuration settings below are optional.**
##! **The values currently assigned are only examples and ARE NOT the default
##!   values.**
2. 修改/var/opt/gitlab/gitlab-rails/etc/gitlab.yml文件
执行如下命令,使用gedit打开/var/opt/gitlab/gitlab-rails/etc/gitlab.yml文件
sudo gedit /var/opt/gitlab/gitlab-rails/etc/gitlab.yml找到关键字 * ## Web server settings *
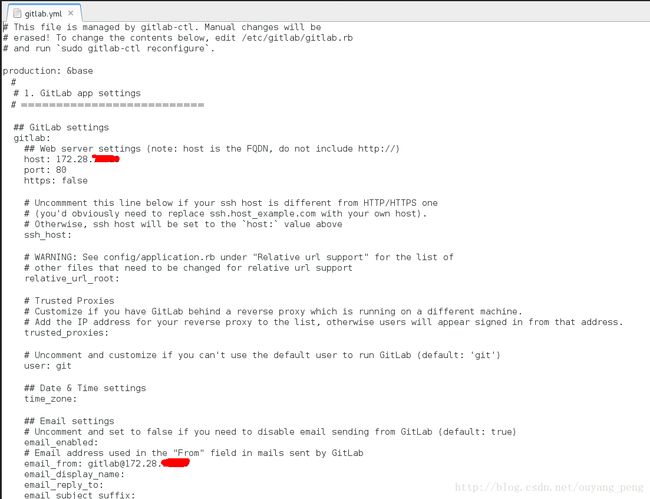
将host的值改成本机的ip地址: 172.28.255.100 ,如下图:
# This file is managed by gitlab-ctl. Manual changes will be
# erased! To change the contents below, edit /etc/gitlab/gitlab.rb
# and run `sudo gitlab-ctl reconfigure`.

production: &base
  #
  # 1. GitLab app settings
  # ==========================

  ## GitLab settings
  gitlab:
    ## Web server settings (note: host is the FQDN, do not include http://)
    host: 172.28.255.100
    port: 80
    https: false

    # Uncommment this line below if your ssh host is different from HTTP/HTTPS one
    # (you'd obviously need to replace ssh.host_example.com with your own host).
    # Otherwise, ssh host will be set to the `host:` value above
    ssh_host:

    # WARNING: See config/application.rb under "Relative url support" for the list of
    # other files that need to be changed for relative url support
    relative_url_root:

    # Trusted Proxies
    # Customize if you have GitLab behind a reverse proxy which is running on a different machine.
    # Add the IP address for your reverse proxy to the list, otherwise users will appear signed in from that address.
    trusted_proxies:

    # Uncomment and customize if you can't use the default user to run GitLab (default: 'git')
    user: git

    ## Date & Time settings
    time_zone:

    ## Email settings
    # Uncomment and set to false if you need to disable email sending from GitLab (default: true)
    email_enabled:
    # Email address used in the "From" field in mails sent by GitLab
    email_from: gitlab@172.28.255.100
    email_display_name:
    email_reply_to:
    email_subject_suffix:
到此为止,gitlab的web管理页面就可以正常访问,并通过自定义域名访问了。
如果还是不能正常访问的话,查看80端口是否被占用?
有时候80端口可能被apache给暂用了,针对此问题,直接停用apache服务,或者修改apache的默认端口。
断口被占用
在后来我进行gitlab迁移的时候,需要在新的Ubuntu服务器上搭建Gitlab的时候,端口80以及端口8080分别被Ubuntu服务器上的Apache服务和Tomcat服务所占用。
我的做法是修改 /etc/gitlab/gitlab.rb 文件
vim /etc/gitlab/gitlab.rb 将external_url 直接输入 ip加上端口号 ,比如因为80端口被占用,我直接输入9999端口
external_url 'http://172.28.100.26:9999修改NGINX监听的端口为9999
#edited by ouyang 2017-8-10 16:15:05
nginx['listen_addresses'] = ['*']
nginx['listen_port'] = 9999
8080端口被Tomcat占用,会出现502的页面。
因此需要修改unicorn的配置,如下:
### Advanced settings
# unicorn['listen'] = '127.0.0.1'
# unicorn['port'] = 8080

# 本机有Tomcat占用了8080,因此改为8082试一试
 unicorn['listen'] = '127.0.0.1'
 unicorn['port'] = 8082
修改Gitlab数据存储路径
默认的Gitlab数据存储路径,在目录/var/opt/gitlab/git-data下,但是新的Ubuntu服务器根目录分配的空间比较小,为了防止以后数据过大,所以可以修改路径存储为/data/gitlabData, /data是挂载的2T的硬盘够用。
### For setting up different data storing directory
###! Docs: https://docs.gitlab.com/omnibus/settings/configuration.html#storing-git-data-in-an-alternative-directory
###! **If you want to use a single non-default directory to store git data use a
###!   path that doesn't contain symlinks.**
# git_data_dirs({ "default" => { "path" => "/var/opt/gitlab/git-data", 'gitaly_address' => 'unix:/var/opt/gitlab/gitaly/gitaly.socket' } })

#edited by ouyangpeng 2017-8-10  配置gitlab的数据存储位置为/data目录下,保证硬盘安全
git_data_dirs({ "default" => { "path" => "/data/gitlabData" } })
设置完后,过一段使用时间,可以看到该目录下的resposities,如下所示:
4.配置并启动GitLab
执行如下命令
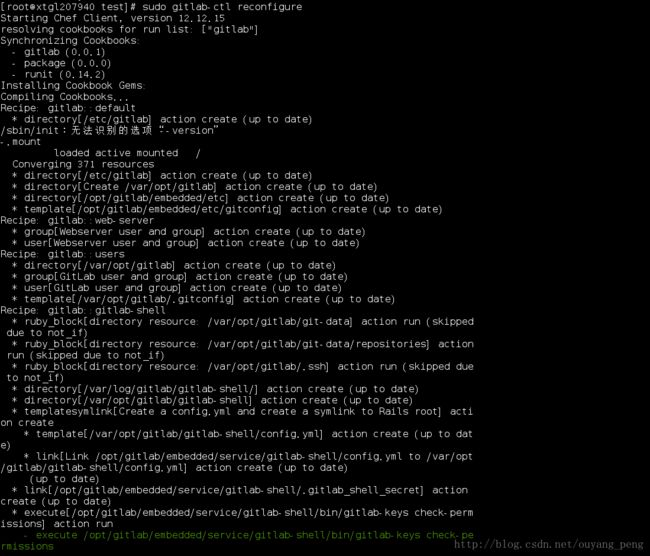
sudo gitlab-ctl reconfigure有时候,像上面步骤修改了GitLab的ip地址一样,临时修改了GitLab的配置之后,得执行如下的命令,应用重新配好的配置并重启GitLab,然后查看GitLab的状态
sudo gitlab-ctl reconfigure
sudo gitlab-ctl restart
sudo gitlab-ctl status
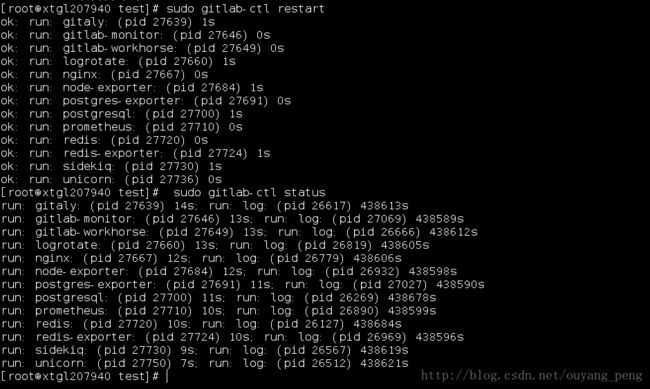
如下所示,就是运行命令的截图。
[root@xtgl207940 test]# sudo gitlab-ctl restart
ok: run: gitaly: (pid 27639) 1s
ok: run: gitlab-monitor: (pid 27646) 0s
ok: run: gitlab-workhorse: (pid 27649) 0s
ok: run: logrotate: (pid 27660) 1s
ok: run: nginx: (pid 27667) 0s
ok: run: node-exporter: (pid 27684) 1s
ok: run: postgres-exporter: (pid 27691) 0s
ok: run: postgresql: (pid 27700) 1s
ok: run: prometheus: (pid 27710) 0s
ok: run: redis: (pid 27720) 0s
ok: run: redis-exporter: (pid 27724) 1s
ok: run: sidekiq: (pid 27730) 1s
ok: run: unicorn: (pid 27736) 0s
[root@xtgl207940 test]#  sudo gitlab-ctl status
run: gitaly: (pid 27639) 14s; run: log: (pid 26617) 438613s
run: gitlab-monitor: (pid 27646) 13s; run: log: (pid 27069) 438589s
run: gitlab-workhorse: (pid 27649) 13s; run: log: (pid 26666) 438612s
run: logrotate: (pid 27660) 13s; run: log: (pid 26819) 438605s
run: nginx: (pid 27667) 12s; run: log: (pid 26779) 438606s
run: node-exporter: (pid 27684) 12s; run: log: (pid 26932) 438598s
run: postgres-exporter: (pid 27691) 11s; run: log: (pid 27027) 438590s
run: postgresql: (pid 27700) 11s; run: log: (pid 26269) 438678s
run: prometheus: (pid 27710) 10s; run: log: (pid 26890) 438599s
run: redis: (pid 27720) 10s; run: log: (pid 26127) 438684s
run: redis-exporter: (pid 27724) 10s; run: log: (pid 26969) 438596s
run: sidekiq: (pid 27730) 9s; run: log: (pid 26567) 438619s
run: unicorn: (pid 27750) 7s; run: log: (pid 26512) 438621s
[root@xtgl207940 test]#
5.打开浏览器,输入本机的ip地址并登陆
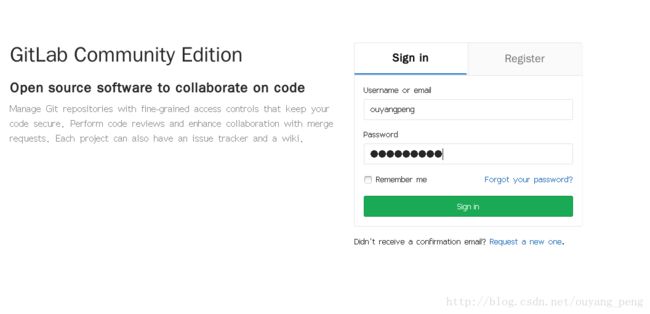
在您的第一次访问时,您将被重定向到密码重置屏幕,以提供初始管理员帐户的密码。输入您想要的密码,您将被重定向回登录屏幕。
默认帐户的用户名是root。提供您先前创建的密码并登录。登录后,您可以更改用户名。
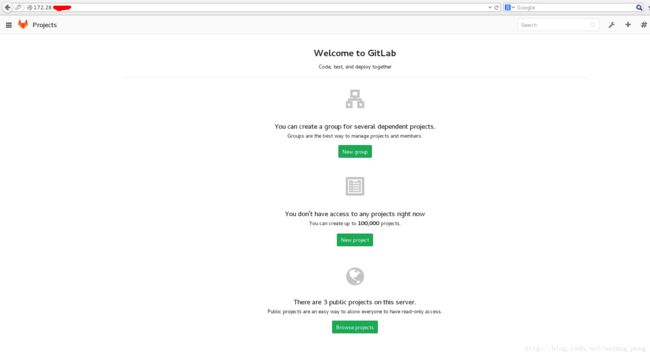
我这边因为以及不是第一次访问了,所以进入的是如下的页面:
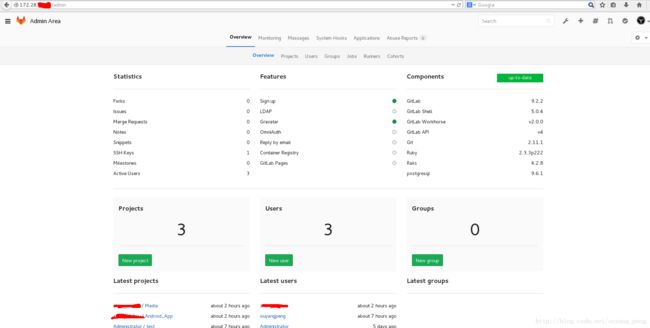
这个是新注册的帐号登陆之后的页面
然后你可以在该管理网站上进行相应的操作,如下图所示:
常用的几个Gitlab命令
# 重新应用gitlab的配置,每次修改/etc/gitlab/gitlab.rb文件之后执行
sudo gitlab-ctl reconfigure

# 启动gitlab服务
sudo gitlab-ctl start

# 重启gitlab服务
sudo gitlab-ctl restart

# 查看gitlab运行状态
sudo gitlab-ctl status

#停止gitlab服务
sudo gitlab-ctl stop

# 查看gitlab运行所有日志
sudo gitlab-ctl tail

#查看 nginx 访问日志
sudo gitlab-ctl tail nginx/gitlab_acces.log

#查看 postgresql 日志
sudo gitlab-ctl tail postgresql

# 停止相关数据连接服务
gitlab-ctl stop unicorn
gitlab-ctl stop sidekiq

# 系统信息监测
gitlab-rake gitlab:env:info
gitlab相关目录
/var/opt/gitlab/git-data/repositories/root:库默认存储目录
/opt/gitlab:是gitlab的应用代码和相应的依赖程序
- /var/opt/gitlab:此目录下是运行gitlab-ctl reconfigure命令编译后的应用数据和配置文件,不需要人为修改配置
- /etc/gitlab:此目录下存放了以omnibus-gitlab包安装方式时的配置文件,这里的配置文件才需要管理员手动编译配置
- /var/log/gitlab:此目录下存放了gitlab各个组件产生的日志
- /opt/gitlab/backups/:默认备份文件生成的目录
参考链接
- https://about.gitlab.com/installation/#centos
- http://blog.csdn.net/u011241606/article/details/51471367
- http://blog.csdn.net/allenwdj/article/details/50432459
- https://docs.gitlab.com/omnibus/
- https://www.cnblogs.com/madsnotes/articles/5682719.html (GitLab应用总结v1.0)
- http://blog.51cto.com/zhaochj/1737738 (企业级GitLab仓库环境构建)
- http://www.cnblogs.com/xishuai/p/ubuntu-install-gitlab.html
- https://www.digitalocean.com/community/tutorials/how-to-install-and-configure-gitlab-on-ubuntu-16-04
- http://galudisu.info/2017/05/01/gitlab/ubuntu-gitlab-install
作者:欧阳鹏 欢迎转载,与人分享是进步的源泉!
转载请保留原文地址:http://blog.csdn.net/ouyang_peng/article/details/72903221如果本文对您有所帮助,欢迎您扫码下图所示的支付宝和微信支付二维码对本文进行打赏。
