如何Spring Cloud Zuul作为网关的分布式系统中整合Swagger文档在同一个页面上
本文不涉及技术,只是单纯的一个小技巧。
阅读本文前,你需要对spring-cloud-zuul、spring-cloud-eureka、以及swagger的配置和使用有所了解。
如果你的系统也是用zuul作为分布式系统的网关,同时使用swagger生成文档,想把整个系统的文档整合在同一个页面上,可以参考本文。
项目结构
eureka-server:eureka服务注册中心,端口8080,
zuul-server:zuul网关,端口8081
payment-server:支付系统,端口8082
order-server:订单系统,端口8083
order-server1:订单系统,端口8084
order-server2:订单系统,端口8085
其中order-server、order-server1、order-server2组成订单系统集群。

下面是运行后的效果图:
打开zuul的swagger首页http://localhost:8081/swagger-ui.html
实现方法
zuul-server
路由配置
zuul:
  routes:
    payment-server:
      path: /pay/**
    order-server:
path: /order/**swagger配置类SwaggerConfig
@Configuration
@EnableSwagger2
public class SwaggerConfig {

    @Bean
    public Docket createRestApi() {
        return new Docket(DocumentationType.SWAGGER_2)
                .apiInfo(apiInfo());
    }

    private ApiInfo apiInfo() {
        return new ApiInfoBuilder()
                .title("分布式购物系统")
                .description("购物系统接口文档说明")
                .termsOfServiceUrl("http://localhost:8081")
                .contact(new Contact("vker", "", "[email protected]"))
                .version("1.0")
                .build();
    }

    @Bean
    UiConfiguration uiConfig() {
        return new UiConfiguration(null, "list", "alpha", "schema",
                UiConfiguration.Constants.DEFAULT_SUBMIT_METHODS, false, true, 60000L);
    }
}重点:swagger文档资源配置类DocumentationConfig
@Component
@Primary
public class DocumentationConfig implements SwaggerResourcesProvider {
    @Override
    public List get() {
        List resources = new ArrayList<>();
        resources.add(swaggerResource("订单系统", "/order/v2/api-docs", "2.0"));
        resources.add(swaggerResource("支付系统", "/pay/v2/api-docs", "2.0"));
        return resources;
    }

    private SwaggerResource swaggerResource(String name, String location, String version) {
        SwaggerResource swaggerResource = new SwaggerResource();
        swaggerResource.setName(name);
        swaggerResource.setLocation(location);
        swaggerResource.setSwaggerVersion(version);
        return swaggerResource;
    }
} 可以看出来实现的重点就在DocumentationConfig中,通过配置文档资源,当在首页下拉框选择订单系统时,会请求http://localhost:8081/order/v2/api-docs获取文档详情,而根据zuul的路由配置,zuul会将/order/**请求路由到serviceId为order-server的系统上。而且由于order-server是一个集群,就算其中一台服务挂掉,也不会影响到文档的获取。
order-server
swagger配置类SwaggerConfig,order-server、payment-serverswagger配置基本相同。
@Configuration
@EnableSwagger2
public class SwaggerConfig {

    @Bean
    public Docket createRestApi() {
        return new Docket(DocumentationType.SWAGGER_2)
                .apiInfo(apiInfo())
                .select()
                .apis(RequestHandlerSelectors.basePackage("w.m.vker.demo"))
                .apis(RequestHandlerSelectors.withClassAnnotation(Api.class))
                .apis(RequestHandlerSelectors.withMethodAnnotation(ApiOperation.class))
                .paths(PathSelectors.any())
                .build();
    }

    private ApiInfo apiInfo() {
        return new ApiInfoBuilder()
                .title("订单系统api")
                .description("订单系统接口文档说明")
                .contact(new Contact("vker", "", "[email protected]"))
                .version("1.0")
                .build();
    }

    @Bean
    UiConfiguration uiConfig() {
        return new UiConfiguration(null, "list", "alpha", "schema",
                UiConfiguration.Constants.DEFAULT_SUBMIT_METHODS, false, true, 60000L);
    }
}
swagger整合xrebel
xrebel是一款web调试工具,可以参考教程XRebel使用教程。
xrebel的工作原理是追踪页面的各种请求分析整个请求的流程和消耗时间,而swagger则提供了页面在线接口调试功能,将两则结合起来,可以快速调试接口的同时分析接口的流程和缺陷,可谓是如虎添翼。
如图:
点击swagger的try it out时 左下角的xrebel工具栏会记录发起的请求详情。
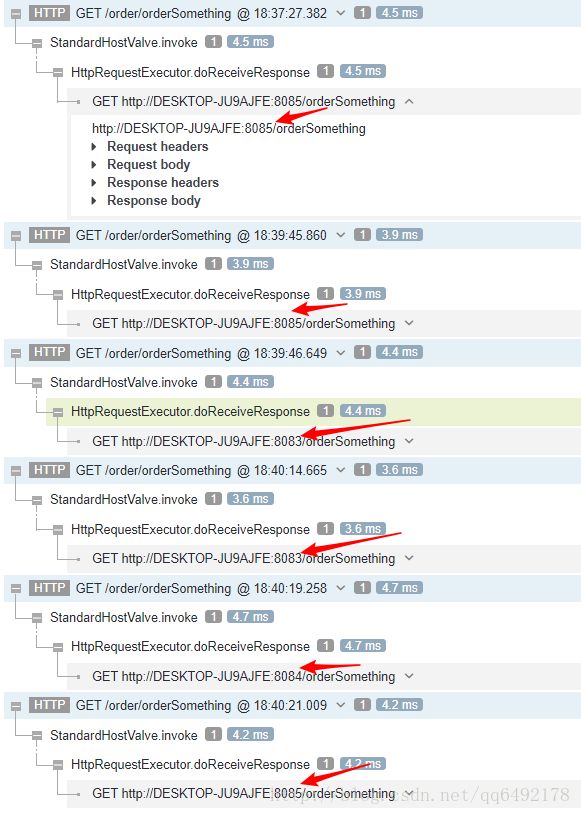
当我多次调用订单系统接口的时候,xrebel甚至可以显示zuul将这个请求通过负载均衡分发到哪一个服务上,如图:
实现方法
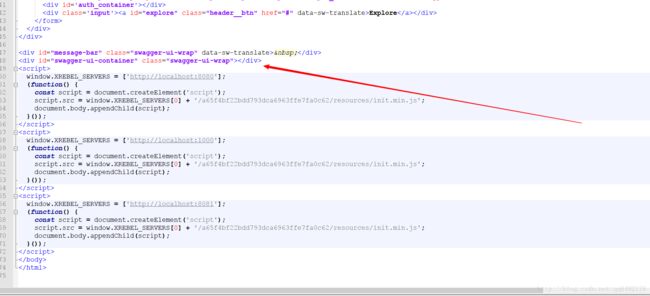
将xrebel集成到zuul-server启动的vm options参数中,在zuul其中成功后,打开http://localhost:8081/xrebel页面,想页面正下方中央的文本框内的js代码
<script>
  window.XREBEL_SERVERS = ['http://localhost:8081'];
  (function() {
    const script = document.createElement('script');
    script.src = window.XREBEL_SERVERS[0] + '/a65f4bf22bdd793dca6963ffe7fa0c62/resources/init.min.js';
    document.body.appendChild(script);
  }());
script>复制出来。然后找到springfox-swagger-ui依赖的jar包,如果使用maven管理,则jar包的位置在maven仓库路径\io\springfox\springfox-swagger-ui\版本号 的文件夹下,将jar包用解压后找到swagger-ui.html文件,将之前的复制的js文件粘贴到里面,然后运行zuul-server,就可以在swagger首页http://localhost:8081/swagger-ui.html看到左下角出现这个可爱的工具栏啦。

最后附上代码地址:https://github.com/91wangmeng/spring-boot-swagger-distributed-demo.git