- SpringBlade dict-biz/list 接口 SQL 注入漏洞
文章永久免费只为良心
oracle数据库
SpringBladedict-biz/list接口SQL注入漏洞POC:构造请求包查看返回包你的网址/api/blade-system/dict-biz/list?updatexml(1,concat(0x7e,md5(1),0x7e),1)=1漏洞概述在SpringBlade框架中,如果dict-biz/list接口的后台处理逻辑没有正确地对用户输入进行过滤或参数化查询(PreparedSta
- spring如何整合druid连接池?
惜.己
springspringjunit数据库javaidea后端xml
目录spring整合druid连接池1.新建maven项目2.新建mavenModule3.导入相关依赖4.配置log4j2.xml5.配置druid.xml1)xml中如何引入properties2)下面是配置文件6.准备jdbc.propertiesJDBC配置项解释7.配置druid8.测试spring整合druid连接池1.新建maven项目打开IDE(比如IntelliJIDEA,Ecl
- SpringCloudAlibaba—Sentinel(限流)
菜鸟爪哇
前言:自己在学习过程的记录,借鉴别人文章,记录自己实现的步骤。借鉴文章:https://blog.csdn.net/u014494148/article/details/105484410Sentinel介绍Sentinel诞生于阿里巴巴,其主要目标是流量控制和服务熔断。Sentinel是通过限制并发线程的数量(即信号隔离)来减少不稳定资源的影响,而不是使用线程池,省去了线程切换的性能开销。当资源
- springboot+vue项目实战一-创建SpringBoot简单项目
苹果酱0567
面试题汇总与解析springboot后端java中间件开发语言
这段时间抽空给女朋友搭建一个个人博客,想着记录一下建站的过程,就当做笔记吧。虽然复制zjblog只要一个小时就可以搞定一个网站,或者用cms系统,三四个小时就可以做出一个前后台都有的网站,而且想做成啥样也都行。但是就是要从新做,自己做的意义不一样,更何况,俺就是专门干这个的,嘿嘿嘿要做一个网站,而且从零开始,首先呢就是技术选型了,经过一番思量决定选择-SpringBoot做后端,前端使用Vue做一
- Spring MVC 全面指南:从入门到精通的详细解析
一杯梅子酱
技术栈学习springmvcjava
引言:SpringMVC,作为Spring框架的一个重要模块,为构建Web应用提供了强大的功能和灵活性。无论是初学者还是有一定经验的开发者,掌握SpringMVC都将显著提升你的Web开发技能。本文旨在为初学者提供一个全面且易于理解的学习路径,通过详细的知识点分析和实际案例,帮助你快速上手SpringMVC,让学习过程既深刻又高效。一、SpringMVC简介1.1什么是SpringMVC?Spri
- Spring Boot中实现跨域请求
BABA8891
springboot后端java
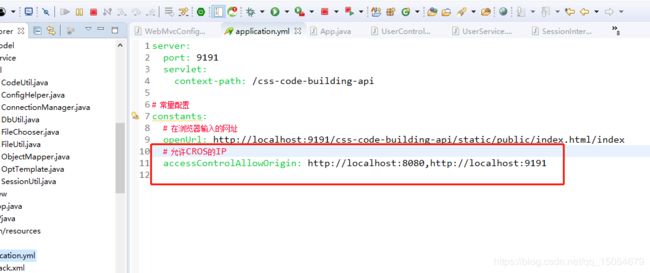
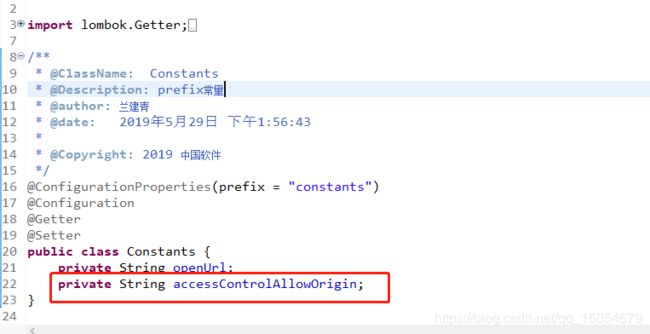
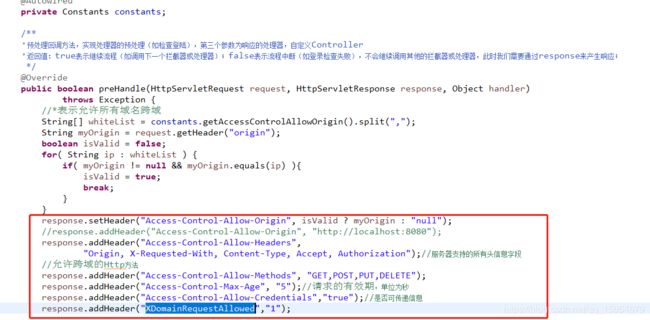
在SpringBoot中实现跨域请求(CORS,Cross-OriginResourceSharing)可以通过多种方式,以下是几种常见的方法:1.使用@CrossOrigin注解在SpringBoot中,你可以在控制器或者具体的请求处理方法上使用@CrossOrigin注解来允许跨域请求。在控制器上应用:importorg.springframework.web.bind.annotation.
- 博客网站制作教程
2401_85194651
javamaven
首先就是技术框架:后端:Java+SpringBoot数据库:MySQL前端:Vue.js数据库连接:JPA(JavaPersistenceAPI)1.项目结构blog-app/├──backend/│├──src/main/java/com/example/blogapp/││├──BlogApplication.java││├──config/│││└──DatabaseConfig.java
- RabbitMQ生产者重复机制与确认机制
java炒饭小能手
java-rabbitmqrabbitmqjava
重复机制生产者发送消息时,出现了网络故障,导致与MQ的连接中断。为了解决这个问题,SpringAMQP提供的消息发送时的重试机制。即:当RabbitTemplate与MQ连接超时后,多次重试。需要修该发送端模块的application.yaml文件,添加下面的内容:spring:rabbitmq:connection-timeout:1s#设置MQ的连接超时时间template:retry:ena
- 非对称加密算法————RSA理论及详情
hu19930613
转自:https://www.kancloud.cn/kancloud/rsa_algorithm/48484一、一点历史1976年以前,所有的加密方法都是同一种模式:(1)甲方选择某一种加密规则,对信息进行加密;(2)乙方使用同一种规则,对信息进行解密。由于加密和解密使用同样规则(简称"密钥"),这被称为"对称加密算法"(Symmetric-keyalgorithm)。这种加密模式有一个最大弱点
- 加载资源时报错-ERR_CONNECTION_RESET,需要多次请求才能拿到资源的有效解决方案
Mebius1916
前端开发前端javascriptreact.js前端框架typescriptvue.js
初次加载资源时无法正常加载,需要多次刷新、请求才能拿到资源的有效解决方案前言在使用cloudinary进行图片上传并获取图片链接作为用户头像时发现,图片链接网址初次加载会报错:ERR_CONNECTION_RESET必须刷新几次才能获取到,原因可能是cloudinary没有国内的节点,而我用的是在新加坡的节点,所以会导致初次加载的时候被重定向。而这个错误会直接导致用户头像无法加载,因为在img中此
- 【Java】已解决:org.springframework.jdbc.datasource.lookup.DataSourceLookupFailureException
屿小夏
java开发语言
文章目录一、分析问题背景问题背景描述出现问题的场景二、可能出错的原因三、错误代码示例四、正确代码示例五、注意事项已解决:org.springframework.jdbc.datasource.lookup.DataSourceLookupFailureException在使用Spring框架进行开发时,数据源的配置和使用是非常关键的一环。然而,有时候我们可能会遇到org.springframewo
- SpringBoot和SpringMVC是什么关系?SpringBoot替代SpringMVC了吗?
瑞金彭于晏
springboot后端javaMVCspring数据库
SpringBoot和SpringMVC都是SpringFramework生态系统中的一部分,但它们各自扮演着不同的角色和提供不同的功能集。理解它们之间的关系,首先需要了解SpringFramework本身。SpringFrameworkSpringFramework是一个全面的、开源的应用程序开发框架,它提供了广泛的功能来支持企业应用开发的几乎所有方面。SpringFramework的核心特性之
- spring mvc @RequestBody String类型参数
zoyation
spring-mvcspringmvc
通过如下配置:text/html;charset=UTF-8application/json;charset=UTF-8在springmvc的Controller层使用@RequestBody接收Content-Type为application/json的数据时,默认支持Map方式和对象方式参数@RequestMapping(value="/{code}/saveUser",method=Requ
- Java -jar 如何在后台运行项目
vincent_hahaha
撸了今年阿里、头条和美团的面试,我有一个重要发现.......>>>说到运行jar包通常我们都会以下面的方式运行:java-jarspringboot-0.0.1-SNAPSHOT.jar这样运行的话会有一个问题,就是我们一关闭当前窗口就会停止运行项目,要想解决这个问题,就需要在后台运行。nohupjava-jarbabyshark-0.0.1-SNAPSHOT.jar >log.file 2>&
- spring security中几大组件的作用和执行顺序
阿信在这里
javaspring
springsecurity中几大组件的作用和执行顺序在SpringSecurity中,AuthenticationProvider、GroupPermissionEvaluator、PermissionEvaluator、AbstractAuthenticationProcessingFilter、DefaultMethodSecurityExpressionHandler和ManageSecu
- 探索Zebra4J:构建高效企业级Web应用的微服务框架
叶准鑫Natalie
探索Zebra4J:构建高效企业级Web应用的微服务框架ZebraZebra4J/Zebra4Js基于SpringBoot的JavaWeb/Nodejs框架项目地址:https://gitcode.com/gh_mirrors/zebra/Zebra项目介绍在当今快速发展的技术环境中,构建高效、可扩展的企业级Web应用是每个开发团队的追求。Zebra4J作为一款基于SpringBoot的全新微服务
- 基于JavaWeb开发的Java+SpringMvc+vue+element实现上海汽车博物馆平台
网顺技术团队
成品程序项目javavue.js汽车课程设计springboot
基于JavaWeb开发的Java+SpringMvc+vue+element实现上海汽车博物馆平台作者主页网顺技术团队欢迎点赞收藏⭐留言文末获取源码联系方式查看下方微信号获取联系方式承接各种定制系统精彩系列推荐精彩专栏推荐订阅不然下次找不到哟Java毕设项目精品实战案例《1000套》感兴趣的可以先收藏起来,还有大家在毕设选题,项目以及论文编写等相关问题都可以给我留言咨询,希望帮助更多的人文章目录基
- 分布式锁和spring事务管理
暴躁的鱼
锁及事务分布式springjava
最近开发一个小程序遇到一个需求需要实现分布式事务管理业务需求用户在使用小程序的过程中可以查看景点,对景点地区或者城市标记是否想去,那么需要统计一个地点被标记的人数,以及记录某个用户对某个地点是否标记为想去,用两个表存储数据,一个地点表记录改地点被标记的次数,一个用户意向表记录某个用户对某个地点是否标记为想去。由于可能有多个用户同时标记一个地点,每个用户在前端点击想去按钮之后,后台接收到请求,从数据
- Java面试笔记记录6
今天背八股了吗
java面试笔记
1.Spring是什么?特性?有哪些模块?Spring是一个轻量级、非入侵式的控制反转Ioc和面向切面AOP的框架。特性:1.Ioc和DISpring的核心就是一个大的工厂容器,可以维护所有对象的创建和依赖关系,Spring工厂用于生成Bean,并且管理Bean的生命周期,实现高内聚低耦合的设计理念。2.AOP编程Spring提供面向切面编程,可以方便实现对程序进行权限拦截、运行监控等切面功能。3
- Sentinel
眼泪落在琴弦
springcloudjavajava
Sentinel(服务熔断降级限流)1.引入spring-cloud-starter-alibaba-sentinel2.下载sentinel服务器3.配置application地址信息4.在控制台调整参数【默认所以流控设置保存在内存中,重启失效】5.想实时监控需每个微服务导入actuator,并配置application暴露所有端口6.自定义sentinel流控返回数据7.配置sentinel类
- Spring @Async 深度解读:默认线程池执行器的配置与优化
小码快撩
springjava前端
在Spring中,@Async注解用于异步执行方法。默认情况下,@Async注解的任务是由一个线程池执行的。然而,这个默认的线程池是如何初始化的呢?本文将深入探讨这一过程,帮助你理解Spring异步任务背后的线程池执行器的初始化原理。1.@Async的基本使用首先,让我们快速回顾一下@Async的基本用法。@Async通常用于标注在需要异步执行的方法上,比如:@Servicepublicclass
- Sentinel实时监控不展示问题
朱杰jjj
sentinelsentinel
问题官方插件Endpoint支持,可以实时统计出SpringBoot的健康状况和请求的调用信息在使用Endpoint特性之前需要在Maven中添加spring-boot-starter-actuator依赖,并在配置中允许Endpoints的访问。SpringBoot1.x中添加配置management.security.enabled=false。暴露的endpoint路径为/sentinelS
- 36. MyBatis如何支持多数据库操作?如何配置不同的数据源?
这孩子叫逆
Mybatis笔记mybatis数据库
在许多企业级应用中,可能需要访问多个数据库。MyBatis可以通过配置多个数据源和动态切换数据源来支持多数据库操作。下面介绍如何在MyBatis中配置和使用多个数据源。1.多数据源的基本配置1.1配置多个数据源要支持多个数据源,首先需要在Spring或SpringBoot中配置不同的数据源。假设我们要连接两个数据库db1和db2,可以通过以下步骤进行配置。SpringBoot示例:applicat
- Cloud Native Weekly | 华为云抢先发布Redis5.0,红帽宣布收购混合云提供商
weixin_34302561
数据库devops大数据
1——华为云抢先发布Redis5.02——DigitalOceanK8s服务正式上线3——红帽宣布收购混合云提供商NooBaa4——微软发布多项AzureKubernetes服务更新1华为云抢先发布Redis5.012月17日,华为云在DCS2.0的基础上,快人一步,抢先推出了新的Redis5.0产品,这是一个崭新的突破。目前国内在缓存领域的发展普遍停留在Redis4.0阶段,华为云率先发布了Re
- Halo 开发者指南——容器私有化部署
SHENHUANJIE
DockerHalo华为云SWRRegistry
华为云SWR私有化部署镜像构建dockerbuild-thalo-dev/halo:2.20.0.上传镜像镜像标签sudodockertag{镜像名称}:{版本名称}swr.cn-south-1.myhuaweicloud.com/{组织名称}/{镜像名称}:{版本名称}sudodockertaghalo-dev/halo:2.20.0swr.cn-south-1.myhuaweicloud.co
- SpringBoot整合ES搜索引擎 实现网站热搜词及热度计算
码踏云端
springbootElasticsearchspringbootelasticsearch后端热搜词热度计算java
博主简介:历代文学网(PC端可以访问:https://literature.sinhy.com/#/literature?__c=1000,移动端可微信小程序搜索“历代文学”)总架构师,15年工作经验,精通Java编程,高并发设计,Springboot和微服务,熟悉Linux,ESXI虚拟化以及云原生Docker和K8s,热衷于探索科技的边界,并将理论知识转化为实际应用。保持对新技术的好奇心,乐于
- Spring Security静态资源过滤(11)
小黑屋说YYDS
spring
在一个实际项目中,并非所有的请求都需要经过SpringSecurity过滤器,有一些特殊的请求,例如静态资源等,一般来说并不需要经过SpringSecurity过滤器链,用户如果访问这些静态资源,直接返回对应的资源即可。回顾关于WebSecurity的讲解,提到它里边维护了一个ignoredRequests变量,该变量,记录的就是所有需要被忽略的请求,这些被忽略的请求将不再经过SpringSecu
- Spring Security定义多个过滤器链(10)
小黑屋说YYDS
spring
在SpringSecurity中可以同时存在多个过滤器链,一个WebSecurityConfigurerAdapter的实例就可以配置一条过滤器链。我们来看如下一个案例:@ConfigurationpublicclassSecurityConfig{@BeanUserDetailsServiceus(){InMemoryUserDetailsManagerusers=newInMemoryUser
- java 技术 架构 相关文档
圣心
java架构开发语言
在Java中,有许多不同的技术和架构,这里我将列举一些常见的Java技术和架构,并提供一些相关的文档资源。SpringFrameworkSpring是一个开源的Java/JavaEE全功能框架,以Apache许可证形式发布,提供了一种实现企业级应用的方法。官方文档:SpringFrameworkSpringBootSpringBoot是Spring的一个子项目,旨在简化创建生产级的Spring应用
- Python国内常用镜像源和使用方法
wfqlt163
Python基础操作python开发语言
常用的镜像源:1、企业镜像:豆瓣https://pypi.doubanio.com/simple/网易https://mirrors.163.com/pypi/simple/阿里云https://mirrors.aliyun.com/pypi/simple/腾讯云https://mirrors.cloud.tencent.com/pypi/simple2、高校镜像:清华大学(推荐):https:/
- 二分查找排序算法
周凡杨
java二分查找排序算法折半
一:概念 二分查找又称
折半查找(
折半搜索/
二分搜索),优点是比较次数少,查找速度快,平均性能好;其缺点是要求待查表为有序表,且插入删除困难。因此,折半查找方法适用于不经常变动而 查找频繁的有序列表。首先,假设表中元素是按升序排列,将表中间位置记录的关键字与查找关键字比较,如果两者相等,则查找成功;否则利用中间位置记录将表 分成前、后两个子表,如果中间位置记录的关键字大于查找关键字,则进一步
- java中的BigDecimal
bijian1013
javaBigDecimal
在项目开发过程中出现精度丢失问题,查资料用BigDecimal解决,并发现如下这篇BigDecimal的解决问题的思路和方法很值得学习,特转载。
原文地址:http://blog.csdn.net/ugg/article/de
- Shell echo命令详解
daizj
echoshell
Shell echo命令
Shell 的 echo 指令与 PHP 的 echo 指令类似,都是用于字符串的输出。命令格式:
echo string
您可以使用echo实现更复杂的输出格式控制。 1.显示普通字符串:
echo "It is a test"
这里的双引号完全可以省略,以下命令与上面实例效果一致:
echo Itis a test 2.显示转义
- Oracle DBA 简单操作
周凡杨
oracle dba sql
--执行次数多的SQL
select sql_text,executions from (
select sql_text,executions from v$sqlarea order by executions desc
) where rownum<81;
&nb
- 画图重绘
朱辉辉33
游戏
我第一次接触重绘是编写五子棋小游戏的时候,因为游戏里的棋盘是用线绘制的,而这些东西并不在系统自带的重绘里,所以在移动窗体时,棋盘并不会重绘出来。所以我们要重写系统的重绘方法。
在重写系统重绘方法时,我们要注意一定要调用父类的重绘方法,即加上super.paint(g),因为如果不调用父类的重绘方式,重写后会把父类的重绘覆盖掉,而父类的重绘方法是绘制画布,这样就导致我们
- 线程之初体验
西蜀石兰
线程
一直觉得多线程是学Java的一个分水岭,懂多线程才算入门。
之前看《编程思想》的多线程章节,看的云里雾里,知道线程类有哪几个方法,却依旧不知道线程到底是什么?书上都写线程是进程的模块,共享线程的资源,可是这跟多线程编程有毛线的关系,呜呜。。。
线程其实也是用户自定义的任务,不要过多的强调线程的属性,而忽略了线程最基本的属性。
你可以在线程类的run()方法中定义自己的任务,就跟正常的Ja
- linux集群互相免登陆配置
林鹤霄
linux
配置ssh免登陆
1、生成秘钥和公钥 ssh-keygen -t rsa
2、提示让你输入,什么都不输,三次回车之后会在~下面的.ssh文件夹中多出两个文件id_rsa 和 id_rsa.pub
其中id_rsa为秘钥,id_rsa.pub为公钥,使用公钥加密的数据只有私钥才能对这些数据解密 c
- mysql : Lock wait timeout exceeded; try restarting transaction
aigo
mysql
原文:http://www.cnblogs.com/freeliver54/archive/2010/09/30/1839042.html
原因是你使用的InnoDB 表类型的时候,
默认参数:innodb_lock_wait_timeout设置锁等待的时间是50s,
因为有的锁等待超过了这个时间,所以抱错.
你可以把这个时间加长,或者优化存储
- Socket编程 基本的聊天实现。
alleni123
socket
public class Server
{
//用来存储所有连接上来的客户
private List<ServerThread> clients;
public static void main(String[] args)
{
Server s = new Server();
s.startServer(9988);
}
publi
- 多线程监听器事件模式(一个简单的例子)
百合不是茶
线程监听模式
多线程的事件监听器模式
监听器时间模式经常与多线程使用,在多线程中如何知道我的线程正在执行那什么内容,可以通过时间监听器模式得到
创建多线程的事件监听器模式 思路:
1, 创建线程并启动,在创建线程的位置设置一个标记
2,创建队
- spring InitializingBean接口
bijian1013
javaspring
spring的事务的TransactionTemplate,其源码如下:
public class TransactionTemplate extends DefaultTransactionDefinition implements TransactionOperations, InitializingBean{
...
}
TransactionTemplate继承了DefaultT
- Oracle中询表的权限被授予给了哪些用户
bijian1013
oracle数据库权限
Oracle查询表将权限赋给了哪些用户的SQL,以备查用。
select t.table_name as "表名",
t.grantee as "被授权的属组",
t.owner as "对象所在的属组"
- 【Struts2五】Struts2 参数传值
bit1129
struts2
Struts2中参数传值的3种情况
1.请求参数绑定到Action的实例字段上
2.Action将值传递到转发的视图上
3.Action将值传递到重定向的视图上
一、请求参数绑定到Action的实例字段上以及Action将值传递到转发的视图上
Struts可以自动将请求URL中的请求参数或者表单提交的参数绑定到Action定义的实例字段上,绑定的规则使用ognl表达式语言
- 【Kafka十四】关于auto.offset.reset[Q/A]
bit1129
kafka
I got serveral questions about auto.offset.reset. This configuration parameter governs how consumer read the message from Kafka when there is no initial offset in ZooKeeper or
- nginx gzip压缩配置
ronin47
nginx gzip 压缩范例
nginx gzip压缩配置 更多
0
nginx
gzip
配置
随着nginx的发展,越来越多的网站使用nginx,因此nginx的优化变得越来越重要,今天我们来看看nginx的gzip压缩到底是怎么压缩的呢?
gzip(GNU-ZIP)是一种压缩技术。经过gzip压缩后页面大小可以变为原来的30%甚至更小,这样,用
- java-13.输入一个单向链表,输出该链表中倒数第 k 个节点
bylijinnan
java
two cursors.
Make the first cursor go K steps first.
/*
* 第 13 题:题目:输入一个单向链表,输出该链表中倒数第 k 个节点
*/
public void displayKthItemsBackWard(ListNode head,int k){
ListNode p1=head,p2=head;
- Spring源码学习-JdbcTemplate queryForObject
bylijinnan
javaspring
JdbcTemplate中有两个可能会混淆的queryForObject方法:
1.
Object queryForObject(String sql, Object[] args, Class requiredType)
2.
Object queryForObject(String sql, Object[] args, RowMapper rowMapper)
第1个方法是只查
- [冰川时代]在冰川时代,我们需要什么样的技术?
comsci
技术
看美国那边的气候情况....我有个感觉...是不是要进入小冰期了?
那么在小冰期里面...我们的户外活动肯定会出现很多问题...在室内呆着的情况会非常多...怎么在室内呆着而不发闷...怎么用最低的电力保证室内的温度.....这都需要技术手段...
&nb
- js 获取浏览器型号
cuityang
js浏览器
根据浏览器获取iphone和apk的下载地址
<!DOCTYPE html>
<html>
<head>
<meta charset="utf-8" content="text/html"/>
<meta name=
- C# socks5详解 转
dalan_123
socketC#
http://www.cnblogs.com/zhujiechang/archive/2008/10/21/1316308.html 这里主要讲的是用.NET实现基于Socket5下面的代理协议进行客户端的通讯,Socket4的实现是类似的,注意的事,这里不是讲用C#实现一个代理服务器,因为实现一个代理服务器需要实现很多协议,头大,而且现在市面上有很多现成的代理服务器用,性能又好,
- 运维 Centos问题汇总
dcj3sjt126com
云主机
一、sh 脚本不执行的原因
sh脚本不执行的原因 只有2个
1.权限不够
2.sh脚本里路径没写完整。
二、解决You have new mail in /var/spool/mail/root
修改/usr/share/logwatch/default.conf/logwatch.conf配置文件
MailTo =
MailFrom
三、查询连接数
- Yii防注入攻击笔记
dcj3sjt126com
sqlWEB安全yii
网站表单有注入漏洞须对所有用户输入的内容进行个过滤和检查,可以使用正则表达式或者直接输入字符判断,大部分是只允许输入字母和数字的,其它字符度不允许;对于内容复杂表单的内容,应该对html和script的符号进行转义替换:尤其是<,>,',"",&这几个符号 这里有个转义对照表:
http://blog.csdn.net/xinzhu1990/articl
- MongoDB简介[一]
eksliang
mongodbMongoDB简介
MongoDB简介
转载请出自出处:http://eksliang.iteye.com/blog/2173288 1.1易于使用
MongoDB是一个面向文档的数据库,而不是关系型数据库。与关系型数据库相比,面向文档的数据库不再有行的概念,取而代之的是更为灵活的“文档”模型。
另外,不
- zookeeper windows 入门安装和测试
greemranqq
zookeeper安装分布式
一、序言
以下是我对zookeeper 的一些理解: zookeeper 作为一个服务注册信息存储的管理工具,好吧,这样说得很抽象,我们举个“栗子”。
栗子1号:
假设我是一家KTV的老板,我同时拥有5家KTV,我肯定得时刻监视
- Spring之使用事务缘由(2-注解实现)
ihuning
spring
Spring事务注解实现
1. 依赖包:
1.1 spring包:
spring-beans-4.0.0.RELEASE.jar
spring-context-4.0.0.
- iOS App Launch Option
啸笑天
option
iOS 程序启动时总会调用application:didFinishLaunchingWithOptions:,其中第二个参数launchOptions为NSDictionary类型的对象,里面存储有此程序启动的原因。
launchOptions中的可能键值见UIApplication Class Reference的Launch Options Keys节 。
1、若用户直接
- jdk与jre的区别(_)
macroli
javajvmjdk
简单的说JDK是面向开发人员使用的SDK,它提供了Java的开发环境和运行环境。SDK是Software Development Kit 一般指软件开发包,可以包括函数库、编译程序等。
JDK就是Java Development Kit JRE是Java Runtime Enviroment是指Java的运行环境,是面向Java程序的使用者,而不是开发者。 如果安装了JDK,会发同你
- Updates were rejected because the tip of your current branch is behind
qiaolevip
学习永无止境每天进步一点点众观千象git
$ git push joe prod-2295-1
To
[email protected]:joe.le/dr-frontend.git
! [rejected] prod-2295-1 -> prod-2295-1 (non-fast-forward)
error: failed to push some refs to '
[email protected]
- [一起学Hive]之十四-Hive的元数据表结构详解
superlxw1234
hivehive元数据结构
关键字:Hive元数据、Hive元数据表结构
之前在 “[一起学Hive]之一–Hive概述,Hive是什么”中介绍过,Hive自己维护了一套元数据,用户通过HQL查询时候,Hive首先需要结合元数据,将HQL翻译成MapReduce去执行。
本文介绍一下Hive元数据中重要的一些表结构及用途,以Hive0.13为例。
文章最后面,会以一个示例来全面了解一下,
- Spring 3.2.14,4.1.7,4.2.RC2发布
wiselyman
Spring 3
Spring 3.2.14、4.1.7及4.2.RC2于6月30日发布。
其中Spring 3.2.1是一个维护版本(维护周期到2016-12-31截止),后续会继续根据需求和bug发布维护版本。此时,Spring官方强烈建议升级Spring框架至4.1.7 或者将要发布的4.2 。
其中Spring 4.1.7主要包含这些更新内容。