基于Spring Boot2 + Spring Security OAuth2 实现单点登陆(一)
放几个阿里云的优惠链接 代金券 / 高性能服务器2折起 / 高性能服务器5折
关于OAuth2的基本介绍:点这里
Spring Security 5.0开始对密码相关内容做了修改,具体查看这里
实现一个最基本的OAuth2认证
项目使用3个独立的工程分别实现认证服务、资源服务器和单点登陆服务器
源码地址
添加项目依赖
allprojects {
    apply plugin: 'idea'
    apply plugin: 'java'
}
buildscript {
    ext {
        springBootVersion = '2.0.0.RELEASE'
    }
    repositories {
        maven { url 'http://maven.aliyun.com/mvn/repository/' }
        mavenCentral()
    }
    dependencies {
        classpath("org.springframework.boot:spring-boot-gradle-plugin:${springBootVersion}")
    }
}

subprojects {
    apply plugin: 'java'
    apply plugin: 'org.springframework.boot'
    apply plugin: 'io.spring.dependency-management'
    repositories {
        maven { url 'http://maven.aliyun.com/mvn/repository/' }
        mavenCentral()
    }
}
project("sso-auth-server") {
    dependencies {
        compile 'org.springframework.boot:spring-boot-starter-web'
        compile 'org.springframework.boot:spring-boot-starter-security'
        compile 'org.springframework.security.oauth.boot:spring-security-oauth2-autoconfigure:2.0.0.RELEASE'
    }
}


project("sso-auth-client") {
    dependencies {
        compile 'org.springframework.boot:spring-boot-starter-web'
        compile 'org.springframework.boot:spring-boot-starter-security'
        compile 'org.springframework.security.oauth.boot:spring-security-oauth2-autoconfigure:2.0.0.RELEASE'
    }
}

project("sso-auth-resource") {
    dependencies {
        compile 'org.springframework.boot:spring-boot-starter-web'
        compile 'org.springframework.boot:spring-boot-starter-security'
        compile 'org.springframework.security.oauth.boot:spring-security-oauth2-autoconfigure:2.0.0.RELEASE'
    }
}
认证服务器配置
- 使用EnableAuthorizationServer注解开启认证服务
@SpringBootApplication
@EnableAuthorizationServer
public class AuthenticationApplication {

    public static void main(String[] args) {
        new SpringApplicationBuilder(AuthenticationApplication.class)
                .run(args);
    }

}
- 使用EnableWebSecurity注解开启权限验证,并做相关配置
@EnableWebSecurity
public class Oauth2SecurityConfig extends WebSecurityConfigurerAdapter {
    // 配置这个bean会在做AuthorizationServerConfigurer配置的时候使用
    @Bean
    @Override
    public AuthenticationManager authenticationManagerBean() throws Exception {
        return super.authenticationManagerBean();
    }

    @Override
    protected void configure(AuthenticationManagerBuilder auth) throws Exception {
        auth.inMemoryAuthentication()
                .withUser("admin")
                .password(PasswordEncoderFactories.createDelegatingPasswordEncoder().encode("admin"))
                .roles("test")
        ;
    }
}
- Oauth2相关配置
@Configuration
public class Oauth2Config extends AuthorizationServerConfigurerAdapter {
    @Autowired
    private AuthenticationManager authenticationManager;

    @Override
    public void configure(AuthorizationServerSecurityConfigurer security) throws Exception {
        /* 配置token获取合验证时的策略 */
        security.tokenKeyAccess("permitAll()").checkTokenAccess("isAuthenticated()");
    }

    @Override
    public void configure(ClientDetailsServiceConfigurer clients) throws Exception {
        // 配置oauth2的 client信息
        // authorizedGrantTypes 有4种,这里只开启2种
        // secret密码配置从 Spring Security 5.0开始必须以 {bcrypt}+加密后的密码 这种格式填写
        clients.inMemory()
                .withClient("testclient")
                .secret(PasswordEncoderFactories.createDelegatingPasswordEncoder().encode("testclient"))
                .scopes("test").authorizedGrantTypes("authorization_code", "refresh_token");
    }

    @Override
    public void configure(AuthorizationServerEndpointsConfigurer endpoints) throws Exception {
        // 配置tokenStore
        endpoints.authenticationManager(authenticationManager).tokenStore(memoryTokenStore());
    }
    // 使用最基本的InMemoryTokenStore生成token
    @Bean
    public TokenStore memoryTokenStore() {
        return new InMemoryTokenStore();
    }

}
资源服务器配置
- 使用EnableResourceServer注解开启资源服务
@SpringBootApplication
@EnableResourceServer
@RestController
public class ResourceApplication {
    private static final Logger log = LoggerFactory.getLogger(ResourceApplication.class);

    public static void main(String[] args) {
        new SpringApplicationBuilder(ResourceApplication.class)
                .run(args);
    }
    // 添加一个测试访问接口
    @GetMapping("/user")
    public Authentication getUser(Authentication authentication) {
        log.info("resource: user {}", authentication);
        return authentication;
    }

}
- 配置oauth2客户端信息
auth-server: http://localhost:8080 # 认证服务器地址

server:
  port: 8086
security:
  oauth2:
    client:
      client-id: testclient # 授权服务器配置的client id
      client-secret: testclient # 授权服务器配置的client secret
      scope: test
      access-token-uri: ${auth-server}/oauth/token # 获取access token接口
      user-authorization-uri: ${auth-server}/oauth/authorize #  获取Authorization Code接口
    resource:
      token-info-uri: ${auth-server}/oauth/check_token # 验证token的接口
#      user-info-uri: ${auth-server}/user # 一个可以获取认证授权的自定义接口,可以在授权服务器,也可以在其他服务器上
#      prefer-token-info: true # 如果同时配置了token-info-uri 和 user-info-uri,这个现象设置使用哪个取验证授权
配置单点登陆服务器
- 使用EnableOAuth2Sso注解配置sso服务
@EnableOAuth2Sso
@SpringBootApplication
@RestController
public class SsoApplication {
    private static final Logger log = LoggerFactory.getLogger(SsoApplication.class);

    public static void main(String[] args) {
        new SpringApplicationBuilder(SsoApplication.class)
                .run(args);
    }
    // sso测试接口
    @GetMapping("/user")
    public Authentication getUser(Authentication authentication) {
        log.info("auth : {}", authentication);
        return authentication;

    }
}
- 配置oauth2客户端信息
auth-server: http://localhost:8080 # 认证服务器地址

server:
  port: 8085
security:
  oauth2:
    client:
      client-id: testclient
      client-secret: testclient
      scope: test
      access-token-uri: ${auth-server}/oauth/token
      user-authorization-uri: ${auth-server}/oauth/authorize
    resource:
      token-info-uri: ${auth-server}/oauth/check_token
具体内容与资源服务器相同
sso 使用方式
- 启动sso-auth-server
- 启动sso-auth-client
- 访问 http://127.0.0.1:8085/user sso再域名相同时浏览器会使用同一个cookie导致页面一直再login页重定向,所以需要把认证服务器和sso客户端设置为不同域名下启动。

资源服务器使用
- 启动sso-auth-server
- 启动sso-auth-resource
- 使用oauth2协议获取sso-auth-server上的token,可以使用postman之类的工具。
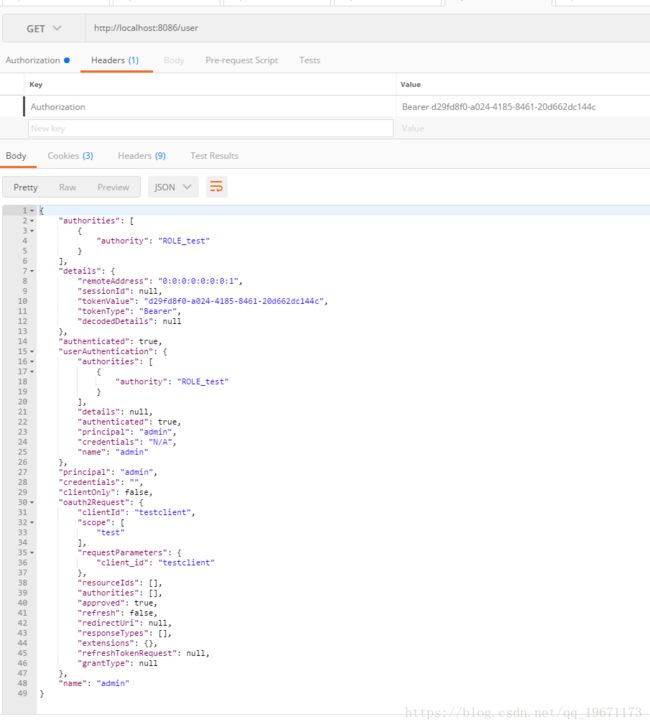
- 访问token资源服务器,例如 http://localhost:8086/user?access_token=cd96398b-4565-43dc-941f-c71f51010ee5
在postman里选择Authorization -> Type -> OAuth2.0

点击Get New Access Token 配置oauth信息
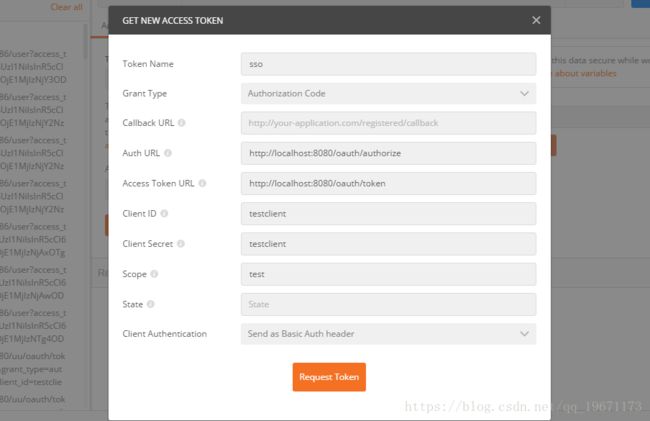
获取token后访问资源