Filebeat的架构分析、配置解释与示例
https://www.linuxidc.com/Linux/2016-10/135850.htm
写在前边的话
在看filebeat之前我们先来看下Beats,Beats 平台是 Elastic.co 从 packetbeat 发展出来的数据收集器系统。beat 收集器可以直接写入 Elasticsearch,也可以传输给 Logstash。其中抽象出来的 libbeat,提供了统一的数据发送方法,输入配置解析,日志记录框架等功能。也就是说,所有的 beat 工具,在配置上,除了 input 以外,在output、filter、shipper、logging、run-options 上的配置规则都是完全一致的
而这里的filebeat就是beats 的一员,目前beat可以发送数据给Elasticsearch,Logstash,File,Console四个目的地址。filebeat 是基于原先 logstash-forwarder 的源码改造出来的。换句话说:filebeat 就是新版的 logstash-forwarder,也会是 ELK Stack 在 shipper 端的第一选择。
Filebeat的架构设计
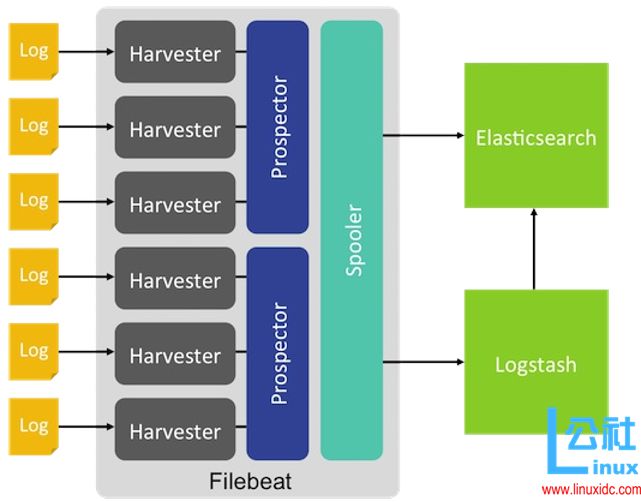
当我们安装完filebeat之后,我们可以在filebeat的安装目录下看到两个文件
- filebeat.template.json (输出的文件格式,在filebeat的template中指定,当服务启动时,会被加载)
- filebeat.yml(所有的配置都在该文件下进行)
整体架构理解:
上边我们也说了filebeat是用来收集日志的,那么在filebeat.yml中会配置指定的监听文件,也就是上图中的一个个log,这个log的目录是在prospectors中设置,在看配置文件的时候便可以很明白的看出来,对于prospectors定位每个日志文件,Filebeat启动harvester。每个harvester读取新的内容一个日志文件,新的日志数据发送到spooler(后台处理程序),它汇集的事件和聚合数据发送到你已经配置了Filebeat输出。
环境准备
要开始使用自己的Filebeat设置,安装和配置这些相关产品:
- Elasticsearch存储和索引数据。
- Kibana为UI。
- Logstash(可选)将数据插入到Elasticsearch。
具体配置可参考:http://www.linuxidc.com/Linux/2016-10/135849.htm
部署filebeat
deb:
curl -L -O https://download.elastic.co/beats/filebeat/filebeat_1.3.1_amd64.deb
sudo dpkg -i filebeat_1.3.1_amd64.deb
rpm:
curl -L -O https://download.elastic.co/beats/filebeat/filebeat-1.0.1-x86_64.rpm
sudo rpm -vi filebeat-1.0.1-x86_64.rpm
mac:
curl -L -O https://download.elastic.co/beats/filebeat/filebeat-1.3.1-darwin.tgz
tar xzvf filebeat-1.3.1-darwin.tgz
win:
- 下载windows zip文件 点击下载.
- 解压文件到 C:\Program Files.
- 重命名为 Filebeat.
- 打开PowerShell提示符作为管理员(右键单击PowerShell的图标,并选择以管理员身份运行)。如果您运行的是Windows XP,则可能需要下载并安装PowerShell
-
运行以下命令来安装Filebeat作为Windows服务
cd ‘C:\Program Files\Filebeat’
C:\Program Files\Filebeat> .\install-service-filebeat.ps1
在启动filebeat服务之前,需要先修改配置文件,接下来我们看下配置文件
配置解析
上边我么也说了FileBeat的四种输出方式为输出到Elasticsearch,logstash,file和console,下面我们具体看下示例
PS:
- 这里说的是需要修改的配置文件,没有提的就是不需要修改
- 每次修改完配置文件都需要重启filebeat服务
- 这里不要追究时间的问题,小主是测试,主要是为了方便记录
这里主要是自定义监听文件的路劲,我设置的是/opt/elk/log/*.log
然后在filebeat.yml中的prospectors路径设置如下(该配置为以下四种方式通用)
paths:
- /opt/elk/log/*.log
1:output of Elasticsearch
filebeat.yml中output的配置将除了es之外注释掉
output
  elasticsearch:
    hosts: ["192.168.197.128:9200"]  #es的ip地址和端口,如果有多个,中间用逗号分隔
    worker: 1             #对应es的个数
    index: "filebeat"     #索引根名称
    template:
      name: "filebeat"    #模板名字和对应的json文件
      path: "filebeat.template.json"
    max_retries: 3         #发送到特定logstash的最大尝试次数。如果达到该次数仍不成功,事件将被丢弃。默认是3,值0表示禁用重试。值小于0将无限重试知道事件已经发布。

    bulk_max_size: 20000   #单个elasticsearch批量API索引请求的最大事件数。默认是50
    timeout: 90          #elasticsearch请求超时事件。默认90秒
    flush_interval: 5    #新事件两个批量API索引请求之间需要等待的秒数。如果bulk_max_size在该值之前到达,额外的批量索引请求生效。
往log文件中追加日志
echo “123456789” >> test1.log
2:output of logstash
filebeat.yml中output的配置将除了logstash之外注释掉
output:
    logstash:
        hosts: ["192.168.197.130:5044"]
        worker: 2
        loadbalance: true
        index: filebeat

这里  worker  的含义,是 beat 连到每个 host 的线程数。
在  loadbalance  开启的情况下,意味着有 4 个worker 轮训发送数据
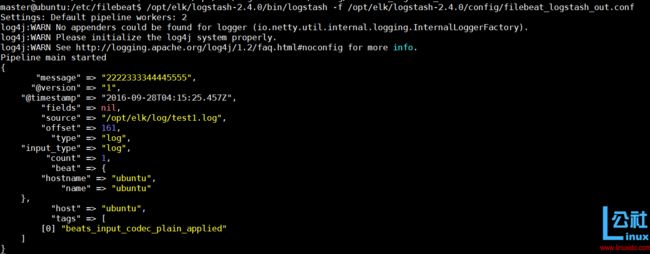
则对应的logstash配置,编写一个配置文件
sudo vim filebeat_logstash_out.conf
beat 写入 Logstash 时,会配合 Logstash-1.5 后新增的 metadata 特性。将 beat 名和 type 名 记录在 metadata 里。所以对应的 Logstash 配置应该是这样:
input {
    beats {
        port => 5044
    }
}
output {
    elasticsearch {
        hosts => ["http://192.168.197.128:9200"]
        index => "%{[@metadata][beat]}-%{+YYYY.MM.dd}"
        document_type => "%{[@metadata][type]}"
    }
    stdout{
        codec=>rubydebug
    }
}
启动conf
bin/logstash -f config/filebeat_logstash_out.conf
往log文件中追加日志
echo “2222333344445555” >> test1.log
3:output of File
filebeat.yml中output的配置将除了file之外注释掉
output:
  file:
    path: "/opt/elk/log/filebeat_output_file"
    filename: filebeat
    rotate_every_kb: 10000
    number_of_files: 7
往log文件中追加日志:
echo “this is filebeat output of file” >> test1.log
4:output of Console
filebeat.yml中output的配置将除了cosnsole之外注释掉
output:
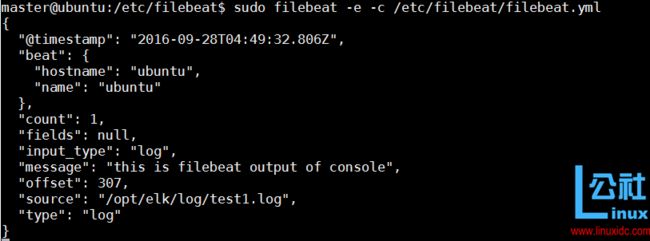
  console:
    pretty: true
重启启动服务:
sudo filebeat -e -c /etc/filebeat/filebeat.yml
往log文件中追加日志:
echo “this is filebeat output of console” >> test1.log
ELK+Filebeat的Demo
1:在/opt/elk/log目录下有三个文件分别是test1.log,test2.log,test3.log**
2:通过Python脚本往三个文件中追加内容,内容格式如下:
| name | age | address | company |
| aa | 23 | beijing | alibaba |
Python的脚本内容如下:
#-*-coding:utf-8-*-

name_list = ['aa','bb','cc','dd','ee']
addr_list = ['beijing','shanghai','guangzhou']
company_list =['baidu','tengxun','alibb']

import random
import time

def get_name():
    return name_list[random.randint(0,4)]

def get_age():
    return random.randint(20,25)

def get_addr():
    return addr_list[random.randint(0,2)]

def get_comp():
    return company_list[random.randint(0,2)]

if __name__=="__main__":
    while True:
        print("%s %s %s %s"%(get_name(),get_age(),get_addr(),get_comp()))
        str_line = get_name()+" "+str(get_age())+" "+get_addr()+" "+get_comp()
        import os
        os.system("echo %s >> test1.log" % str_line)
        time.sleep(1)
3:filebeat 的配置文件使用output=logstash
filebeat.yml
output:
    logstash:
        hosts: ["192.168.197.130:5044"]
        worker: 2
        loadbalance: true
        index: filebeat
4:filebeat_logstash_out.conf
input {
    beats {
        port => 5044
    }
}

filter{
  if [type] == 'log'{
    grok{
        match=>{
            "message"=>"%{WORD:username} %{WORD:age} %{WORD:address} %{WORD:company}"
            }
    }
  }
}

output {
    elasticsearch {
        hosts => ["http://192.168.197.128:9200"]
        index => "%{[@metadata][beat]}-%{+YYYY.MM}"
        document_type => "%{[@metadata][type]}"
    }
    stdout{
        codec=>rubydebug
    }
}
5:启动服务
- 启动python脚本
- 启动conf配置文件
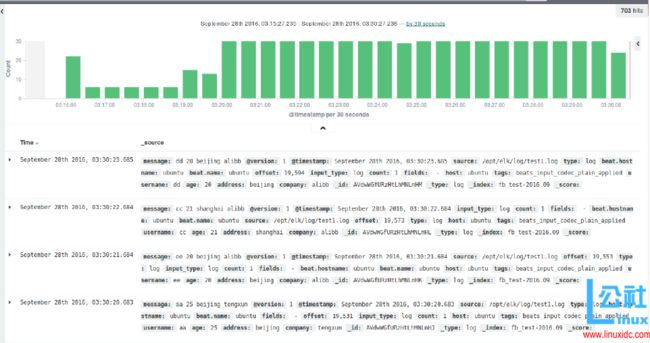
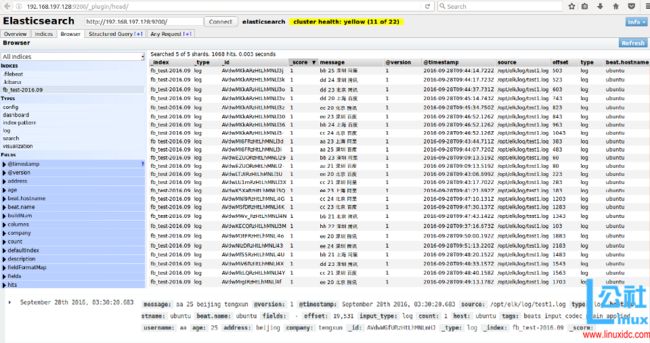
6:web查看结果
END
本文永久更新链接地址:http://www.linuxidc.com/Linux/2016-10/135850.htm

