使用TensorFlow实现卷积与反卷积详细过程
卷积操作
tf.nn.conv2d(input, filter, strides, padding, use_cudnn_on_gpu=None, name=None)除去name参数用以指定该操作的name,与方法有关的一共五个参数:
- input:
指需要做卷积的输入图像,它要求是一个Tensor,具有[batch, in_height, in_width, in_channels]这样的shape,具体含义是[训练时一个batch的图片数量, 图片高度, 图片宽度, 图像通道数],注意这是一个4维的Tensor,要求类型为float32和float64其中之一; - filter:
相当于CNN中的卷积核,它要求是一个Tensor,具有[filter_height, filter_width, in_channels, out_channels]这样的shape,具体含义是[卷积核的高度,卷积核的宽度,图像通道数,卷积核个数],要求类型与参数input相同,有一个地方需要注意,第三维in_channels,就是参数input的第四维; - strides:
卷积时在图像每一维的步长,这是一个一维的向量,长度4 - padding: string类型的量,只能是”SAME”,”VALID”其中之一,这个值决定了不同的卷积方式
- use_cudnn_on_gpu:
bool类型,是否使用cudnn加速,默认为true
结果返回一个Tensor,这个输出,就是我们常说的feature map
实现
那么TensorFlow的卷积具体是怎样实现的呢,用一些例子去解释它:
1.考虑一种最简单的情况,现在有一张3×3单通道的图像(对应的shape:[1,3,3,1]),用一个1×1的卷积核(对应的shape:[1,1,1,1])去做卷积,最后会得到一张3×3的feature map;
2.增加图片的通道数,使用一张3×3五通道的图像(对应的shape:[1,3,3,5]),用一个1×1的卷积核(对应的shape:[1,1,1,1])去做卷积,仍然是一张3×3的feature map,这就相当于每一个像素点,卷积核都与该像素点的每一个通道做点积;
input = tf.Variable(tf.random_normal([1,3,3,5]))
filter = tf.Variable(tf.random_normal([1,1,5,1]))

op = tf.nn.conv2d(input, filter, strides=[1, 1, 1, 1], padding='VALID')
3.把卷积核扩大,现在用3×3的卷积核做卷积,最后的输出是一个值,相当于情况2的feature map所有像素点的值求和
input = tf.Variable(tf.random_normal([1,3,3,5]))
filter = tf.Variable(tf.random_normal([3,3,5,1]))

op = tf.nn.conv2d(input, filter, strides=[1, 1, 1, 1], padding='VALID')
4.使用更大的图片将情况2的图片扩大到5×5,仍然是3×3的卷积核,令步长为1,输出3×3的feature map
.....
.xxx.
.xxx.
.xxx.
.....5.上面我们一直令参数padding的值为‘VALID’(不填充),当其为‘SAME’时(关于两种方式,参考链接),表示卷积核可以停留在图像边缘,如下,输出5×5的feature map
input = tf.Variable(tf.random_normal([1,5,5,5]))
filter = tf.Variable(tf.random_normal([3,3,5,1]))

op = tf.nn.conv2d(input, filter, strides=[1, 1, 1, 1], padding='SAME')
6.如果卷积核有多个
input = tf.Variable(tf.random_normal([1,5,5,5]))
filter = tf.Variable(tf.random_normal([3,3,5,7]))

op = tf.nn.conv2d(input, filter, strides=[1, 1, 1, 1], padding='SAME')
此时输出7张5×5的feature map
7.步长不为1的情况,文档里说了对于图片,因为只有两维,通常strides取[1,stride,stride,1]
input = tf.Variable(tf.random_normal([1,5,5,5]))
filter = tf.Variable(tf.random_normal([3,3,5,7]))

op = tf.nn.conv2d(input, filter, strides=[1, 2, 2, 1], padding='SAME')
8.如果batch值不为1,同时输入10张图
input = tf.Variable(tf.random_normal([10,5,5,5]))
filter = tf.Variable(tf.random_normal([3,3,5,7]))

op = tf.nn.conv2d(input, filter, strides=[1, 2, 2, 1], padding='SAME')
每张图,都有7张3×3的feature map,输出的shape就是[10,3,3,7]
反卷积
conv2d_transpose(value, filter, output_shape, strides, padding="SAME",
data_format="NHWC", name=None)
除去name参数用以指定该操作的name,与方法有关的一共六个参数:
- 第一个参数value:
指需要做反卷积的输入图像,它要求是一个Tensor - 第二个参数filter:
卷积核,它要求是一个Tensor,具有[filter_height, filter_width, out_channels, in_channels]这样的shape,具体含义是[卷积核的高度,卷积核的宽度,卷积核个数,图像通道数] - 第三个参数output_shape:
反卷积操作输出的shape,细心的同学会发现卷积操作是没有这个参数的,那这个参数在这里有什么用呢?下面会解释这个问题 - 第四个参数strides:
反卷积时在图像每一维的步长,这是一个一维的向量,长度4 - 第五个参数padding:
string类型的量,只能是”SAME”,”VALID”其中之一,这个值决定了不同的卷积方式 - 第六个参数data_format:
string类型的量,’NHWC’和’NCHW’其中之一,这是tensorflow新版本中新加的参数,它说明了value参数的数据格式。‘NHWC’指tensorflow标准的数据格式[batch, height, width, in_channels],‘NCHW’指Theano的数据格式,[batch, in_channels,height, width],当然默认值是’NHWC’
首先定义一个单通道图和3个卷积核
x1 = tf.constant(1.0, shape=[1,3,3,1])
kernel = tf.constant(1.0, shape=[3,3,3,1])
再定义一些图
x2 = tf.constant(1.0, shape=[1,6,6,3])
x3 = tf.constant(1.0, shape=[1,5,5,3])
x2是6×6的3通道图,x3是5×5的3通道图
好了,接下来对x3做一次卷积操作
y2 = tf.nn.conv2d(x3, kernel, strides=[1,2,2,1], padding="SAME") 所以返回的y2是一个单通道的图,如果你了解卷积过程,很容易看出来y2是[1,3,3,1]的Tensor,y2的结果如下:
[[[[ 12.]
   [ 18.]
   [ 12.]]

  [[ 18.]
   [ 27.]
   [ 18.]]

  [[ 12.]
   [ 18.]
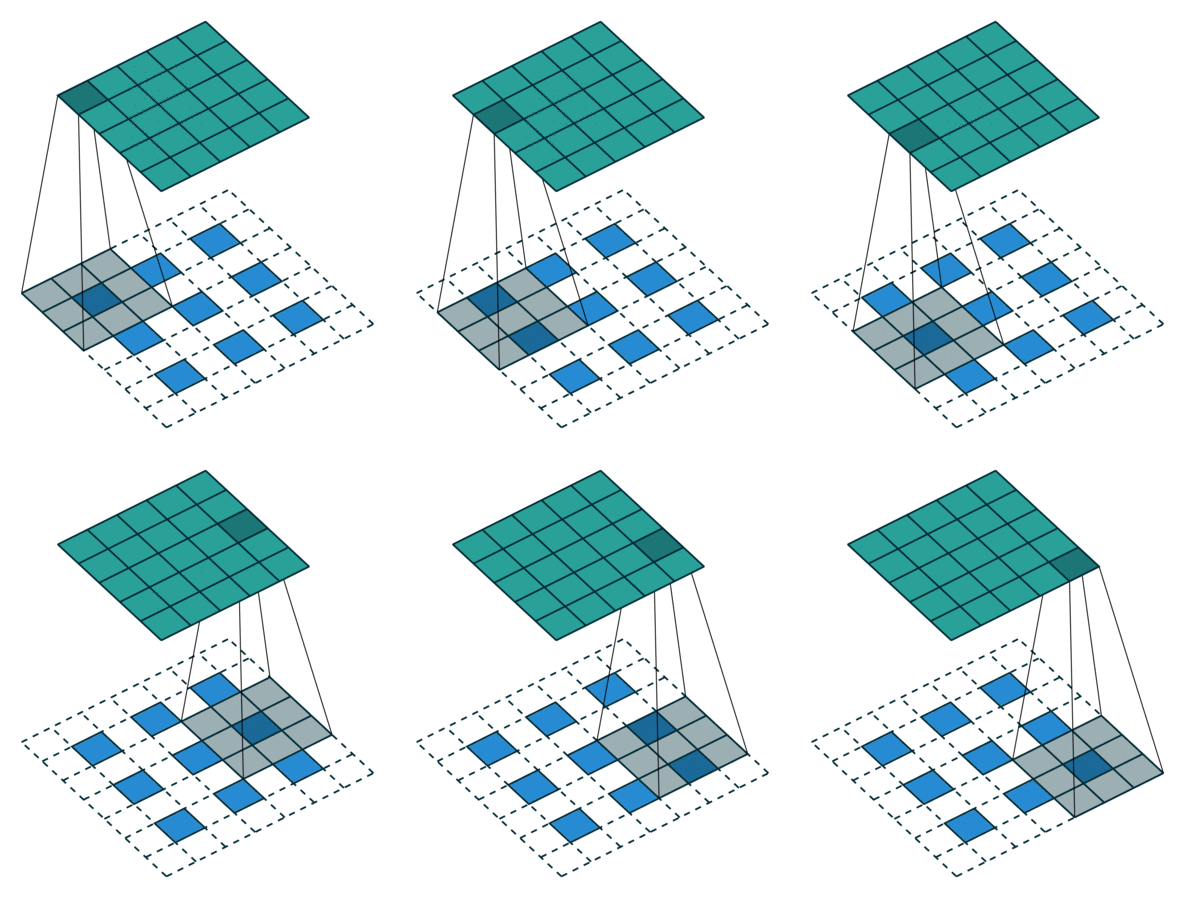
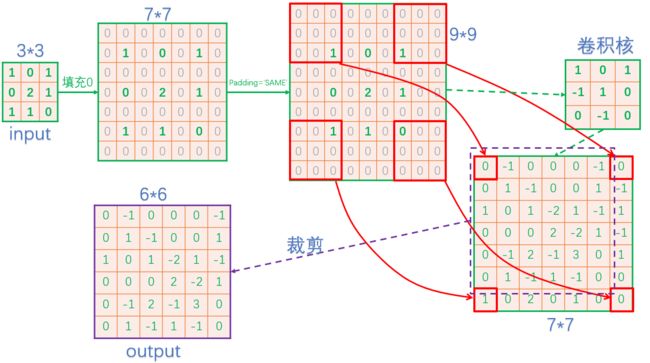
[ 12.]]]]又一个很重要的部分!tf.nn.conv2d中的filter参数,是[filter_height, filter_width, in_channels, out_channels]的形式,而tf.nn.conv2d_transpose中的filter参数,是[filter_height, filter_width, out_channels,in_channels]的形式,注意in_channels和out_channels反过来了!因为两者互为反向,所以输入输出要调换位置。反卷积核是原卷积核的转置矩阵,所以反卷积又称为转置卷积
既然y2是卷积操作的返回值,那我们当然可以对它做反卷积,反卷积操作返回的Tensor,应该和x3的shape是一样的(不难理解,因为是卷积的反过程)
y3 = tf.nn.conv2d_transpose(y2,kernel,output_shape=[1,5,5,3],
strides=[1,2,2,1],padding="SAME")
好,现在返回的y3果然是[1,5,5,3]的Tensor,结果如下:
[[[[ 12.  12.  12.]
   [ 30.  30.  30.]
   [ 18.  18.  18.]
   [ 30.  30.  30.]
   [ 12.  12.  12.]]

  [[ 30.  30.  30.]
   [ 75.  75.  75.]
   [ 45.  45.  45.]
   [ 75.  75.  75.]
   [ 30.  30.  30.]]

  [[ 18.  18.  18.]
   [ 45.  45.  45.]
   [ 27.  27.  27.]
   [ 45.  45.  45.]
   [ 18.  18.  18.]]

  [[ 30.  30.  30.]
   [ 75.  75.  75.]
   [ 45.  45.  45.]
   [ 75.  75.  75.]
   [ 30.  30.  30.]]

  [[ 12.  12.  12.]
   [ 30.  30.  30.]
   [ 18.  18.  18.]
   [ 30.  30.  30.]
[ 12. 12. 12.]]]] 看起来,tf.nn.conv2d_transpose的output_shape似乎是多余的,因为知道了原图,卷积核,步长显然是可以推出输出图像大小的,那为什么要指定output_shape呢?
看这样一种情况:
y4 = tf.nn.conv2d(x2, kernel, strides=[1,2,2,1], padding="SAME") 我们把上面的x2也做卷积,获得shape为[1,3,3,1]的y4如下:
[[[[ 27.]
   [ 27.]
   [ 18.]]

  [[ 27.]
   [ 27.]
   [ 18.]]

  [[ 18.]
   [ 18.]
   [ 12.]]]]
[1,6,6,3]和[1,5,5,3]的图经过卷积得到了相同的大小,[1,3,3,1]
让我们再反过来看,那么[1,3,3,1]的图反卷积后得到什么呢?产生了两种情况。所以这里指定output_shape是有意义的,当然随意指定output_shape是不允许的,如下情况程序会报错:
y5 = tf.nn.conv2d_transpose(x1,kernel,output_shape=[1,10,10,3],
strides=[1,2,2,1],padding="SAME")
程序清单:
import tensorflow as tf

x1 = tf.constant(1.0, shape=[1,3,3,1])

x2 = tf.constant(1.0, shape=[1,6,6,3])

x3 = tf.constant(1.0, shape=[1,5,5,3])

kernel = tf.constant(1.0, shape=[3,3,3,1])


y1 = tf.nn.conv2d_transpose(x1,kernel,output_shape=[1,6,6,3],
    strides=[1,2,2,1],padding="SAME")

y2 = tf.nn.conv2d(x3, kernel, strides=[1,2,2,1], padding="SAME")

y3 = tf.nn.conv2d_transpose(y2,kernel,output_shape=[1,5,5,3],
    strides=[1,2,2,1],padding="SAME")

y4 = tf.nn.conv2d(x2, kernel, strides=[1,2,2,1], padding="SAME")

'''''
Wrong!!This is impossible
y5 = tf.nn.conv2d_transpose(x1,kernel,output_shape=[1,10,10,3],
strides=[1,2,2,1],padding="SAME")
'''
sess = tf.Session()
tf.global_variables_initializer().run(session=sess)
x1_decov, x3_cov, y2_decov, x2_cov=sess.run([y1,y2,y3,y4])
print(x1_decov.shape)
print(x3_cov.shape)
print(y2_decov.shape)
print(x2_cov.shape)
python实现卷积操作
import numpy as np
input_data=[
              [[1,0,1,2,1],
               [0,2,1,0,1],
               [1,1,0,2,0],
               [2,2,1,1,0],
               [2,0,1,2,0]],

               [[2,0,2,1,1],
                [0,1,0,0,2],
                [1,0,0,2,1],
                [1,1,2,1,0],
                [1,0,1,1,1]]
            ]
weights_data=[
               [[ 1, 0, 1],
                [-1, 1, 0],
                [ 0,-1, 0]],
               [[-1, 0, 1],
                [ 0, 0, 1],
                [ 1, 1, 1]]

           ]

#fm:[h,w]
#kernel:[k,k]
#return rs:[h,w]
def compute_conv(fm,kernel):
    [h,w]=fm.shape
    [k,_]=kernel.shape
    r=int(k/2)
    #定义边界填充0后的map
    padding_fm=np.zeros([h+2,w+2],np.float32)
    #保存计算结果
    rs=np.zeros([h,w],np.float32)
    #将输入在指定该区域赋值,即除了4个边界后,剩下的区域
    padding_fm[1:h+1,1:w+1]=fm
    #对每个点为中心的区域遍历
    for i in range(1,h+1):
        for j in range(1,w+1):
            #取出当前点为中心的k*k区域
            roi=padding_fm[i-r:i+r+1,j-r:j+r+1]
            #计算当前点的卷积,对k*k个点点乘后求和
            rs[i-1][j-1]=np.sum(roi*kernel)

    return rs

def my_conv2d(input,weights):
    [c,h,w]=input.shape
    [_,k,_]=weights.shape
    outputs=np.zeros([h,w],np.float32)

    #对每个feature map遍历,从而对每个feature map进行卷积
    for i in range(c):
        #feature map==>[h,w]
        f_map=input[i]
        #kernel ==>[k,k]
        w=weights[i]
        rs =compute_conv(f_map,w)
        outputs=outputs+rs

    return outputs

def main():

    #shape=[c,h,w]
    input = np.asarray(input_data,np.float32)
    #shape=[in_c,k,k]
    weights =  np.asarray(weights_data,np.float32)
    rs=my_conv2d(input,weights)
    print(rs)


if __name__=='__main__':
    main()

