在VMware虚拟机的Red Hat Enterprise Linux 6.5 64bit安装oracle 11g
VMware Red Hat Enterprise Linux 6.5 64bit安装oracle 11g
1.具体描述
在VMware虚拟机的Red Hat Enterprise Linux 6.5 64bit安装oracle 11g
2.思路
2.1 安装VMware
2.2 安装Linux
2.3 安装JDK
2.4 安装Oracle 11g
3.实现
3.1 安装VMware、Linux
Windows直接下载安装VMware,难度不大。
VMware Workstation Pro安装Linux RedHat6.5,难度不大。主要是配置好网络,推荐使用NAT模式。
3.2 安装JDK
参考我的博客:CentOS7使用rpm方式安装JDK1.8
3.3 Linux安装Oracle
3.3.1 安装前准备
(1)RedHat6.5系统的镜像文件(即安装Linux系统时的那个iso包,这里用于安装rpm包)
(2)oracle11g的安装包
linux.x64_11gR2_database_1of2.zip
linux.x64_11gR2_database_2of2.zip
(3)要有一个可以远程操作服务器(虚拟机)的软件,方便从windows主机向虚拟机上传送文件。如: SSH Secure File Transfer Client、SecureCRT等。
3.3.2 修改配置系统参数
(1)创建Oracle用户
根据oracle官方文档所述,需要创建oinstall、dba用户组和oralce用户
[root@localhost ~]#  groupadd oinstall
[root@localhost ~]#  groupadd dba
[root@localhost ~]#  useradd -g oinstall -G dba oracle
[root@localhost ~]#  passwd oracle              #设置oracle用户的密码
Changing password for useroracle.
New UNIX password:BAD PASSWORD: it is too simplistic/systematic
Retype new UNIX password:
passwd: all authentication tokens updated successfully.
(2)修改内核参数
[root@localhost ~]# vi  /etc/sysctl.conf
kernel.shmall =4294967296      --这个系统安装后就会有,直接用系统带的就可以,其它下面的都要加在文件最后面
kernel.shmmni= 4096
kernel.sem= 250 32000 100 128
net.ipv4.ip_local_port_range= 9000 65500
net.core.rmem_default= 4194304
net.core.rmem_max= 4194304
net.core.wmem_default= 262144
net.core.wmem_max= 1048576
fs.aio-max-nr= 1048576
fs.file-max= 6815744
修改内核参数,修改后运行sysctl –p 使修改生效
[root@ localhost~]# sysctl -p (3) 创建oracle的安装目录
[root@localhost ~]# mkdir -p /u01/oracle
[root@localhost ~]# chown –R oracle:oinstall /u01/oracle
[root@localhost ~]# chmod -R 775 /u01
(4)进入oracle用户下,为 oracle 用户设置环境变量
[root@localhost ~]# su -l oracle
[oracle@localhost ~]$ vi .bash_profile
在后面加上
TMP=/tmp;export TMP
TMPDIR=$TMP;export TMPDIR
exportORACLE_BASE=/u01/oracle  #这个是自己刚刚创建的目录,要修改,修改为自己的路径
export ORACLE_HOME=$ORACLE_BASE/product/OraHome
export ORACLE_SID=orcl                 #自己的oracle  ID
export ORACLE_OWNER=oracle
export PATH=/usr/sbin:$ORACLE_HOME/bin:$PATH
LD_LIBRARY_PATH=$ORACLE_HOME/lib:/lib:/usr/lib:/usr/local/lib
export LD_LIBRARY_PATH
CLASSPATH=$ORACLE_HOME/JRE:$ORACLE_HOME/jlib:$ORACLE_HOME/rdbms/jlib     #这里要修改,修改为自己的路径
CLASSPATH=$CLASSPATH:$ORACLE_HOME/network/jlib
export CLASSPATH
执行以下命令让配置马上生效
[oracle@localhost ~]$ source $HOME/.bash_profile或者
[oracle@localhost ~]$ source .bash_profile
(5)修改用户的限制和验证等配置文件
切换到root用户
[oracle@localhost ~]$ su1、修改 /etc/security/limits.conf文件
[root@localhost ~]# vi  /etc/security/limits.conf

后面加上如下参数
oraclesoft nofile 65536
oracle hard nofile 65536
oracle soft nproc 16384
oracle hard nproc 16384
2、修改用户验证选项
修改/etc/pam.d/login文件
 [root@localhost ~]# vi /etc/pam.d/login

如果里面没有 加上如下参数

sessionrequired /lib/security/pam_limits.so
session    required    pam_limits.so
3、在/etc/profile后加入以下语句:
[root@localhost ~]# vi/etc/profile

if [ $USER = "oracle" ];then
if [$SHELL = "/bin/ksh" ]; then
ulimit-p 16384
ulimit-n 16384
else
ulimit-u 16384 -n 16384
fi
fi
3.4 安装Oracle管理工具
3.4.1 上传oracle安装包到root 家目录
这里我们就要用到SSH Secure File Transfer Client来连接虚拟机Linux
一般为了方便连接我们需要设置虚拟机网络方式为NAT
连接上后直接将文件拖拉进Linux对应的文件夹即可。
3.4.2 解压安装包 移动到安装目录
上面我们已将安装包上传至root 用户家目录,查看一下
[root@localhost ~]# ls
linux.x64_11gR2_database_1of2.zip linux.x64_11gR2_database_2of2.zip

解压
[root@localhost ~]# unzip linux.x64_11gR2_database_1of2.zip
[root@localhost ~]# unzip linux.x64_11gR2_database_2of2.zip
[root@localhost ~]# mv  database   /u01/       #将database移至我们建好的u01目录
3.4.3 执行oracle图形化安装程序(使用oracle用户)
直接用oracle用户登录到虚拟机不要用CRT 因为Windows执行linux系统的图形化界面需要繁琐的设置 而且尽量不要使用su切换到oracle 直接用oracle登录
切换到oracle用户,进入database文件夹,准备开始安装
[oracle@localhost ~]$ cd /u01/database/
[oracle@localhost ~]$ ./runInstaller
进入图形化安装
3.4.4 安装需要的rpm包
在3.2.1步骤中我并没有列出需要检查安装的rpm软件包,我把它放在图形化安装界面的先决条件检查中
当图形化安装到先决条件检查步骤时就不能点下一步继续向前了
出现以下界面:

一般安装oracle所需要的rpm包在linux系统镜像文件中都可以找到。
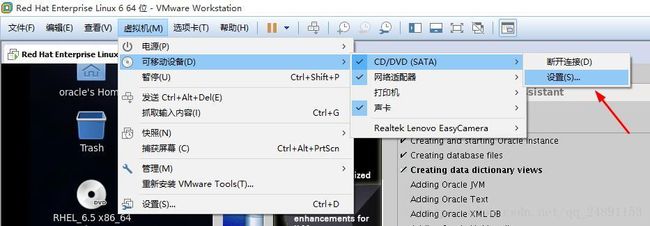
1、先将redhead6.5.iso文件连接到虚拟机内

2、进入该文件夹,可以看到以下文件列表
[root@localhost ~]# cd /media/RHEL_6.5 x86_64 Disc 1
或者右击鼠标,在弹出菜单中选择Open in Terminal
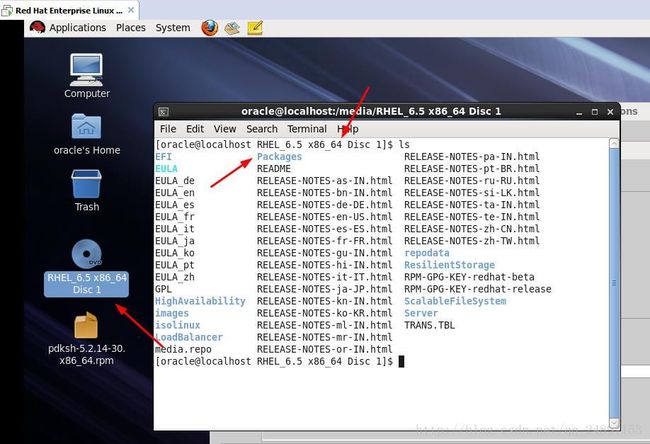
[root@localhost ~]# cd Packages/
使用rpm –ivh 命令安装rpm包,如
[root@localhost ~]# rpm –ivh libaio-devel-0.3.107-10.el6.x86_64.rpm

找此方法将需要的rpm包都安装好后,进入图形化安装界面 点击back 然后next 重新检查先决条件,这时你就会发现可以进行下面的步骤
安装pdksh-5.2.14的rpm包(选做)
如果发现redhead6.5.iso文件夹中没有pdksh-5.2.14的rpm包,可以先下载,然后通过SSH Secure File Transfer Client将其上传到Linux服务器中。
pdksh-5.2.14的rpm包下载地址:http://down.51cto.com/data/846832
重新配置swap(选做)
参考自:http://zhaohang3031.blog.163.com/blog/static/1784024520081128234222/
注明:如果发现oracle安装条件检查后出现swap不足,则需要重新配置swap大小。
一、查看内存和swap大小,发现swap是内存大小的一半
 [root@localhost ~]# free –m
    total           used            free        shared      buffers         cached

Mem:    1001            338         662             0           8           307
-/+ buffers/cache:  22          978
Swap:   509 0   509
二、决定修改swap大小,首先在空间合适处创建用于分区的swap文件:
[root@localhost tmp]# dd if=/dev/zero of=/tmp/big_swap bs=1024 count=2000000
读入了 2000000+0 个块
输出了 2000000+0 个块
(注意:if 表示 infile,of 表示outfile,bs=1024 表示写入的每个块的大小为1024B=1KB(1024B字节=1024*8bit位)
三、查看创建的文件大小是否符合要求
[root@localhost tmp]# du -sh big_swap
2.0G    big_swap
[root@localhost tmp]# ls -al big_swap
-rw-r--r--  1 root root 2048000000  6月 18 11:55 big_swap
四、将目的文件设置为swap分区文件:
[root@localhost tmp]# mkswap big_swap
Setting up swapspace version 1, size = 2047995 kB
五、激活swap,立即启用交换分区文件:
[root@localhost tmp]# swapon big_swap六、再次查看内存和虚拟内存,发现已经被正常修改:
[root@localhost tmp]# free –m
    total           used            free        shared      buffers         cached

Mem:    1001            984             16          0           2           931
-/+ buffers/cache:  50          950
Swap:   2462    0   2462
七、若要想使开机时自启用,则需修改文件/etc/fstab中的swap行:
[root@localhost tmp]# vi /etc/fstab
# LABEL=SWAP-hda2       swap                    swap    defaults        0 0
/tmp/big_swap           swap                    swap    defaults        0 0
八、完整命令
[root@localhost ~]# free –m
[root@localhost tmp]# dd if=/dev/zero of=/tmp/big_swap bs=1024 count=2000000
[root@localhost tmp]# du -sh /tmp/big_swap
[root@localhost tmp]# mkswap /tmp/big_swap
[root@localhost tmp]# swapon /tmp/big_swap
[root@localhost tmp]# free –m
[root@localhost tmp]# vi /etc/fstab
# LABEL=SWAP-hda2         swap                    swap    defaults        0 0
  /tmp/big_swap           swap                    swap    defaults        0 0
执行脚本(选做)
当图形化界面快要结束时提示我们需要运行两个脚本
以root用户执行这两个脚本
[root@localhost ~]# /u01/oralnventory/orainstRoot.sh
[root@localhost ~]# /u01/oracle/product/OraHome/root.sh
执行完成后点ok
3.4.5 完成后续步骤之后oracle就安装完成了
3.5 通过DBCA安装Oracle 11g
http://blog.csdn.net/theory93/article/details/9043069
以上操作只是安装了Oracle的管理软件,还需要安装数据库。参考以上博客。
其他
1.网卡配置
1.1 桥接模式:直接连接本届网卡
如果是路由器上加了MAC限制,NAT时是通过本机代理出去的,不受此限制,而桥接就不同了,连接不了网络。此时推荐使用NAT模式。
本机ip设置:
虚拟机ip设置:
1.2 使用NAT模式(推荐)
http://jingyan.baidu.com/article/e8cdb32b4217e737052baddb.html
2.安装时出现错误
2.1 具体描述:
Starting Oracle Universal Installer...

Checking Temp space: must be greater than 80 MB.   Actual 10115 MB    Passed
Checking swap space: must be greater than 150 MB.   Actual 2047 MB    Passed
Checking monitor: must be configured to display at least 256 colors
>>> Could not execute auto check for display colors using command /usr/bin/xdpyinfo. Check if the DISPLAY variable is set.    Failed <<<<

Some requirement checks failed. You must fulfill these requirements before

continuing with the installation,at which time they will be rechecked.

Continue? (y/n) [n]
2.2 解决办法:
把系统注销,然后使用Oracle用户直接登录系统进入即可!
另外注意:环境变量配置文件中,如果加上官方文档中的一个参数
export DISPLAY=local_host:0.0
会导致不能以Oracle用户的身份登录到图形界面,提示什么10s什么的
来自 http://docs.oracle.com/cd/E11882_01/install.112/e24326/toc.htm
3.参考网站
Oracle官方文档:
http://docs.oracle.com/cd/E11882_01/install.112/e24326/toc.htm#CEGHFFGG
http://docs.oracle.com/cd/E11882_01/install.112/e24326/toc.htm
linux redhat6.4安装oracle11g:
http://www.cnblogs.com/jhlong/p/5442459.html
VMware虚拟机Red Hat Enterprise Linux 6.5 64bit安装oracle 11g
http://blog.csdn.net/yuanchengmm/article/details/51669807
Linux下安装Oracle 11g详细过程
http://www.linuxidc.com/Linux/2015-02/113222.htm
通过DBCA安装Oracle 11g:
http://blog.csdn.net/theory93/article/details/9043069
修改swap大小:
http://blog.chinaunix.net/uid-26642180-id-3308762.html
http://blog.sina.com.cn/s/blog_7aebf7a70100rw3u.html
Linux中修改环境变量及生效方法:
http://www.cnblogs.com/franson-2016/p/6063226.html
RPM resource pdksh:
http://rpmfind.net/linux/rpm2html/search.php?query=pdksh