Netty源码简析之服务端Channel的创建
1 引入netty的maven依赖如下
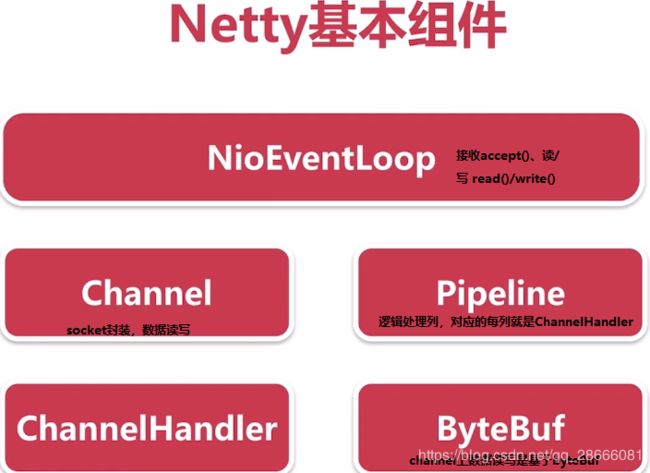
2 netty的基本组件如下

-
Channel:Java Stream是以流的方式一个一个byte通过滑动窗口来接收,是连续性的,造成阻塞,只能一次性接收完。而NIO Channel非阻塞,但是必须通过Buffer来中转。
-
Buffer:可理解为一个数组的封装,例如 IntBuffer、CharBuffer、ByteBuffer 等分别对应 int[]、char[]、byte[] 等。有Byte/Short/Long/Int/Float/Double/Char/MappedByteBuffer。
-
buffer四个基本属性:
-
capacity:当前buffer的最大容量,如int[] buffer = new int[1024]; 那capacity=1024
-
position:当前buffer真实已用的下一个位置,如buffer最大容量=1024,现在真实用了500,那position=500
-
limit:读情况下,limit=buffer实际大小;写情况下,limit=capacity
-
mark:记录当前postion位置,即标记上一次读写位置
-
-
mark <= position <= limit <= capacity
-
-
Selector:轮询channel,轮询到某个channel是读写时间的就绪状态,就取出来
netty启动过程分为:
- 创建服务端channel
- 初始化服务端channel
- 注册selector
3 以下是一个简单的netty服务段程序代码(在后续部分讲解会用到)
public static void main(String[] args) throws Exception {
EventLoopGroup bossGroup = new NioEventLoopGroup(1);
EventLoopGroup workerGroup = new NioEventLoopGroup();
try {
ServerBootstrap b = new ServerBootstrap();
b.group(bossGroup, workerGroup)
.channel(NioServerSocketChannel.class) // A点 设置channel
.childOption(ChannelOption.TCP_NODELAY, true)
.childAttr(AttributeKey.newInstance("childAttr"), "childAttrValue")
.handler(new ServerHandler())
.childHandler(new ChannelInitializer() {
@Override
public void initChannel(SocketChannel ch) {
ch.pipeline().addLast(new AuthHandler());
}
});
ChannelFuture f = b.bind(8888).sync();
f.channel().closeFuture().sync();
} finally {
bossGroup.shutdownGracefully();
workerGroup.shutdownGracefully();
}
}
4 服务端Channel的创建过程
/** AbstractBootStrap.java类中
* Create a new {@link Channel} and bind it.
*/
public ChannelFuture bind(int inetPort) {
return bind(new InetSocketAddress(inetPort));
}
/** AbstractBootStrap.java类中
* Create a new {@link Channel} and bind it.
*/
public ChannelFuture bind(SocketAddress localAddress) {
validate();
if (localAddress == null) {
throw new NullPointerException("localAddress");
}
return doBind(localAddress);
}
然后调用initAndRegister()创建服务端channel
// AbstractBootStrap.java类中
private ChannelFuture doBind(final SocketAddress localAddress) {
final ChannelFuture regFuture = initAndRegister();
final Channel channel = regFuture.channel();
...........
}
最终发现是通过newChannel()创建的,点进去发现是由clazz.newInstance()反射来创建一个channel
final ChannelFuture initAndRegister() {
Channel channel = null;
try {
channel = channelFactory.newChannel();
init(channel);
...................
}
阅读上面的代码可知channel是通过反射来创建的,但是对应的对象channelFactory是如何初始化的?
首先我们看3的A点,可以看到通过.chanel(NioServerSocketChannel.class)设置了channelFactory,往下继续跟

点击.channel()方法后进入查看如下
public B channel(Classextends C> channelClass) {
...........
return channelFactory(new ReflectiveChannelFactory<C>(channelClass));
}
上面可知 NioServerSocketChannel.class 传入ReflectiveChannelFactory中,然后赋值给了里面的一个clazz参数。然后最后包装好会赋值给AbstractBootStrap.java的channelFactory属性,最终复制代码如下
public B channelFactory(ChannelFactoryextends C> channelFactory) {
if (channelFactory == null) {
throw new NullPointerException("channelFactory");
}
if (this.channelFactory != null) {
throw new IllegalStateException("channelFactory set already");
}
this.channelFactory = channelFactory;
return (B) this;
}
总结:通过channel(NioServerSocketChannel.class),传入NioServerSocketChannel.class,然后使用ReflectiveChannelFactory包装后赋值给channelFactory属性。然后最终调用clazz.newInstance()来实例化一个channel实例。
通过上面我们可以知道channel是通过反射来创建的,接下来我们来看看他创建对应的NioServerSocketChannel.java类,其构造方法如下:
public NioServerSocketChannel() {
this(newSocket(DEFAULT_SELECTOR_PROVIDER));
}
首先点击newSocket()方法如下,可见调用的jdk底层来创建socket(点击openServerSocketChannel() 可见其在jdk1.8的包中)
private static ServerSocketChannel newSocket(SelectorProvider provider) {
try {
return provider.openServerSocketChannel();
} catch (IOException e) {
throw new ChannelException("Failed to open a server socket.", e);
}
}
然后继续点击this(newSocket(DEFAULT_SELECTOR_PROVIDER))的this,找到当前对应的方法如下:
public NioServerSocketChannel(ServerSocketChannel channel) {
super(null, channel, SelectionKey.OP_ACCEPT);
config = new NioServerSocketChannelConfig(this, javaChannel().socket());
}
点击super()层层往上看,最后找到代码如下:
protected AbstractNioChannel(Channel parent, SelectableChannel ch, int readInterestOp) {
super(parent);
this.ch = ch;
this.readInterestOp = readInterestOp;
try {
ch.configureBlocking(false); //设置非阻塞
.................
}
由上可见其默认设置了非阻塞(通过 ch.configureBlocking(false) 设置),继续看上面的super(parent)方法如下:
protected AbstractChannel(Channel parent) {
this.parent = parent;
id = newId();
unsafe = newUnsafe();
pipeline = newChannelPipeline();
}
可看到其最终赋值了(id,unsafe,pipeline)这三个属性,这几个属性将会在后续用到。