Dubbo+zookeeper+smm+业务与服务分离+MySQL集群(读写分离)
摘要:
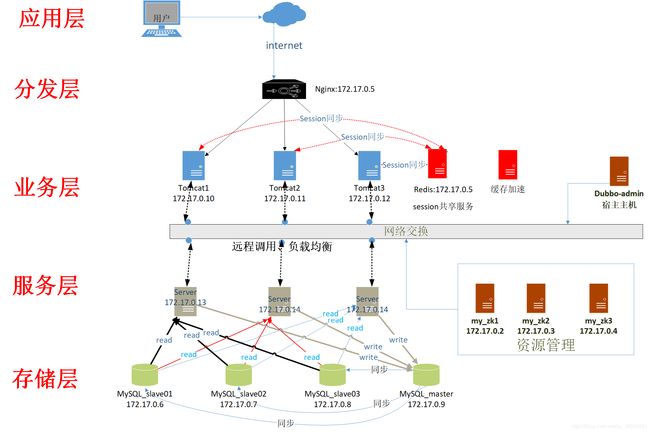
随着企业的发展,用户访问量迅猛增加,业务类型和业务量增加。企业对整个应用系统提出高性能,高可用,高吞吐量,7*24小时等等。然而企业(公司)的单台数据库无法响应用户请求,用户量对响应速度提出更高的要求,开发代码管理不当,开发效率低,业务逻辑混乱。为了解决以上问题,本文提出一种以Docker容器为基础的高性能架构。主要使用一个容器安装nginx做负载均衡,使用6个容器安装tomcat将业务代码和服务代码分开部署,其中3个tomcat部署业务代码,3个tomcat部署服务代码。业务层通过阿里开源框架Dubbo框架实现远程调用服务层。使用3个容器部署zookeeper做Dubbo资源管理。使用4个容器部署MySQL集群实现数据库读写分离,其中1个master,3个slave。关于数据库的负载均衡本文引用基于uid 哈希算法。本文最后给出实验结构表明该架构具有高响应性,负载均衡性,可用性。
一、架构部署
本架构分为五层,如上图所示应用层主要开发(android,IOS,web,微信小程序,H5,支付宝等等),分发层除了做负载均衡也可以做防DDoS,防SQL注入,WAF等小型安全应用。业务主要做业务逻辑开发,当然也可以通过AOP做系统日志,权限控制等等,除此之外,可以使用redis集群做session共享和缓存加速(某些业务可以放到redis来做,减少数据库压力)。服务层主要做DAO服务或者其他算法服务。zookeeper主要做资源管理。Dubbo管理员可以查看业务层和服务层的一些情况(有点类型小型微型数据治理的概念)。
二、实现如下:(说明,因为本文测试花了两天时间,可能下面展示的有些IP地址与架构中所展示的对不上,但是步骤没问题)
1、创建master数据库
1.1、创建 master.cnf
# Copyright (c) 2014, Oracle and/or its affiliates. All rights reserved.
#
# This program is free software; you can redistribute it and/or modify
# it under the terms of the GNU General Public License as published by
# the Free Software Foundation; version 2 of the License.
#
# This program is distributed in the hope that it will be useful,
# but WITHOUT ANY WARRANTY; without even the implied warranty of
# MERCHANTABILITY or FITNESS FOR A PARTICULAR PURPOSE.  See the
# GNU General Public License for more details.
#
# You should have received a copy of the GNU General Public License
# along with this program; if not, write to the Free Software
# Foundation, Inc., 51 Franklin St, Fifth Floor, Boston, MA  02110-1301 USA

#
# The MySQL Community Server configuration file.
#
# For explanations see
# http://dev.mysql.com/doc/mysql/en/server-system-variables.html

[client]
port        = 3306
socket      = /var/run/mysqld/mysqld.sock

[mysqld_safe]
pid-file    = /var/run/mysqld/mysqld.pid
socket      = /var/run/mysqld/mysqld.sock
nice        = 0

[mysqld]
user        = mysql
pid-file    = /var/run/mysqld/mysqld.pid
socket      = /var/run/mysqld/mysqld.sock
port        = 3306
basedir     = /usr
datadir     = /var/lib/mysql
tmpdir      = /tmp
lc-messages-dir = /usr/share/mysql
explicit_defaults_for_timestamp

log-bin = mysql-bin
server-id = 1

# Instead of skip-networking the default is now to listen only on
# localhost which is more compatible and is not less secure.
#bind-address   = 127.0.0.1

#log-error  = /var/log/mysql/error.log

# Recommended in standard MySQL setup
sql_mode=NO_ENGINE_SUBSTITUTION,STRICT_TRANS_TABLES

# Disabling symbolic-links is recommended to prevent assorted security risks
symbolic-links=0

# * IMPORTANT: Additional settings that can override those from this file!
#   The files must end with '.cnf', otherwise they'll be ignored.
#
!includedir /etc/mysql/conf.d/
1.2、创建 sources.list
deb http://mirrors.aliyun.com/debian wheezy main contrib non-free
deb-src http://mirrors.aliyun.com/debian wheezy main contrib non-free
deb http://mirrors.aliyun.com/debian wheezy-updates main contrib non-free
deb-src http://mirrors.aliyun.com/debian wheezy-updates main contrib non-free
deb http://mirrors.aliyun.com/debian-security wheezy/updates main contrib non-free
deb-src http://mirrors.aliyun.com/debian-security wheezy/updates main contrib non-free
1.3、创建容器
docker run -d -e MYSQL_ROOT_PASSWORD=123qwe --name mysql_master -v D:/VMdata/mysql/master/master.cnf:/etc/mysql/my.cnf -v D:/VMdata/mysql/master/sources.list:/etc/apt/sources.list -p 33006:3306 mysql:5.71.4、找到局域网IP
>>apt-get update -y
>>apt install net-tools
>>ifconfig

eth0      Link encap:Ethernet  HWaddr 02:42:ac:11:00:02
          inet addr:172.17.0.2  Bcast:172.17.255.255  Mask:255.255.0.0
1. 5、进入终端
>>docker exec -it mysql_master bash
>>mysql -uroot -p
>>grant replication slave on *.* to 'slave01'@'%' identified by 'slave01';
>>flush privileges;
>>show master status;

+------------------+----------+--------------+------------------+-------------------+
| File             | Position | Binlog_Do_DB | Binlog_Ignore_DB | Executed_Gtid_Set |
+------------------+----------+--------------+------------------+-------------------+
| mysql-bin.000003 |      592 |              |                  |                   |
+------------------+----------+--------------+------------------+-------------------+
2、创建slave01数据库(其他照猫画虎)
2.1、创建 slave01.cnf, 将server-id = 1 修改为server-id = 2(每个slave都不一样就是)
2.2、创建容器
docker run -d -e MYSQL_ROOT_PASSWORD=123qwe --name mysql_slave01 -v D:/VMdata/mysql/slaves/u01/slave01.cnf:/etc/mysql/my.cnf -v D:/VMdata/mysql/slaves/u01/sources.list:/etc/apt/sources.list -p 33008:3306 mysql:5.72.3、进入终端
mysql> change master to master_host='172.17.0.2',
    master_user='slave01',
    master_password='slave01',
    master_log_file='mysql-bin.000003',
    master_log_pos=0,
    master_port=3306;
mysql> start slave;
mysql> show slave status \G
*************************** 1. row ***************************
               Slave_IO_State: Waiting for master to send event
                  Master_Host: 172.17.0.2
                  Master_User: slave01
                  Master_Port: 3306
                Connect_Retry: 60
              Master_Log_File: mysql-bin.000003
          Read_Master_Log_Pos: 1326
               Relay_Log_File: 1d464b6d48fd-relay-bin.000002
                Relay_Log_Pos: 1539
        Relay_Master_Log_File: mysql-bin.000003
             Slave_IO_Running: Yes
            Slave_SQL_Running: Yes
              Replicate_Do_DB:
          Replicate_Ignore_DB:
           Replicate_Do_Table:
       Replicate_Ignore_Table:
      Replicate_Wild_Do_Table:
  Replicate_Wild_Ignore_Table:
                   Last_Errno: 0
                   Last_Error:
                 Skip_Counter: 0
          Exec_Master_Log_Pos: 1326
              Relay_Log_Space: 1753
              Until_Condition: None
               Until_Log_File:
                Until_Log_Pos: 0
           Master_SSL_Allowed: No
           Master_SSL_CA_File:
           Master_SSL_CA_Path:
              Master_SSL_Cert:
            Master_SSL_Cipher:
               Master_SSL_Key:
        Seconds_Behind_Master: 0
Master_SSL_Verify_Server_Cert: No
                Last_IO_Errno: 0
                Last_IO_Error:
               Last_SQL_Errno: 0
               Last_SQL_Error:
  Replicate_Ignore_Server_Ids:
             Master_Server_Id: 1
                  Master_UUID: 408a8322-f9cd-11e8-a764-0242ac110002
             Master_Info_File: /var/lib/mysql/master.info
                    SQL_Delay: 0
          SQL_Remaining_Delay: NULL
      Slave_SQL_Running_State: Slave has read all relay log; waiting for more updates
           Master_Retry_Count: 86400
                  Master_Bind:
      Last_IO_Error_Timestamp:
     Last_SQL_Error_Timestamp:
               Master_SSL_Crl:
           Master_SSL_Crlpath:
           Retrieved_Gtid_Set:
            Executed_Gtid_Set:
                Auto_Position: 0
         Replicate_Rewrite_DB:
                 Channel_Name:
           Master_TLS_Version:
1 row in set (0.00 sec)
3、在master创建数据库、创建表并添加数据,查看是否已经同步到slaves
mysql> create database xiaochongdian;
Query OK, 1 row affected (0.01 sec)

mysql> show databases;
+--------------------+
| Database           |
+--------------------+
| information_schema |
| mysql              |
| performance_schema |
| sys                |
| xiaochongdian      |
+--------------------+
5 rows in set (0.00 sec)

mysql> use xiaochongdian
Database changed
mysql> insert into user values(1,'xm01','112233tt'),(2,'xw02','eerr4433'),(2,'xr03','rreeww');
Query OK, 3 rows affected (0.01 sec)
Records: 3  Duplicates: 0  Warnings: 0
mysql> select * from user;
+------+------+----------+
| id   | name | pwd      |
+------+------+----------+
|    1 | xm01 | 112233tt |
|    2 | xw02 | eerr4433 |
|    2 | xr03 | rreeww   |
+------+------+----------+
3 rows in set (0.01 sec)
4、进入slave01终端查看(其他数据库效果一样)
mysql> show databases;
+--------------------+
| Database           |
+--------------------+
| information_schema |
| mysql              |
| performance_schema |
| sys                |
| xiaochongdian      |
+--------------------+
5 rows in set (0.00 sec)

mysql> use xiaochongdian
Reading table information for completion of table and column names
You can turn off this feature to get a quicker startup with -A

Database changed
mysql> select * from user;
+------+------+----------+
| id   | name | pwd      |
+------+------+----------+
|    1 | xm01 | 112233tt |
|    2 | xw02 | eerr4433 |
|    2 | xr03 | rreeww   |
+------+------+----------+
3 rows in set (0.00 sec)
到这里已经实现master-slaves同步了,只有在master中写slaves才能看到,要是在slave01中写,其他数据库是看不到的,所以
很明显,读写分离就只能master是写,slaves读。
5、部署zookeeper集群(我们采用三台机器)
version: '2'
services:
    my_zk1:
        image: zookeeper
        restart: always
        container_name: my_zk1
        ports:
            - "2181:2181"
        environment:
            ZOO_MY_ID: 1
            ZOO_SERVERS: server.1=my_zk1:2888:3888 server.2=my_zk2:2888:3888 server.3=my_zk3:2888:3888

    my_zk2:
        image: zookeeper
        restart: always
        container_name: my_zk2
        ports:
            - "2182:2181"
        environment:
            ZOO_MY_ID: 2
            ZOO_SERVERS: server.1=my_zk1:2888:3888 server.2=my_zk2:2888:3888 server.3=my_zk3:2888:3888

    my_zk3:
        image: zookeeper
        restart: always
        container_name: my_zk3
        ports:
            - "2183:2181"
        environment:
            ZOO_MY_ID: 3
            ZOO_SERVERS: server.1=my_zk1:2888:3888 server.2=my_zk2:2888:3888 server.3=my_zk3:2888:3888
分别进去看看哪个是leader
5.1 进入my_zk1
>>D:\VMdata\zookeeper>docker exec -it 4dab1b3d59a1 /bin/bash
>>cd bin
>>./zkServer.sh status

ZooKeeper JMX enabled by default
Using config: /conf/zoo.cfg
Mode: follower  #没被选上
5.2 进入my_zk2
>>docker exec -it ecb7befbf3e0 /bin/bash
>>cd bin
>>./zkServer.sh status


ZooKeeper JMX enabled by default
Using config: /conf/zoo.cfg
Mode: leader    #哈哈哈找到了
5.3 进入my_zk3
>>docker exec -it e4da8424ab59 /bin/bash
>> cd bin
>>./zkServer.sh status

ZooKeeper JMX enabled by default
Using config: /conf/zoo.cfg
Mode: follower  #没被选上
6、创建tomcat、redis、nginx在本博客的另一篇文章中由详细的步骤,这里不再做啰嗦。
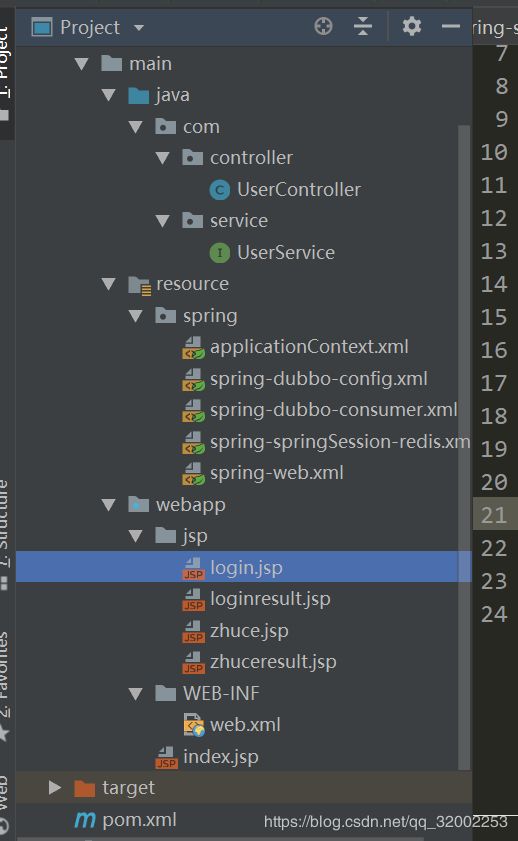
7、创建业务层代码,项目的目录结构如下图,对着抄没毛病。我们从下图看到业务层根本不需要程序员知道接口是怎么实现的,尽管做业务逻辑就可以(一本正经的螺丝钉就怪架构师,哈哈)。因为我们将代码部署在3台机器上,按道理只要写好一份copy上去就行,但是这里为了实验效果,需要稍微改一下在部署,该的地方你往下,我不上你也懂。(默认你懂)
7.1 pom.xml
  4.0.0
  xcdweb
  xcdweb
  1.0-SNAPSHOT
  war
  xcdweb Maven Webapp

  http://www.example.com

    UTF-8
    1.7
    1.7


      org.springframework.session
      spring-session-data-redis
      1.2.1.RELEASE


      redis.clients
      jedis
      2.8.1


      taglibs
      standard
      1.1.2


      jstl
      jstl
      1.2


      com.fasterxml.jackson.core
      jackson-databind
      2.5.4


      javax.servlet
      javax.servlet-api
      3.1.0


      org.springframework
      spring-core
      4.1.7.RELEASE


      org.springframework
      spring-beans
      4.1.7.RELEASE


      org.springframework
      spring-context
      4.1.7.RELEASE


      org.springframework
      spring-jdbc
      4.1.7.RELEASE


      org.springframework
      spring-tx
      4.1.7.RELEASE


      org.springframework
      spring-web
      4.1.7.RELEASE


      org.springframework
      spring-webmvc
      4.1.7.RELEASE


      org.springframework
      spring-test
      4.1.7.RELEASE


      com.alibaba
      dubbo
      2.5.7


          spring
          org.springframework


      org.apache.zookeeper
      zookeeper
      3.5.3-beta


          log4j
          log4j


      com.101tec
      zkclient
      0.8


      junit
      junit
      4.11
      test


    xcdweb


          maven-clean-plugin
          3.0.0


          maven-resources-plugin
          3.0.2


          maven-compiler-plugin
          3.7.0


          maven-surefire-plugin
          2.20.1


          maven-war-plugin
          3.2.0


          maven-install-plugin
          2.5.2


          maven-deploy-plugin
          2.8.2
7.2 applicationContext.xml
7.3 spring-dubbo-config.xml
7.4 spring-dubbo-consumer.xml
7.5 spring-springSession-redis.xml
7.6 spring-web.xml
7.7 web.xml
        xcddispatcher
        org.springframework.web.servlet.DispatcherServlet


            contextConfigLocation
            classpath:spring/applicationContext.xml


        xcddispatcher

        /


        contextConfigLocation
        classpath:spring/applicationContext.xml


        org.springframework.web.context.ContextLoaderListener


        springSessionRepositoryFilter
        org.springframework.web.filter.DelegatingFilterProxy


        springSessionRepositoryFilter
        /*


        encoding
        org.springframework.web.filter.CharacterEncodingFilter

            encoding
            UTF-8


        encoding
        /*
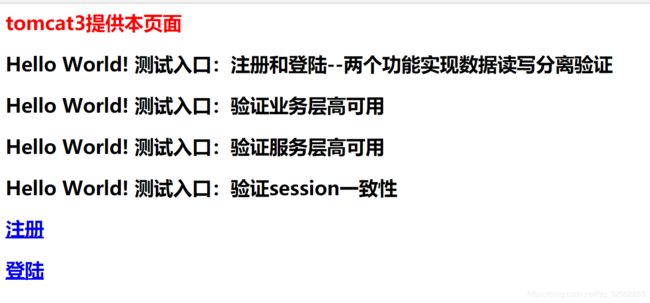
7.8 indes.jsp(为了显示效果,本文部署3份代码在业务层,知识加了不同的输出)
<%@ page contentType="text/html;charset=UTF-8" language="java" %>


tomcat3提供本页面
Hello World!   测试入口:注册和登陆--两个功能实现数据读写分离验证
Hello World!   测试入口:验证业务层高可用
Hello World!   测试入口:验证服务层高可用
Hello World!   测试入口:验证session一致性
注册
登陆
7.9 具体的JSP代码比较简单,在实验结果中就可以反推代码怎么写的
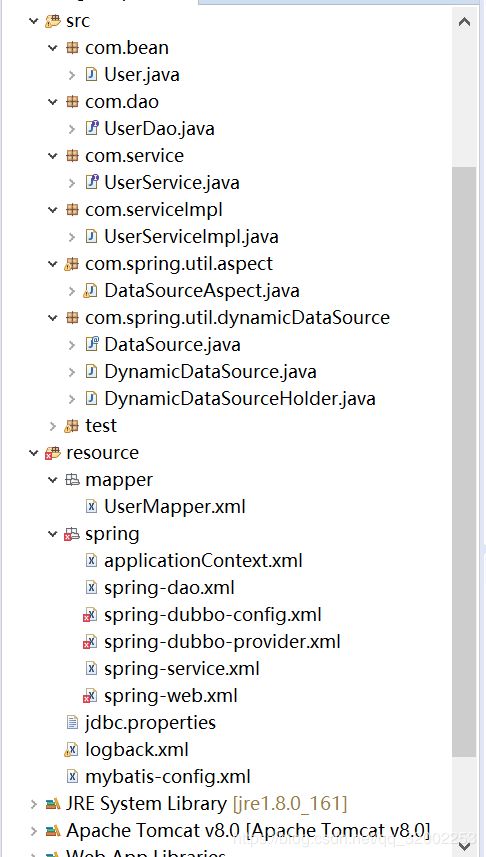
8、服务层的实现如下。先看下图项目结构。是在Eclipse中写的,可能某些人看不习惯这个白色的,下图中有些x,不要管,没有bug,这是Eclipse这个编译器的痛。我们看到这里就是接口具体实现和算法实现的地方。
8.1还是先从配置入手 pom.xml
  4.0.0

  xcdServer
  xcdServer
  1.0-SNAPSHOT
  war

  xcdServer Maven Webapp

  http://www.example.com


    UTF-8
    1.7
    1.7


      junit
      junit
      4.11


      ch.qos.logback
      logback-classic
      1.1.1


      mysql
      mysql-connector-java
      5.1.37
      runtime


      c3p0
      c3p0
      0.9.1.2


      org.mybatis
      mybatis
      3.3.0


      org.mybatis
      mybatis-spring
      1.2.3


      taglibs
      standard
      1.1.2


      jstl
      jstl
      1.2


      com.fasterxml.jackson.core
      jackson-databind
      2.5.4


      javax.servlet
      javax.servlet-api
      3.1.0


      org.springframework
      spring-core
      4.1.7.RELEASE


      org.springframework
      spring-beans
      4.1.7.RELEASE


      org.springframework
      spring-context
      4.1.7.RELEASE


      org.springframework
      spring-jdbc
      4.1.7.RELEASE


      org.springframework
      spring-tx
      4.1.7.RELEASE


      org.springframework
      spring-web
      4.1.7.RELEASE


      org.springframework
      spring-webmvc
      4.1.7.RELEASE


      org.springframework
      spring-test
      4.1.7.RELEASE


      com.alibaba
      dubbo
      2.5.7


          spring
          org.springframework


      org.apache.zookeeper
      zookeeper
      3.5.3-beta


          log4j
          log4j


      com.101tec
      zkclient
      0.8


      junit
      junit
      4.11
      test


    xcdServer


          maven-clean-plugin
          3.0.0


          maven-resources-plugin
          3.0.2


          maven-compiler-plugin
          3.7.0


          maven-surefire-plugin
          2.20.1


          maven-war-plugin
          3.2.0


          maven-install-plugin
          2.5.2


          maven-deploy-plugin
          2.8.2
8.2 UserMapper.xml
insert into user (name,pwd) values (#{name},#{pwd})
8.3 applicationContext.xml 和业务层一样
8.4 jdbc.properties
#master
jdbc.driver=com.mysql.jdbc.Driver
jdbc.url=jdbc:mysql://172.17.0.9:3306/xiaochongdian?useUnicode=true&characterEncoding=utf-8&useSSL=false
jdbc.username=root
jdbc.password=123qwe
jdbc.initialSize=1
jdbc.minIdle=1
jdbc.maxActive=20
jdbc.maxWait=60000
jdbc.removeAbandoned=true
jdbc.removeAbandonedTimeout=180
jdbc.timeBetweenEvictionRunsMillis=60000
jdbc.minEvictableIdleTimeMillis=300000
jdbc.validationQuery=SELECT 1
jdbc.testWhileIdle=true
jdbc.testOnBorrow=false
jdbc.testOnReturn=false
#slave01
slave01.driver=com.mysql.jdbc.Driver
slave01.url=jdbc:mysql://172.17.0.6:3306/xiaochongdian?useUnicode=true&characterEncoding=utf-8&useSSL=false
slave01.username=root
slave01.password=123qwe
slave01.initialSize=1
slave01.minIdle=1
slave01.maxActive=20
slave01.maxWait=60000
slave01.removeAbandoned=true
slave01.removeAbandonedTimeout=180
slave01.timeBetweenEvictionRunsMillis=60000
slave01.minEvictableIdleTimeMillis=300000
slave01.validationQuery=SELECT 1
slave01.testWhileIdle=true
slave01.testOnBorrow=false
slave01.testOnReturn=false
#slave02
slave02.driver=com.mysql.jdbc.Driver
slave02.url=jdbc:mysql://172.17.0.7:3306/xiaochongdian?useUnicode=true&characterEncoding=utf-8&useSSL=false
slave02.username=root
slave02.password=123qwe
#slave03
slave03.driver=com.mysql.jdbc.Driver
slave03.url=jdbc:mysql://172.17.0.8:3306/xiaochongdian?useUnicode=true&characterEncoding=utf-8&useSSL=false
slave03.username=root
slave03.password=123qwe
8.5 spring-dao.xml
8.6 spring-dubbo-config.xml
8.7 spring-dubbo-provider.xml
8.8 spring-service.xml
8.9 spring-web.xml
8.10 mybatis-config.xml
8.11 User 实体geter,seter自己写
private String name;
private String pwd;
8.12 UserDao
package com.dao;
public interface UserDao {
    public void  write(String name,String pwd);
    public String readpwdByName(String name);
}
8.13 UserService
package com.service;

public interface UserService {
    public void  write(String name,String pwd);
    public String readpwdByName(String name);
    public String writeandreturn(String name,String pwd);
}
8.14 UserServiceImpl (部署在不同的tomcat中自己改一下编号,演示用的,读的负载字在这里实现,简单的hash,挂了下一个)
package com.serviceImpl;

import com.dao.UserDao;
import com.service.UserService;
import com.spring.util.dynamicDataSource.DataSource;

import org.springframework.beans.factory.annotation.Autowired;

public class UserServiceImpl  implements UserService {

    @Autowired
    UserDao userDao;


    @Override
    public void write(String name,String pwd){
    	userDao.write(name, pwd);
    }

    @DataSource("write")
    public String writeandreturn(String name,String pwd) {
    	write(name,pwd);
    	return "写操作: 路由:MySQL_master->服务层tomcat4->";
    }
    @DataSource("read01")
    public String readpwdByName01(String name) {
    	String msg="读取结果:"+userDao.readpwdByName(name)+"\n 路由:MySQL_slave01->服务层tomcat6->";
        return msg;
    }
    @DataSource("read02")
    public String readpwdByName02(String name) {
    	String msg="读取结果:"+userDao.readpwdByName(name)+"\n路由:MySQL_slave02->服务层tomcat6->";
        return msg;
    }
    @DataSource("read03")
    public String readpwdByName03(String name) {
    	String msg="读取结果:"+userDao.readpwdByName(name)+"\n 路由:MySQL_slave03->服务层tomcat6->";
        return msg;
    }

    @Override
    public String readpwdByName(String name){
    	String msg=null;
    	int slaveID=Math.abs(name.hashCode())%3;//配置省略
    	System.out.println("ID:============================》"+slaveID);
    	switch (slaveID) {
		case 0:
			msg=readpwdByName01(name);
			if( msg!=null) {
				break;
			}
		case 1:
			msg=readpwdByName02(name);
			if( msg!=null) {
				break;
			}
		case 2:
			msg=readpwdByName03(name);
			if( msg!=null) {
				break;
			}
		default:
			msg=readpwdByName01(name);
			if( msg!=null) {
				break;
			}
			msg=readpwdByName02(name);
			if( msg!=null) {
				break;
			}
			msg=readpwdByName03(name);
			if( msg!=null) {
				break;
			}

		}

        return msg;
    }
}
8.15 下面是多数据源读写实现,这个就不贴出来了比较简单
三、测试结果
1、docker
2数据库集群
3、Dubbo管理(挂了一个照样用不误)
4、访问结果
总结与展望:
1、本文使用docker容器实现架构部署,但是在具体应用时,因各个企业拥有的设备数量以及设备配置不一样,部署时应加以考虑。
2、测试使用的框架为ssm+duboo+zookeeper+springsession,duboo框架在这里的具体担任远程调用角色,有多种其他实现。
3、本文没有实现redis缓存加速,下期在写
4、当数据量增大的时候,boss准备搞机器学习深度学习什么人工智能,想搞BI,就离不开大数据架构部署,如何将大数据平台接上去,下下期见。
5、有了机器学习,boss既然就想到实时地把机器学习,深度学习的应用成果上线,如何上线?引出实时处理,--->kafka(MQ)、flume等等隆重登场
6、讲了这么多,就一点:数据--->传输---->处理--->传输---->数据
好了,牛B就吹到这,哈哈哈!


