JAVA直接内存(堆外内存)
本篇主要讲解如何使用直接内存(堆外内存),并按照下面的步骤进行说明:
|
1
|
相关背景-->读写操作-->关键属性-->读写实践-->扩展-->参考说明
|
希望对想使用直接内存的朋友,提供点快捷的参考。
数据类型
下面这些,都是在使用DirectBuffer中必备的一些常识,暂作了解吧!如果想要深入理解,可以看看下面参考的那些博客。
基本类型长度
在Java中有很多的基本类型,比如:
byte,一个字节是8位bit,也就是1Bshort,16位bit,也就是2Bint,32位bit,也就是4Blong, 64位bit,也就是8Bchar,16位bit,也就是2Bfloat,32位bit,也就是4Bdouble,64位bit,也就是8B
不同的类型都会按照自己的位数来存储,并且可以自动进行转换提升。byte、char、short都可以自动提升为int,如果操作数有long,就会自动提升为long,float和double也是如此。
大端小端
由于一个数据类型可能有很多个字节组成的,那么它们是如何摆放的。这个是有讲究的:
- 大端:低地址位 存放 高有效字节
- 小端:低地址位 存放 低有效字节
举个例子,一个char是有两个字节组成的,这两个字节存储可能会显示成如下的模样,比如字符a:
|
1
2
3
|
低地址位 高地址位
大端;
00
96
小端:
96
00
|
String与new String的区别
再说说"hello"和new String("hello")的区别:
如果是"hello",JVM会先去共享的字符串池中查找,有没有"hello"这个词,如果有直接返回它的引用;如果没有,就会创建这个对象,再返回。因此,"a"+"b"相当于存在3个对象,分别是"a"、"b"、"ab"。
而new String("hello"),则省去了查找的过程,直接就创建一个hello的对象,并且返回引用。
读写数据
在直接内存中,通过allocateDirect(int byte_length)申请直接内存。这段内存可以理解为一段普通的基于Byte的数组,因此插入和读取都跟普通的数组差不多。
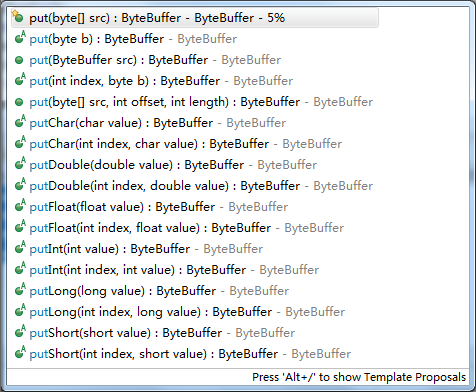
只不过提供了基于不同数据类型的插入方法,比如:
- put(byte) 插入一个byte
- put(byte[]) 插入一个byte数组
- putChar(char) 插入字符
- putInt(int) 插入Int
- putLong(long) 插入long
等等….详细的使用方法,也可以参考下面的图片:
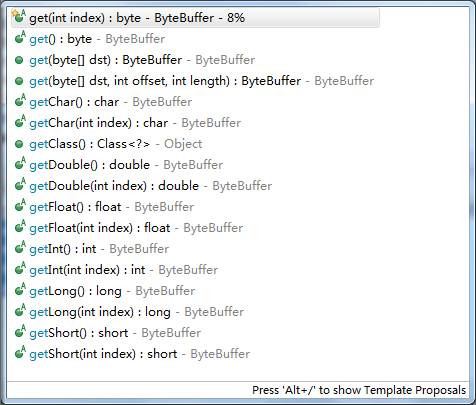
对应读取数据,跟写入差不多:
注意所有没有index参数的方法,都是按照当前position的位置进行操作的。
下面看看什么是position,还有什么其他的属性吧!
基本的属性值
它有几个关键的指标:
|
1
|
mark-->position-->limit-->capacity
|
另外,还有remaining=limit-position。
先说说他们的意思吧!
当前位置——position
position是当前数组的指针,指示当前数据位置。举个例子:
|
1
2
3
4
5
6
7
|
ByteBuffer buffer = ByteBuffer.allocateDirect(
1024
);
buffer.putChar(
'a'
);
System.out.println(buffer);
buffer.putChar(
'c'
);
System.out.println(buffer);
buffer.putInt(
10
);
System.out.println(buffer);
|
由于一个char是2个字节,一个Int是4个字节,因此position的位置分别是:
|
1
|
2
,
4
,
8
|
注意,Position的位置是插入数据的当前位置,如果插入数据,就会自动后移。
也就是说,如果存储的是两个字节的数据,position的位置是在第三个字节上,下标就是2。
|
1
2
3
|
java.nio.DirectByteBuffer[pos=
2
lim=
1024
cap=
1024
]
java.nio.DirectByteBuffer[pos=
4
lim=
1024
cap=
1024
]
java.nio.DirectByteBuffer[pos=
8
lim=
1024
cap=
1024
]
|
- position可以通过position()获得,也可以通过position(int)设置。
|
1
2
3
4
5
6
7
8
|
//position(int)方法的源码
public
final
Buffer position(
int
newPosition) {
if
((newPosition > limit) || (newPosition <
0
))
throw
new
IllegalArgumentException();
position = newPosition;
if
(mark > position) mark = -
1
;
return
this
;
}
|
注意:position的位置要比limit小,比mark大
空间容量——capacity
capacity是当前申请的直接内存的容量,它是申请后就不会改变的。
- capacity则可以通过capacity()方法获得。
限制大小——limit
我们可能想要改变这段直接内存的大小,因此可以通过一个叫做Limit的属性设置。
- limit则可以通过limit()获得,通过limit(int)进行设置。
注意limit要比mark和position大,比capacity小。
|
1
2
3
4
5
6
7
8
9
|
//limit(int)方法的源码
public
final
Buffer limit(
int
newLimit) {
if
((newLimit > capacity) || (newLimit <
0
))
throw
new
IllegalArgumentException();
limit = newLimit;
if
(position > limit) position = limit;
if
(mark > limit) mark = -
1
;
return
this
;
}
|
标记位置——mark
mark,就是一个标记为而已,记录当前的position的值。常用的场景,就是记录某一次插入数据的位置,方便下一次进行回溯。
- 可以使用
mark()方法进行标记, - 使用
reset()方法进行清除, - 使用
rewind()方法进行初始化12345678910111213141516171819//mark方法标记当前的position,默认为-1publicfinalBuffer mark() {mark = position;returnthis;}//reset方法重置mark的位置,position的位置,不能小于mark的位置,否则会出错publicfinalBuffer reset() {intm = mark;if(m <0)thrownewInvalidMarkException();position = m;returnthis;}//重置mark为-1.position为0publicfinalBuffer rewind() {position =0;mark = -1;returnthis;}使用案例
1234567891011ByteBuffer buffer = ByteBuffer.allocateDirect(1024);buffer.putChar('a');buffer.putChar('c');System.out.println("插入完数据 "+ buffer);buffer.mark();// 记录mark的位置buffer.position(30);// 设置的position一定要比mark大,否则mark无法重置System.out.println("reset前 "+ buffer);buffer.reset();// 重置reset ,reset后的position=markSystem.out.println("reset后 "+ buffer);buffer.rewind();//清除标记,position变成0,mark变成-1System.out.println("清除标记后 "+ buffer);可以看到如下的运行结果:
1234插入完数据 java.nio.DirectByteBuffer[pos=4lim=1024cap=1024]reset前 java.nio.DirectByteBuffer[pos=30lim=1024cap=1024]reset后 java.nio.DirectByteBuffer[pos=4lim=1024cap=1024]清除标记后 java.nio.DirectByteBuffer[pos=0lim=1024cap=1024]
剩余空间——remaing
remaing则表示当前的剩余空间:
|
1
2
3
|
public
final
int
remaining() {
return
limit - position;
}
|
读写实践
写操作主要就是按照自己的数据类型,写入到直接内存中,注意每次写入数据的时候,position都会自动加上写入数据的长度,指向下一个该写入的起始位置:
下面看看如何写入一段byte[]或者字符串:
|
1
2
3
4
5
6
7
|
ByteBuffer buffer = ByteBuffer.allocateDirect(
10
);
byte
[] data = {
1
,
2
};
buffer.put(data);
System.out.println(
"写byte[]后 "
+ buffer);
buffer.clear();
buffer.put(
"hello"
.getBytes());
System.out.println(
"写string后 "
+ buffer);
|
输出的内容为:
|
1
2
|
写
byte
[]后 java.nio.DirectByteBuffer[pos=
2
lim=
10
cap=
10
]
写string后 java.nio.DirectByteBuffer[pos=
5
lim=
10
cap=
10
]
|
读的时候,可以通过一个外部的byte[]数组进行读取。由于没有找到直接操作直接内存的方法: 因此如果想在JVM应用中使用直接内存,需要申请一段堆中的空间,存放数据。
如果有更好的方法,还请留言。
|
1
2
3
4
5
6
7
8
9
10
11
|
ByteBuffer buffer = ByteBuffer.allocateDirect(
10
);
buffer.put(
new
byte
[]{
1
,
2
,
3
,
4
});
System.out.println(
"刚写完数据 "
+buffer);
buffer.flip();
System.out.println(
"flip之后 "
+buffer);
byte
[] target =
new
byte
[buffer.limit()];
buffer.get(target);
//自动读取target.length个数据
for
(
byte
b : target){
System.out.println(b);
}
System.out.println(
"读取完数组 "
+buffer);
|
输出为
|
1
2
3
4
5
6
7
|
刚写完数据 java.nio.DirectByteBuffer[pos=
4
lim=
10
cap=
10
]
flip之后 java.nio.DirectByteBuffer[pos=
0
lim=
4
cap=
10
]
1
2
3
4
读取完数组 java.nio.DirectByteBuffer[pos=
4
lim=
4
cap=
10
]
|
常用方法
上面的读写例子中,有几个常用的方法:
clear()
这个方法用于清除mark和position,还有limit的位置:
|
1
2
3
4
5
6
|
public
final
Buffer clear() {
position =
0
;
limit = capacity;
mark = -
1
;
return
this
;
}
|
flip()
这个方法主要用于改变当前的Position为limit,主要是用于读取操作。
|
1
2
3
4
5
6
|
public
final
Buffer flip() {
limit = position;
position =
0
;
mark = -
1
;
return
this
;
}
|
compact()
这个方法在读取一部分数据的时候比较常用。
它会把当前的Position移到0,然后position+1移到1。
|
1
2
3
4
5
6
7
8
9
10
11
12
|
public
ByteBuffer compact() {
int
pos = position();
int
lim = limit();
assert
(pos <= lim);
int
rem = (pos <= lim ? lim - pos :
0
);
unsafe.copyMemory(ix(pos), ix(
0
), rem <<
0
);
position(rem);
limit(capacity());
discardMark();
return
this
;
}
|
比如一段空间内容为:
|
1
|
123456789
|
当position的位置在2时,调用compact方法,会变成:
|
1
|
345678989
|
isDirect()
这个方法用于判断是否是直接内存。如果是返回true,如果不是返回false。
rewind()
这个方法用于重置mark标记:
|
1
2
3
4
5
|
public
final
Buffer rewind() {
position =
0
;
mark = -
1
;
return
this
;
}
|

