MySQL数据库集群——PXC
MySQL数据库集群
数据库——Percona Server
安装
安装方式两种:
-
Installing Percona Server from Percona yum repository
-
Install the Percona repository
You can install Percona yum repository by running the following command as a root user or with sudo:
yum install http://www.percona.com/downloads/percona-release/redhat/0.1-6/percona-release-0.1-6.noarch.rpm -
Testing the repository
Make sure packages are now available from the repository, by executing the following command:
yum list | grep percona
You should see output similar to the following:... Percona-Server-57-debuginfo.x86_64 5.7.10-3.1.el7 @percona-release-x86_64 Percona-Server-client-57.x86_64 5.7.10-3.1.el7 @percona-release-x86_64 Percona-Server-devel-57.x86_64 5.7.10-3.1.el7 @percona-release-x86_64 Percona-Server-server-57.x86_64 5.7.10-3.1.el7 @percona-release-x86_64 Percona-Server-shared-57.x86_64 5.7.10-3.1.el7 @percona-release-x86_64 Percona-Server-shared-compat-57.x86_64 5.7.10-3.1.el7 @percona-release-x86_64 Percona-Server-test-57.x86_64 5.7.10-3.1.el7 @percona-release-x86_64 Percona-Server-tokudb-57.x86_64 5.7.10-3.1.el7 @percona-release-x86_64 ... -
Install the packages
You can now install Percona Server by running:
yum install Percona-Server-server-57
-
-
离线本地安装
- 下载Percona Server
访问Percona最新版下载页面选择Download All Packages Together
或者使用wget命令wget https://www.percona.com/downloads/Percona-Server-5.7/Percona-Server-5.7.10-3/binary/redhat/7/x86_64/Percona-Server-5.7.10-3-r63dafaf-el7-x86_64-bundle.tar - 解压安装压缩包
tar xvf Percona-Server-5.7.10-3-r63dafaf-el7-x86_64-bundle.tar
解压完成后$ ls *.rpm Percona-Server-57-debuginfo-5.7.10-3.1.el7.x86_64.rpm Percona-Server-client-57-5.7.10-3.1.el7.x86_64.rpm Percona-Server-devel-57-5.7.10-3.1.el7.x86_64.rpm Percona-Server-server-57-5.7.10-3.1.el7.x86_64.rpm Percona-Server-shared-57-5.7.10-3.1.el7.x86_64.rpm Percona-Server-shared-compat-57-5.7.10-3.1.el7.x86_64.rpm Percona-Server-test-57-5.7.10-3.1.el7.x86_64.rpm Percona-Server-tokudb-57-5.7.10-3.1.el7.x86_64.rpm - 安装
rpm -ivh *.rpm - 启动
service mysql start - 查看运行状态
service mysql status - 关闭
service mysql stop - 重启
service mysql restart
- 下载Percona Server
卸载
- 停止服务器(Stop the Percona Server service)
service mysql stop - 删除安装包(Remove the packages)
yum remove Percona-Server* - 删除数据及其配置(Remove the data and configuration files)
注意这将会删除所有的安装文件以及删除所有的数据文件(数据库、数据表、日志等等),如果数据重要的话请在删除之前对数据进行备份以便日后恢复。rm -rf /var/lib/mysql rm -f /etc/my.cnf
开放系统的3306端口
firewall-cmd  --zone=public --add-port=3306/tcp --permanent
firewall-cmd --reload
修改数据库的配置文件
vim /etc/my.cnf
[mysqld]
character_set_server=utf8
bind-addredd=0.0.0.0
# 跳过DNS解析
skip-name-resolve
修改完MySQL配置后需要重启MySQL服务。
删除MySQL的自动启动
chkconfig mysqld off
之所以关闭MySQL的自动启动是因为如果在集群中的一个MySQL节点宕机重启后会自动与一个随机的节点进行数据的同步,而如果一个MySQL节点宕机时间过长,在重启之后需要同步的数据量过大会严重影响MySQL的性能,正确的做法是从其他正常的节点中拷贝数据文件到当前节点,然后再启动数据库,减少同步的数据量。
初始化MySQL数据库
- 修改root账户的默认密码
-
获取原始密码(系统生成的)
cat /var/log/mysqld.log | grep "A temporary password"[root@localhost etc]# cat /var/log/mysqld.log | grep "A temporary password" 2018-11-30T22:47:41.832236Z 1 [Note] A temporary password is generated for root@localhost: NhR3(r0e?9dS其中
NhR3(r0e?9dS就是默认的初始化密码 -
修改原始密码
命令:mysql_secure_installation[root@localhost etc]# mysql_secure_installation Securing the MySQL server deployment. Enter password for user root: The existing password for the user account root has expired. Please set a new password. New password: Re-enter new password: ... Failed! Error: Your password does not satisfy the current policy requirements New password: Re-enter new password:
-
需要注意的是这里修改的密码必须有大写、小写和数字以及符号。
后面如果有选择选Y,并且重复输入修改后的密码。
创建一个可以远程连接的密码
- 登录数据库
mysql -uroot -p - 添加一个远程账户
-- 创建一个用户名为root登录ip不做限制的用户,密码为:Admin123456
CREATE USER 'root'@'%' IDENTIFIED BY 'Admin123456';
-- 分配权限,*.*代表将所有的权限分配给该账户
GRANT all privileges ON *.* TO 'root'@'%';
- 刷新配置
FLUSH PRIVILEGES;
找回数据库密码
-
修改MySQL数据库的配置文件——增加参数
vim /etc/my.cnf
在配置文件中添加:[mysqld] ....... skip-grant-tables -
重启MySQL服务
service mysqld restart -
不使用用户名密码登录MySQL数据库
mysql
不用添加任何参数 -
修改用户密码
USE mysql; UPDATE user SET password=password('new-password') WHERE user = 'root'; -
刷新配置
FLUSH PRIVILEGES; -
修改MySQL数据库的配置文件——删除参数
vim /etc/my.cnf将其中的
skip-grant-tables删除或者注释掉 -
重启MySQL服务
service mysqld restart
创建PXC集群
1. 删除MariaDB程序包
yum -y remove mari*
2. 开放防火墙端口
firewall-cmd --zone=public --add-port=3306/tcp --permanent
firewall-cmd --zone=public --add-port=4444/tcp --permanent
firewall-cmd --zone=public --add-port=4567/tcp --permanent
firewall-cmd --zone=public --add-port=4568/tcp --permanent
3. 关闭SELINUX
vi /etc/selinux/config
把SELINUX属性值设置成disabled后重启服务器
reboot
4. 离线安装PXC
-
下载所有的安装文件Percona-XtraDB-Cluster-5.7.23-31.31-r438-el7-x86_64-bundle.tar
-
解压压缩包
tar -xvf Percona-XtraDB-Cluster-5.7.23-31.31-r438-el7-x86_64-bundle.tar -
进入RPM文件目录,执行安装命令
yum install *.rpm -
参考前面内容,修改MySQL配置文件、创建账户等操作
5. 创建PXC集群
-
停止MySQL服务
service mysql stop -
修改每个PXC节点的/etc/my.cnf文件(在不同节点上,注意调整文件内容)
server-id=1 #PXC集群中MySQL实例的唯一ID,不能重复,必须是数字 wsrep_provider=/usr/lib64/galera3/libgalera_smm.so wsrep_cluster_name=pxc-cluster #PXC集群的名称 wsrep_cluster_address=gcomm://192.168.99.151,192.168.99.159,192.168.99.215 wsrep_node_name=pxc1 #当前节点的名称 wsrep_node_address=192.168.99.151 #当前节点的IP wsrep_sst_method=xtrabackup-v2 #同步方法(mysqldump、rsync、xtrabackup) wsrep_sst_auth= admin:Abc_123456 #同步使用的帐户 pxc_strict_mode=ENFORCING #同步严厉模式 binlog_format=ROW #基于ROW复制(安全可靠) default_storage_engine=InnoDB #默认引擎 innodb_autoinc_lock_mode=2 #主键自增长不锁表 -
主节点的管理命令(第一个启动的PXC节点)
systemctl start [email protected] systemctl stop [email protected] systemctl restart [email protected] -
非主节点的管理命令(非第一个启动的PXC节点)
service start mysql service stop mysql service restart mysql -
查看PXC集群状态信息
show status like 'wsrep_cluster%' ; -
按照上述配置方法,创建两组PXC集群
6. PXC节点启动与关闭
- 如果最后关闭的PXC节点是安全退出的,那么下次启动要最先启动这个节点,而且要以主节点的启动方式启动
- 如果最后关闭的PXC节点不是安全退出的,那么要先修改
/var/lib/mysql/grastate.dat文件,把其中的safe_to_bootstrap属性值设置为1,再按照主节点启动
配置MyCat负载均衡
安装MyCat准备工作
MyCat是使用Java开发的,所以在使用前需要在机器上安装好JDK,并配置好Java环境,如果使用的是yum或者apt等方式安装的,可能在其机器上还需要配置一个JAVA_HOME的环境变量。
- 安装JDK
- 离线安装
前往Oracle 官网下载JDK,下载到本地,进入到下载目录
.tar.gz文件使用tar -zxvf命令解压到你希望存放的目录(我放到了/usr/lib),编辑配置文件vim /etc/profile在文件末尾添加配置信息
如果下载的是export JAVA_HOME=/usr/lib/jdk1.8 export JAVA_BIN=$JAVA_HOME/bin export JAVA_LIB=$JAVA_HOME/lib export CLASSPATH=.:$JAVA_LIB/tools.jar:$JAVA_LIB/dt.jar export PATH=$JAVA_BIN:$PATH.rpm文件则使用yum install jdk*.rpm安装 - 在线安装
如果yum搜索慢,可以将源换成阿里的
使用yum或者apt搜索jdk的包名,使用# 备份原始数据源 mv /etc/yum.repos.d/CentOS-Base.repo /etc/yum.repos.d/CentOS-Base.repo.backup # 下载Centos 7 的源 wget -O /etc/yum.repos.d/CentOS-Base.repo http://mirrors.aliyun.com/repo/Centos-7.repo # 更新缓存 yum makecacheyum install 包名安装,apt类似
- 离线安装
- 配置JAVA_HOME环境变量
vim /etc/profile 在文件末尾添加 export JAVA_HOME=/usr/lib/jdk1.8 - 刷新配置
source /etc/profile - 创建两个PXC集群,充当两个分片
- 创建数据表(在两个集群中都要创建)
-- 创建数据表,用于保存切分数据
drop table if exists `t_user`;

create table `t_user`
(
  `id`       int(10) unsigned    not null,
  `username` varchar(200)        not null,
  `password` varchar(200)        not null,
  `tel`      char(11)            not null,
  `locked`   tinyint(1) unsigned not null default 0,
  primary key (`id`) using BTREE,
  index `idx_username` (`username`) using BTREE,
  unique index `unq_username` (`username`) using BTREE
);
安装MyCat
-
下载Mycat并解压
Mycat官方下载链接 :http://dl.mycat.io/1.6.6.1/Mycat-server-1.6.6.1-release-20181031195535-linux.tar.gztar -zxvf Mycat-server-1.6.6.1-release-20181031195535-linux.tar.gz -
编辑Mycat配置文件
文件 作用 修改内容 rule.xml 切分算法 修改mod-long分片数量为2 server.xml 虚拟MySQL 修改用户名、密码和逻辑库 scheme.xml 数据库链接、读写分离、负载均衡、数据表映射 定义链接、读写分离、负载均衡、数据表映射 - server.xml
97行左右修改文件<user name="root" defaultAccount="true"> <property name="password">123456property> <property name="schemas">chenproperty> user> - scheme.xml修改比较多,建议备份原始文件,重写
<mycat:schema xmlns:mycat="http://io.mycat/"> <schema name="chen" checkSQLschema="false" sqlMaxLimit="100"> <table name="t_user" dataNode="dn1,dn2" rule="mod-long" /> schema> <dataNode name="dn1" dataHost="localhost1" database="chen" /> <dataNode name="dn2" dataHost="localhost2" database="chen" /> <dataHost name="localhost1" maxCon="1000" minCon="10" balance="2" writeType="1" dbType="mysql" dbDriver="native" switchType="1" slaveThreshold="100"> <heartbeat>select user()heartbeat> <writeHost host="W1" url="192.168.56.11:3306" user="root" password="Admin123456"> <readHost host="W1R1" url="192.168.56.22:3306" user="root" password="Admin123456" /> <readHost host="W2R2" url="192.168.56.33:3306" user="root" password="Admin123456" /> writeHost> <writeHost host="W2" url="192.168.56.22:3306" user="root" password="Admin123456"> <readHost host="W1R1" url="192.168.56.11:3306" user="root" password="Admin123456" /> <readHost host="W2R2" url="192.168.56.33:3306" user="root" password="Admin123456" /> writeHost> dataHost> <dataHost name="localhost2" maxCon="1000" minCon="10" balance="2" writeType="1" dbType="mysql" dbDriver="native" switchType="1" slaveThreshold="100"> <heartbeat>select user()heartbeat> <writeHost host="W1" url="192.168.56.44:3306" user="root" password="Admin123456"> <readHost host="W1R1" url="192.168.56.55:3306" user="root" password="Admin123456" /> <readHost host="W2R2" url="192.168.56.66:3306" user="root" password="Admin123456" /> writeHost> <writeHost host="W2" url="192.168.56.55:3306" user="root" password="Admin123456"> <readHost host="W1R1" url="192.168.56.44:3306" user="root" password="Admin123456" /> <readHost host="W2R2" url="192.168.56.66:3306" user="root" password="Admin123456" /> writeHost> dataHost> mycat:schema> - rule.xml
修改较少,在文件中修改分片数量<function name="mod-long" class="io.mycat.route.function.PartitionByMod"> <property name="count">2property> function>
- server.xml
-
开放防火墙,关闭SELINUX
端口 作用 8066 数据服务 9066 管理端口
使用Mycat
- 启动和关闭Mycat
- 修改启动命令的权限(bin目录)
chmod -R 777 ./*.sh - 启动
./startup_nowrap.sh - 关闭(关闭进程,查找进程->杀死进程)
ps -aux | grep mycat
kill -9 1012
- 修改启动命令的权限(bin目录)
数据切分
切分算法
| 切分算法 | 适用场合 | 备注 |
|---|---|---|
| 主键求模算法 | 数据增长速度慢,难于增加分片 | 有明确的主键值 |
| 枚举切分 | 归类存储数据,适合与大多数的业务需求 | |
| 主键范围切分 | 数据快速增长,容易增加分片 | 有明确的主键 |
| 日期切分 | 数据快速增长,容易增加分片 |
-
主键求模切分
求模切合适合用在初始的数据量大,但是数据增长不是很快的场景- 地图产品
- 行政数据
- 企业数据
求模切分的短板在于拓展新分片的时候难度大,需要迁移的数据量大,在现有分片不足以保存热数据的时候才考虑拓展分片,建议拓展后的分片数量是原有数量的2N倍,如原有的2个分片拓展成4个分片(对原有数据主键对4取余):

-
枚举值切分
按照某个字段的值(数字)来切分数据
优点:数据可用性好,比如一个分片宕机,只会影响该分片所管理的数据操作,不会影响其他分片的数据操作
缺点:数据存储不均匀,有的分片数据量特别大,有的分片数据量特别小-
实际操作
在/mycat/conf/目录下创建customer-hash-int.txt文件101=0 102=0 103=0 104=1 105=1 106=1在
rule.xml文件中添加一个function标签<function name="customer-hash-int" class="io.mycat.route.function.PartitionByFileMap"> <property name="mapFile">customer-hash-int.txtproperty> function>配置数据表的切分字段
<tableRule name="sharding-by-customerIntfile">
	<rule>
		<columns>sharding_idcolumns>
		<algorithm>customer-hash-intalgorithm>
	rule>
tableRule>
在
schema.xml文件中配置应用该切分算法的数据表t_customer<schema name="chen" checkSQLschema="false" sqlMaxLimit="100"> <table name="t_user" dataNode="dn1,dn2" rule="mod-long" /> <table name="t_customer" dataNode="dn1,dn2" rule="sharding-by-customerIntfile"> schema>连接Mycat管理端口9066,执行SQL语句(建议才命令行执行DataGrip客户端不支持执行此SQL语句,使用Navicat客户端也可以)
mysql -uroot -h127.0.0.1 -P9066 -p-- 热加载配置 reload @@config_all;
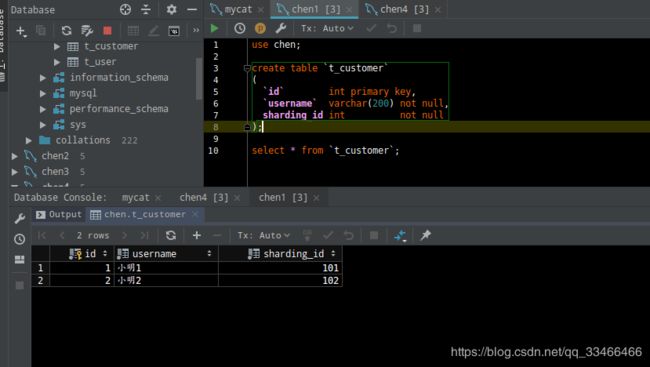
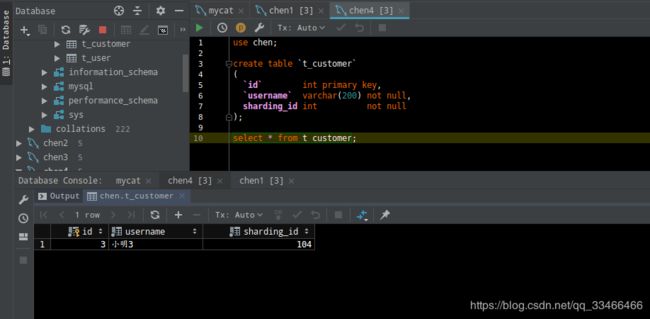
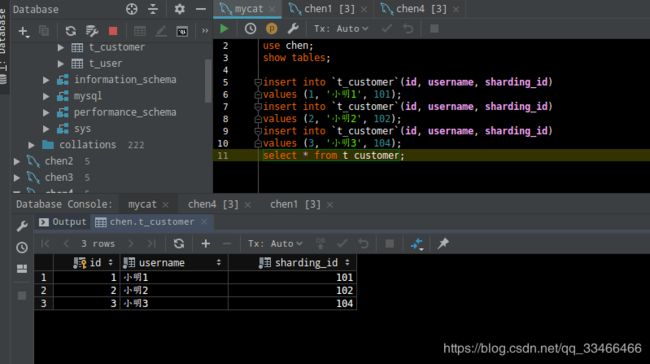
创建t_customer数据表,创建数据表的操作不允许在mycat上执行,需要在两个数据分片中分别执行建表操作。use chen; create table `t_customer` ( `id` int primary key, `username` varchar(200) not null, sharding_id int not null );在Mycat上执行插入语句:
insert into `t_customer`(id, username, sharding_id)
values (1, '小明1', 101);
insert into `t_customer`(id, username, sharding_id)
values (2, '小明2', 102);
insert into `t_customer`(id, username, sharding_id)
values (3, '小明3', 104);
-
父子表
情况:小明的用户信息被切分算法保存到了分片1,但是小明的购物记录等信息被保存到了分片2,同样的,小芳的用户信息被保存到分片2,但是小芳的购物信息记录被保存到了分片1。但是如果在系统中小芳需要查询自己的所有购物信息,一定是需要跨越分片进行数据操作,在这种情况下,表连接的IO传输成本过大,因此在Mycat中不允许扩分片做表连接的查询。
为了解决上述问题,Mycat提出了父子表的解决方案。父表可以使用任何的数据切分算法,但是子表不允许有切分算法,子表的数据需要跟随父表。
即父表的数据被保存到哪个分片,则子表的数据也一定需要被保存到该数据分片。
-
在
schema.xml中配置父子表的关系<schema name="chen" checkSQLschema="false" sqlMaxLimit="100"> <table name="t_user" dataNode="dn1,dn2" rule="mod-long" /> <table name="t_customer" dataNode="dn1,dn2" rule="sharding-by-customerIntfile"> <childTable name="t_orders" primaryKey="ID" joinKey="customer_id" parentKey="id" > childTable> table> schema>修改完成配置记得登录Mycat管理端口,重新加载配置
-
在两个分片中创建子表
t_orders-- 创建子表`t_orders` drop table if EXISTS `t_order`; create table `t_orders` ( `id` int primary key, `customer_id` int not null, `datetime` timestamp default current_timestamp ); -
Mycat中插入数据
insert into `t_orders` (`id` , `customer_id`)values (1,1); insert into `t_orders` (`id` , `customer_id`)values (2,1); insert into `t_orders` (`id` , `customer_id`)values (3,2); insert into `t_orders` (`id` , `customer_id`)values (4,3); -
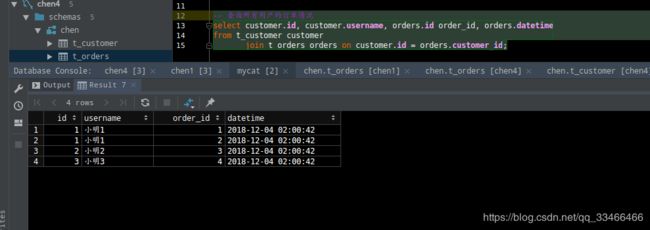
用户订单数据连接查询(Mycat中执行)
-- 查询所有用户的订单情况
select customer.id, customer.username, orders.id order_id, orders.datetime
from t_customer customer
       join t_orders orders on customer.id = orders.customer_id;
组建双机热备的Mycat集群
准备工作
- 准备两个Mycat
之前的操作,我是把我的Mycat放到了我的本地计算机中,到了这一步,我准备把Mycat上传到我创建的两台虚拟机上,一台的ip为192.168.56.11,另一台IP为192.168.56.44
上传命令为:# 先进入到本地,注意:是本地Mycat所在的文件夹,因为本地的MyCat是配置好的 scp -r ./mycat/ [email protected]:/root/ # 上传到另一台虚拟机上 scp -r ./mycat/ [email protected]:/root/ - 准备两个Haproxy
同样的,为了节省内存,我将两个Haproxy分别部署到了上面的两台虚拟机上
安装Haproxy
-
安装Haproxy准备工作
- 关闭防火墙端口
端口 作用 8888 TCP/IP转发端口 4001 监控界面端口 firewall-cmd --zone=public --add-port=8888/tcp --permanent firewall-cmd --zone=public --add-port=4001/tcp --permanent firewall-cmd --reload-
关闭SELINUX
vi /etc/selinux/config把SELINUX属性值设置成disabled
reboot
-
安装Haproxy与使用
安装Haproxy
# 安装Haproxy
yum install -y haproxy
修改Haproxy配置文件
# 修改Haproxy配置文件 vim /etc/haproxy/haproxy.cfg配置文件内容如下:haproxy.cfg
#---------------------------------------------------------------------
# Example configuration for a possible web application.  See the
# full configuration options online.
#
#   http://haproxy.1wt.eu/download/1.4/doc/configuration.txt
#
#---------------------------------------------------------------------

#---------------------------------------------------------------------
# Global settings
#---------------------------------------------------------------------
global
    # to have these messages end up in /var/log/haproxy.log you will
    # need to:
    #
    # 1) configure syslog to accept network log events.  This is done
    #    by adding the '-r' option to the SYSLOGD_OPTIONS in
    #    /etc/sysconfig/syslog
    #
    # 2) configure local2 events to go to the /var/log/haproxy.log
    #   file. A line like the following can be added to
    #   /etc/sysconfig/syslog
    #
    #    local2.*                       /var/log/haproxy.log
    #
    log         127.0.0.1 local2

    chroot      /var/lib/haproxy
    pidfile     /var/run/haproxy.pid
    maxconn     4000
    user        haproxy
    group       haproxy
    daemon

    # turn on stats unix socket
    stats socket /var/lib/haproxy/stats

#---------------------------------------------------------------------
# common defaults that all the 'listen' and 'backend' sections will
# use if not designated in their block
#---------------------------------------------------------------------
defaults
    mode                    http
    log                     global
    # 日志格式
    option                  httplog
    # 日志中不记录负载均衡的心跳检测记录
    option                  dontlognull
    # 连接超时(毫秒)
    timeout connect         5000
    # 客户端超时(毫秒)
    timeout client          50000
    # 服务器超时
    timeout server          50000

# 监控界面
listen admin_stats
    # 监控界面的访问IP和端口
    bind        0.0.0.0:4001
    # 访问协议
    mode        http
    # URI相对地址
    stats uri   /dbs
    # 统计报告格式
    stats realm     Global\ statistics
    # 登录账户信息
    stats auth      admin:abc123456

# 数据库负载均衡
listen proxy-mysql
    # 访问的IP和端口
    bind        0.0.0.0:8888
    # 网络协议
    mode        tcp
    # 负载均衡算法(轮询算法)
    # 轮询算法:roundrobin
    # 权重算法:static-rr
    # 最少连接算法:leastconn
    # 请求源IP算法:source
    balance     roundrobin
    # 日志格式
    option      tcplog
    # 负载均衡
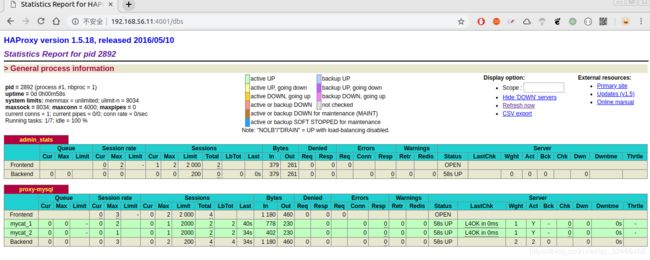
    server  mycat_1 192.168.56.11:8066 check port 8066 weight 1 maxconn 2000
    server  mycat_2 192.168.56.44:8066 check port 8066 weight 1 maxconn 2000
    # 使用keeplive监测死链
    option  tcpka
启动Haproxy
service haproxy start停止Haproxy
service haproxy stop重启Haproxy
service haproxy restart -
数据操作
-
连接
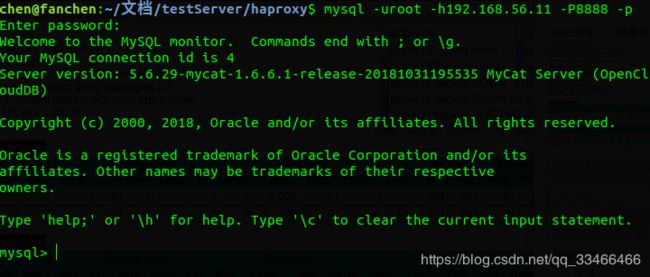
连接Haproxy,端口为8888,但是连接的用户名和密码为你配置的Mycat的,因为你说有的请求都是通过Haproxy转发给Mycat的mysql -uroot -h192.168.56.11 -P8888 -p -
查询
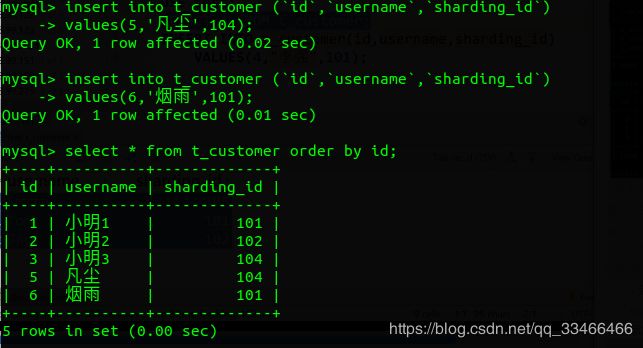
-- 切换到chen数据库 use chen; -- 查看所有数据表 show tables; -- 查询t_customer表中所有数据 select * from t_customer order by id; -
添加
-- 添加两条数据到t_customer
insert into t_customer (`id`,`username`,`sharding_id`)
values(5,'凡尘',104);
insert into t_customer (`id`,`username`,`sharding_id`)
values(6,'烟雨',101);
-- 查询添加后的结果
select * from t_customer order by id;
-
-
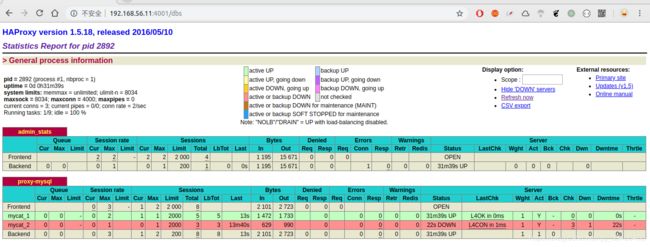
关闭一个Mycat节点检验是否能正常工作
在IP为
192.168.56.44的虚拟机上关闭Mycat# 查询Mycat的进程id ps -aux | grep mycat # 杀死Mycat进程 kill -9 2024
使用Keepalived抢占虚拟IP
- 开启防火墙的VRRP协议
#开启VRRP firewall-cmd --direct --permanent --add-rule ipv4 filter INPUT 0 --protocol vrrp -j ACCEPT #应用设置 firewall-cmd --reload - 安装Keepalived
-
安装
yum install -y keepalived -
配置
vim /etc/keepalived/keepalived.conf配置文件如下:
keepalived.conf! Configuration File for keepalived vrrp_instance VI_1 { state MASTER interface eth0 virtual_router_id 52 priority 100 advert_int 1 authentication { auth_type PASS auth_pass 1111 } virtual_ipaddress { 192.168.56.99 } } -
常用命令
# 启动 service keepalived start # 停止 service keepalived stop # 重启 service keepalived restart -
使用配置的虚拟IP访问进行数据操作。
-


