Springboot 整合Swagger 2框架 让接口查看及调试更加优雅
先是pom.xml文件添加依赖:
			io.springfox
			springfox-swagger2
			2.8.0


			io.springfox
			springfox-swagger-ui
			2.8.0
application.yml不需要做配置
接着是Swagger2的配置类 Swagger2Config.java:
import org.springframework.context.annotation.Bean;
import org.springframework.context.annotation.Configuration;
import org.springframework.web.servlet.config.annotation.ResourceHandlerRegistry;
import org.springframework.web.servlet.config.annotation.WebMvcConfigurationSupport;
import springfox.documentation.builders.ApiInfoBuilder;
import springfox.documentation.builders.PathSelectors;
import springfox.documentation.builders.RequestHandlerSelectors;
import springfox.documentation.service.ApiInfo;
import springfox.documentation.spi.DocumentationType;
import springfox.documentation.spring.web.plugins.Docket;
import springfox.documentation.swagger2.annotations.EnableSwagger2;
/**
* @Author:JCccc
* @Description:
* @Date: created in 20:50 2019/5/25
*/
@Configuration
@EnableSwagger2
public class Swagger2Config extends WebMvcConfigurationSupport {
/**
* 因为 Swagger2的资源文件都是在jar包里面,如果不在此处配置加载静态资源,
* 会导致请求http://localhost:8081/swagger-ui.html失败
*
* 然后是写一个Controller ,整合Swagger2框架注解 Swagger2TestController.java:
import com.alibaba.fastjson.JSONObject;
import com.soelegant.elegantdemo.pojo.UserInfo;
import io.swagger.annotations.Api;
import io.swagger.annotations.ApiImplicitParam;
import io.swagger.annotations.ApiOperation;
import org.springframework.web.bind.annotation.*;

/**
 * @Author:JCccc
 * @Description:
 * @Date: created in 20:54 2019/5/25
 */
@Api(value = "测试各种方法", tags = {"测试使用Controller"})
@RestController
public class Swagger2TestController {

    @ApiOperation(value = "测试Swagger2接口", notes = "传入编号!")
    @ApiImplicitParam(name = "id", value = "id", required = true)
    @RequestMapping(value = "/swaTest2/{id}", method = RequestMethod.GET)
    public String TestSwa2(@PathVariable("id") Integer id) {
        System.out.println("swaTest!");
        //  Optional user = userRepository.findById(id);
        UserInfo userInfo = new UserInfo();
        userInfo.setUsername("test");
        userInfo.setState(1);
        userInfo.setPassword("123456");
        userInfo.setNickName("testNickName");
        userInfo.setIsDeleted(id);
        userInfo.setIds(null);
        userInfo.setIdList(null);
        return userInfo.toString();
    }


    @ApiOperation(value = "swaTest3", notes = "测试GET!")
    @ApiImplicitParam(name = "name", value = "用户name")
    @RequestMapping(value = "/swaTest3", method = RequestMethod.GET)
    public String TestSwa3(@RequestParam("name") String name) {
        System.out.println("swaTest!");


        return name;
    }


    @ApiOperation(value = "swaTest4", notes = "测试POST!")
    @RequestMapping(value = "/swaTest4", method = RequestMethod.POST)
    public String TestSwa4(@RequestBody JSONObject jsonObject) {
        System.out.println("swaTest4!" + jsonObject.toString());

        String str = jsonObject.toString();
        return str;
    }


    @ApiOperation(value = "swaTest5", notes = "测试对象传值!")
    @RequestMapping(value = "/swaTest5", method = RequestMethod.POST)
    public String TestSwa5(UserInfo userInfo) {

        return userInfo.toString();
    }

}
可以看到上面的第一个接口用到了UserInfo实体类, 那么我们也将这个跟接口有关的类也结合Swagger2注解 UserInfo.java:
import io.swagger.annotations.ApiModel;
import io.swagger.annotations.ApiModelProperty;
import lombok.Data;

import java.io.Serializable;
import java.util.List;

/**
 * @Author:JCccc
 * @Description:
 * @Date: created in 20:57 2019/5/25
 */
@Data
@ApiModel(value = "userInfo 对象",description = "用户对象user")
public class UserInfo implements Serializable {
    private static final long serialVersionUID = 1L;
    @ApiModelProperty(value="用户名",name="username",example="lx")
    private String username;
    @ApiModelProperty(value="状态",name="state",required=true)
    private Integer state;
    private String password;
    private String nickName;
    private Integer isDeleted;

    @ApiModelProperty(value="id数组",hidden=true)
    private String[] ids;
    private List idList;


}
那么到此,我们整合Swagger2基本已经完毕,接下来看看效果:
运行项目后,进入Swagger2的接口页面:http://localhost:8099/swagger-ui.html# (端口就是自己项目的端口,我自己的是8099)
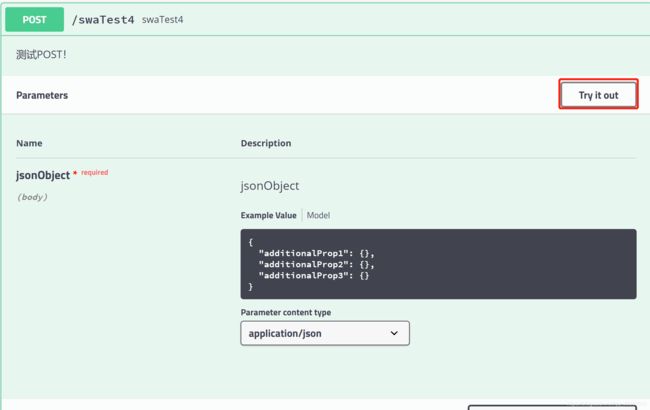
然后可以点开接口看看,顺便还可以在线调试(点开接口,点击Try it out):
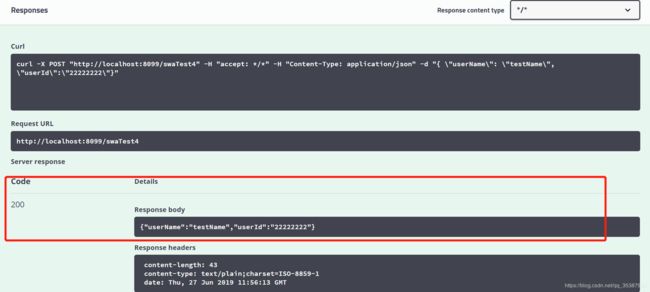
然后/swaTest4这个接口是通过@RequestBody JSONObject jsonObject 接收参数,所以在Swagger2的接口页面上,我们也传入一个json格式数据:
{
"userName": "testName",
"userId":"22222222"
}
如图:
点击Execute进行接口调用,可以看到接口返回:
OK,本篇springboot整合Swagger2 到此结束。


