Spring Boot搭建简易spring clound框架 (一)
Spring Boot搭建简易spring clound框架 (一)
1.搭建之前先了解微服务
微服务架构介绍
微服务架构(Microservice Architecture)是一种架构概念,旨在通过将功能分解到各个离散的服务中以实现对解决方案的解耦。你可以将其看作是在架构层次而非获取服务的
类上应用很多SOLID原则。微服务架构是个很有趣的概念,它的主要作用是将功能分解到离散的各个服务当中,从而降低系统的耦合性,并提供更加灵活的服务支持。
概念:把一个大型的单个应用程序和服务拆分为数个甚至数十个的支持微服务,它可扩展单个组件而不是整个的应用程序堆栈,从而满足服务等级协议。
定义:围绕业务领域组件来创建应用,这些应用可独立地进行开发、管理和迭代。在分散的组件中使用云架构和平台式部署、管理和服务功能,使产品交付变得更加简单。
本质:用一些功能比较明确、业务比较精练的服务去解决更大、更实际的问题。
概念是这样,下面这个图帮大家理解一下,每个业务都独立出来
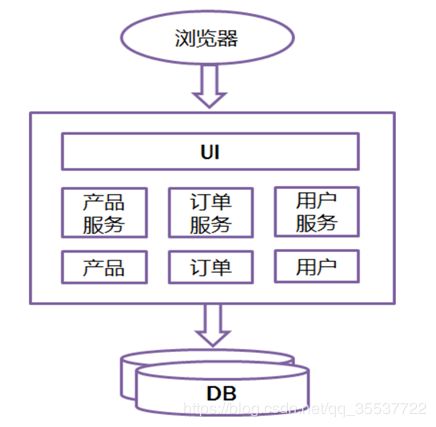
现在主流的微服务架构有spring cloud和Dubbo,下面对比一下两个架构
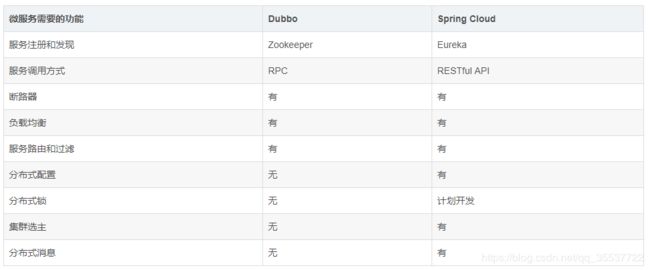
Spring Cloud抛弃了Dubbo的RPC通信,采用的是基于HTTP的REST方式。严格来说,这两种方式各有优劣。虽然从一定程度上来说,后者牺牲了服务调用的性能,但也避免了上面提到的原生RPC带来的问题。而且REST相比RPC更为灵活,服务提供方和调用方的依赖只依靠一纸契约,不存在代码级别的强依赖,这在强调快速演化的微服务环境下,显得更加合适。
很明显,Spring Cloud的功能比DUBBO更加强大,涵盖面更广,而且作为Spring的拳头项目,它也能够与Spring Framework、Spring Boot、Spring Data、Spring Batch等其他Spring项目完美融合,这些对于微服务而言是至关重要的。前面提到,微服务背后一个重要的理念就是持续集成、快速交付,而在服务内部使用一个统一的技术框架,显然比把分散的技术组合到一起更有效率。更重要的是,相比于Dubbo,它是一个正在持续维护的、社区更加火热的开源项目,这就保证使用它构建的系统,可以持续地得到开源力量的支持。
介绍就就到这了,其余大家网上搜搜,要详细了解可以看下这篇介绍链接
https://blog.csdn.net/itjiandingshi/article/details/79756133
2.搭建spring cloud项目
官方文档,里面有详细介绍spring cloud中的插件 https://springcloud.cc/
这边主要介绍以下几个
Eureka:各个服务启动时,Eureka Client都会将服务注册到Eureka Server,并且Eureka Client还可以反过来从Eureka Server拉取注册表,从而知道其他服务在哪里
Ribbon:服务间发起请求的时候,基于Ribbon做负载均衡,从一个服务的多台机器中选择一台
Feign:基于Feign的动态代理机制,根据注解和选择的机器,拼接请求URL地址,发起请求
Hystrix:发起请求是通过Hystrix的线程池来走的,不同的服务走不同的线程池,实现了不同服务调用的隔离,避免了服务雪崩的问题
Zuul:如果前端、移动端要调用后端系统,统一从Zuul网关进入,由Zuul网关转发请求给对应的服务
这篇博客主要先采用Eureka搭建服务中心,并采用Ribbon做通信
1)搭建Eureka服务中心
这边采用spring boot 2.1.x版本(gradle版本)
首先先创建spring boot项目(自行创建)
然后在修改build.gradle
plugins {
	id 'org.springframework.boot' version '2.1.3.RELEASE'
	id 'java'
}
apply plugin: 'io.spring.dependency-management'
group = 'lin29'
version = '0.0.1-SNAPSHOT'
sourceCompatibility = '1.8'
repositories {
	mavenCentral()
	maven { url 'https://repo.spring.io/milestone' }
}
ext {
	set('springCloudVersion', 'Greenwich.SR1')
}
dependencies {
	implementation 'org.springframework.cloud:spring-cloud-starter-netflix-eureka-client'
	testImplementation 'org.springframework.boot:spring-boot-starter-test'
	compile('org.springframework.cloud:spring-cloud-starter-netflix-eureka-server')
}
dependencyManagement {
	imports {
		mavenBom "org.springframework.cloud:spring-cloud-dependencies:${springCloudVersion}"
	}
}
修改后重新加载jar包,并修改启动类
package com.example.demo;
import org.springframework.boot.SpringApplication;
import org.springframework.boot.autoconfigure.SpringBootApplication;
import org.springframework.cloud.netflix.eureka.server.EnableEurekaServer;

@SpringBootApplication
@EnableEurekaServer
public class EurekaApplication {

	public static void main(String[] args) {
		SpringApplication.run(EurekaApplication.class, args);
	}
}
修改application.yml文件
,Eureka会将自己也作为客户端尝试注册,所以在单机模式下,我们需要禁止该行为registerWithEureka,fetchRegistry需要设置为false
  server:
  port: 8761                    # 指定该Eureka实例的端口

eureka:
  instance:
    hostname: discovery         # 指定该Eureka实例的主机名
  client:
    registerWithEureka: false
    fetchRegistry: false
    serviceUrl:
      defaultZone: http://${eureka.instance.hostname}:${server.port}/eureka/
2) 创建业务模块
创建springboot项目修改build.gradle文件
plugins {
	id 'org.springframework.boot' version '2.1.3.RELEASE'
	id 'java'
}

apply plugin: 'io.spring.dependency-management'

group = 'lin29'
version = '0.0.1-SNAPSHOT'
sourceCompatibility = '1.8'

repositories {
	mavenCentral()
}

ext {
	set('springCloudVersion', 'Greenwich.SR1')
}

dependencies {
	implementation 'org.mybatis.spring.boot:mybatis-spring-boot-starter:2.0.0'
	runtimeOnly 'mysql:mysql-connector-java:8.0.15'
	testImplementation 'org.springframework.boot:spring-boot-starter-test'
	implementation 'org.springframework.cloud:spring-cloud-starter-netflix-eureka-client'
	compile('org.springframework.cloud:spring-cloud-starter-netflix-eureka-server')

	compile("org.springframework.boot:spring-boot-starter-web")
	compile("org.springframework.boot:spring-boot-starter-actuator")
	compile("org.springframework.boot:spring-boot-starter-jdbc")

}

dependencyManagement {
	imports {
		mavenBom "org.springframework.cloud:spring-cloud-dependencies:${springCloudVersion}"
	}
}
修改启动类
package com;

import org.springframework.boot.SpringApplication;
import org.springframework.boot.autoconfigure.SpringBootApplication;
import org.springframework.cloud.client.discovery.EnableDiscoveryClient;

@SpringBootApplication
@EnableDiscoveryClient
public class BusApplication {

	public static void main(String[] args) {
		SpringApplication.run(BusApplication.class, args);
	}
}
修改application.yml文件
server:
  port: 8000
spring:
  application:
    name: user    # 项目名称尽量用小写
  jpa:
    generate-ddl: false
    show-sql: true
    hibernate:
      ddl-auto: none
  datasource:                           # 指定数据源(mysql)
    url: jdbc:mysql://127.0.0.1:3306/demo
    username: root
    password: 123456
    driver-class-name: com.mysql.jdbc.Driver
logging:
  level:
    root: INFO
    org.hibernate: INFO
    org.hibernate.type.descriptor.sql.BasicBinder: TRACE
    org.hibernate.type.descriptor.sql.BasicExtractor: TRACE
    com.itmuch.youran.persistence: ERROR
eureka:
  client:
    serviceUrl:
      defaultZone: http://${eureka.instance.hostname}:8761/eureka/    # 指定注册中心的地址
  instance:
    hostname: 127.0.0.1
    preferIpAddress: true
创建测试类
package com.controller;

import org.springframework.web.bind.annotation.RequestMapping;
import org.springframework.web.bind.annotation.RestController;

@RestController
public class TestController {

	@RequestMapping("/test")
	public String test() {
		return "hello world";
	}
}
3)创建客户端
创建springboot项目,修改build.gradle文件
plugins {
	id 'org.springframework.boot' version '2.1.3.RELEASE'
	id 'java'
}

apply plugin: 'io.spring.dependency-management'

group = 'lin29'
version = '0.0.1-SNAPSHOT'
sourceCompatibility = '1.8'

repositories {
	mavenCentral()
}

ext {
	set('springCloudVersion', 'Greenwich.SR1')
}

dependencies {
	implementation 'org.springframework.boot:spring-boot-starter-web'
	testImplementation 'org.springframework.boot:spring-boot-starter-test'
	testImplementation 'org.springframework.security:spring-security-test'
	implementation 'org.springframework.cloud:spring-cloud-starter-netflix-eureka-client'
	compile('org.springframework.cloud:spring-cloud-starter-netflix-eureka-server')
	compile('org.springframework.cloud:spring-cloud-starter-netflix-ribbon')
	compile("org.springframework.boot:spring-boot-starter-actuator")
}

dependencyManagement {
	imports {
		mavenBom "org.springframework.cloud:spring-cloud-dependencies:${springCloudVersion}"
	}
}
修改启动类
package com;

import org.springframework.boot.SpringApplication;
import org.springframework.boot.autoconfigure.SpringBootApplication;
import org.springframework.cloud.client.discovery.EnableDiscoveryClient;
import org.springframework.cloud.client.loadbalancer.LoadBalanced;
import org.springframework.context.annotation.Bean;
import org.springframework.web.client.RestTemplate;

@SpringBootApplication
@EnableDiscoveryClient
public class WebApplication {

	/**
	   * 实例化RestTemplate,通过@LoadBalanced注解开启均衡负载能力.
	   * @return restTemplate
	   */
	@Bean
	@LoadBalanced
	public RestTemplate restTemplate() {
	    return new RestTemplate();
	}

	public static void main(String[] args) {
		SpringApplication.run(WebApplication.class, args);
	}

}
配置application.yml文件
server:
  port: 8710
spring:
  application:
    name: web
eureka:
  client:
    serviceUrl:
      defaultZone: http://${eureka.instance.hostname}:8761/eureka/
  instance:
    hostname: 127.0.0.1
    preferIpAddress: true
写测试类RibbonController.java
package com.controller;

import org.springframework.beans.factory.annotation.Autowired;
import org.springframework.web.bind.annotation.RequestMapping;
import org.springframework.web.bind.annotation.RestController;

import com.service.RibbonService;

@RestController
public class RibbonController {

	@Autowired
	private RibbonService service;

	@RequestMapping("/ribbon/test")
	public String ribbonTest() {
		return service.ribbonTest();
	}
}
RibbonService.java类
package com.service;

import org.springframework.beans.factory.annotation.Autowired;
import org.springframework.stereotype.Service;
import org.springframework.web.client.RestTemplate;

@Service
public class RibbonService {

	@Autowired
	private RestTemplate restTemplate;

	public String ribbonTest() {
		 return this.restTemplate.getForObject("http://user/test", String.class);
	}
}
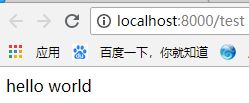
启动服务,查看localhost:8710/ribbon/test
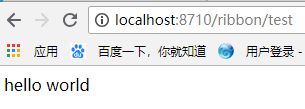
至此,采用ribbon通信成功,这边没做负载均衡测试,可自行测试
