SSM集成Redis缓存数据库
首先,去官网下载redis并安装。
在maven里下载jar包
<dependency>
    <groupId>org.springframework.datagroupId>
    <artifactId>spring-data-redisartifactId>
    <version>1.6.2.RELEASEversion>
dependency>

<dependency>
    <groupId>redis.clientsgroupId>
    <artifactId>jedisartifactId>
    <version>2.8.0version>
dependency>

<dependency>
    <groupId>org.mybatisgroupId>
    <artifactId>mybatis-ehcacheartifactId>
    <version>1.0.0version>
dependency>
jar包的版本要注意,不然会报错,找到适合自己的版本。
我这里是spring-4.1.9,mybatis-3.2.7,mybatis-spring-1.3.1.
Redis数据库参数文件
redis.properties
# Redis settings   配置
redis.host=127.0.0.1
redis.port=6379
redis.pass=

redis.maxIdle=300
redis.maxActive=600
redis.maxWait=1000
redis.testOnBorrow=true
接下来是配置文件 我这里配置在spring里边。在原先的配置里加入redis配置。
applicationContext.xml
    <bean id="propertyConfigurer" class="org.springframework.beans.factory.config.PropertyPlaceholderConfigurer">
        <property name="locations">
            <list>
                <value>classpath:db.propertiesvalue>
                <value>classpath:redis.propertiesvalue>
            list>
        property>
    bean>


<bean id="poolConfig" class="redis.clients.jedis.JedisPoolConfig">
    <property name="maxIdle" value="${redis.maxIdle}" />
    <property name="maxTotal" value="${redis.maxActive}" />
    <property name="maxWaitMillis" value="${redis.maxWait}" />
    <property name="testOnBorrow" value="${redis.testOnBorrow}" />
bean>


    <bean id="jedisConnectionFactory" class="org.springframework.data.redis.connection.jedis.JedisConnectionFactory">
        <property name="hostName" value="${redis.host}">property>
        <property name="port" value="${redis.port}">property>
        <property name="password" value="${redis.pass}">property>
        <property name="poolConfig"  ref="poolConfig">property>
     bean>


    <bean id="redisCacheTransfer" class="com.ys.redis.RedisCacheTransfer">
        <property name="jedisConnectionFactory" ref="jedisConnectionFactory"/>
    bean>


    <bean id="redisTemplate" class="org.springframework.data.redis.core.RedisTemplate">
        <property name="connectionFactory" ref="jedisConnectionFactory" />
        <property name="keySerializer">
            <bean class="org.springframework.data.redis.serializer.StringRedisSerializer" />
        property>
        <property name="valueSerializer">
            <bean class="org.springframework.data.redis.serializer.JdkSerializationRedisSerializer" />
        property>
        <property name="hashKeySerializer">
            <bean class="org.springframework.data.redis.serializer.StringRedisSerializer" />
        property>

        <property name="enableTransactionSupport" value="true">property>
    bean>


    <bean id="cacheManager" class="org.springframework.data.redis.cache.RedisCacheManager">
        <constructor-arg index="0" ref="redisTemplate" />
    bean>
在mybatis配置文件里启用缓存
mybatis.cfg.xml
<settings>


        <setting name="cacheEnabled" value="true"/>


        <setting name="lazyLoadingEnabled" value="false"/>


        <setting name="multipleResultSetsEnabled" value="true"/>


        <setting name="aggressiveLazyLoading" value="true"/>

    settings>
中间件实现第三方缓存
RedisCacheTransfer.java
package com.ys.redis;

import org.springframework.beans.factory.annotation.Autowired;
import org.springframework.data.redis.connection.jedis.JedisConnectionFactory;

/**
*@Title RedisCacheTransfer.java
*@description:
**/
public class RedisCacheTransfer {

    @Autowired
    public void setJedisConnectionFactory(JedisConnectionFactory jedisConnectionFactory) {
        RedisCache.setJedisConnectionFactory(jedisConnectionFactory);
    }
}
接下来编写RedisCache类并实现Cache接口
RedisCache.java
package com.ys.redis;
import java.util.concurrent.locks.ReadWriteLock;
import java.util.concurrent.locks.ReentrantReadWriteLock;
import org.apache.ibatis.cache.Cache;
import org.slf4j.Logger;
import org.slf4j.LoggerFactory;
import org.springframework.data.redis.connection.jedis.JedisConnection;
import org.springframework.data.redis.connection.jedis.JedisConnectionFactory;
import org.springframework.data.redis.serializer.JdkSerializationRedisSerializer;
import org.springframework.data.redis.serializer.RedisSerializer;
import redis.clients.jedis.exceptions.JedisConnectionException;
/**
*@Title RedisCache.java
*@description:
**/
public class RedisCache implements Cache{
private static final Logger logger = LoggerFactory.getLogger(RedisCache.class);
private static JedisConnectionFactory jedisConnectionFactory;
private final String id;
/**
* The {@code ReadWriteLock}.
*/
private final ReadWriteLock readWriteLock = new ReentrantReadWriteLock();
public RedisCache(final String id) {
System.out.println(id);
if (id == null) {
logger.error("缓存实例编号为null");
throw new IllegalArgumentException("Cache instances require an ID");
}
logger.debug("MybatisRedisCache: Mybatis 缓存编号为 id=" + id);
this.id = id;
}
@Override
public void clear()
{
JedisConnection connection = null;
try
{
connection = (JedisConnection) jedisConnectionFactory.getConnection();
connection.flushDb();
connection.flushAll();
logger.debug("清空Redis内存数据库中的所有的数据");
}
catch (JedisConnectionException e)
{
e.printStackTrace();
}
finally
{
if (connection != null) {
connection.close();
}
}
}
@Override
public String getId()
{
return this.id;
}
@Override
public Object getObject(Object key)
{
Object result = null;
JedisConnection connection = null;
try
{
connection = (JedisConnection) jedisConnectionFactory.getConnection();
RedisSerializerRedis工具类
RedisUtils.java
package com.ys.redis;

import redis.clients.jedis.Jedis;
import redis.clients.jedis.JedisPool;
import redis.clients.jedis.JedisPoolConfig;

/**
*@Title RedisUtils.java
*@description:  RedisUtils
**/
public class RedisUtils {

    // Redis服务器IP
        private static String ADDR = "127.0.0.1";

        // Redis的端口号
        private static int PORT = 6379;

        // redis密码
        // private static String AUTH = "";

        // 可用连接实例的最大数目,默认值为8
        private static int MAX_ACTIVE = 1024;

        // 控制一个pool最多有多少个状态为idle(空闲的)的jedis实例,默认值也是8。
        private static int MAX_IDLE = 200;

        // 等待可用连接的最大时间,单位毫秒,默认值为-1,表示永不超时。如果超过等待时间,则直接抛出JedisConnectionException;
        private static int MAX_WAIT = 10000;

        private static int TIMEOUT = 10000;

        // 在borrow一个jedis实例时,是否提前进行validate操作;如果为true,则得到的jedis实例均是可用的;
        private static boolean TEST_ON_BORROW = true;

        private static JedisPool jedisPool = null;

        /**
         * 初始化Redis连接池
         */
        static {
            try {
                JedisPoolConfig config = new JedisPoolConfig();
                config.setMaxIdle(MAX_ACTIVE);
                config.setMaxTotal(MAX_ACTIVE);
                config.setMaxIdle(MAX_IDLE);
                config.setMaxWaitMillis(MAX_WAIT);
                config.setTestOnBorrow(TEST_ON_BORROW);
                jedisPool = new JedisPool(config, ADDR, PORT, TIMEOUT);
            } catch (Exception e) {
                e.printStackTrace();
            }
        }

        /**
         * 获取Jedis实例
         *
         * @return
         */
        public synchronized static Jedis getJedis() {
            try {
                if (jedisPool != null) {
                    Jedis resource = jedisPool.getResource();
                    return resource;
                } else {
                    return null;
                }
            } catch (Exception e) {
                e.printStackTrace();
                return null;
            }
        }

        /**
         * 释放jedis资源
         *
         * @param jedis
         */
        public static void returnResource(final Jedis jedis) {
            if (jedis != null) {
                jedisPool.returnResource(jedis);
            }
        }
}
序列化工具类SerializeUtils
SerializeUtils.java
package com.ys.redis;

import java.io.ByteArrayInputStream;
import java.io.ByteArrayOutputStream;
import java.io.ObjectInputStream;
import java.io.ObjectOutputStream;

/**
*@Title SerializeUtils.java
*@description:  序列化
**/
public class SerializeUtils {


    /**
     * @Title: serialize
     * @Description: 序列化
     * @return byte[]
     */
    public static byte[] serialize(Object object) {
        ObjectOutputStream oos = null;
        ByteArrayOutputStream baos = null;
        try {
            // 序列化
            baos = new ByteArrayOutputStream();
            oos = new ObjectOutputStream(baos);
            oos.writeObject(object);
            byte[] bytes = baos.toByteArray();
            return bytes;
        } catch (Exception e) {
            e.printStackTrace();
        }
        return null;
    }

    /**
     * @Title: unserialize
     * @Description: 反序列化
     * @return Object
     */
    public static Object unserialize(byte[] bytes) {
        if (bytes == null)
            return null;
        ByteArrayInputStream bais = null;
        try {
            // 反序列化
            bais = new ByteArrayInputStream(bytes);
            ObjectInputStream ois = new ObjectInputStream(bais);
            return ois.readObject();
        } catch (Exception e) {
            e.printStackTrace();
        }
        return null;
    }
}
接着在需要缓存的实体类实现序列化,与之有关联的数据也需要实现序列化,不然操作的时候会报错
public class User implements Serializable{


    private static final long serialVersionUID = 1L;

    //getter/setter;
}
到这里配置完成了,开启缓存就在mybatis的mapper文件里引入RedisCache
<mapper namespace="com.ys.dao.UserMapper">

<cache type="com.ys.redis.RedisCache" />

mapper>
不想要缓存的数据在对应的SQL上加上 useCache=”false”,不写默认为开启状态
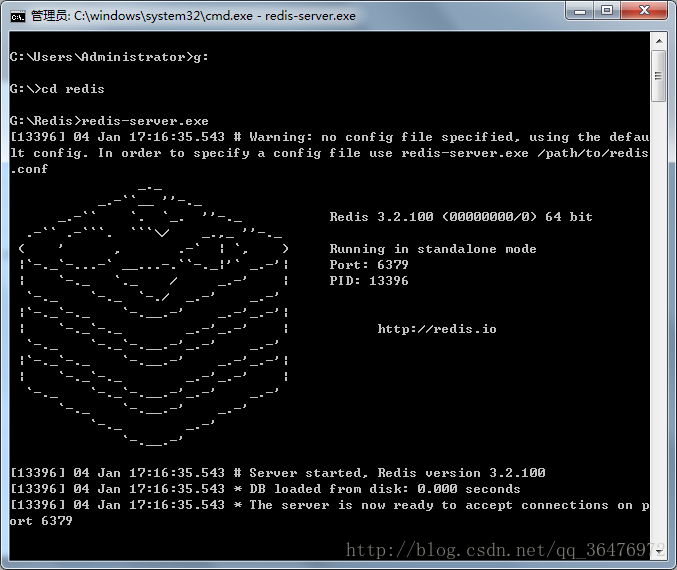
<select id="" parameterType="" resultType="" useCache="false">接下来启动redis。进入cmd,进入安装路径,启动redis服务,如下:
此窗口不可关闭,接着再打开cmd,测试redis是否可以使用,设置键值,再取值
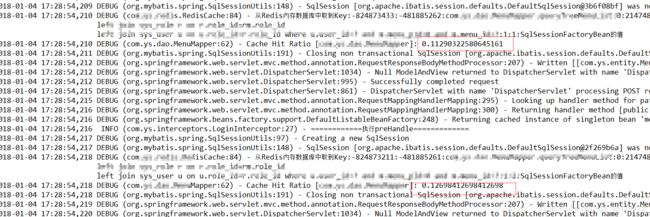
运行项目可以从日志中看见,先从数据库中读取数据然后存放到redis里
刷新一下发现,没有执行SQL而是直接读取redis
到这Redis配置成功。


