前端面试题精选1-原生JS实现图片懒加载
github: 更多文章
推荐在线阅读:点我跳转
文章目录
- 1.原生JS实现图片懒加载(考虑不重复加载以及节流)
- 2.如何渲染几万条数据且不卡住页面?
- 3.写函数实现任意标签转换成json形式
- 4.判断执行顺序(事件循环)
- 5.实现一个 sleep 函数
- 6.meta 标签的作用
1.原生JS实现图片懒加载(考虑不重复加载以及节流)
知识点:视口位置判断,懒加载实现(data-set),节流等

1.Element.getBoundingClientRect()
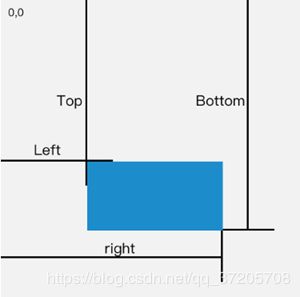
该方法返回元素的大小及其相对于视口的位置,具体解释及用法参考 MDN.
通过 Element.getBoundingClientRect().top 与 window.innerHeight(当前视窗的高度)比较就可以判断图片是否出现在可视区域。注意这个 top 是相对于当前视窗的顶部的top值而不是一开始的顶部。
2.通过 Element.dataset 可以获取到为元素节点添加的data-*属性,我们可以通过这个属性来保存图片加载时的url。
<html lang="en">
<head>
<meta charset="UTF-8">
<meta name="viewport" content="width=device-width, initial-scale=1.0">
<meta http-equiv="X-UA-Compatible" content="ie=edge">
<title>Documenttitle>
<style>
* {
padding: 0;
margin: 0;
}
img {
display: inline-block;
width: 100%;
height: 300px;
background: gray;
}
style>
head>
<body>
<div class="box-image">
<img src="" class="image-item" lazyload="true" data-original="https://img.alicdn.com/imgextra/i2/252339290/TB29PYUXnIlyKJjSZFrXXXn2VXa_!!252339290-0-beehive-scenes.jpg_180x180xzq90.jpg_.webp" alt="">
<img src="" class="image-item" lazyload="true" data-original="https://img.alicdn.com/imgextra/i4/2260152888/O1CN01vw2e251XCkJr0VPZU_!!2260152888-0-beehive-scenes.jpg_250x250xz.jpg" alt="">
<img src="" class="image-item" lazyload="true" data-original="https://img.alicdn.com/imgextra/i3/24687421/TB2Xg1izsyYBuNkSnfoXXcWgVXa_!!24687421-0-beehive-scenes.jpg_250x250xz.jpg" alt="">
<img src="" class="image-item" lazyload="true" data-original="https://img.alicdn.com/imgextra/i4/890151842/TB2II1mnZbI8KJjy1zdXXbe1VXa_!!890151842-0-beehive-scenes.jpg_250x250xz.jpg" alt="">
<img src="" class="image-item" lazyload="true" data-original="https://img.alicdn.com/imgextra/i2/2096513830/TB2l1W0kRnTBKNjSZPfXXbf1XXa_!!2096513830-0-beehive-scenes.jpg_250x250xz.jpg" alt="">
<img src="" class="image-item" lazyload="true" data-original="https://img.alicdn.com/imgextra/i3/2586222636/TB2RDGrpqAoBKNjSZSyXXaHAVXa_!!2586222636-0-daren.jpg_250x250xz.jpg" alt="">
<img src="" class="image-item" lazyload="true" data-original="https://img.alicdn.com/imgextra/i2/1870112525/TB2Ae.xbOwIL1JjSZFsXXcXFFXa_!!1870112525-2-beehive-scenes.png_250x250xz.jpg" alt="">
<img src="" class="image-item" lazyload="true" data-original="https://img.alicdn.com/imgextra/i2/2194952831/TB2PwWty7qvpuFjSZFhXXaOgXXa_!!2194952831-0-beehive-scenes.jpg_250x250xz.jpg" alt="">
div>
<script>
var viewHeight = document.documentElement.clientHeight; // = window.innerHeight?
// 节流:加一个300ms的间隔执行
function throttle(fn, wait) {
let canRun = true
return function (...args) {
if (!canRun) return
canRun = false
setTimeout(() => {
fn.apply(this, args)
canRun = true
}, wait)
}
}
function lazyload() {
let imgs = document.querySelectorAll('img[data-original][lazyload]') // 获取文档中所有拥有data-original lazyload属性的![]() 节点
imgs.forEach(item => {
if (item.dataset.original == '') {// HTMLElement.dataset属性允许无论是在读取模式和写入模式下访问在 HTML或 DOM中的元素上设置的所有自定义数据属性(data-*)集。
return
}
// 返回一个DOMRect对象,包含了一组用于描述边框的只读属性——left、top、right和bottom,
// 单位为像素。除了 width 和 height 外的属性都是相对于视口的左上角位置而言的。
let rect = item.getBoundingClientRect()
// 其top值是相对于当前视窗的顶部而言的而不是绝对的顶部,所以top值 < window.innerHeight的话图片就出现在底部了就需要加载
if (rect.bottom >= 0 && rect.top < viewHeight) {
let img = new Image()
img.src = item.dataset.original
// 图片加载完成触发load事件?
img.onload = function () {
item.src = img.src
}
// 移除属性的话就不会重复加载了
item.removeAttribute('data-original')
item.removeAttribute('lazyload')
}
})
}
// 先调用一次加载最初显示在视窗中的图片
lazyload();
let throttle_lazyload = throttle(lazyload, 300)
document.addEventListener('scroll', throttle_lazyload)
script>
body>
html>
节点
imgs.forEach(item => {
if (item.dataset.original == '') {// HTMLElement.dataset属性允许无论是在读取模式和写入模式下访问在 HTML或 DOM中的元素上设置的所有自定义数据属性(data-*)集。
return
}
// 返回一个DOMRect对象,包含了一组用于描述边框的只读属性——left、top、right和bottom,
// 单位为像素。除了 width 和 height 外的属性都是相对于视口的左上角位置而言的。
let rect = item.getBoundingClientRect()
// 其top值是相对于当前视窗的顶部而言的而不是绝对的顶部,所以top值 < window.innerHeight的话图片就出现在底部了就需要加载
if (rect.bottom >= 0 && rect.top < viewHeight) {
let img = new Image()
img.src = item.dataset.original
// 图片加载完成触发load事件?
img.onload = function () {
item.src = img.src
}
// 移除属性的话就不会重复加载了
item.removeAttribute('data-original')
item.removeAttribute('lazyload')
}
})
}
// 先调用一次加载最初显示在视窗中的图片
lazyload();
let throttle_lazyload = throttle(lazyload, 300)
document.addEventListener('scroll', throttle_lazyload)
script>
body>
html>
2.如何渲染几万条数据且不卡住页面?
①利用文档碎片,实现一次性插入多个节点,减少回流
②分批次地插入节点而不是一次性插入,防止阻塞
③使用 requestAnimationFrame 让浏览器选择最为合适的渲染间隔
<html lang="en">
  <head>
    <meta charset="UTF-8" />
    <meta name="viewport" content="width=device-width, initial-scale=1.0" />
    <meta http-equiv="X-UA-Compatible" content="ie=edge" />
    <title>Documenttitle>
  head>
  <body>
    <ul>
      控件
    ul>
    <script>
      const total = 100000 // 10万条数据
      const once = 20      // 每轮插入的数据条目
      const loopCount = total / once // 渲染总次数
      let countOfRender = 0
      let ul = document.querySelector('ul')
      function add() {
        // 使用文档碎片优化性能
        const fragment = document.createDocumentFragment()
        for (let i = 0; i < once; i++) {
          const li = document.createElement('li')
          li.innerText = Math.floor(Math.random() * total)
          fragment.appendChild(li)
        }
        ul.appendChild(fragment)
        countOfRender+=1
        loop()
      }
      function loop() {
        if (countOfRender < loopCount) {
          window.requestAnimationFrame(add) // 使用requestAnimationFrame每隔16ms(浏览器自己选择最佳时间)刷新一次
        }
      }
    script>
  body>
html>
3.写函数实现任意标签转换成json形式
/*


*/

function DOM2JSON(str) {
  let reg = /<(.+)>(.*?)<\/\1>/g
  let result = null
  let nodes = []
  while((result = reg.exec(str))!== null) {
    nodes.push({ tag: result[1], children: DOM2JSON(result[2])}) // exec返回的数组,[0]匹配的字符串 然后依次是捕获的分组 然后有index和input属性
  }
  return nodes.length > 1 ? nodes : nodes[0]
}

console.log(JSON.stringify(DOM2JSON('')))
// {"tag":"div","children":[{"tag":"span","children":{"tag":"a"}},{"tag":"span","children":[{"tag":"a"},{"tag":"a"}]}]}
这里主要利用了 exec 函数会在上一次匹配的结果之后继续匹配,且如果未匹配成功会返回 null,然后注意下 exec 和正则表达式分组的使用即可。
4.判断执行顺序(事件循环)
console.log('begin'); // 1.begin
setTimeout(() => {
    console.log('setTimeout 1'); // 3.setTimeout 1
    Promise.resolve() // Promise.resolve().then ?
        .then(() => {
            console.log('promise 1'); // 5.promise 1
            setTimeout(() => {
                console.log('setTimeout2'); // 8. setTimeout2
            });
        })
        .then(() => {
            console.log('promise 2'); // 7. promise 2  注意7比8要快,会同时放入宏任务和微任务队列?
        });
    new Promise(resolve => {
        console.log('a'); // 4. a
        resolve();
    }).then(() => {
        console.log('b'); // 6. b
    });
}, 0);
console.log('end'); // 2.end
5.实现一个 sleep 函数
async function test () {
  console.log('start')
  await sleep(3000)
  console.log('3s has passed')
}

function sleep (ms) {
  return new Promise((resolve, reject) => {
    setTimeout(() => {
      resolve()
    }, ms)
  })
}
6.meta 标签的作用
meta 标签分两大部分:HTTP 标题信息(http-equiv)和页面描述信息(name)。
1、声明文档使用的字符编码
<meta charset='utf-8'>
以下设置更为详细:
<meta http-equiv="Content-Type" content="text/html; charset=utf-8" />
该 meta 标签定义了 HTML 页面所使用的字符集为 utf-8 ,就是万国码。它可以在同一页面显示中文简体、繁体及其它语言(如日文,韩文)等
2、声明文档的兼容模式
// 指示IE以目前可用的最高模式显示内容
<meta http-equiv="X-UA-Compatible" content="IE=edge" />

<meta http-equiv="X-UA-Compatible" content="IE=Emulate IE7" />
// 指示IE使用 <!DOCTYPE> 指令确定如何呈现内容。标准模式指令以IE7 标准模式显示,而 Quirks 模式指令以 IE5 模式显示
3、SEO 优化
<meta name="description" content="不超过150个字符" /> // 页面描述
<meta name="keywords" content="html5, css3, 关键字"/> // 页面关键词
<meta name="author" content="魔法小栈" /> // 定义网页作者

// 定义网页搜索引擎索引方式,robotterms是一组使用英文逗号「,」分割的值,通常有如下几种取值:none,noindex,nofollow,all,index和follow。
<meta name="robots" content="index,follow" />
4、为移动设备添加 viewport
/*
  content 参数解释:
  width       viewport 宽度(数值/device-width)
  height         viewport 高度(数值/device-height)
  initial-scale  初始缩放比例
  maximum-scale  最大缩放比例
  minimum-scale  最小缩放比例
  user-scalable  是否允许用户缩放(yes/no)
  minimal-ui     iOS 7.1 beta 2 中新增属性,可以在页面加载时最小化上下状态栏。这是一个布尔值,可以直接这样写:
*/

<meta name="viewport" content="width=device-width, initial-scale=1, minimal-ui">
例如如下设置:
<meta name="viewport" content="width=device-width, initial-scale=1.0, maximum-scale=1.0, user-scalable=no" />
- 强制让文档与设备的宽度保持 1:1 ;
- 文档最大的宽度比列是1.0( initial-scale 初始刻度值和 maximum-scale 最大刻度值);
- user-scalable 定义用户是否可以手动缩放( no 为不缩放),使页面固定设备上面的大小;
更多内容参考 https://blog.csdn.net/xmtblog/article/details/46226717